


文章来源https://www.cnblogs.com/duanrantao/p/8988116.html
1、首先关闭linux的防火墙,执行命令
chkconfig iptables off
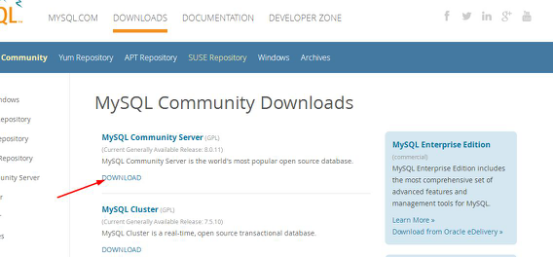
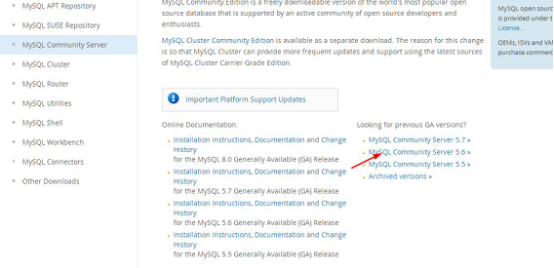
2、从mysql官网上下载自己适合的mysql版本https://dev.mysql.com/downloads/mysql/5.6.html#downloads,进入mysql官网,依次点击


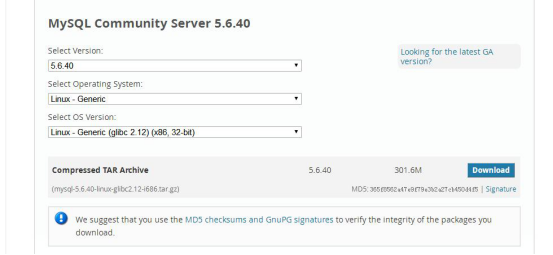
3、下载后的mysql文件
mysql-5.6.40-linux-glibc2.12-i686.tar.gz
将下载好的mysql压缩文件放置在linux的/usr/local文件夹下,解压该压缩文件
tar -zxvf mysql-5.6.40-linux-glibc2.12-i686.tar.gz
将解压后的文件重命名为mysql
mv mysql-5.6.40-linux-glibc2.12-i686 mysql
4、创建mysql用户组及用户
groupadd mysql
useradd -r -g mysql mysql
5、进入到mysql目录,执行添加MySQL配置的操作
cp support-files/my-medium.cnf /etc/my.cnf
或:
cp support-files/my-default.cnf /etc/my.cnf
是否覆盖?按y 回车
6、编辑/etc/my.cnf文件;
vi /etc/my.cnf
在my.cnf文件中添加或者修改相关配置,更改完成后保存退出

  # For advice on how to change settings please see
  # http://dev.mysql.com/doc/refman/5.6/en/server-configuration-defaults.html
  # *** DO NOT EDIT THIS FILE. It's a template which will be copied to the
  # *** default location during install, and will be replaced if you
  # *** upgrade to a newer version of MySQL.

  [mysqld]

  # Remove leading # and set to the amount of RAM for the most important data
 # cache in MySQL. Start at 70% of total RAM for dedicated server, else 10%.
 # innodb_buffer_pool_size = 128M

 # Remove leading # to turn on a very important data integrity option: logging
 # changes to the binary log between backups.
 # log_bin

 # These are commonly set, remove the # and set as required.
 basedir = /usr/local/mysql
 datadir = /usr/local/mysql/data
 port = 3306
 # server_id = .....
 socket = /tmp/mysql.sock
 character-set-server = utf8
 skip-name-resolve
 log-err = /usr/local/mysql/data/error.log
 pid-file = /usr/local/mysql/data/mysql.pid

 # Remove leading # to set options mainly useful for reporting servers.
 # The server defaults are faster for transactions and fast SELECTs.
 # Adjust sizes as needed, experiment to find the optimal values.
 # join_buffer_size = 128M
 # sort_buffer_size = 2M
 # read_rnd_buffer_size = 2M

 sql_mode=NO_ENGINE_SUBSTITUTION,STRICT_TRANS_TABLES
7、在mysql当前目录下设定目录的访问权限(注意后面的小点,表示当前目录)
chown -R mysql .
chgrp -R mysql .
scripts/mysql_install_db --user=mysql
#由于是最小化安装,缺少了一些命令,这里遇到了报错,提示-bash: ./scripts/mysql_install_db: /usr/bin/perl: bad interpreter: No such file or directory
#解决方法 yum -y install perl perl-devel
chown -R root .
chown -R mysql data
8、初始化数据(在mysql/bin或者mysql/scripts下有个 mysql_install_db 可执行文件初始化数据库),进入mysql/bin或者mysql/scripts目录下,执行下面命令
./mysql_install_db --verbose --user=root --defaults-file=/etc/my.cnf --datadir=/usr/local/mysql/data --basedir=/usr/local/mysql --pid-file=/usr/local/mysql/data/mysql.pid --tmpdir=/tmp
#遇到报错please install the following Perl modules before executing ./mysql_install_db:
#使用命令yum -y install autoconf
9、启动mysql,进入/usr/local/mysql/bin目录,执行下面命令
./mysqld_safe --defaults-file=/etc/my.cnf --socket=/tmp/mysql.sock --user=root &
注意,如果光标停留在屏幕上,表示启动成功,需要我们先关闭shell终端,再开启一个新的shell终端,不要执行退出操作。如果出现 mysql ended这样的语句,表示Mysql没有正常启动,你可以到log中查找问题.
10、设置开机启动,新开启shell中断后,进入mysql目录,执行下面命令
cp /usr/local/mysql/support-files/mysql.server /etc/init.d/mysqld
cp /usr/local/mysql/support-files/mysql.server /etc/rc.d/init.d/mysql
chmod 700 /etc/init.d/mysql
chkconfig --add mysqld
chkconfig --level 2345 mysqld on
chown mysql:mysql -R /usr/local/mysql/
重启linux
reboot
查看mysql状态
service mysqld status
11、添加远程访问权限
(1)、添加mysql命令
ln -s /usr/local/mysql/bin/mysql /usr/bin (mysql的安装路径)
(2)、更改访问权限
登录mysql,执行下面命令
mysql -uroot -p
密码为空直接回车,运行以下两条命令
GRANT ALL PRIVILEGES ON *.* TO 'root'@'%' IDENTIFIED BY '' with grant option;
---所有用户都能访问,密码为空
Flush privileges;----强制执行
退出mysql
exit
重启linux,就完成了
reboot
注:本机访问mysql,root账户默认是没有密码的,端口号默认3306,如果需要修改root账户密码,在/usr/local/mysql/bin目录下,执行下面命令
./mysqladmin -h 127.0.0.1 -P3306 -uroot password 'duan'exit
systemctl stop firewalld-----远程连接不上的时候需要关闭linux中的防火墙


 3万+
3万+


 被折叠的 条评论
为什么被折叠?
被折叠的 条评论
为什么被折叠?
 到【灌水乐园】发言


