


一、前言
一般linux是通过printk来输出调试信息的,而输出的端口设置成串口0,配置的地方是在linux内核的cmdline。
可是这种修改方式并不适用于全志平台,修改完linux内核的cmdline后,再烧录到开发板,利用命令“cat /proc/cmdline”查看,发现并没有改变。
shell@tulip-t1:/ # cat /proc/cmdline
enforcing=1 earlyprintk=sunxi-uart,0x01c28000 initcall_debug=0 console=ttyS0,115200 loglevel=1 root=/dev/mmcblk0p7 init=/init partitions=bootloader@mmcblk0p2:env@mmcblk0p5:boot@mmcblk0p6:system@mmcblk0p7:misc@mmcblk0p8:recovery@mmcblk0p9:cache@mmcblk0p10:metadata@mmcblk0p11:private@mmcblk0p12:alog@mmcblk0p13:UDISK@mmcblk0p1 cma=260M androidboot.serialno=34005036c8242409028e androidboot.hardware=sun50iw1p1
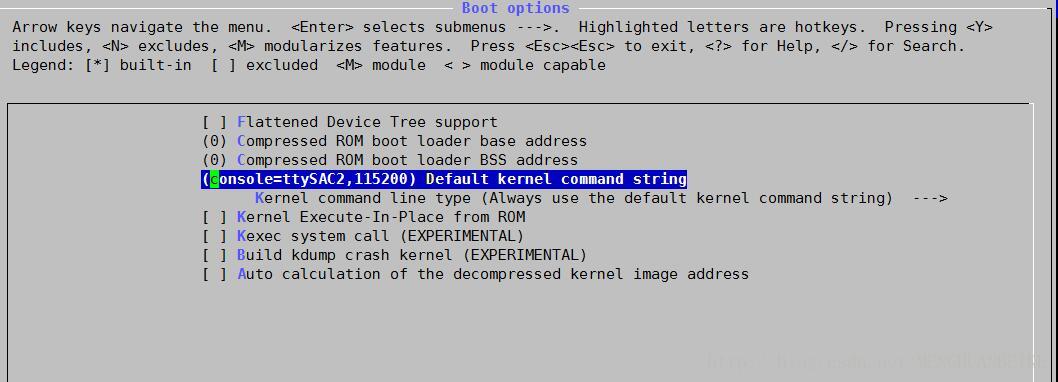
其实控制linux内核的启动参数有三种方式
Kernel command line type (Use bootloader kernel arguments if available)  --->
(1) Use bootloader kernel arguments if available
(2) Extend bootloader kernel arguments
(3) Always use the default kernel command string二、分析全志的启动命令行cmdline
可以根据开发板中的cmdline,可以在lichee目录下搜索关键词“enforcing=1”
litin@linuxService:~/Android/allwinner/cqa64_android_v5.1/lichee$ grep "enforcing=1" . -Rn
./linux-3.10/security/selinux/Kconfig:64:      unless you specify enforcing=1 on the kernel command line.  You
./tools/pack/chips/sun50iw1p1/configs/default/env.cfg:3:enforcing=1
由上可知,控制cmdline的默认配置文件位于:lichee/tools/pack/chips/sun50iw1p1/configs/default/env.cfg
========================== env.cfg ===================================
#kernel command arguments
enforcing=1                        #强制使用
earlyprintk=sunxi-uart,0x01c28000  # 开机前期打印调试信息,所用的串口和波特率(内存地址)
initcall_debug=0                   # 初始化调用的调试开关
console=ttyS0,115200               #控制台的串口和波特率
nand_root=/dev/system              #nand芯片的root目录
mmc_root=/dev/mmcblk0p7            #emmc兴平的root目录分区地址
init=/init                         #init命令的位置
loglevel=1      #调试等级,可以控制printk的打印等级
cma=260M
#set kernel cmdline if boot.img or recovery.img has no cmdline we will use this
setargs_nand=setenv bootargs enforcing=${enforcing} earlyprintk=${earlyprintk} initcall_debug=${initcall_debug} console=${console} loglevel=${loglevel} root=${nand_root} init=${init} partitions=${partitions} cma=${cma}
setargs_mmc=setenv  bootargs enforcing=${enforcing} earlyprintk=${earlyprintk} initcall_debug=${initcall_debug} console=${console} loglevel=${loglevel} root=${mmc_root}  init=${init} partitions=${partitions} cma=${cma}
#nand command syntax: sunxi_flash read address partition_name read_bytes
#0x4007f800 = 0x40080000(kernel entry) - 0x800(boot.img header 2k)
boot_normal=sunxi_flash read 4107f800 boot;boota 4107f800
boot_recovery=sunxi_flash read 4107f800 recovery;boota 4107f800
boot_fastboot=fastboot
#recovery key
recovery_key_value_max=0x13
recovery_key_value_min=0x10
#fastboot key
fastboot_key_value_max=0x8
fastboot_key_value_min=0x2

#uboot system env config
bootdelay=0              #uboot启动的等待时间
#default bootcmd, will change at runtime according to key press
bootcmd=run setargs_nand boot_normal#default nand boot;------------------------------>mmcblk0p5/nandb
[partition]
name = env
size = 32768
downloadfile = "env.fex"
user_type = 0x8000
三、修改调试信息输出到串口和调试等级
printk有8个loglevel,定义在<linux/kernel.h>中,其中数值范围从0到7,数值越小,优先级越高。#define KERN_EMERG "<0>" /* system is unusable */ 系统崩溃#define KERN_ALERT "<1>"/* action must be taken immediately*/必须紧急处理#define KERN_CRIT "<2>" /* critical conditions */ 临界条件,严重的硬软件错误#define KERN_ERR "<3>" /* error conditions */ 报告错误#define KERN_WARNING "<4>" /* warning conditions */警告#define KERN_NOTICE "<5>" /* normal but significant condition */普通但还是须注意#define KERN_INFO "<6>" /* informational */ 信息#define KERN_DEBUG "<7>" /* debug-level messages */ 调试信息从这里也可以看出他们的优先级是数值越小,其紧急和严重程度就越高。
earlyprintk=ttyS0,115200
loglevel=4            #调试等级 <4> KERN_WARNING 警告
shell@tulip-t1:/ # cat /proc/sys/kernel/printk
4	4	1	7
该文件有四个数字值,它们根据日志记录消息的重要性,定义将其发送到何处。关于不同日志级别的更多信息,请查阅syslog(2)联机帮助。上面显示的4个数据分别对应:
控制台日志级别:优先级高于该值的消息将被打印至控制台
默认的消息日志级别:将用该优先级来打印没有优先级的消息
最低的控制台日志级别:控制台日志级别可被设置的最小值(最高优先级)
默认的控制台日志级别:控制台日志级别的缺省值
参考资料:http://bbs.csdn.net/topics/392178478?list=lz
http://blog.csdn.net/tonywgx/article/details/17504001


 3294
3294

 被折叠的 条评论
为什么被折叠?
被折叠的 条评论
为什么被折叠?
 到【灌水乐园】发言


