


这个控件是将UILabel和UITextField放到一个自定义的视图上,实现统一对两个控件进行操作
1.首先在xcode上建一个LTView的类
2.在LTView 的 .h文件中签订一个 UITextFieldDelegate 的协议
3.在.h文件中建两个属性(UILabel 和UITextField)
例子:
@property(nonatomic ,retain)UILabel *myLabel;
@property(nonatomic ,retain)UITextField *myTextField;
因为要在类的外部获取输入框的内容,修改label的标题,所以我们可以把这两部分作为属性写在.h中,这样在外部就可以直接进行修改
4.在.m文件中 重写默认的初始化方法
例子:
-(instancetype)initWithFrame:(CGRect)frame{
    self=[super initWithFrame:frame];
    if (self) {
        // 模块化(同样功能的代码放到一起)
        [self createView ];
    }
    return self;
}
5.创建视图上的UILabel和UITextField
-(void)createView{
/*
   创建两个子视图,一个是label.
 */
self.myLabel =[[UILabel alloc] initWithFrame:CGRectMake(50, 20, 100, 30)];
self.myLabel.backgroundColor =[UIColor yellowColor];
[self addSubview:self.myLabel];
[_myLabel release];
/*
    一个是textfield
 */
self.myTextField =[[UITextField alloc] initWithFrame:CGRectMake(200, 20, 100, 30)];
self.myTextField.backgroundColor =[UIColor cyanColor];
[self addSubview:self.myTextField];
// 设置代理人
self.myTextField.delegate =self;
[_myTextField release];
}
-(void)dealloc
{
[_myTextField release];
[_myLabel release];
[super dealloc];
}
6.实现return回收
在签订协议设置代理人之后就可以实现这个方法
例子:
-(BOOL)textFieldShouldReturn:(UITextField *)textField{
    [textField resignFirstResponder];
    return YES;
}
7.在AppDelegate中引入头文件
例子:
#import "LTView.h"8.建立一个LTView 的属性
例子:
@property(nonatomic ,retain)LTView *ltView;9.建立一个ltView
实现更改 label里的文字
例子:
self.ltView =[[LTView alloc] initWithFrame:CGRectMake(0, 0, self.window.frame.size.width, self.window.frame.size.height)];
    self.ltView.backgroundColor =[UIColor redColor];
    [self.window addSubview:self.ltView];
    [self.ltView release];
    self.ltView.myLabel.text =@"姓名";
UIAlertView
一个控件
(1).在.m文件中添加一个属性
代码例子:
@property(nonatomic,retain)UIAlertView *alertView;(2).实现UIAlertView的控件:
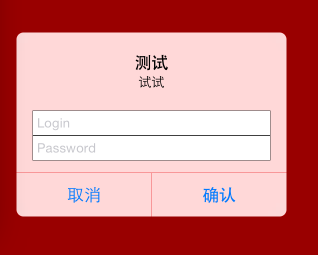
self.alertView=[[UIAlertView alloc] initWithTitle:@"测试" message:@"试试" delegate:self cancelButtonTitle:@"取消" otherButtonTitles:@"确认", nil];
    // 让alertView中出现textfield   self.alertView.alertViewStyle=UIAlertViewStyleLoginAndPasswordInput;
    实现方法
[self.alertView  show];
(3).添加方法:
- (void)alertView:(UIAlertView *)alertView clickedButtonAtIndex:(NSInteger)buttonIndex{
    NSLog(@"11");
    // 先找到alertView中的textfield
    UITextField *first =[self.alertView textFieldAtIndex:0];
    NSLog(@"%@",first.text);
    if(buttonIndex == 0){
        NSLog( @"取消按钮");
    }
    if (buttonIndex == 1) {
        NSLog(@"确定按钮");
    }
效果图


 1446
1446

 被折叠的 条评论
为什么被折叠?
被折叠的 条评论
为什么被折叠?
 到【灌水乐园】发言


