


 本文介绍如何使用Objective-C创建平滑的动画效果来实现应用中页面间的切换,提供了一种简单易学的方法。
(底部有代码下载地址!!!)
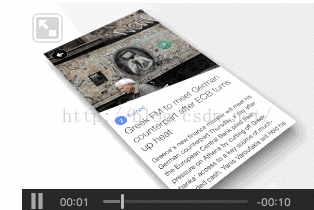
首先展示效果:
那么这么动画是如何应用的呢?
首先我们对照片进行了分割,当然这是咱么自己做的计算...

可以取出你想要进行缩放的中心点,之后根据你的缩放线去取得最长的线.做成两个圆,通过圆形去进行下一个页面的切换.
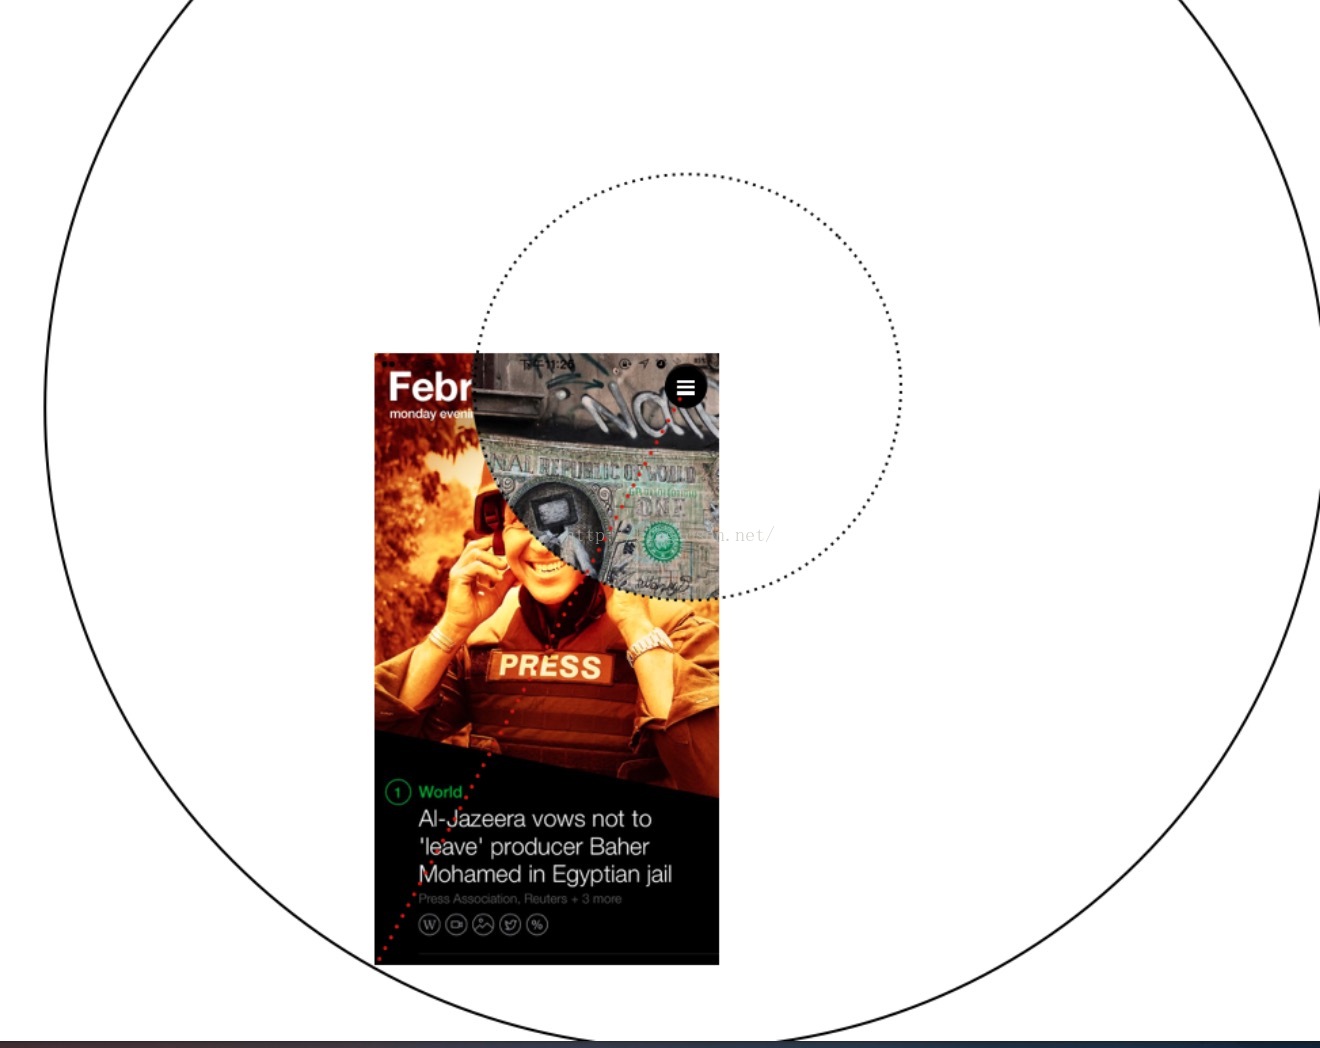
“TIPS:创建两个圆形的 UIBezierPath实例;
一个是初始位置的最小内接圈。
另一个是拥有足够覆盖屏幕半径的外接圆。
最终的动画则是在这两个贝塞尔路径之间进行的。
一个是初始位置的最小内接圈。
另一个是拥有足够覆盖屏幕半径的外接圆。
最终的动画则是在这两个贝塞尔路径之间进行的。
通过确定初始点所在的象限位置,从而确定终点位置,从而计算出半径 ——也就是最小能覆盖整个界面的圆。”
原理就是如此,下面放代码.
FirstViewController.h
#import <UIKit/UIKit.h>

@interface FirstViewController : UIViewController

@property(nonatomic,strong)UIButton *button;

@end
FirstViewController.m
#import "FirstViewController.h"
#import "SecondViewController.h"
#import "PingTransition.h"
@interface FirstViewController () <UINavigationControllerDelegate>

@end

@implementation FirstViewController

-(void)viewWillAppear:(BOOL)animated{
    //设置代理
    self.navigationController.delegate = self;

    //为了美观,将 NavigationBar 隐藏
    self.navigationController.navigationBarHidden = YES;
}
- (void)viewDidLoad {
    [super viewDidLoad];

    self.view.backgroundColor = [UIColor clearColor];

    //创建底层图片
    UIImageView *image = [[UIImageView alloc]initWithImage:[UIImage imageNamed:@"page1"]];
    image.frame = [UIScreen mainScreen].bounds;
    image.userInteractionEnabled = YES;
    [self.view addSubview:image];

    //创建按钮
    _button = [UIButton buttonWithType:(UIButtonTypeCustom)];
    [_button addTarget:self action:@selector(buttonAction) forControlEvents:(UIControlEventTouchUpInside)];
    [_button setTitle:@"" forState:(UIControlStateNormal)];
    _button.frame =CGRectMake(self.view.bounds.size.width - 70, 15, 50, 50);
    [image addSubview:_button];


}
//button 的事件
-(void)buttonAction{
    SecondViewController *second = [[SecondViewController alloc]init];
    [self.navigationController pushViewController:second animated:YES];
}
//UINavigationController 的代理方法,实现动画样式的跳转
#pragma mark - UINavigationControllerDelegate
- (id <UIViewControllerAnimatedTransitioning>)navigationController:(UINavigationController *)navigationController
                                   animationControllerForOperation:(UINavigationControllerOperation)operation
                                                fromViewController:(UIViewController *)fromVC
                                                  toViewController:(UIViewController *)toVC{
    if (operation == UINavigationControllerOperationPush) {

        PingTransition *ping = [PingTransition new];
        return ping;
    }else{
        return nil;
    }
}
既然用到了
PingTransition
我们就来看看这里面是怎么写的.
PingTransition.h
#import <Foundation/Foundation.h>
#import <UIKit/UIKit.h>
//#import <pop/POP.h>

@interface PingTransition : NSObject<UIViewControllerAnimatedTransitioning>

@end
#import "PingTransition.h"
#import "SecondViewController.h"
#import "FirstViewController.h"

@interface PingTransition ()
@property (nonatomic,strong)id<UIViewControllerContextTransitioning> transitionContext;

@end

@implementation PingTransition

//“TIPS: 这个协议方法返回动画的执行时间。通常把我们把动画时间设计成一个外部接口,因此只要返回这个属性就可以了。”
- (NSTimeInterval)transitionDuration:(id <UIViewControllerContextTransitioning>)transitionContext{
    return  0.7f;
}

//“TIPS: 一切的核心。所有 CoreAnimation 的代码就是写在这里了。”
- (void)animateTransition:(id <UIViewControllerContextTransitioning>)transitionContext{

    /*
     “TIPS:  transitionContext 是动画执行过程中的上下文。通过 UIViewControllerContextTransitioning 你可以拿到执行动画的容器 containerView 。
     所有动画必须发生在这个容器上。除了可以拿到 containerView ,你还可以获取:
     UIView *fromView = [transitionContext viewForKey:UITransitionContextFromViewKey];

     UIView *toView = [transitionContext viewForKey:UITransitionContextToViewKey];”
     */
    self.transitionContext = transitionContext;

    FirstViewController * fromVC = (FirstViewController *)[transitionContext viewControllerForKey:UITransitionContextFromViewControllerKey];
    SecondViewController *toVC = (SecondViewController *)[transitionContext viewControllerForKey:UITransitionContextToViewControllerKey];
    UIView *contView = [transitionContext containerView];

    UIButton *button = fromVC.button;


    UIBezierPath *maskStartBP =  [UIBezierPath bezierPathWithOvalInRect:button.frame];
    [contView addSubview:fromVC.view];
    [contView addSubview:toVC.view];


    //创建两个圆形的 UIBezierPath 实例;一个是 button 的 size ,另外一个则拥有足够覆盖屏幕的半径。最终的动画则是在这两个贝塞尔路径之间进行的
    CGPoint finalPoint;
    //判断触发点在那个象限
    if(button.frame.origin.x > (toVC.view.bounds.size.width / 2)){
        if (button.frame.origin.y < (toVC.view.bounds.size.height / 2)) {
            //第一象限
            finalPoint = CGPointMake(button.center.x - 0, button.center.y - CGRectGetMaxY(toVC.view.bounds)+30);
        }else{
            //第四象限
            finalPoint = CGPointMake(button.center.x - 0, button.center.y - 0);
        }
    }else{
        if (button.frame.origin.y < (toVC.view.bounds.size.height / 2)) {
            //第二象限
            finalPoint = CGPointMake(button.center.x - CGRectGetMaxX(toVC.view.bounds), button.center.y - CGRectGetMaxY(toVC.view.bounds)+30);
        }else{
            //第三象限
            finalPoint = CGPointMake(button.center.x - CGRectGetMaxX(toVC.view.bounds), button.center.y - 0);
        }
    }

    CGFloat radius = sqrt((finalPoint.x * finalPoint.x) + (finalPoint.y * finalPoint.y));
    UIBezierPath *maskFinalBP = [UIBezierPath bezierPathWithOvalInRect:CGRectInset(button.frame, -radius, -radius)];

    //创建一个 CAShapeLayer 来负责展示圆形遮盖
    CAShapeLayer *maskLayer = [CAShapeLayer layer];
    maskLayer.path = maskFinalBP.CGPath; //将它的 path 指定为最终的 path 来避免在动画完成后会回弹
    toVC.view.layer.mask = maskLayer;

    CABasicAnimation *maskLayerAnimation = [CABasicAnimation animationWithKeyPath:@"path"];
    maskLayerAnimation.fromValue = (__bridge id)(maskStartBP.CGPath);
    maskLayerAnimation.toValue = (__bridge id)((maskFinalBP.CGPath));
    maskLayerAnimation.duration = [self transitionDuration:transitionContext];
    maskLayerAnimation.timingFunction = [CAMediaTimingFunction  functionWithName:kCAMediaTimingFunctionEaseInEaseOut];
    maskLayerAnimation.delegate = self;

    [maskLayer addAnimation:maskLayerAnimation forKey:@"path"];


/*  POP的弹框效果 CGPathRef

    CAKeyframeAnimation *keyFrame = [CAKeyframeAnimation animationWithKeyPath:@"path"];
    keyFrame.values = @[(__bridge id)(maskStartBP.CGPath),(__bridge id)(maskFinalBP.CGPath)];
    keyFrame.duration = 100.0f;
    keyFrame.additive = YES;
    keyFrame.removedOnCompletion = NO;
    keyFrame.fillMode = kCAFillModeForwards;


    [maskLayer addAnimation:keyFrame forKey:nil];
    maskLayer.speed = 0.0;


    POPAnimatableProperty* pop = [POPAnimatableProperty propertyWithName:@"timeOffset" initializer:^(POPMutableAnimatableProperty *prop) {
        // read value
        prop.readBlock = ^(CAShapeLayer *obj, CGFloat values[]) {
            values[0] = obj.timeOffset;
        };
        // write value
        prop.writeBlock = ^(CAShapeLayer *obj, const CGFloat values[]) {
            obj.timeOffset = values[0];
        };
        // dynamics threshold
        prop.threshold = 0.1;
    }];


    POPSpringAnimation *popSpring = [POPSpringAnimation animation];
    popSpring.fromValue = @(0.0);
    popSpring.toValue =  @(100.f);
    popSpring.springBounciness = 1.0;//弹性
    popSpring.springSpeed = 20.0;//速度
    popSpring.dynamicsTension = 700;//张力
    popSpring.dynamicsFriction = 5; // 摩擦力
    popSpring.dynamicsMass = 1;
    popSpring.property = pop;
    popSpring.delegate = self;
    [maskLayer pop_addAnimation:popSpring forKey:nil];

  */

//    kPOPShapeLayerStrokeStart

    //创建一个关于 path 的 CABasicAnimation 动画来从 circleMaskPathInitial.CGPath 到 circleMaskPathFinal.CGPath 。同时指定它的 delegate 来在完成动画时做一些清除工作

}


//- (void)pop_animationDidStop:(POPAnimation *)anim finished:(BOOL)finished{
//    //告诉 iOS 这个 transition 完成
//    [self.transitionContext completeTransition:![self. transitionContext transitionWasCancelled]];
//    //清除 fromVC 的 mask
//    [self.transitionContext viewControllerForKey:UITransitionContextFromViewControllerKey].view.layer.mask = nil;
//    [self.transitionContext viewControllerForKey:UITransitionContextToViewControllerKey].view.layer.mask = nil;
//}

//“TIPS: 最后通知上下文动画已完成。”
#pragma mark - CABasicAnimation的Delegate
- (void)animationDidStop:(CAAnimation *)anim finished:(BOOL)flag{

    //告诉 iOS 这个 transition 完成
    [self.transitionContext completeTransition:![self. transitionContext transitionWasCancelled]];
    //清除 fromVC 的 mask
    [self.transitionContext viewControllerForKey:UITransitionContextFromViewControllerKey].view.layer.mask = nil;
    [self.transitionContext viewControllerForKey:UITransitionContextToViewControllerKey].view.layer.mask = nil;

}


@end
这时候我们就完成了第一个页面跳转至第二个页面的动画切换效果了,
第二个页面重新跳转会第一个页面也是大同小异.
SecondViewController.h
#import <UIKit/UIKit.h>

@interface SecondViewController : UIViewController

@property(nonatomic,strong)UIButton *button;

@endSecondViewController.m
#import "SecondViewController.h"
#import "FirstViewController.h"
#import "PingInvertTransition.h"
@interface SecondViewController () <UINavigationControllerDelegate>{

    //设置并更新一个 iOS 7 新加入的类的对象。 UIPercentDrivenInteractiveTransition。
    //这个类的对象会根据我们的手势,来决定我们的自定义过渡的完成度
    UIPercentDrivenInteractiveTransition *percentTransition;
}

@end

@implementation SecondViewController
-(void)viewWillAppear:(BOOL)animated{
    self.navigationController.delegate = self;
    self.navigationController.navigationBarHidden = YES;
}
- (void)viewDidLoad {
    [super viewDidLoad];
    // Do any additional setup after loading the view.

    self.view.backgroundColor = [UIColor clearColor];

    UIImageView *image = [[UIImageView alloc]initWithImage:[UIImage imageNamed:@"page2"]];
    image.frame = [UIScreen mainScreen].bounds;
    image.userInteractionEnabled = YES;
    [self.view addSubview:image];

    //设置action, 并设置改变的方法,因为我们是想从第二个页面回到第一个页面,所以设置 UIRectEdgeLeft
    UIScreenEdgePanGestureRecognizer *edgeGes = [[UIScreenEdgePanGestureRecognizer alloc]initWithTarget:self action:@selector(edgePan:)];
    edgeGes.edges = UIRectEdgeLeft;
    [self.view addGestureRecognizer:edgeGes];


    _button = [UIButton buttonWithType:(UIButtonTypeCustom)];
    [_button addTarget:self action:@selector(buttonAction) forControlEvents:(UIControlEventTouchUpInside)];
    [_button setTitle:@"" forState:(UIControlStateNormal)];
    _button.frame = image.frame;
    [image addSubview:_button];
}
-(void)buttonAction{
    [self.navigationController popViewControllerAnimated:YES];
}


- (id <UIViewControllerInteractiveTransitioning>)navigationController:(UINavigationController *)navigationController
                          interactionControllerForAnimationController:(id <UIViewControllerAnimatedTransitioning>) animationController {
    // 返回我们的自定义过渡
    return percentTransition;
}
-(void)edgePan:(UIPanGestureRecognizer *)recognizer{
    // 计算用户手指划了多远
    CGFloat per = [recognizer translationInView:self.view].x / (self.view.bounds.size.width);
    per = MIN(1.0,(MAX(0.0, per)));

    if (recognizer.state == UIGestureRecognizerStateBegan) {
        // 创建过渡对象,弹出viewController
        percentTransition = [[UIPercentDrivenInteractiveTransition alloc]init];
        [self.navigationController popViewControllerAnimated:YES];
    }else if (recognizer.state == UIGestureRecognizerStateChanged){
        // 更新 interactive transition 的进度
        [percentTransition updateInteractiveTransition:per];
    }else if (recognizer.state == UIGestureRecognizerStateEnded || recognizer.state == UIGestureRecognizerStateCancelled){
        // 完成或者取消过渡
        if (per > 0.3) {
            [percentTransition finishInteractiveTransition];
        }else{
            [percentTransition cancelInteractiveTransition];
        }
        percentTransition = nil;
    }
}


- (id <UIViewControllerAnimatedTransitioning>)navigationController:(UINavigationController *)navigationController
                                   animationControllerForOperation:(UINavigationControllerOperation)operation
                                                fromViewController:(UIViewController *)fromVC
                                                  toViewController:(UIViewController *)toVC{
    if (operation == UINavigationControllerOperationPop) {
        PingInvertTransition *pingInvert = [PingInvertTransition new];
        return pingInvert;
    }else{
        return nil;
    }
}PingInvertTransition.h
#import <Foundation/Foundation.h>
#import <UIKit/UIKit.h>

@interface PingInvertTransition : NSObject <UIViewControllerAnimatedTransitioning>

@end
PingInvertTransition.m
#import "PingInvertTransition.h"
#import "SecondViewController.h"
#import "FirstViewController.h"

@interface PingInvertTransition()

@property(nonatomic,strong)id<UIViewControllerContextTransitioning>transitionContext;

@end

@implementation PingInvertTransition


//“TIPS: 这个协议方法返回动画的执行时间。通常把我们把动画时间设计成一个外部接口,因此只要返回这个属性就可以了。”
- (NSTimeInterval)transitionDuration:(id <UIViewControllerContextTransitioning>)transitionContext{
    return 0.7f;
}

//“TIPS: 一切的核心。所有 CoreAnimation 的代码就是写在这里了。”
- (void)animateTransition:(id <UIViewControllerContextTransitioning>)transitionContext{
    /*
     “TIPS:  transitionContext 是动画执行过程中的上下文。通过 UIViewControllerContextTransitioning 你可以拿到执行动画的容器 containerView 。
     所有动画必须发生在这个容器上。除了可以拿到 containerView ,你还可以获取:
     UIView *fromView = [transitionContext viewForKey:UITransitionContextFromViewKey];

     UIView *toView = [transitionContext viewForKey:UITransitionContextToViewKey];”
     */

    self.transitionContext = transitionContext;

    SecondViewController *fromVC = (SecondViewController *)[transitionContext viewControllerForKey:UITransitionContextFromViewControllerKey];
    FirstViewController *toVC   = (FirstViewController *)[transitionContext viewControllerForKey:UITransitionContextToViewControllerKey];
    UIView *containerView = [transitionContext containerView];
    UIButton *button = toVC.button;


    [containerView addSubview:toVC.view];
    [containerView addSubview:fromVC.view];


    UIBezierPath *finalPath = [UIBezierPath bezierPathWithOvalInRect:button.frame];

    /*
     “TIPS: 创建两个圆形的 UIBezierPath 实例;
     一个是初始位置的最小内接圈。
     另一个是拥有足够覆盖屏幕半径的外接圆。
     最终的动画则是在这两个贝塞尔路径之间进行的。

     通过确定初始点所在的象限位置,从而确定终点位置,从而计算出半径 —— 也就是最小能覆盖整个界面的圆。”
     */
    CGPoint finalPoint;

    //判断触发点在那个象限
    if(button.frame.origin.x > (toVC.view.bounds.size.width / 2)){
        if (button.frame.origin.y < (toVC.view.bounds.size.height / 2)) {
            //第一象限
            finalPoint = CGPointMake(button.center.x - 0, button.center.y - CGRectGetMaxY(toVC.view.bounds)+30);
        }else{
            //第四象限
            finalPoint = CGPointMake(button.center.x - 0, button.center.y - 0);
        }
    }else{
        if (button.frame.origin.y < (toVC.view.bounds.size.height / 2)) {
            //第二象限
            finalPoint = CGPointMake(button.center.x - CGRectGetMaxX(toVC.view.bounds), button.center.y - CGRectGetMaxY(toVC.view.bounds)+30);
        }else{
            //第三象限
            finalPoint = CGPointMake(button.center.x - CGRectGetMaxX(toVC.view.bounds), button.center.y - 0);
        }
    }


    CGFloat radius = sqrt(finalPoint.x * finalPoint.x + finalPoint.y * finalPoint.y);
    UIBezierPath *startPath = [UIBezierPath bezierPathWithOvalInRect:CGRectInset(button.frame, -radius, -radius)];

    CAShapeLayer *maskLayer = [CAShapeLayer layer];
    maskLayer.path = finalPath.CGPath;
    fromVC.view.layer.mask = maskLayer;


    CABasicAnimation *pingAnimation = [CABasicAnimation animationWithKeyPath:@"path"];
    pingAnimation.fromValue = (__bridge id)(startPath.CGPath);
    pingAnimation.toValue   = (__bridge id)(finalPath.CGPath);
    pingAnimation.duration = [self transitionDuration:transitionContext];
    pingAnimation.timingFunction = [CAMediaTimingFunction  functionWithName:kCAMediaTimingFunctionEaseInEaseOut];

    pingAnimation.delegate = self;

    [maskLayer addAnimation:pingAnimation forKey:@"pingInvert"];

}

//“TIPS: 最后通知上下文动画已完成。”
- (void)animationDidStop:(CAAnimation *)anim finished:(BOOL)flag{

    [self.transitionContext completeTransition:![self.transitionContext transitionWasCancelled]];
    [self.transitionContext viewControllerForKey:UITransitionContextFromViewControllerKey].view.layer.mask = nil;
    [self.transitionContext viewControllerForKey:UITransitionContextToViewControllerKey].view.layer.mask = nil;

}
代码下载地址:https://github.com/larra123/LineLoadView
更多精彩文章,尽在我的公众号.


 被折叠的 条评论
为什么被折叠?
被折叠的 条评论
为什么被折叠?
 到【灌水乐园】发言


