


MySQL完成主从复制教程
主从复制(也称 AB 复制)就是将一个服务器(主服务器)的数据复制到一个或多个MySQL数据库服务器(从服务器)中。
可以根据配置,指定复制哪个库哪个表数据。
可以想到复制是通过异步的。
准备:
2台版本一致的服务器数据库,一台作为主库、一台作为从库
(我的两个数据库版本:5.7)
一台服务器搭建2个数据库实例教程:http://t.csdnimg.cn/aaErM
原理:
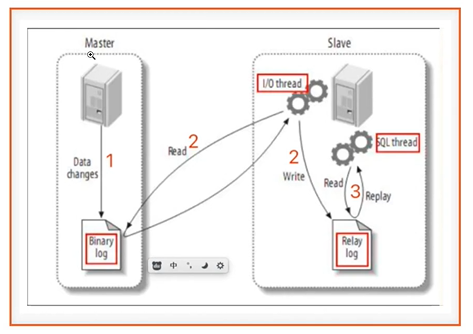
主库一旦变更数据,就会写入二进制日志文件(Binary log),从库IO线程( I/O thread)连接到主库,读取二进制日志文件内容并写入自己的中继日志文件(Realy log),然后从库 SQL thread 定时检查中继日志 (Realy log),发现有更新的内容就自己的库执行一遍。
从服务器都会copy主服务器二进制日志的全部内容到副本,然后从服务器设备负责决定应该执行副本中的哪些语句。
步骤:
-
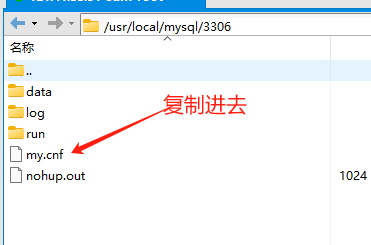
主库配置my.cnf文件指定唯一server-id
[mysqld] ## 同一局域网内注意要唯一 server-id=100 ## 开启二进制日志功能,可以随便取(关键) log-bin=mysql-bin ## 复制过滤:不需要备份的数据库,不输出(mysql库一般不同步) binlog-ignore-db=mysql ## 为每个session 分配的内存,在事务过程中用来存储二进制日志的缓存 binlog_cache_size=1M ## 主从复制的格式(mixed,statement,row,默认格式是statement) binlog_format=mixed -
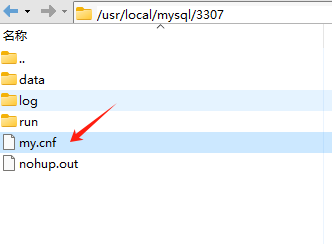
从库配置my.cnf文件指定唯一server-id
[mysqld] ## 设置server_id,注意要唯一 server-id=102 ## 开启二进制日志功能,以备Slave作为其它Slave的Master时使用 log-bin=mysql-slave-bin ## relay_log配置中继日志 relay_log=edu-mysql-relay-bin ##复制过滤:不需要备份的数据库,不输出(mysql库一般不同步) binlog-ignore-db=mysql ## 如果需要同步函数或者存储过程 log_bin_trust_function_creators=true ## 为每个session 分配的内存,在事务过程中用来存储二进制日志的缓存 binlog_cache_size=1M ## 主从复制的格式(mixed,statement,row,默认格式是statement) binlog_format=mixed ## 跳过主从复制中遇到的所有错误或指定类型的错误,避免slave端复制中断。 ## 如:1062错误是指一些主键重复,1032错误是因为主从数据库数据不一致 slave_skip_errors=1062 -
重启3306、3307服务,使配置生效
# 查看mysql 3306、3307进程 root@songdanminserver:[/usr/local/mysql/3306/run]ps -ef | grep mysqld root 8568 25795 0 13:40 pts/0 00:00:00 grep --color=auto mysqld mysql 30201 1 0 Nov10 ? 00:07:13 /usr/local/mysql/bin/mysqld --defaults-file=/usr/local/mysql/3306/my.cnf --user=mysql mysql 30473 1 0 Nov10 ? 00:07:46 /usr/local/mysql/bin/mysqld --defaults-file=/usr/local/mysql/3307/my.cnf --user=mysql # 停止3306、3307进程服务 root@songdanminserver:[/usr/local/mysql/3306/run]kill 30201 root@songdanminserver:[/usr/local/mysql/3306/run]kill 30473 # 查看mysql进程 root@songdanminserver:[/usr/local/mysql/3306/run]ps -ef | grep mysqld root 8614 25795 0 13:41 pts/0 00:00:00 grep --color=auto mysqld # 查看端口占用情况是否没有3306、3307 root@songdanminserver:[/usr/local/mysql/3306/run]netstat -ntl Active Internet connections (only servers) Proto Recv-Q Send-Q Local Address Foreign Address State tcp 0 0 0.0.0.0:111 0.0.0.0:* LISTEN tcp 0 0 0.0.0.0:22 0.0.0.0:* LISTEN tcp 0 0 127.0.0.1:25 0.0.0.0:* LISTEN tcp6 0 0 :::111 :::* LISTEN tcp6 0 0 :::8080 :::* LISTEN tcp6 0 0 ::1:25 :::* LISTEN tcp6 0 0 127.0.0.1:8005 :::* LISTEN # 重新启动3306、3307 root@songdanminserver:[/usr/local/mysql/3306]nohup /usr/local/mysql/bin/mysqld --defaults-file=/usr/local/mysql/3306/my.cnf --user=mysql & [1] 9413 root@songdanminserver:[/usr/local/mysql/3306]nohup: ignoring input and appending output to ‘nohup.out’ ^C root@songdanminserver:[/usr/local/mysql/3307]nohup /usr/local/mysql/bin/mysqld --defaults-file=/usr/local/mysql/3307/my.cnf --user=mysql & [2] 9457 root@songdanminserver:[/usr/local/mysql/3307]nohup: ignoring input and appending output to ‘nohup.out’ ^C root@songdanminserver:[/usr/local/mysql/3306] # 查看mysql 3306、3307进程 root@songdanminserver:[/usr/local/mysql/3307]ps -ef | grep mysqld mysql 9413 25795 0 13:52 pts/0 00:00:00 /usr/local/mysql/bin/mysqld --defaults-file=/usr/local/mysql/3306/my.cnf --user=mysql mysql 9559 25795 1 13:54 pts/0 00:00:00 /usr/local/mysql/bin/mysqld --defaults-file=/usr/local/mysql/3307/my.cnf --user=mysql root 9608 25795 0 13:54 pts/0 00:00:00 grep --color=auto mysqld -
登录主库,授予从库连接主库,并复制主库数据的权限,刷新权限生效
# 登录主库3306 root@songdanminserver:[/usr/local/mysql/3306]mysql -uroot -h127.0.0.1 -p -P3306 Enter password: Welcome to the MySQL monitor. Commands end with ; or \g. Your MySQL connection id is 5 Server version: 5.7.36-log MySQL Community Server (GPL) Copyright (c) 2000, 2021, Oracle and/or its affiliates. Oracle is a registered trademark of Oracle Corporation and/or its affiliates. Other names may be trademarks of their respective owners. Type 'help;' or '\h' for help. Type '\c' to clear the current input statement. # 授予从库3307的root用户在指定从库ip上从主库复制所有库、所有表数据的权限 mysql> grant replication slave, replication client on *.* to 'root'@'你的从库服务器ip' identified by '你的从库root用户密码'; Query OK, 0 rows affected, 1 warning (0.00 sec) # 刷新权限 mysql> flush privileges; Query OK, 0 rows affected (0.00 sec) # 查看MySQL现在有哪些用户及对应的IP权限,可以看到你刚授权的从库user,host mysql> select user,host from mysql.user; +---------------+--------------+ | user | host | +---------------+--------------+ | root | % | | root | 121.41.59.91 | | mysql.session | localhost | | mysql.sys | localhost | +---------------+--------------+ 4 rows in set (0.00 sec) # 查看主库3306的binlog文件名和位置 mysql> show master status; +------------------+----------+--------------+------------------+-------------------+ | File | Position | Binlog_Do_DB | Binlog_Ignore_DB | Executed_Gtid_Set | +------------------+----------+--------------+------------------+-------------------+ | mysql-bin.000003 | 612 | | mysql | | +------------------+----------+--------------+------------------+-------------------+ 1 row in set (0.00 sec) -
登录从库,连接主库,指定主库ip、主库为从库连接所创建的用户、密码、从库从主库哪个二进制文件的哪里开始读取数据等
# 登录从库3307 root@songdanminserver:[/usr/local/mysql/3306]mysql -uroot -h127.0.0.1 -p -P3307 Enter password: Welcome to the MySQL monitor. Commands end with ; or \g. Your MySQL connection id is 3 Server version: 5.7.36-log MySQL Community Server (GPL) Copyright (c) 2000, 2021, Oracle and/or its affiliates. Oracle is a registered trademark of Oracle Corporation and/or its affiliates. Other names may be trademarks of their respective owners. Type 'help;' or '\h' for help. Type '\c' to clear the current input statement. # 配置连接主库3306 # change master to master_host='主库服务器ip', master_user='root(上一步主库授权从库能进行复制的用户)', master_password='123456(上一步主库授权从库能进行复制的密码)', master_port=3306(主库端口), master_log_file='mysql-bin.000002(上一步查看到的主库日志文件名称)',master_log_pos=2079(上一步查看到的主库日志文件位置); mysql> change master to master_host='121.41.53.91', master_user='root', master_password='123456', master_port=3306, master_log_file='mysql-bin.000003',master_log_pos=612; Query OK, 0 rows affected, 1 warning (0.02 sec) -
从库启动主从复制,查看是否连接主库成功
# 启动从库复制主库 mysql> start slave; Query OK, 0 rows affected (0.00 sec) # 查看主从复制状态,查看Slave_IO_Running、Slave_SQL_Running 是否为yes mysql> show slave status\G; *************************** 1. row *************************** Slave_IO_State: Waiting for master to send event Master_Host: 121.41.53.91 # 绑定的主库ip Master_User: root # 主库用户 Master_Port: 3306 # 主库端口 Connect_Retry: 60 Master_Log_File: mysql-bin.000003 # 主库同步日志,从这读取主库数据 Read_Master_Log_Pos: 612 Relay_Log_File: edu-mysql-relay-bin.000002 # 从库中继日志 Relay_Log_Pos: 320 Relay_Master_Log_File: mysql-bin.000003 Slave_IO_Running: Yes # 这里是yes 说明复制成功 Slave_SQL_Running: Yes # 这里是yes 说明复制成功 Replicate_Do_DB: Replicate_Ignore_DB: Replicate_Do_Table: Replicate_Ignore_Table: Replicate_Wild_Do_Table: Replicate_Wild_Ignore_Table: Last_Errno: 0 Last_Error: Skip_Counter: 0 Exec_Master_Log_Pos: 612 Relay_Log_Space: 531 Until_Condition: None Until_Log_File: Until_Log_Pos: 0 Master_SSL_Allowed: No Master_SSL_CA_File: Master_SSL_CA_Path: Master_SSL_Cert: Master_SSL_Cipher: Master_SSL_Key: Seconds_Behind_Master: 0 Master_SSL_Verify_Server_Cert: No Last_IO_Errno: 0 Last_IO_Error: Last_SQL_Errno: 0 Last_SQL_Error: Replicate_Ignore_Server_Ids: Master_Server_Id: 100 Master_UUID: cfb53930-7fa2-11ee-8ea9-00163e2859d2 Master_Info_File: /usr/local/mysql/3307/data/master.info SQL_Delay: 0 SQL_Remaining_Delay: NULL Slave_SQL_Running_State: Slave has read all relay log; waiting for more updates Master_Retry_Count: 86400 Master_Bind: Last_IO_Error_Timestamp: Last_SQL_Error_Timestamp: Master_SSL_Crl: Master_SSL_Crlpath: Retrieved_Gtid_Set: Executed_Gtid_Set: Auto_Position: 0 Replicate_Rewrite_DB: Channel_Name: Master_TLS_Version: 1 row in set (0.00 sec) # 停止从库复制主库 mysql> stop slave; Query OK, 0 rows affected (0.01 sec) -
测试主从复制是否成功,在主库建表,插入数据,查看从库是否也有
在主库执行操作:
- 新增库
- 新增表
- 新增数据
- 修改数据
- 删除数据
查看从库3307是否发生变化
# 进入主库3306
root@songdanminserver:[/usr/local/mysql/3306]mysql -uroot -h127.0.0.1 -p -P3306
Enter password:
Welcome to the MySQL monitor.  Commands end with ; or \g.
Your MySQL connection id is 16
Server version: 5.7.36-log MySQL Community Server (GPL)

Copyright (c) 2000, 2021, Oracle and/or its affiliates.

Oracle is a registered trademark of Oracle Corporation and/or its
affiliates. Other names may be trademarks of their respective
owners.

Type 'help;' or '\h' for help. Type '\c' to clear the current input statement.
# 新建数据库 my_test
mysql> create database my_test;
Query OK, 1 row affected (0.00 sec)

mysql> use my_test;
Database changed
mysql> CREATE TABLE test (
    ->   id INT(6) UNSIGNED AUTO_INCREMENT PRIMARY KEY,
    ->   name VARCHAR(30) NOT NULL,
    ->   email VARCHAR(50) NOT NULL,
    ->   reg_date TIMESTAMP DEFAULT CURRENT_TIMESTAMP ON UPDATE CURRENT_TIMESTAMP
    -> );
Query OK, 0 rows affected (0.01 sec)
# 插入初识数据
mysql> INSERT INTO test (name, email)
    -> VALUES ('John Doe', 'john@example.com');
Query OK, 1 row affected (0.00 sec)

# 查看从库变化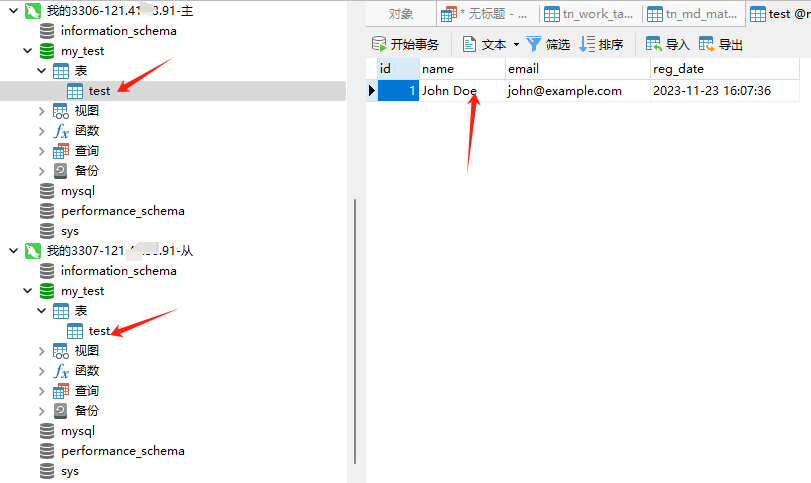
注意:如果出现从库复制失败没有效果时候,从库重新绑定主库(执行6)
造成这类问题的原因一般是在主从复制的时候,基于创建表,然后又去删除和操作了数据表或者表。


 782
782


 被折叠的 条评论
为什么被折叠?
被折叠的 条评论
为什么被折叠?
 到【灌水乐园】发言


