


前言
先自定义一个View集成ViewGroup,编辑器会提示你实现OnLayout方法,实现之,这里我们动态的添加的话其实不用到OnLayout方法,自定义一个layoutChildrenView()用来为子view设定位置就行了,该方法的实现如下:
这代码里面在调用子view的layout方法的同时设定了本身ViewGroup的高度大小,因为NineGridView的高度是要根据子View的高度来确定的.
复制代码
添加一个设置图片资源的接口,一般情况下我们都是用在listview来显示数据,而数据都是封装好的,这里提供一个Image封装类,接口和封装类代码如下:
复制代码
Image封装类:
复制代码
在添加数据的时候,我们要根据图片的个数来确定具体的布局情况,这个函数就是generateChildrenLayout(),实现如下:
复制代码
这些,就是NineGridLayout的核心代码了,是不是很简单,整个类的源码如下:
复制代码
因为微信那些图片在点击的时候是有一个灰色的蒙版的,实现起来其实很简单,我们这里在自定义一个imageview,叫做CustomImageView,复写onTouchEvent方法,在onKeyDown的时候添加一个colorfilter,然后再onKeyUp的时候clear掉,这样就实现了点击有灰色蒙版的效果,同时为了方便项目加载图片的解耦,我加载图片用了picasso这个开源库,这个开源库的地址为点击打开链接 ,具体的代码如下:
复制代码
上面就是所以的代码了,上几张图看看效果

这个demo代码我也上传了,在我的github上面,可以到上面去下载,地址是:项目源码
本文的CSDN地址,希望多多支持 ----》》》 地址
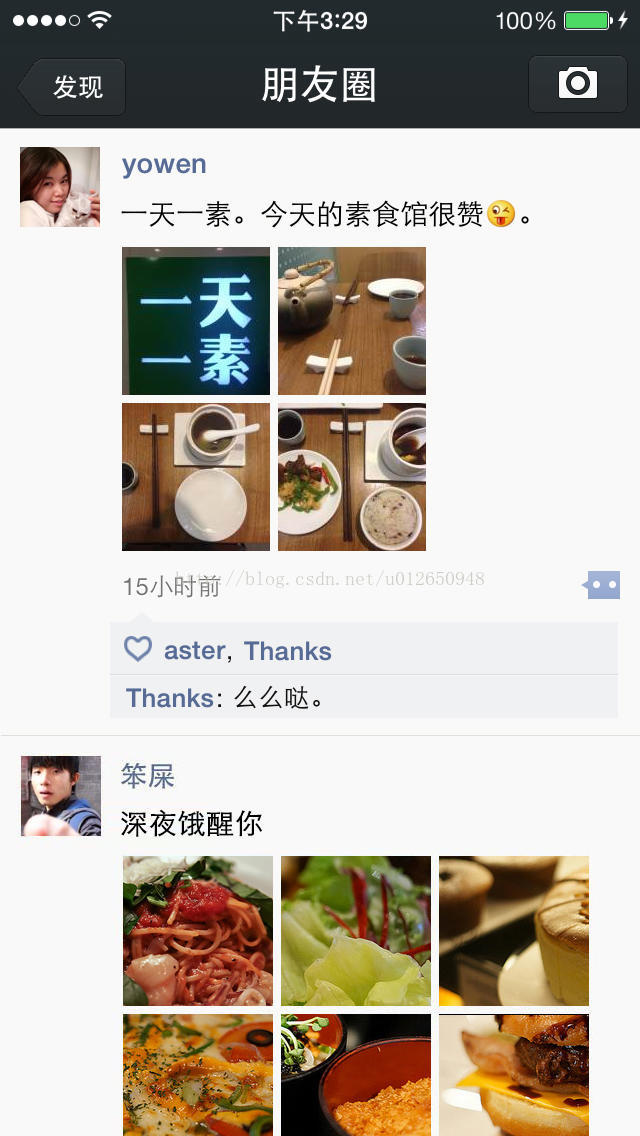
很多时候我们都在刷微博或者微信朋友圈的时候都会看到很多图片,而这些图片的显示跟我们平时很多控件的显示方式都不一样,而且,当我们仔细去观察后就会发现,他加载的图片都是根据图片数量动态加载的,根据不同的图片数量来用不同的布局显示,如下图:
PS:图片来源于网络
当图片是4张的时候,就会形成一个2x2的正方形,除了一张的情况,另外的都是按照九宫格的方式显示和排列图片的。那么这种布局是怎么实现的呢,一开始,好多人都可能认为用原生的GridView就能搞掂,但是,却有几种特殊的情况是GridView解决不了的,例如4张图片的情况,或者1张,其实也可以根据图片的数量然后用几个不同布局的GridView来实现,不过那样的话就复杂得多了。而且处理起来很麻烦,其实,大部分的实现都是通过自定义ViewGroup来实现的,通过代码编写来设定childrenView的layout来实现这种布局,而NineGridView控件就是这么一个东西,代码其实很简单,100行就够了。
代码编写
先自定义一个View集成ViewGroup,编辑器会提示你实现OnLayout方法,实现之,这里我们动态的添加的话其实不用到OnLayout方法,自定义一个layoutChildrenView()用来为子view设定位置就行了,该方法的实现如下:
这代码里面在调用子view的layout方法的同时设定了本身ViewGroup的高度大小,因为NineGridView的高度是要根据子View的高度来确定的.
- private void layoutChildrenView(){
- int childrenCount = listData.size();
- int singleWidth = (totalWidth - gap * (3 - 1)) / 3;
- int singleHeight = singleWidth;
- //根据子view数量确定高度
- ViewGroup.LayoutParams params = getLayoutParams();
- params.height = singleHeight * rows + gap * (rows - 1);
- setLayoutParams(params);
- for (int i = 0; i < childrenCount; i++) {
- CustomImageView childrenView = (CustomImageView) getChildAt(i);
- childrenView.setImageUrl(((Image) listData.get(i)).getUrl());
- int[] position = findPosition(i);
- int left = (singleWidth + gap) * position[1];
- int top = (singleHeight + gap) * position[0];
- int right = left + singleWidth;
- int bottom = top + singleHeight;
- childrenView.layout(left, top, right, bottom);
- }
- }
添加一个设置图片资源的接口,一般情况下我们都是用在listview来显示数据,而数据都是封装好的,这里提供一个Image封装类,接口和封装类代码如下:
- public void setImagesData(List<Image> lists) {
- if (lists == null || lists.isEmpty()) {
- return;
- }
- //初始化布局
- generateChildrenLayout(lists.size());
- //这里做一个重用view的处理
- if (listData == null) {
- int i = 0;
- while (i < lists.size()) {
- CustomImageView iv = generateImageView();
- addView(iv,generateDefaultLayoutParams());
- i++;
- }
- } else {
- int oldViewCount = listData.size();
- int newViewCount = lists.size();
- if (oldViewCount > newViewCount) {
- removeViews(newViewCount - 1, oldViewCount - newViewCount);
- } else if (oldViewCount < newViewCount) {
- for (int i = 0; i < newViewCount - oldViewCount; i++) {
- CustomImageView iv = generateImageView();
- addView(iv,generateDefaultLayoutParams());
- }
- }
- }
- listData = lists;
- layoutChildrenView();
- }
Image封装类:
- public class Image {
- private String url;
- private int width;
- private int height;
- public Image(String url, int width, int height) {
- this.url = url;
- this.width = width;
- this.height = height;
- L.i(toString());
- }
- public String getUrl() {
- return url;
- }
- public void setUrl(String url) {
- this.url = url;
- }
- public int getWidth() {
- return width;
- }
- public void setWidth(int width) {
- this.width = width;
- }
- public int getHeight() {
- return height;
- }
- public void setHeight(int height) {
- this.height = height;
- }
- @Override
- public String toString() {
- return "image---->>url="+url+"width="+width+"height"+height;
- }
- }
在添加数据的时候,我们要根据图片的个数来确定具体的布局情况,这个函数就是generateChildrenLayout(),实现如下:
- /**
- * 根据图片个数确定行列数量
- * 对应关系如下
- * num row column
- * 1 1 1
- * 2 1 2
- * 3 1 3
- * 4 2 2
- * 5 2 3
- * 6 2 3
- * 7 3 3
- * 8 3 3
- * 9 3 3
- *
- * @param length
- */
- private void generateChildrenLayout(int length) {
- if (length <= 3) {
- rows = 1;
- columns = length;
- } else if (length <= 6) {
- rows = 2;
- columns = 3;
- if (length == 4) {
- columns = 2;
- }
- } else {
- rows = 3;
- columns = 3;
- }
- }
- package com.weixinninegridlayout;
- import android.content.Context;
- import android.graphics.Color;
- import android.graphics.drawable.ColorDrawable;
- import android.util.AttributeSet;
- import android.view.View;
- import android.view.ViewGroup;
- import android.widget.ImageView;
- import java.util.List;
- /**
- * Created by Pan_ on 2015/2/2.
- */
- public class NineGridlayout extends ViewGroup {
- /**
- * 图片之间的间隔
- */
- private int gap = 5;
- private int columns;//
- private int rows;//
- private List listData;
- private int totalWidth;
- public NineGridlayout(Context context) {
- super(context);
- }
- public NineGridlayout(Context context, AttributeSet attrs) {
- super(context, attrs);
- ScreenTools screenTools=ScreenTools.instance(getContext());
- totalWidth=screenTools.getScreenWidth()-screenTools.dip2px(80);
- }
- @Override
- protected void onMeasure(int widthMeasureSpec, int heightMeasureSpec) {
- super.onMeasure(widthMeasureSpec, heightMeasureSpec);
- }
- @Override
- protected void onLayout(boolean changed, int l, int t, int r, int b) {
- }
- private void layoutChildrenView(){
- int childrenCount = listData.size();
- int singleWidth = (totalWidth - gap * (3 - 1)) / 3;
- int singleHeight = singleWidth;
- //根据子view数量确定高度
- ViewGroup.LayoutParams params = getLayoutParams();
- params.height = singleHeight * rows + gap * (rows - 1);
- setLayoutParams(params);
- for (int i = 0; i < childrenCount; i++) {
- CustomImageView childrenView = (CustomImageView) getChildAt(i);
- childrenView.setImageUrl(((Image) listData.get(i)).getUrl());
- int[] position = findPosition(i);
- int left = (singleWidth + gap) * position[1];
- int top = (singleHeight + gap) * position[0];
- int right = left + singleWidth;
- int bottom = top + singleHeight;
- childrenView.layout(left, top, right, bottom);
- }
- }
- private int[] findPosition(int childNum) {
- int[] position = new int[2];
- for (int i = 0; i < rows; i++) {
- for (int j = 0; j < columns; j++) {
- if ((i * columns + j) == childNum) {
- position[0] = i;//行
- position[1] = j;//列
- break;
- }
- }
- }
- return position;
- }
- public int getGap() {
- return gap;
- }
- public void setGap(int gap) {
- this.gap = gap;
- }
- public void setImagesData(List<Image> lists) {
- if (lists == null || lists.isEmpty()) {
- return;
- }
- //初始化布局
- generateChildrenLayout(lists.size());
- //这里做一个重用view的处理
- if (listData == null) {
- int i = 0;
- while (i < lists.size()) {
- CustomImageView iv = generateImageView();
- addView(iv,generateDefaultLayoutParams());
- i++;
- }
- } else {
- int oldViewCount = listData.size();
- int newViewCount = lists.size();
- if (oldViewCount > newViewCount) {
- removeViews(newViewCount - 1, oldViewCount - newViewCount);
- } else if (oldViewCount < newViewCount) {
- for (int i = 0; i < newViewCount - oldViewCount; i++) {
- CustomImageView iv = generateImageView();
- addView(iv,generateDefaultLayoutParams());
- }
- }
- }
- listData = lists;
- layoutChildrenView();
- }
- /**
- * 根据图片个数确定行列数量
- * 对应关系如下
- * num row column
- * 1 1 1
- * 2 1 2
- * 3 1 3
- * 4 2 2
- * 5 2 3
- * 6 2 3
- * 7 3 3
- * 8 3 3
- * 9 3 3
- *
- * @param length
- */
- private void generateChildrenLayout(int length) {
- if (length <= 3) {
- rows = 1;
- columns = length;
- } else if (length <= 6) {
- rows = 2;
- columns = 3;
- if (length == 4) {
- columns = 2;
- }
- } else {
- rows = 3;
- columns = 3;
- }
- }
- private CustomImageView generateImageView() {
- CustomImageView iv = new CustomImageView(getContext());
- iv.setScaleType(ImageView.ScaleType.CENTER_CROP);
- iv.setOnClickListener(new OnClickListener() {
- @Override
- public void onClick(View v) {
- }
- });
- iv.setBackgroundColor(Color.parseColor("#f5f5f5"));
- return iv;
- }
- }
- package com.weixinninegridlayout;
- import android.content.Context;
- import android.graphics.Color;
- import android.graphics.PorterDuff;
- import android.graphics.drawable.ColorDrawable;
- import android.graphics.drawable.Drawable;
- import android.text.TextUtils;
- import android.util.AttributeSet;
- import android.view.MotionEvent;
- import android.widget.ImageView;
- import com.squareup.picasso.Picasso;
- /**
- * Created by Pan_ on 2015/2/2.
- */
- public class CustomImageView extends ImageView {
- private String url;
- private boolean isAttachedToWindow;
- public CustomImageView(Context context, AttributeSet attrs) {
- super(context, attrs);
- }
- public CustomImageView(Context context) {
- super(context);
- }
- @Override
- public boolean onTouchEvent(MotionEvent event) {
- switch (event.getAction()) {
- case MotionEvent.ACTION_DOWN:
- Drawable drawable=getDrawable();
- if(drawable!=null) {
- drawable.mutate().setColorFilter(Color.GRAY,
- PorterDuff.Mode.MULTIPLY);
- }
- break;
- case MotionEvent.ACTION_MOVE:
- break;
- case MotionEvent.ACTION_CANCEL:
- case MotionEvent.ACTION_UP:
- Drawable drawableUp=getDrawable();
- if(drawableUp!=null) {
- drawableUp.mutate().clearColorFilter();
- }
- break;
- }
- return super.onTouchEvent(event);
- }
- @Override
- public void onAttachedToWindow() {
- isAttachedToWindow = true;
- setImageUrl(url);
- super.onAttachedToWindow();
- }
- @Override
- public void onDetachedFromWindow() {
- Picasso.with(getContext()).cancelRequest(this);
- isAttachedToWindow = false;
- setImageBitmap(null);
- super.onDetachedFromWindow();
- }
- public void setImageUrl(String url) {
- if (!TextUtils.isEmpty(url)) {
- this.url = url;
- if (isAttachedToWindow) {
- Picasso.with(getContext()).load(url).placeholder(new ColorDrawable(Color.parseColor("#f5f5f5"))).into(this);
- }
- }
- }
- }
上面就是所以的代码了,上几张图看看效果
这个demo代码我也上传了,在我的github上面,可以到上面去下载,地址是:项目源码
本文的CSDN地址,希望多多支持
----》》》 地址


 1750
1750

 被折叠的 条评论
为什么被折叠?
被折叠的 条评论
为什么被折叠?
 到【灌水乐园】发言


