UIView动画
步骤
1.开始动画
2.之间写你要执行的动画
3.提交动画
开始动画
参数1:动画的ID
参数2: 携带的参数[UIView beginAnimations:@"cartoon" context:@"hhhh"];设置动画执行的时间
[UIView setAnimationDuration:3];设置延迟
[UIView setAnimationDelay:2];设置是否反转动画
[UIView setAnimationRepeatAutoreverses:YES];执行的次数
// 一直执行
[UIView setAnimationRepeatCount:CGFLOAT_MAX];
是否继续执行
[UIView setAnimationBeginsFromCurrentState:YES];设置代理
需要自己设置代理方法
[UIView setAnimationDelegate:self];动画将要开始
[UIView setAnimationWillStartSelector:@selector(AnimationWillStart:context:)];// 动画开始 - (void)AnimationWillStart:(NSString *)ID context:(NSString *)context { }动画已经结束
[UIView setAnimationDidStopSelector:@selector(AnimationDidStop)];// 动画结束 - (void)AnimationDidStop { // 还原位置(oldFrame、oldColor分别记录初始的位置和颜色) self.imageV.frame = self.oldFrame; self.imageV.backgroundColor = self.oldColor; }提交动画
[UIView commitAnimations];
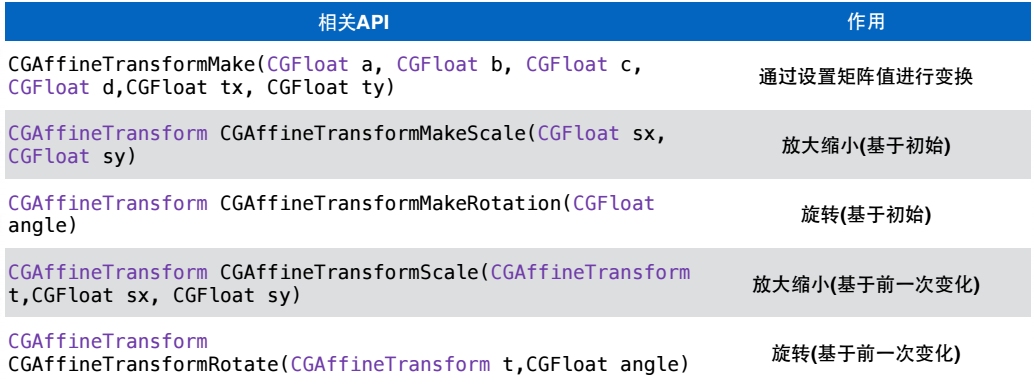
CGAffineTransform2D仿射变换
CGAffineTransform是结构体,标识一个矩阵,用于映射视图变换。
缩放、旋转、偏移是仿射变换支持的最常用的操作。
平移
改变的是视图的形变属性。创建UIImageView并设为属性。
[UIView animateWithDuration:2 animations:^{
        // 你要执行的动画
        // 改变的是视图的形变属性
        self.imageV.transform = CGAffineTransformTranslate(self.imageV.transform, 100, 0);

    } completion:^(BOOL finished) {
        // 动画结束后执行的block
        // block里面乐意再嵌套一个动画block,移动回去
        [UIView animateWithDuration:3 animations:^{
            self.imageV.transform = CGAffineTransformTranslate(self.imageV.transform, -100, 0);
        }completion:^(BOOL finished) {

    }];
    }];
缩放
 [UIView animateWithDuration:1 animations:^{
          // 填的是缩放的比例
         self.imageV.transform = CGAffineTransformScale(self.imageV.transform, 2, 2.5);

 }];
旋转
// 实现转动的方法
- (void)imageViewRotate
{
    if (self.isRunning) {
        [UIView animateWithDuration:0.1 animations:^{

            // 改变视图的弧度
            self.imageV.transform = CGAffineTransformRotate(self.imageV.transform, M_SQRT1_2);

        } completion:^(BOOL finished) {
            // 转完之后再转一次
            [self imageViewRotate];

        }];
    }

}
动画特点
全部都是类方法,直接用类去调用。
layer
视图的构成分两部分:UIView和UIView上面的layer层。
layer层是负责渲染视图(layer就相当于画布上的画)
UIView负责把渲染完成的视图展示出来(UIView就相当于画布)
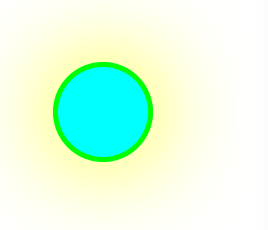
layer属性
创建UIImageView并设为属性imageV。
圆角
视图正方形宽的一半,设置为圆。
self.imageV.layer.cornerRadius = self.imageV.frame.size.width / 2;阴影
CGColorRef 绘制图层使用颜色
self.imageV.layer.shadowColor = [UIColor yellowColor].CGColor;偏移距离
self.imageV.layer.shadowOffset = CGSizeMake(0, 0);阴影模糊程度
self.imageV.layer.shadowRadius = 50;阴影透明度
self.imageV.layer.shadowOpacity = 1;边框颜色
self.imageV.layer.borderColor = [UIColor greenColor].CGColor;边框大小
self.imageV.layer.borderWidth = 5;
layer动画步骤
选取合适的类去创建动画(修改1个值就用基本动画,修改一组值,就用轨迹动画)
创建动画,并且设置要修改的值
添加到要动画的视图上
CAAnimation
CAAnimation是抽象类,有三个子类:
- CAAnimationGroup 设置组动画
- CAPropertyAnimation 属性动画 抽象类
有两个子类:
① CABasicAnimation 旋转 改变大小等
② CAKeyframeAnimation 可以设置轨迹动画 (改变一组颜色) - CATransition 私有的过渡动画
旋转 —- CABasicAnimation
创建基本动画CABasicAnimation。绕x轴旋转,修改的是形变属性中弧度的x轴的值。
-  (void)rotationX
{
    CABasicAnimation *animation = [CABasicAnimation animationWithKeyPath:@"transform.rotation.x"];
    // 修改值
    // 由于修改时需要把基本数据类型或者结构体数据类型转化成对象类型(NSNumber、NSValue)
    animation.toValue = [NSNumber numberWithFloat:M_PI];
    // 设置动画的时间
    animation.duration = 2;
    // 重复次数
    animation.repeatCount = 2;
    // 把动画添加到layer层上
    [self.imageV.layer addAnimation:animation forKey:@"transform.rotation.x"];

}
改变视图大小 —- CABasicAnimation
注意:KeyPath 一个字母都不能差
- (void)animationBoundsSize
{
    CABasicAnimation *animation = [CABasicAnimation animationWithKeyPath:@"bounds.size"];
    // 修改值 从一个值修改到一个值
    NSValue *value1 = [NSValue valueWithCGSize:CGSizeMake(50, 50)];
    NSValue *value2 = [NSValue valueWithCGSize:CGSizeMake(100, 100)];
    animation.fromValue = value1;
    animation.toValue = value2;
    // 设置时间
    animation.duration = 1;
    // 添加到layer上
    [self.imageV.layer addAnimation:animation forKey:@"bounds.size"];
}
改变一组背景颜色 —- CAKeyframeAnimation
- (void)animationBackgroundColor
{
    CAKeyframeAnimation *animation = [CAKeyframeAnimation animationWithKeyPath:@"backgroundColor"];
    // 修改一组值
    CGColorRef zhonghuang = [UIColor zhonghuang].CGColor;
    CGColorRef tanguolu = [UIColor qianweise].CGColor;
    CGColorRef tangerineColor = [UIColor tangerineColor].CGColor;
    // 需要把颜色强转成对象类型 放进数组
    animation.values = @[(id)zhonghuang, (id)tanguolu, (id)tangerineColor];
    animation.duration = 5;

    [self.imageV.layer addAnimation:animation forKey:@"backgroundColor"];

}
按轨迹移动 - 调整位置 —- CAKeyframeAnimation
- (void)positionAnimation
{
    CAKeyframeAnimation *animation = [CAKeyframeAnimation animationWithKeyPath:@"position"];
    // 创建点
    CGPoint p1 = CGPointMake(10, 100);
    CGPoint p2 = CGPointMake(100, 150);
    CGPoint p3 = CGPointMake(200, 200);
    CGPoint p4 = CGPointMake(30, 300);
    // 转化成对象类型
    NSValue *v1 = [NSValue valueWithCGPoint:p1];
    NSValue *v2 = [NSValue valueWithCGPoint:p2];
    NSValue *v3 = [NSValue valueWithCGPoint:p3];
    NSValue *v4 = [NSValue valueWithCGPoint:p4];
    animation.values = @[v1, v2, v3, v4];
     animation.duration = 5;
    [self.imageV.layer addAnimation:animation forKey:@"position"];
}
抖动 —- CAKeyframeAnimation
- (void)animationDou
{
    CAKeyframeAnimation *animation = [CAKeyframeAnimation animationWithKeyPath:@"position.x"];
    // 获取当前的位置点
    CGFloat center = self.imageV.layer.position.x;
    CGFloat left = center - 20;
    CGFloat right = center + 20;

    // 转化成对象类型
    NSNumber *vc = [NSNumber numberWithFloat:center];
    NSNumber *vl = [NSNumber numberWithFloat:left];
    NSNumber *vr = [NSNumber numberWithFloat:right];

    animation.values = @[vl, vc, vr,vl, vc, vr,vl, vc, vr,vl, vc, vr,vl, vc, vr,vl, vc, vr,vl, vc, vr,vl, vc, vr,vl, vc, vr];
    animation.duration = 1;
    [self.imageV.layer addAnimation:animation forKey:@"position.x"];
}
3D转动 —- CABasicAnimation
- (void)transformAnimation
{
    CABasicAnimation *animation = [CABasicAnimation animationWithKeyPath:@"transform"];
    // 根据x、y、z轴进行角度转动
    NSValue *value = [NSValue valueWithCATransform3D:CATransform3DRotate(self.imageV.layer.transform, M_PI, 100, 100, 100)];
    animation.toValue = value;
    animation.duration = 4;
    [self.imageV.layer addAnimation:animation forKey:@"transform"];

}
组动画
- (void)groupAnimation
{
    // 创建组动画对象
    CAAnimationGroup *animation = [CAAnimationGroup animation];


    // 基本动画  旋转
    CABasicAnimation *animation1 = [CABasicAnimation animationWithKeyPath:@"transform.rotation.x"];
    animation1.toValue = [NSNumber numberWithFloat:M_PI];
    animation1.duration = 5;
    animation1.repeatCount = 1;


    // 轨迹动画  改变颜色
    CAKeyframeAnimation *animation2 = [CAKeyframeAnimation animationWithKeyPath:@"backgroundColor"];
    CGColorRef zhonghuang = [UIColor zhonghuang].CGColor;
    CGColorRef tanguolu = [UIColor qianweise].CGColor;
    CGColorRef tangerineColor = [UIColor tangerineColor].CGColor;
    animation2.values = @[(id)zhonghuang, (id)tanguolu, (id)tangerineColor];
    animation2.duration = 5;


    animation.animations = @[animation1, animation2];
    animation.duration = 5;
    [self.imageV.layer addAnimation:animation forKey:@"group"];
}
CATransition
创建两个ViewController,RootViewController和SecondViewController。
- (void)buttonClick:(UIButton *)button
{
    SecondViewController *secondVC = [[SecondViewController alloc]init];

    // 从哪个view到哪个view
    [UIView transitionFromView:self.view toView:secondVC.view duration:3 options:UIViewAnimationOptionTransitionFlipFromLeft completion:^(BOOL finished) {

    }];
    // 注意:animated为NO
    [self.navigationController pushViewController:secondVC animated:NO];

    [secondVC release];
}


 2502
2502

 被折叠的 条评论
为什么被折叠?


