


网络无人值守批量装机 cobbler
1. cobbler简介
pxe + kickstart已经可以解决网络批量装机的问题, 但是环境配置过于复杂, 而且仅针对某一个版本的操作系统进行批量安装, 无法满足目前复杂环境的部署需求
cobbler 是基于pxe + kickstart技术的二次封装, 简化了安装部署流程, 增加了对多发行版的支持, 并且有独立的web管理页面, 极大方便了初级人员的学习和使用
2. cobbler工作原理
pxe + kickstart 工作原理 : 见另一篇文章
cobbler 二次封装后的原理 :
3. cobbler 部署
本机环境 :
server ip : 192.168.71.11
gateway : 192.168.71.2
3.1 环境准备
3.1.1 关闭防火墙
#关闭防火墙
systemctl stop firewalld
systemctl disable firewalld
#关闭selinux
setenforce 0
sed -i 's/SELINUX=enforcing/SELINUX=disabled/g' /etc/sysconfig/selinux
3.1.2 配置阿里源
#下载yum源
wget -O /etc/yum.repos.d/CentOS-Base.repo https://mirrors.aliyun.com/repo/Centos-7.repo
wget -O /etc/yum.repos.d/epel.repo http://mirrors.aliyun.com/repo/epel-7.repo
#建立yum缓存
yum clear all
yum makecache
3.2 安装cobbler和相关软件
3.2.1 安装软件
yum -y install cobbler cobbler-web tftp-server dhcp httpd xinetd
3.2.2 设置开机自动启动
systemctl start httpd cobblerd
systemctl enable httpd cobblerd
#dhcpd 我们修改配置文件后再启动
3.2.3 配置cobbler配置文件
使用
cobbler check命令可以检查还有哪些配置项需要进行修改, 结果如下 , 我们依次解决下面8个问题
[root@localhost ~]# cobbler check
The following are potential configuration items that you may want to fix:

1 : The 'server' field in /etc/cobbler/settings must be set to something other than localhost, or kickstarting features will not work.  This should be a resolvable hostname or IP for the boot server as reachable by all machines that will use it.
2 : For PXE to be functional, the 'next_server' field in /etc/cobbler/settings must be set to something other than 127.0.0.1, and should match the IP of the boot server on the PXE network.
3 : change 'disable' to 'no' in /etc/xinetd.d/tftp
4 : Some network boot-loaders are missing from /var/lib/cobbler/loaders.  If you only want to handle x86/x86_64 netbooting, you may ensure that you have installed a *recent* version of the syslinux package installed and can ignore this message entirely.  Files in this directory, should you want to support all architectures, should include pxelinux.0, menu.c32, elilo.efi, and yaboot.
5 : enable and start rsyncd.service with systemctl
6 : debmirror package is not installed, it will be required to manage debian deployments and repositories
7 : The default password used by the sample templates for newly installed machines (default_password_crypted in /etc/cobbler/settings) is still set to 'cobbler' and should be changed, try: "openssl passwd -1 -salt 'random-phrase-here' 'your-password-here'" to generate new one
8 : fencing tools were not found, and are required to use the (optional) power management features. install cman or fence-agents to use them
问题一 & 问题二 : server 和 next_server 地址必须设置一个非本地地址
#打开开关并重启服务
sed -i 's/allow_dynamic_settings: 0/allow_dynamic_settings: 1/' /etc/cobbler/settings
systemctl restart cobblerd.service
#重启服务后, 依次执行如下几条命令
cobbler setting edit --name=server --value=192.168.71.11
cobbler setting edit --name=next_server --value=192.168.71.11
cobbler setting edit --name=pxe_just_once --value=1
#再次重启
systemctl restart cobblerd.service
#此时可以使用cobbler check命令发现前两条问题已经解决了
问题三 : 更改tftp配置文件 disbale 改成 no , 即14行改成no
#vim /etc/xinetd.d/tftp
#---------------------------------------------------------------------------------------------------
  1 # default: off
  2 # description: The tftp server serves files using the trivial file transfer \
  3 #       protocol.  The tftp protocol is often used to boot diskless \
  4 #       workstations, download configuration files to network-aware printers, \
  5 #       and to start the installation process for some operating systems.
  6 service tftp
  7 {
  8         socket_type             = dgram
  9         protocol                = udp
 10         wait                    = yes
 11         user                    = root
 12         server                  = /usr/sbin/in.tftpd
 13         server_args             = -s /var/lib/tftpboot
 14         disable                 = no
 15         per_source              = 11
 16         cps                     = 100 2
 17         flags                   = IPv4
 18 }
问题四 : 一些启动文件是丢失的 , 从网络下载后放到 /var/lib/cobbler/loaders (pxelinux.0 , menu.c32, elilo.efi, yaboot)
注意: 不能用本机光盘中的对应文件代替!!!
#下载启动文件
cd /root
wget https://raw.githubusercontent.com/hbokh/cobbler-loaders/main/files/cobbler-loaders.tar.gz
#安装相关模块
yum -y install grub2-efi-x64-modules grub2-pc-modules

#对下载的启动文件进行解压缩
tar -xf /root/cobbler-loaders.tar.gz
cd /var/lib/cobbler/loaders/
cp -a /root/var/lib/cobbler/loaders/* ./
问题五 :
#rsyncd 用于将 cobbler 配置模板 同步到 DHCP服务器
systemctl enable rsyncd
systemctl start rsyncd
问题六 : 忽略即可, debin相关配置
问题七 :
[root@localhost ~]# openssl passwd -1 -salt 'root' '123456'
$1$root$j0bp.KLPyr.u9kgQ428D10
vim /etc/cobbler/settings 修改如下信息
default_password_crypted: $1$root$j0bp.KLPyr.u9kgQ428D10
问题八 : 安装 fence-agents
yum -y install fence-agents
3.2.4 配置cobbler-dhcp
cobbler setting edit --name=manage_dhcp --value=1

#仅需修改网段信息 , 网关 , DNS , 地址池范围
vim /etc/cobbler/dhcp.template

 21 subnet 192.168.71.0 netmask 255.255.255.0 {
 22      option routers             192.168.71.2;
 23      option domain-name-servers 114.114.114.114;
 24      option subnet-mask         255.255.255.0;
 25      range dynamic-bootp        192.168.71.200 192.168.71.254;
 26      default-lease-time         21600;
 27      max-lease-time             43200;
 28      next-server                $next_server;
3.2.5 重启检查DHCP相关配置
systemctl restart cobblerd
此时我们发现DHCP配置文件还是一片空, 原因是cobbler使用sync将刚才的配置文件同步到DHCP配置中
[root@localhost dhcp]# cat /etc/dhcp/dhcpd.conf
# ******************************************************************
# Cobbler managed dhcpd.conf file
# generated from cobbler dhcp.conf template (Fri Apr 21 10:51:04 2023)
# Do NOT make changes to /etc/dhcpd.conf. Instead, make your changes
# in /etc/cobbler/dhcp.template, as /etc/dhcpd.conf will be
# overwritten.
# ******************************************************************

[root@localhost dhcp]# cobbler sync

[root@localhost dhcp]# cat /etc/dhcp/dhcpd.conf
	subnet 192.168.71.0 netmask 255.255.255.0 {
     	option routers             192.168.71.2;
     	option domain-name-servers 114.114.114.114;
     	option subnet-mask         255.255.255.0;
     	range dynamic-bootp        192.168.71.200 192.168.71.254;
     	default-lease-time         21600;
     	max-lease-time             43200;
     	next-server                192.168.71.11;
	}
3.2.6 将所有服务重启一遍
systemctl restart httpd rsyncd dhcpd xinetd cobblerd
systemctl enable httpd rsyncd dhcpd xinetd cobblerd
4.导入镜像绑定ks文件
4.1 导入镜像
mkdir /iso/centos7.6/
mount -r /dev/sr0 /iso/centos7.6/
#从 /iso/centos7.6拷贝镜像到 /var/www下 , 并且命名为CentOS-7.6-x86_64
cobbler import --name="CentOS-7.6-x86_64" --path=/iso/centos7.6

# 列出所有导入的镜像列表
[root@localhost ~]# cobbler profile list
   CentOS-7.6-x86_64
4.2 生成ks模板文件
vim /var/lib/cobbler/kickstarts/centos7.cfg
#----------------------- /var/lib/cobbler/kickstarts/centos7.cfg-----------------------------
#重点关注 : HTTP服务器地址, 填写为本机地址
#重点关注 : 此 rootpw 是 ming
#version=DEVEL
auth --enableshadow --passalgo=sha512
url --url=http://192.168.71.11/cobbler/ks_mirror/CentOS-7.6-x86_64/	    #HTTP服务器地址(本机IP) (此处Cobbler 和 Kickstart不一样)
graphical 						  			#图形启动项
firstboot --enable 							#设置为优先启动项
ignoredisk --only-use=sda 					#忽略磁盘,只从sda上安装
keyboard --vckeymap=us --xlayouts='us' 		#键盘类型
lang en_US.UTF-8 							#语言及编码
network --bootproto=dhcp --device=ens33 --onboot=on --ipv6=auto --no-activate   		#网卡信息
network --hostname=localhost.localdomain 												#主机名
rootpw --iscrypted $5$su4LamXmWPPFwGLq$g3VtBjbRlBWCB7XSWLG4oZr4L2vXfGRTbKanCTbipR3
#注意 rootpw --iscrypted $5.......           #容易换行, 此加密后的信息为 123123
firewall --disabled 						#防火墙开机禁用
selinux --disabled 							#selinux关闭
services --disabled="chronyd" 				#时间同步关闭
timezone Asia/Shanghai --isUtc --nontp 		#时区
bootloader --append=" crashkernel=auto" --location=mbr --boot-drive=sda     	#分区表相关信息
clearpart --none --initlabel 				#初始化分区,自己分区
part /boot --fstype="xfs" --ondisk=sda --size=1024 	#分区信息 1GB
part swap --fstype="swap" --ondisk=sda --size=2048 	#swap分区 2Gb
part / --fstype="xfs" --ondisk=sda --size=1 	#/分区
%packages 									#要安装的软件包
@^web-server-environment
@base
@core
@web-server
kexec-tools
%end 										#结束
reboot 										#安装后自动重启
注意 url --url=http://192.168.71.11/cobbler/ks_mirror/CentOS-7.6-x86_64/ , 这是cobbler 和 kickstart 的区别位置
4.3 查看指定镜像的profile配置文件, 将ks文件绑定到指定镜像
# 查看指定镜像的profile配置文件
cobbler profile report --name=CentOS-7.6-x86_64

#显示如下信息
[root@localhost www]# cobbler profile report --name=CentOS-7.6-x86_64
Name                           : CentOS-7.6-x86_64
TFTP Boot Files                : {}
Comment                        :
DHCP Tag                       : default
Distribution                   : CentOS-7.6-x86_64
Enable gPXE?                   : 0
Enable PXE Menu?               : 1
Fetchable Files                : {}
Kernel Options                 : {}
Kernel Options (Post Install)  : {}
Kickstart                      : /var/lib/cobbler/kickstarts/sample_end.ks


#我们将此名称绑定到刚刚自己指定的配置文件
cobbler profile edit --name=CentOS-7.6-x86_64 --kickstart=/var/lib/cobbler/kickstarts/centos7.cfg

#再次验证目录是否更改
[root@localhost www]# cobbler profile report --name=CentOS-7.6-x86_64
Name                           : CentOS-7.6-x86_64
TFTP Boot Files                : {}
Comment                        :
DHCP Tag                       : default
Distribution                   : CentOS-7.6-x86_64
Enable gPXE?                   : 0
Enable PXE Menu?               : 1
Fetchable Files                : {}
Kernel Options                 : {}
Kernel Options (Post Install)  : {}
Kickstart                      : /var/lib/cobbler/kickstarts/centos7.cfg
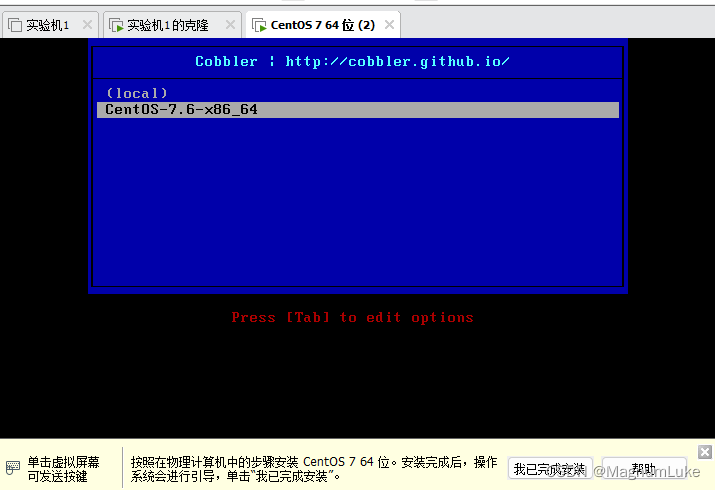
5.测试机进行测试
内存大于2GB


 395
395

 被折叠的 条评论
为什么被折叠?
被折叠的 条评论
为什么被折叠?
 到【灌水乐园】发言


