


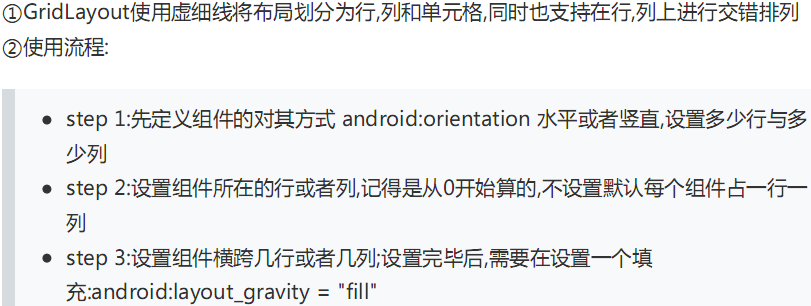
(一)概述
GridLayout是在Android 4.0以后引入的一个新的布局,和TableLayout(表格布局)有点类似,不过它比后者更加强大,也更加好用;
1)可以自己设置布局中组件的排列方式
2)可以自定义网格布局有多少行,多少列
3)可以直接设置组件位于某行某列
4)可以设置组件横跨几行或者几列
(二)常用属性介绍
No.1 —–设置排列对齐
android:orientation :设置排列方式,可以是水平(horizontal)也可以是垂直(vertical竖直,默认);
android:layout_gravity : 设置对齐方式,可以是left ,right,center,buttom,也可以同时使用俩个,比如:top|left
No.2 ——设置几行几列
android:rowCount=”6”//设置网格布局有6行
android:columnCount=”6”//设置网格布局有6列
No.3——–设置组件所在的行列(注意:从0开始计算呀!)
android:layout_row =”1”//设置组件位于第2行
android:layout_column = “2” //设置该组件位于第3列
No.4 ——-设置组件横跨几行几列
android:layout_rowSpan=”2”//纵向横跨2行
android:layout_columnSpan=”3”//横向横跨2列
(三) 使用案例—–计算器布局的实现(是不是觉的比LinearLayout好用多了,不用再各种嵌套了)
运行效果如下:
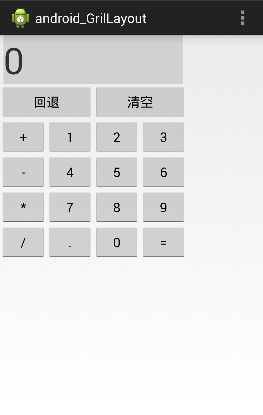
实现代码:
<GridLayout xmlns:android="http://schemas.android.com/apk/res/android"
    xmlns:tools="http://schemas.android.com/tools"
    android:id="@+id/GridLayout1"
    android:layout_width="wrap_content"
    android:layout_height="wrap_content"
    android:columnCount="4"
    android:orientation="horizontal"
    android:rowCount="6"
    tools:context="com.example.android_grillayout.MainActivity" >

    <!-- 4行6列的一个网格布局 -->
    <!-- layout_columnSpan="4"表示横向横跨4列 -->
    <TextView android:layout_columnSpan="4"
        android:layout_gravity="fill"
        android:layout_marginLeft="5dp"
        android:layout_marginRight="5dp"
        android:background="#D1D1D1"
        android:text="0"
        android:textSize="50sp"
        />
    <!-- layout_columnSpan="2"表示横向横跨2列 -->
    <Button android:layout_columnSpan="2"
        android:layout_gravity="fill"
        android:text="回退"/>
    <Button android:layout_columnSpan="2"
        android:layout_gravity="fill"
        android:text="清空"/>
    <Button android:text="+"/>
    <Button android:text="1"/>
    <Button android:text="2"/>
    <Button android:text="3"/>
    <Button android:text="-"/>
    <Button android:text="4"/>
    <Button android:text="5"/>
    <Button android:text="6"/>
    <Button android:text="*"/>
    <Button android:text="7"/>
    <Button android:text="8"/>
    <Button android:text="9"/>
    <Button android:text="/"/>
    <Button
        android:layout_width="wrap_content"
        android:text="."/>
    <Button android:text="0"/>
    <Button android:text="="/>


</GridLayout>
代码解释:
新建了一个4列6行的网格布局,默认每个组件占一行一列,但是有一点必须注意:

android:layout_gravity=”fill” !!!!!就像这个计算器显示数字的部分;
(三)GridLayout用法归纳总结
(四)使用GridLayout需要注意的地方

(五)低版本如何使用GridLayout


完毕~~~(~﹃~)~zZ


 248
248

 被折叠的 条评论
为什么被折叠?
被折叠的 条评论
为什么被折叠?
 到【灌水乐园】发言


