


一、前言
相信大家在看本篇文章的时候,对IoC应该有一个比较清晰的理解,我在这里再重新描述下:它的作用就是实现一个容器将一个个的Bean(这里的Bean可以是一个Java的业务对象,也可以是一个配置对象)统一管理起来。在Java中,我们创建一个对象最简单的方法是使用new关键字。Spring框架的IoC容器则是将创建Bean的动作与使用Bean解耦,将应用层程序员无需关注底层对象的构建以及其生命周期,以便更好的专注于业务开发。
本节我们则开始进入手写Spring框架的第一步:实现一个最简易的IoC容器。
二、一个最简易的IoC容器
1、简易流程
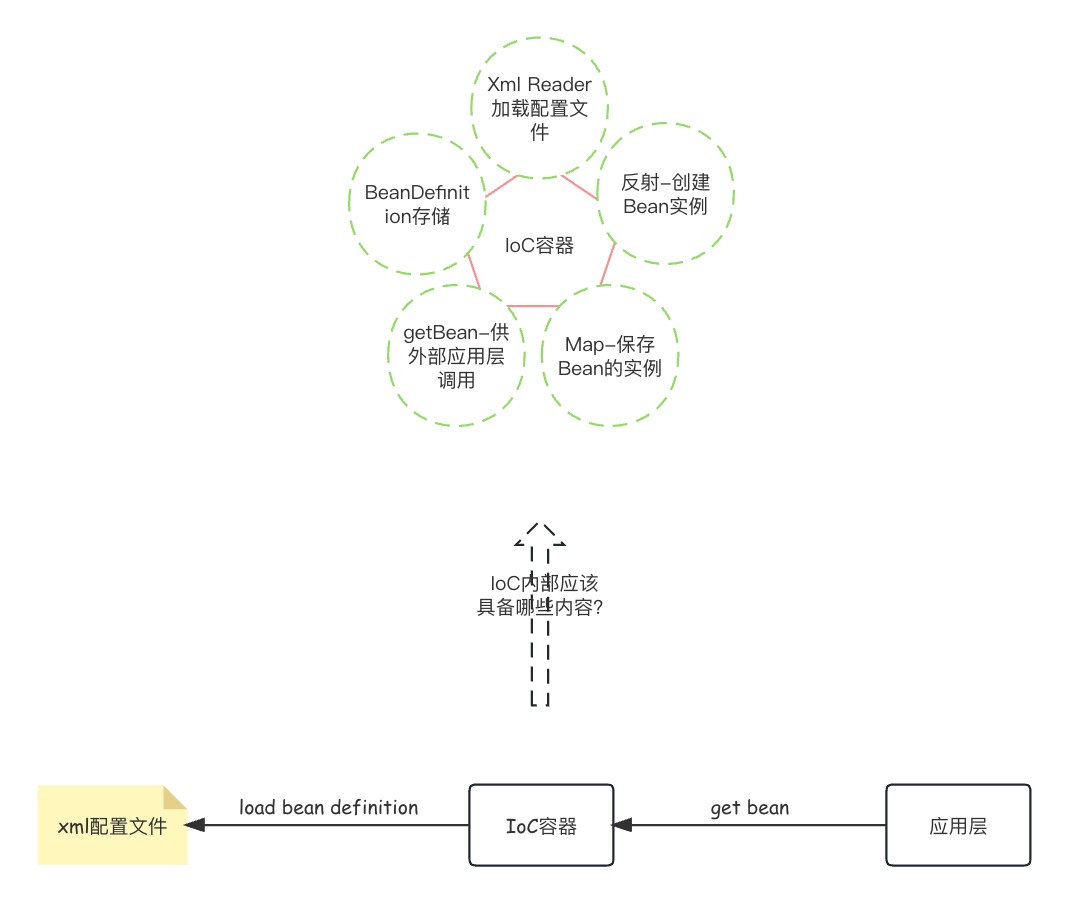
我们在面向Spring框架开发时,想要使用一个Bean时,通常会将bean的一些元信息配置在xml文件中(也可以通过注解),Spring IoC容器会加载指定路径的xml文件,将其进一步解析成BeanDefinition并存储到IoC容器中,当我们(应用层)去获取Bean实例(通过getBean)时,如果该Bean没有被初始化,则会触发Bean实例创建的动作,创建实例由反射实现。
2、简易功能下UML图

3、相关代码
BeanDefinition
package com.tiny.spring.beans.factory.config;

/**
 * @author: markus
 * @date: 2023/10/7 8:14 PM
 * @Description: Bean配置元信息
 * @Blog: https://markuszhang.com
 * It's my honor to share what I've learned with you!
 */
public class BeanDefinition {
    private String id;
    private String className;

    public BeanDefinition() {
    }

    public BeanDefinition(String id, String className) {
        this.id = id;
        this.className = className;
    }

    public String getId() {
        return id;
    }

    public void setId(String id) {
        this.id = id;
    }

    public String getClassName() {
        return className;
    }

    public void setClassName(String className) {
        this.className = className;
    }
}
ClassPathXmlApplicationContext
package com.tiny.spring.context.support;

import com.tiny.spring.beans.factory.config.BeanDefinition;
import org.dom4j.Document;
import org.dom4j.DocumentException;
import org.dom4j.Element;
import org.dom4j.io.SAXReader;

import java.net.URL;
import java.util.ArrayList;
import java.util.HashMap;
import java.util.List;
import java.util.Map;

/**
 * @author: markus
 * @date: 2023/10/7 8:16 PM
 * @Description: 基于xml的Spring应用上下文
 * @Blog: https://markuszhang.com
 * It's my honor to share what I've learned with you!
 */
public class ClassPathXmlApplicationContext {
    private List<BeanDefinition> beanDefinitions = new ArrayList<>();
    private Map<String, Object> singletons = new HashMap<>();

    public ClassPathXmlApplicationContext(String pathname) {
        this.readXml(pathname);
        this.instanceBeans();
    }

    private void readXml(String pathname) {
        SAXReader saxReader = new SAXReader();
        try {
            URL xmlPath = this.getClass().getClassLoader().getResource(pathname);
            Document document = saxReader.read(xmlPath);
            Element rootElement = document.getRootElement();
            // 对配置文件的每一个<bean>标签进行处理
            for (Element element : rootElement.elements()) {
                // 获取Bean的基本信息
                String beanId = element.attributeValue("id");
                String beanClassName = element.attributeValue("class");
                BeanDefinition beanDefinition = new BeanDefinition(beanId, beanClassName);
                // 将Bean的定义存放到BeanDefinition
                beanDefinitions.add(beanDefinition);
            }
        } catch (DocumentException e) {
            e.printStackTrace();
        }
    }

    /**
     * 利用反射创建Bean实例,并存储在singletons中
     */
    private void instanceBeans() {
        for (BeanDefinition beanDefinition : beanDefinitions) {
            try {
                singletons.put(beanDefinition.getId(), Class.forName(beanDefinition.getClassName()).newInstance());
            } catch (InstantiationException | IllegalAccessException | ClassNotFoundException e) {
                e.printStackTrace();
            }
        }
    }

    /**
     * 对外提供的方法,让外部程序获取Bean实例
     * @param beanName
     * @return
     */
    public Object getBean(String beanName) {
        return singletons.get(beanName);
    }
}
测试类
package com.tiny.spring.test;

import com.tiny.spring.beans.BeansException;
import com.tiny.spring.context.support.ClassPathXmlApplicationContext;
import com.tiny.spring.test.service.AService;

/**
 * @author: markus
 * @date: 2023/10/7 8:37 PM
 * @Description: 最原始的IoC容器功能测试
 * @Blog: https://markuszhang.com
 * It's my honor to share what I've learned with you!
 */
public class OriginalIoCContainerTest {
    public static void main(String[] args) throws BeansException {
        ClassPathXmlApplicationContext classPathXmlApplicationContext = new ClassPathXmlApplicationContext("beans.xml");
        AService aService = (AService) classPathXmlApplicationContext.getBean("aService");
        aService.sayHello();
    }
}

三、单一职责原则
我们可以看到,上面的ClassPathXmlApplicationContext承担了太多的功能,这不符合对象单一职责原则。
原本ClassPathXmlApplicationContext既承担了对外提供Bean实例访问,对内进行配置文件的加载并解析成BeanDefinition存储起来以及进行Bean实例的创建操作。
我们需要对此进行优化,将IoC容器的核心功能(Bean实例访问+BeanDefinition注册)和外部信息的访问剥离出来。
1、优化后的UML类图

2、相关代码
Resource
package com.tiny.spring.core.io;

import java.util.Iterator;

/**
 * @author: markus
 * @date: 2023/10/7 8:45 PM
 * @Description: 外部的配置信息抽象
 * @Blog: https://markuszhang.com
 * It's my honor to share what I've learned with you!
 */
public interface Resource extends Iterator<Object> {
}
ClassPathXmlResource
package com.tiny.spring.core.io;

import org.dom4j.Document;
import org.dom4j.DocumentException;
import org.dom4j.Element;
import org.dom4j.io.SAXReader;

import java.net.URL;
import java.util.Iterator;

/**
 * @author: markus
 * @date: 2023/10/7 8:47 PM
 * @Description:
 * @Blog: https://markuszhang.com
 * It's my honor to share what I've learned with you!
 */
public class ClassPathXmlResource implements Resource {

    Document document;
    Element rootElement;
    Iterator<Element> elementIterator;

    public ClassPathXmlResource(String pathname) {
        SAXReader saxReader = new SAXReader();
        URL xmlPath = this.getClass().getClassLoader().getResource(pathname);
        try {
            this.document = saxReader.read(xmlPath);
            this.rootElement = document.getRootElement();
            this.elementIterator = this.rootElement.elementIterator();
        } catch (DocumentException e) {
            e.printStackTrace();
        }
    }

    @Override
    public boolean hasNext() {
        return this.elementIterator.hasNext();
    }

    @Override
    public Object next() {
        return this.elementIterator.next();
    }
}
XmlBeanDefinitionReader
package com.tiny.spring.beans.factory.xml;

import com.tiny.spring.beans.factory.BeanFactory;
import com.tiny.spring.beans.factory.config.BeanDefinition;
import com.tiny.spring.core.io.Resource;
import org.dom4j.Element;

/**
 * @author: markus
 * @date: 2023/10/7 8:50 PM
 * @Description:
 * @Blog: https://markuszhang.com
 * It's my honor to share what I've learned with you!
 */
public class XmlBeanDefinitionReader {
    BeanFactory beanFactory;

    public XmlBeanDefinitionReader(BeanFactory beanFactory) {
        this.beanFactory = beanFactory;
    }

    public void loadBeanDefinitions(Resource resource) {
        while (resource.hasNext()) {
            Element element = (Element) resource.next();
            String beanId = element.attributeValue("id");
            String className = element.attributeValue("class");
            BeanDefinition beanDefinition = new BeanDefinition(beanId, className);
            this.beanFactory.registerBeanDefinition(beanDefinition);
        }
    }
}
BeanFactory
package com.tiny.spring.beans.factory;

import com.tiny.spring.beans.BeansException;
import com.tiny.spring.beans.factory.config.BeanDefinition;

/**
 * @author: markus
 * @date: 2023/10/7 8:43 PM
 * @Description: IoC底层容器的根类
 * @Blog: https://markuszhang.com
 * It's my honor to share what I've learned with you!
 */
public interface BeanFactory {
    /**
     * 根据beanName获取Bean实例
     * @param beanName
     * @return
     * @throws BeansException
     */
    Object getBean(String beanName) throws BeansException;

    /**
     * 注册Bean配置元信息
     * @param beanDefinition
     */
    void registerBeanDefinition(BeanDefinition beanDefinition);
}
ClassPathXmlApplicationContext
package com.tiny.spring.context.support;

import com.tiny.spring.beans.BeansException;
import com.tiny.spring.beans.factory.BeanFactory;
import com.tiny.spring.beans.factory.config.BeanDefinition;
import com.tiny.spring.beans.factory.support.SimpleBeanFactory;
import com.tiny.spring.beans.factory.xml.XmlBeanDefinitionReader;
import com.tiny.spring.core.io.ClassPathXmlResource;
import com.tiny.spring.core.io.Resource;
import org.dom4j.Document;
import org.dom4j.DocumentException;
import org.dom4j.Element;
import org.dom4j.io.SAXReader;

import java.net.URL;
import java.util.ArrayList;
import java.util.HashMap;
import java.util.List;
import java.util.Map;

/**
 * @author: markus
 * @date: 2023/10/7 8:16 PM
 * @Description: 基于xml的Spring应用上下文
 * @Blog: https://markuszhang.com
 * It's my honor to share what I've learned with you!
 */
public class ClassPathXmlApplicationContext implements BeanFactory {
    BeanFactory beanFactory;

    public ClassPathXmlApplicationContext(String pathname) {
        Resource resource = new ClassPathXmlResource(pathname);
        BeanFactory beanFactory = new SimpleBeanFactory();
        XmlBeanDefinitionReader reader = new XmlBeanDefinitionReader(beanFactory);
        reader.loadBeanDefinitions(resource);
        this.beanFactory = beanFactory;
    }

    /**
     * 对外提供的方法,让外部程序获取Bean实例
     *
     * @param beanName
     * @return
     */
    public Object getBean(String beanName) throws BeansException {
        return this.beanFactory.getBean(beanName);
    }

    @Override
    public void registerBeanDefinition(BeanDefinition beanDefinition) {
        this.beanFactory.registerBeanDefinition(beanDefinition);
    }
}
功能验证

四、本文总结
可以看到,经过上述构建,我们在使用一个对象时不需要再去手动new一个了,只需要进行一些简单的配置将其交给框架容器去管理就可以获取我们所需的对象。通过功能解耦,我们定义出以下几个核心类:
- BeanFactory : 底层根容器
- SimpleBeanFactory : 容器的实现类
- ClassPathXmlApplicationContext : 应用层容器,交付给上层程序调用
- Resource : 外部资源对象抽象
- ClassPathXmlResource : 外部Xml资源对象
- XmlBeanDefinitionLoader : xml文件加载,并解析为BeanDefinition
通过功能解耦,我们后续对容器进行扩展时就会更方便,适配更多的场景。
就这样,一个简易的IoC容器就实现了,接下来我们就一步一步的将其他功能添加上去,让一颗小树苗发育成一个参天大树。
完整代码参见:https://github.com/markuszcl99/tiny-spring


 995
995


 被折叠的 条评论
为什么被折叠?
被折叠的 条评论
为什么被折叠?
 到【灌水乐园】发言


