


记录学习过程中的小案例。持续更新 ~ ~ ~
一、事件
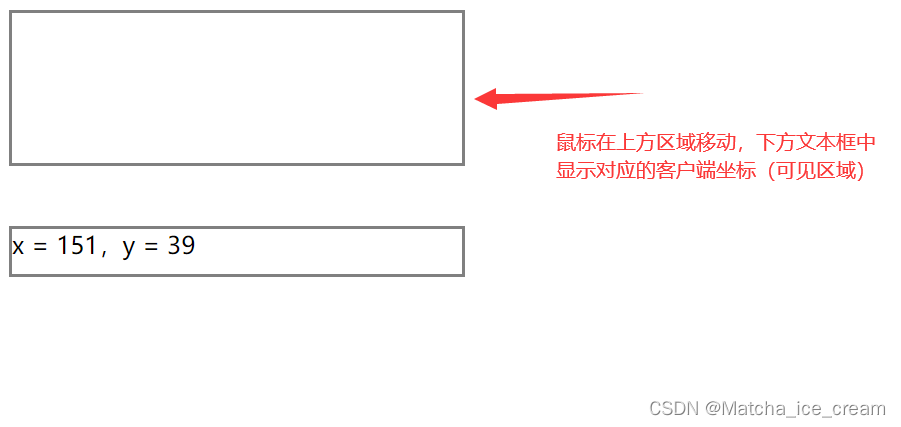
1. 显示鼠标区域移动坐标
代码展示:
<!DOCTYPE html>
<html lang="en">
<head>
  <meta charset="UTF-8">
  <meta http-equiv="X-UA-Compatible" content="IE=edge">
  <meta name="viewport" content="width=device-width, initial-scale=1.0">
  <title>鼠标移动事件</title>
</head>
<style>
  #moveArea {
    width: 300px;
    height: 100px;
    border: 2px solid gray;
  }
  #showArea {
    width: 300px;
    height: 30px;
    border: 2px solid grey;
    margin-top: 40px;
  }
</style>
<script>
  window.onload = function() {
    let moveArea = document.getElementById("moveArea");
    let showArea = document.getElementById("showArea");
    let x, y;
    moveArea.onmousemove = function(e) {
      e = e || window.e; //为了兼容性
      x = e.clientX;
      y = e.clientY;
      showArea.innerHTML = "x = " + x +  ",y = " + y;
    }
  }
</script>
<body>
  <div id="moveArea"></div>
  <div id="showArea"></div>

</body>
</html>
显示效果:
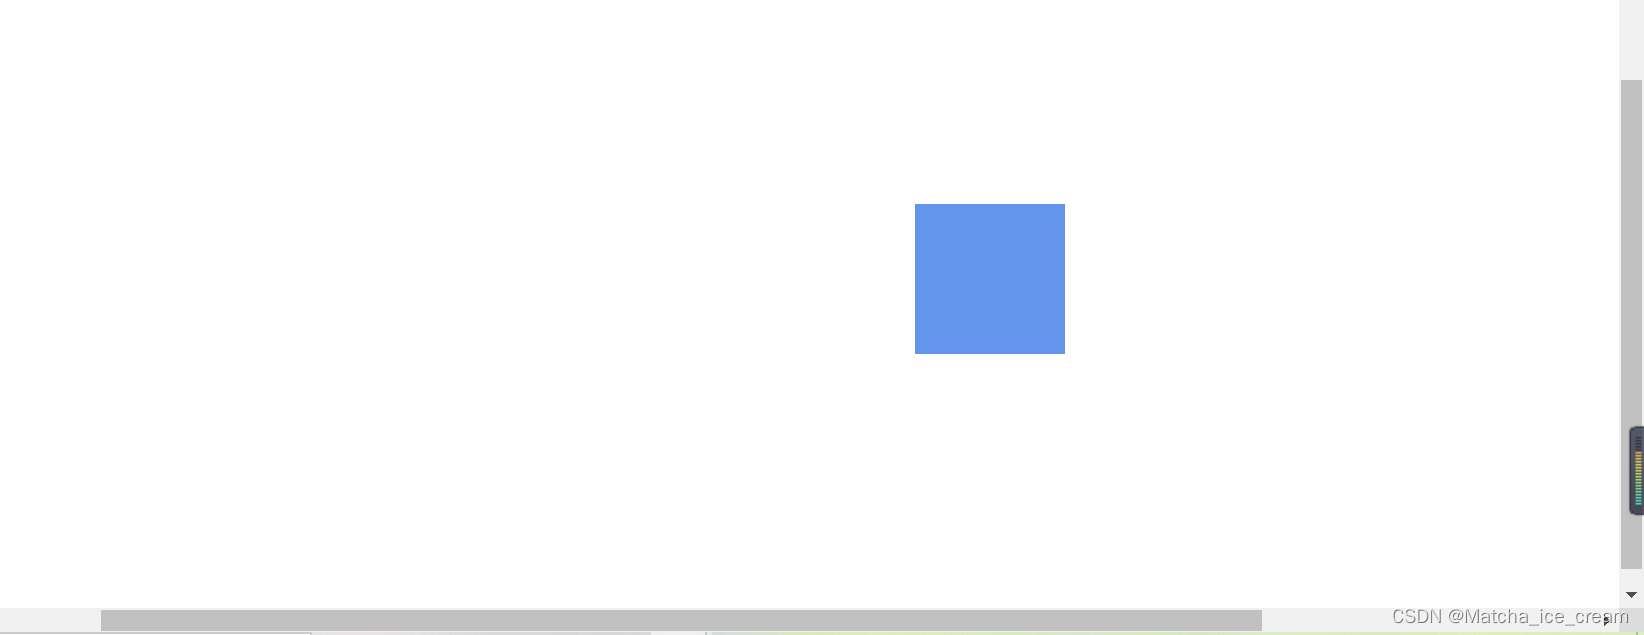
2. div跟随鼠标移动
方案一:使用clientX、clientY,需计算scrollTop和scrollLeft的值
方案一代码展示:
<!DOCTYPE html>
<html lang="en">
<head>
  <meta charset="UTF-8">
  <meta http-equiv="X-UA-Compatible" content="IE=edge">
  <meta name="viewport" content="width=device-width, initial-scale=1.0">
  <title>div随鼠标移动</title>
</head>
<style>
  #div {
    position: absolute;
    width: 100px;
    height: 100px;
    background-color: cornflowerblue;
  }
</style>
<script>
  window.onload = function() {
    let div = document.getElementById("div");
    document.onmousemove = function(e) {
      let x = e.clientX; //获取可视区域的客户端坐标
      let y = e.clientY;
      let st = document.documentElement.scrollTop; //获取html的scrollTop值,而非body的
      let sl = document.documentElement.scrollLeft;
      div.style.left = x + sl + "px";  //注意,一定要加上px,不然没有效果
      div.style.top = y + st + "px";
    }
  }
</script>
<body style="height: 1000px; width: 2000px;">
  <div id="div"></div>
</body>
</html>
方案二:使用pageX、pageY,很方便
方案二代码展示:
<!DOCTYPE html>
<html lang="en">
<head>
  <meta charset="UTF-8">
  <meta http-equiv="X-UA-Compatible" content="IE=edge">
  <meta name="viewport" content="width=device-width, initial-scale=1.0">
  <title>div随鼠标移动</title>
</head>
<style>
  #div {
    position: absolute;
    width: 100px;
    height: 100px;
    background-color: cornflowerblue;
  }
</style>
<script>
  window.onload = function() {
    let div = document.getElementById("div");
    document.onmousemove = function(e) {
      let x = e.pageX; //获取页面坐标
      let y = e.pageY;
      div.style.left = x + "px";  //注意,一定要加上px,不然没有效果
      div.style.top = y + "px";
    }
  }
</script>
<body style="height: 1000px; width: 2000px;">
  <div id="div"></div>
</body>
</html>
显示效果: div跟随鼠标移动
3. 鼠标拖拽事件
分析:
鼠标拖拽事件可以分为以下几步:
1)鼠标按下时,开始拖拽
2)鼠标移动时,被拖拽元素跟随其移动
3)鼠标松开时,被拖拽元素固定在原位置
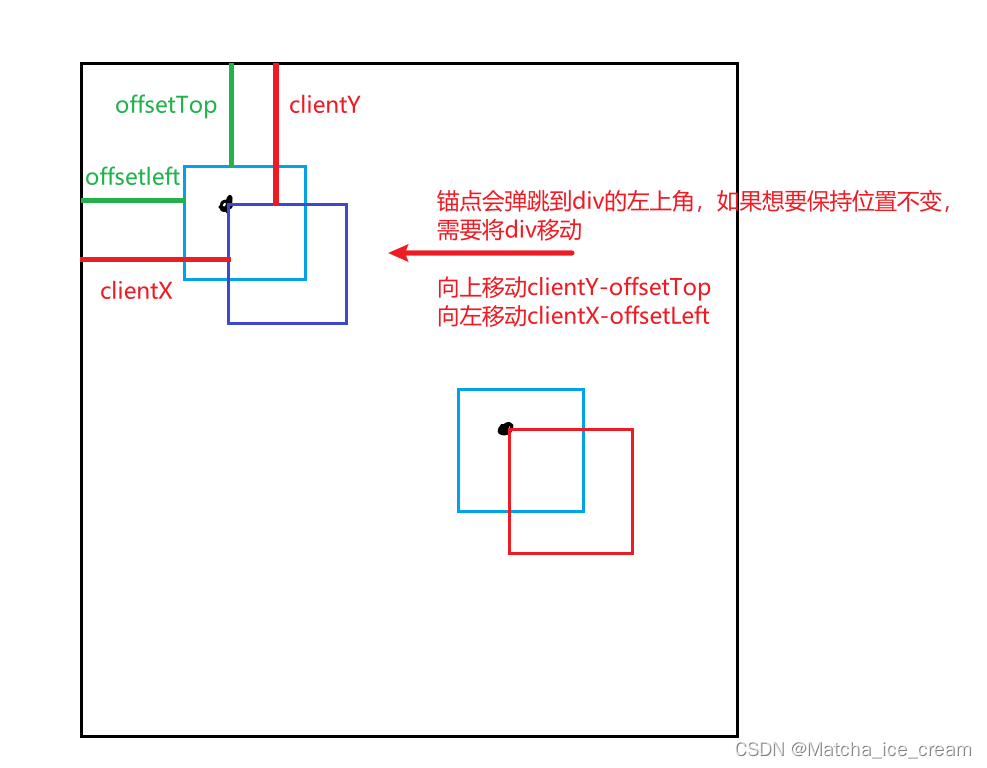
案例过程中的鼠标分析:
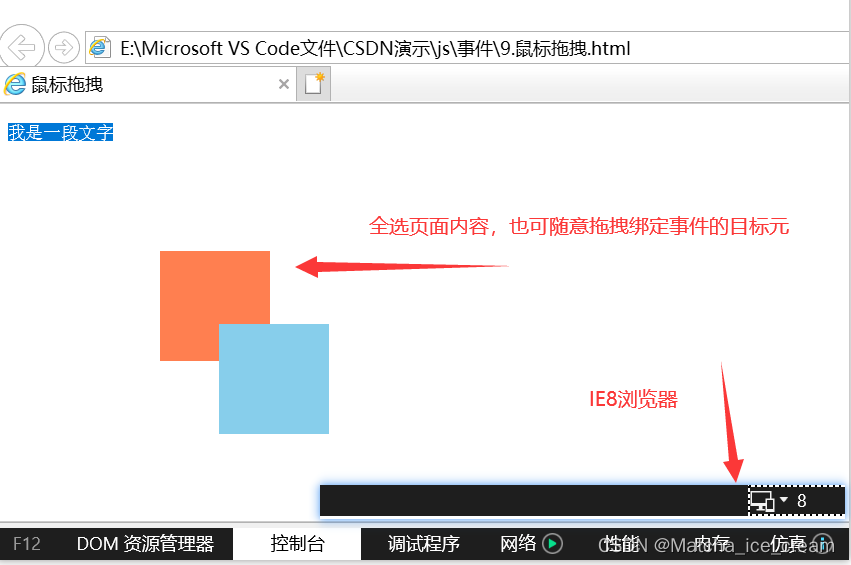
在拖拽过程中,可以发现鼠标锚点总是会弹跳到被拖拽元素的左上角,需要进一步优化,使拖拽过程中鼠标锚点不再弹跳。
分析如下:
具体代码展示:
<!DOCTYPE html>
<html lang="en">
<head>
<meta charset="UTF-8">
<meta http-equiv="X-UA-Compatible" content="IE=edge">
<meta name="viewport" content="width=device-width, initial-scale=1.0">
<title>鼠标拖拽</title>
</head>
<style>
#box1 {
position: absolute;
width: 100px;
height: 100px;
background-color: coral;
}
#box2 {
position: absolute;
width: 100px;
height: 100px;
background-color: skyblue;
top: 200px;
left: 200px;
}
</style>
<script>
window.onload = function () {
//鼠标拖拽事件分析:
/**
* 1.鼠标按下时,即开始拖拽
* 2.鼠标移动时,被拖拽元素跟随鼠标移动
* 3.鼠标松开时,被拖拽元素固定在原位置
*/
var box1 = document.getElementById("box1");
box1.onmousedown = function (event) {
//给document绑定一个onmousemove事件
//从开始点击拖拽时,就确定鼠标锚点的相对位置
event = event || window.event;
var ol = event.clientX - box1.offsetLeft;
var ot = event.clientY - box1.offsetTop;
//针对IE8进行全选时,取消默认行为,使用setCapture;
box1.setCapture && box1.setCapture();
//执行过程是这样的,先判断box1.setCapture是否为true,如果为true,则执行box1.setCapture
//setCapture()函数,就是把所有的事件都包揽给自己
document.onmousemove = function (event) {
event = event || window.event;
var left = event.clientX;
var top = event.clientY;
box1.style.left = left - ol + "px";
box1.style.top = top - ot + "px";
}
//为document元素绑定一个松开事件
document.onmouseup = function () {
document.onmousemove = null;
document.onmouseup = null;
//需要取消鼠标松开事件,否则,点击文档任意部分,松开鼠标就会触发鼠标松开事件
box1.releaseCapture && box1.releaseCapture();
//鼠标松开后,取消releaseCapture()事件,执行过程同setCapture类似
}
return false; //取消浏览器的默认行为
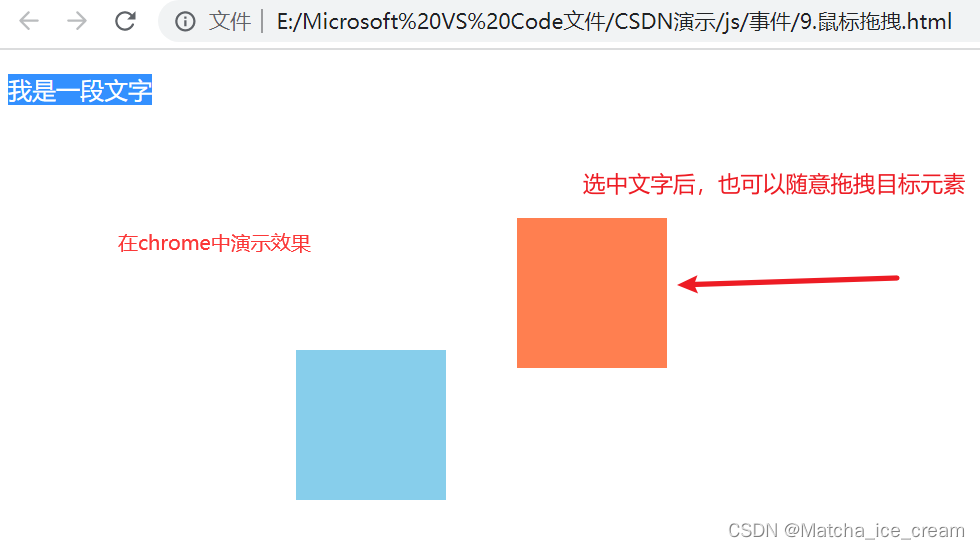
//引入的情况:当页面中有文字时,全选页面内容,会拖动文字和div盒子,
//使用return false,取消默认事件行为,但是对于IE8不起作用
}
}
</script>
<body>
<p>我是一段文字</p>
<div id="box1"></div>
<div id="box2"></div>
</body>
</html>
展示效果:
Chrome中:
IE8中:
封装一个用于拖拽的函数:
代码展示:
<!DOCTYPE html>
<html lang="en">
<head>
  <meta charset="UTF-8">
  <meta http-equiv="X-UA-Compatible" content="IE=edge">
  <meta name="viewport" content="width=device-width, initial-scale=1.0">
  <title>鼠标拖拽</title>
</head>
<style>
  #box1 {
    position: absolute;
    width: 100px;
    height: 100px;
    background-color: coral;
  }
  #box2 {
    position: absolute;
    width: 100px;
    height: 100px;
    background-color: skyblue;
    top: 200px;
    left: 200px;
  }
</style>
<script>
  window.onload = function () {
    //鼠标拖拽事件分析:
    /**
     * 1.鼠标按下时,即开始拖拽
     * 2.鼠标移动时,被拖拽元素跟随鼠标移动
     * 3.鼠标松开时,被拖拽元素固定在原位置
     */
    var box1 = document.getElementById("box1");
    var box2 = document.getElementById("box2");
    drag(box1);
    drag(box2);
  }
  //提取一个用来设置拖拽的函数
  function drag(obj) {
      obj.onmousedown = function (event) {
        //给document绑定一个onmousemove事件
        //从开始点击拖拽时,就确定鼠标锚点的相对位置
        event = event || window.event;
        var ol = event.clientX - obj.offsetLeft;
        var ot = event.clientY - obj.offsetTop;

        //针对IE8进行全选时,取消默认行为,使用setCapture;
        obj.setCapture && obj.setCapture();
        //执行过程是这样的,先判断box1.setCapture是否为true,如果为true,则执行box1.setCapture
        //setCapture()函数,就是把所有的事件都包揽给自己

        document.onmousemove = function (event) {
          event = event || window.event;
          var left = event.clientX;
          var top = event.clientY;
          obj.style.left = left - ol + "px";
          obj.style.top = top - ot + "px";
        }
        //为document元素绑定一个松开事件
        document.onmouseup = function () {
          document.onmousemove = null;
          document.onmouseup = null;
          //需要取消鼠标松开事件,否则,点击文档任意部分,松开鼠标就会触发鼠标松开事件

          obj.releaseCapture && obj.releaseCapture();
          //鼠标松开后,取消releaseCapture()事件,执行过程同setCapture类似
        }

        return false; //取消浏览器的默认行为
        //引入的情况:当页面中有文字时,全选页面内容,会拖动文字和div盒子,
        //使用return false,取消默认事件行为,但是对于IE8不起作用
      }

    }
</script>

<body>
  <p>我是一段文字</p>
  <div id="box1"></div>
  <div id="box2"></div>
</body>

</html>
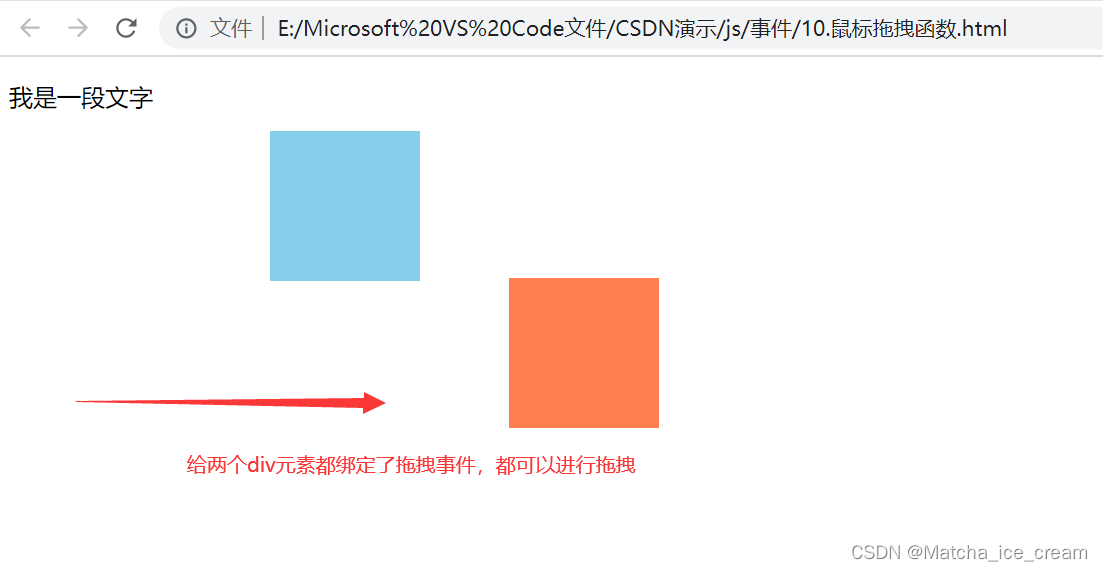
显示效果:
给元素调用拖拽函数,即可进行拖拽效果
4. 键盘移动div
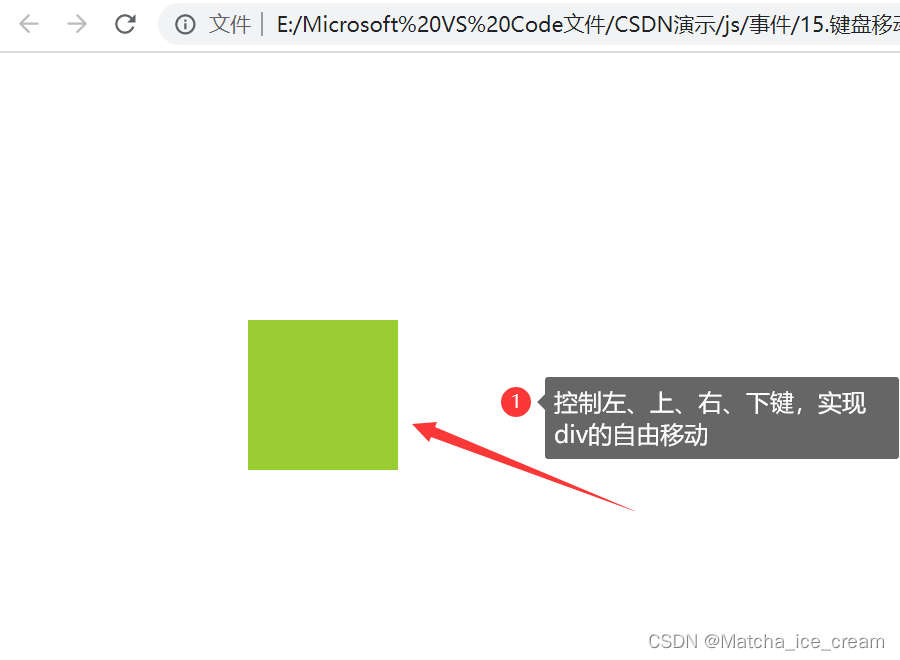
实现的效果:当按下左键时,div向左移动;按下上键时,div向上移动;按下右键时,div向右移动;按下下键时,div向下移动。
代码展示:
<!DOCTYPE html>
<html lang="en">
<head>
  <meta charset="UTF-8">
  <meta http-equiv="X-UA-Compatible" content="IE=edge">
  <meta name="viewport" content="width=device-width, initial-scale=1.0">
  <title>键盘移动div</title>
</head>
<style>
  #box1 {
    position: absolute;
    width: 100px;
    height: 100px;
    background-color: yellowgreen;
  }
</style>
<script>
  window.onload = function() {
    /**
     * 实现功能:
     * 1.当点击左键时,div向左移动
     * 2.当点击上键时,div向上移动
     * 3.当点击右键时,div向右移动
     * 4.当点击下键时,div向下移动
     * keyCode:左:37 上:38 右:39 下:40 从左开始,顺时针记忆
    */
    var box1 = document.getElementById("box1");
    var speed = 10;
    document.onkeydown = function(event) {
      switch(event.keyCode) {
        case 37:
          box1.style.left = box1.offsetLeft - speed + "px";
          break;
        case 38:
          box1.style.top = box1.offsetTop - speed + "px";
          break;
        case 39:
          box1.style.left = box1.offsetLeft + speed + "px";
          break;
        case 40:
          box1.style.top = box1.offsetTop + speed + "px";
      }
    }
  }
</script>
<body>
  <div id="box1"></div>
</body>
</html>
显示效果:
二、动画
1. 封装简单动画函数
动画函数的封装
animate.js文件
// 主要进行简单动画函数的封装
/*
  业务实现:封装的animate动画主要实现obj对象简单的左右移动的功能
  其中,obj为目标对象;target为对象需要移动的目标;
  callback为回调函数,可以在动画结束后实现相关的操作
 */
function animate(obj, target, callback) {

  // 清除在此之前的定时器,保证一次只开一个定时器
  clearInterval(obj.timer);
  //使用定时器实现左右移动,其中,给每一个对象设置一个定时器
  obj.timer = setInterval(() => {

    //这里让动画减速运行,每次运行时,步长按规律减小,但是这样的话,步长值可能有小数,需要取整
    var step = (target - obj.offsetLeft) / 10;

    //对步长值取整。向右移动时,向上取整(Math.ceil);向左移动时,向下取整(Math.floor)
    step = step > 0 ? Math.ceil(step) : Math.floor(step);

    if(obj.offsetLeft == target) {
      // 如果到达目的地之后,清除动画
      clearInterval(obj.timer);
      if(callback) {
        // 如果传入的参数有回调函数,则调用回调函数
        callback();
      }
    }

    // obj.style.left获取的是具有定位属性的父元素的左边距。
    // 并且obj.style.left是可读写的;而obj.offsetLeft是只读的属性,返回值为数值
    obj.style.left = obj.offsetLeft + step + 'px';  // 每调用一次,就会计算一下left值
  }, 15);
}
使用animation.js中的动画效果
<!DOCTYPE html>
<html lang="en">
<head>
<meta charset="UTF-8">
<title>animate动画实现</title>
</head>
<style>
span {
display: block;
position: relative;
top: 50px;
left: 0;
width: 200px;
height: 200px;
background-color: #42b983;
}
</style>
<script src="animate.js"></script>
<body>
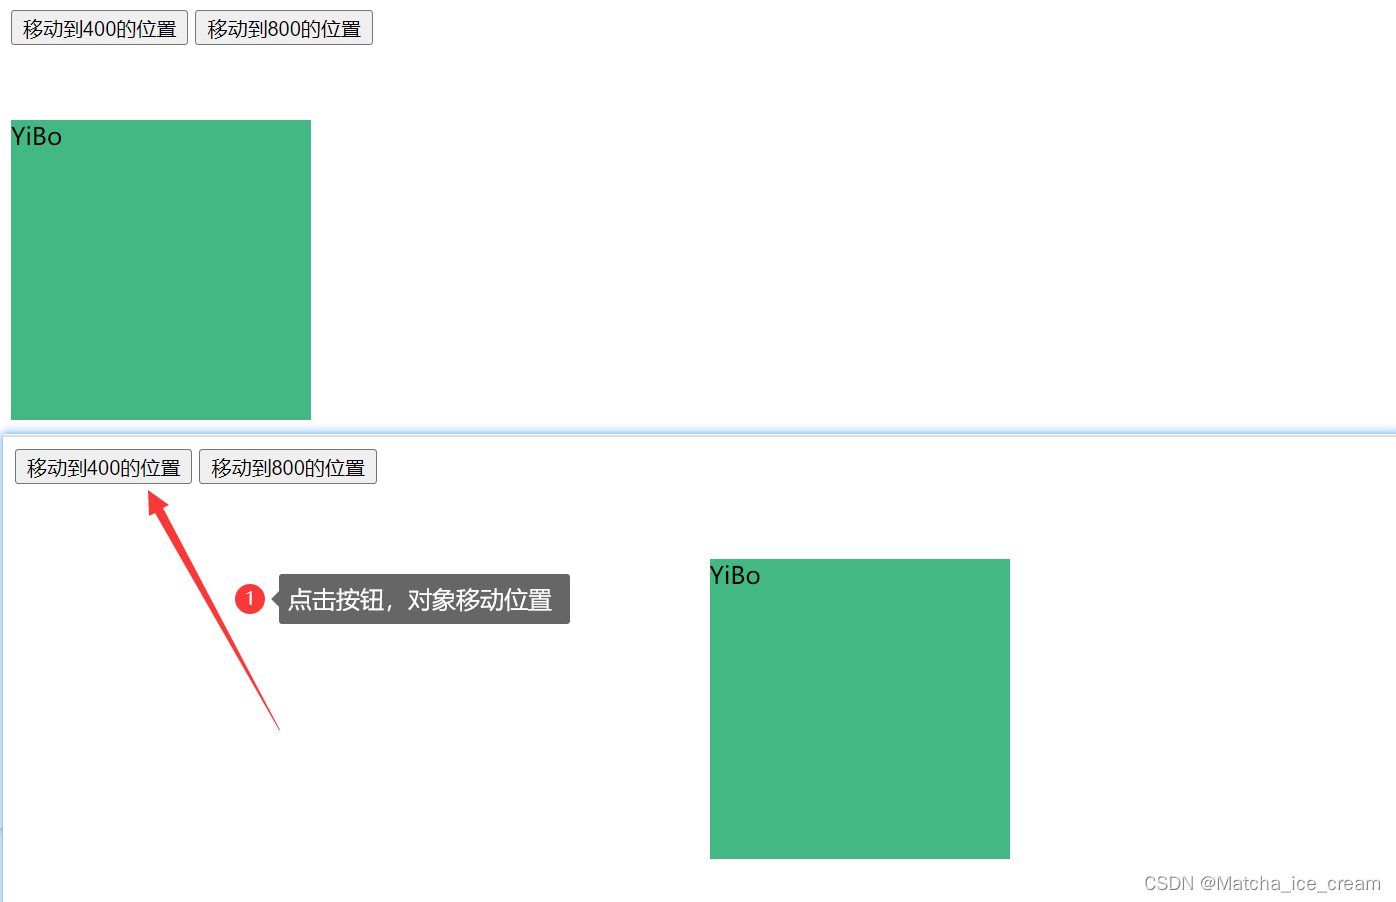
<button class="btn400">移动到400的位置</button>
<button class="btn800">移动到800的位置</button>
<span>YiBo</span>
<script>
window.addEventListener('load', function (){
// var btn400 = document.getElementById('btn400');
// var box1 = document.getElementById('box1');
var btn400 = document.querySelector('.btn400');
var btn800 = document.querySelector('.btn800');
var span = document.querySelector('span');
btn400.addEventListener('click', function () {
animate(span, 400);
// alert("1");
});
btn800.addEventListener('click', function() {
animate(span, 800);
})
})
</script>
</body>
</html>
显示效果:


 7085
7085


 被折叠的 条评论
为什么被折叠?
被折叠的 条评论
为什么被折叠?
 到【灌水乐园】发言


