


Servlet
1. Servlet概述
- Servlet是JavaEE规范(接口)之一
- Servlet是JavaWeb三大组件之一,三大组件分别是Servlet程序、Filter过滤器、Listener监听器
- Servlet是运行在服务器上的一个Java程序,可以接收客户端发来的请求,并响应数据给客户端
2. 快速入门
步骤:
- 定义一个类,实现Servlet接口,并实现接口中的抽象方法
public class MyServletDemo1 implements Servlet {
    @Override
    public void init(ServletConfig servletConfig) throws ServletException {

    }

    @Override
    public ServletConfig getServletConfig() {
        return null;
    }

    @Override
    public void service(ServletRequest servletRequest, ServletResponse servletResponse) throws ServletException, IOException {
        System.out.println("你好,MyServletDemo1.....");
    }

    @Override
    public String getServletInfo() {
        return null;
    }

    @Override
    public void destroy() {

    }
}
- 在WEB-INF文件夹中的
web.xml文件中配置Servlet程序的访问地址
<?xml version="1.0" encoding="UTF-8"?>
<web-app xmlns="http://xmlns.jcp.org/xml/ns/javaee"
         xmlns:xsi="http://www.w3.org/2001/XMLSchema-instance"
         xsi:schemaLocation="http://xmlns.jcp.org/xml/ns/javaee http://xmlns.jcp.org/xml/ns/javaee/web-app_4_0.xsd"
         version="4.0">
    <!--配置Servlet-->
    <!--servlet标签给Tomcat配置Servlet程序-->
    <servlet>
        <!--servlet-name标签给Servlet程序起一个别名(一般是类名)-->
        <servlet-name>myServlet</servlet-name>
        <!--servlet-class标签是Servlet程序的全类名-->
        <servlet-class>com.ming.web.servlet.MyServletDemo1</servlet-class>
    </servlet>
    <!--servlet-mapping标签是servlet的映射,给Servlet程序配置访问地址-->
    <servlet-mapping>
        <!--此时servlet-name标签要与上一个servlet-name标签中相同-->
        <servlet-name>myServlet</servlet-name>
        <!--url-pattern标签配置访问地址:/myServlet,
            也就是说在浏览器的地址栏中输入'http://localhost:8080/servlet_demo_1/myServlet'访问到的是MyServletDemo1类-->
        <url-pattern>/myServlet</url-pattern>
    </servlet-mapping>
</web-app>
- 访问路径,输出结果。
你好,MyServletDemo1.....
3. 执行原理
简图:
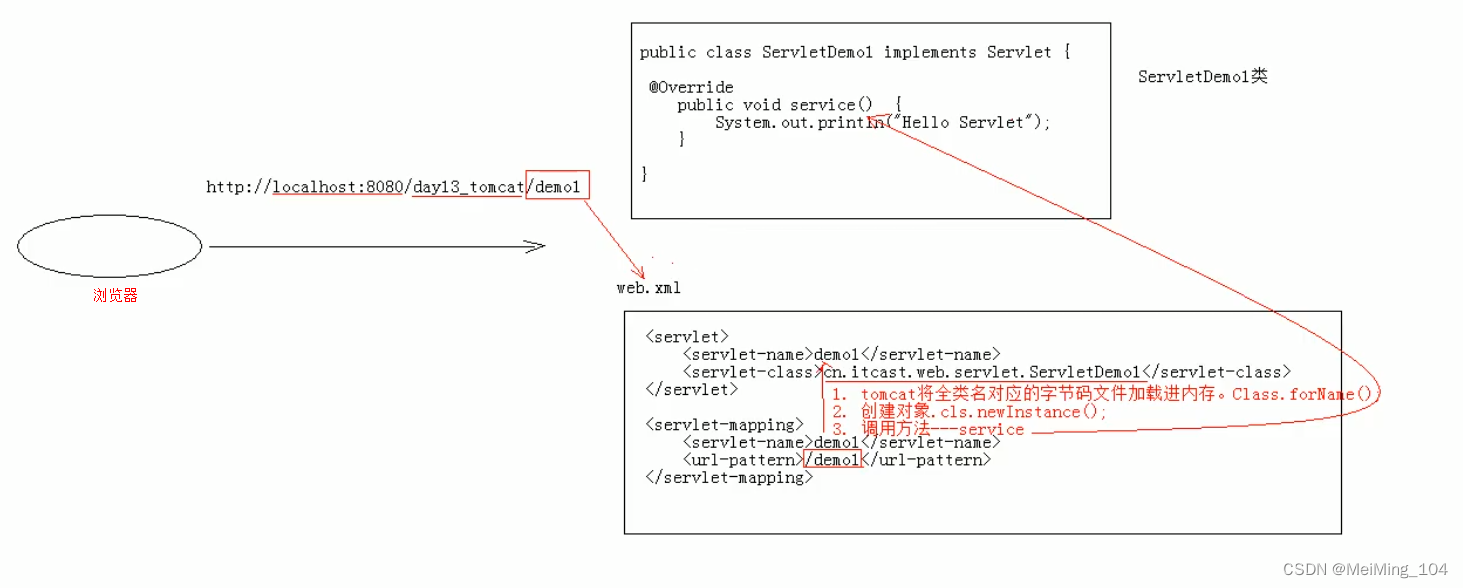
文字说明:
- 当服务器接收到客户端浏览器的请求后,会解析请求URL路径,获取访问的Servlet的资源路径
- 查找web.xml文件,是否有对应的 标签体内容
- 如果有,则在找到对应的全类名
- tomat会将字节码文件加载进内存,并且创建其对象
- 调用其方法
4. 生命周期方法
- 被创建:执行init方法,只执行一次
- Servlet什么时候被创建?
- 默认情况下,第一次被访问时,Servlet被创建
- 可以配置执行Servlet的创建时机。
<servlet>
    <servlet-name>myServlet</servlet-name>
    <servlet-class>com.ming.web.servlet.MyServletDemo1</servlet-class>
    <!--指定Servlet的创建时机
        1. 第一次被访问时,创建 :设置成负数
        2. 在服务器启动时,创建 :设置成正数或0
     -->
    <load-on-startup>1</load-on-startup>
</servlet>
- Servlet的init方法,只执行一次,说明一个Servlet在内存中只存在一个对象,Servlet是单例的。(多个用户同时访问时,可能存在线程安全问题)
- Servlet什么时候被创建?
- 提供服务:执行service方法,执行多次
- 每次访问Servlet时,service方法都会被调用一次。
- 被销毁:执行destroy方法,只执行一次
- Servlet被销毁时执行。服务器关闭时,Servlet被销毁
- 只有服务器正常关闭时,才会执行destroy方法
- destroy方法在Servlet被销毁之前执行,一般用于释放资源
5. Servlet3.0
- 好处:
- 支持注解配置。可以不需要web.xml.
- 步骤:
- 创建JavaEE项目,选择Servlet版本3.0以上,可以不创建web.xml
- 定义一个类,实现Servlet接口,实现抽象方法
- 在类上加上注解
@WebServlet("/资源路径")
代码展示:
@WebServlet("/myServletDemo3")
public class MyServletDemo3 implements Servlet {
    @Override
    public void init(ServletConfig servletConfig) throws ServletException {
    }
    @Override
    public ServletConfig getServletConfig() {
        return null;
    }
    @Override
    public void service(ServletRequest servletRequest, ServletResponse servletResponse) throws ServletException, IOException {
        System.out.println("注解配置.........");
    }
    @Override
    public String getServletInfo() {
        return null;
    }
    @Override
    public void destroy() {
    }
}
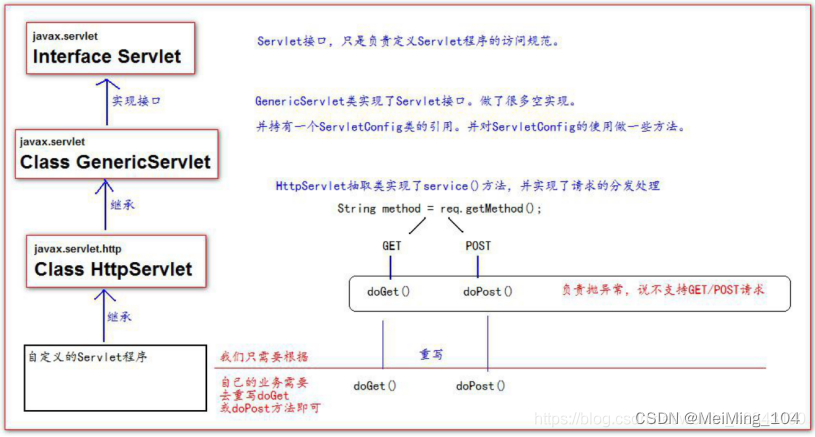
6. 体系结构
7. 相关配置
- urlpartten:Servlet访问路径
- 一个Servlet可以定义多个访问路径:
@WebServlet({"/d1","/dd1","/ddd1"}) - 路径定义规则:(/XXX,/XXX/XXX,*.do)
- 一个Servlet可以定义多个访问路径:
8. HTTP
8.1 概念
Hyper Transfer Protocol 超文本传输协议
- 传输协议:定义了,客户端和服务器端通信时,发送数据的格式。HTTP协议中的数据又称为报文
- 特点:
- 基于TCP/IP的高级协议
- 默认端口号:80
- 基于请求/响应模型的:一次请求对应一个响应
- 无状态的,每次请求之间相互独立,不能交互数据
- 历史版本:
- 1.0 : 每一次请求响应都会建立新的连接
- 1.1 : 复用连接(长连接)
请求消息数据格式:
字符串格式:
POST /myServletDemo2 HTTP/1.1
Host: localhost:8080
Connection: keep-alive
Content-Length: 12
Cache-Control: max-age=0
Upgrade-Insecure-Requests: 1
Origin: http://localhost:8080
Content-Type: application/x-www-form-urlencoded
User-Agent: Mozilla/5.0 (Windows NT 10.0; WOW64) AppleWebKit/537.36 (KHTML, like Gecko) Chrome/86.0.4240.198 Safari/537.36
Accept: text/html,application/xhtml+xml,application/xml;q=0.9,image/avif,image/webp,image/apng,*/*;q=0.8,application/signed-exchange;v=b3;q=0.9
Sec-Fetch-Site: same-origin
Sec-Fetch-Mode: navigate
Sec-Fetch-User: ?1
Sec-Fetch-Dest: document
Referer: http://localhost:8080/login.html
Accept-Encoding: gzip, deflate, br
Accept-Language: zh-CN,zh;q=0.9
说明:
-
请求行
请求方式 请求url 请求协议/版本
GET /myServletDemo1 HTTP/1.1- 请求方式:
- HTTP协议有7种请求方式,常用的有2种
- GET
- 请求参数在请求行中,在url后。
- 请求的url长度有限制的
- 不太安全
- POST
- 请求参数在请求体中。
- 请求的url长度没有限制
- 相对安全
- GET
- HTTP协议有7种请求方式,常用的有2种
- 请求方式:
-
请求头:客户端浏览器告诉服务器一些信息
请求头名称:请求头值
Host: localhost:8080- 常见的请求头:
- User-Agent:浏览器告诉服务器,我访问你使用的浏览器版本信息
- 作用:可以在服务器端获取该头的信息,解决浏览器的兼容性问题
Referer: http://localhost:8080/login.html: 告诉服务器,我(当前请求)从哪里来?- 作用:防盗链,统计工作
- User-Agent:浏览器告诉服务器,我访问你使用的浏览器版本信息
- 常见的请求头:
-
请求空行
空行,就是用于分割POST请求的请求头和请求体的。 -
请求体(正文)
GET :没有请求体
POST :请求体是请求参数
8.2 Request
(1) request对象和response对象的原理
- request和response对象是由服务器创建的。我们来使用它们
- request对象是来获取请求消息,response对象是来设置响应消息
(2) request的继承体系结构
	public interface ServletRequest{}
	public interface HttpServletRequest extends ServletRequest {}
	// 具体实现由tomcat来完成
	// org.apache.catalina.connector.RequestFacade
	public class RequestFacade implements HttpServletRequest {}
(3) request 功能:
-
获取请求行数据(GET /demo/myServletDemo1?name=zhansan HTTP/1.1)
String getMethod()- 获取请求方式:GETString getContextPath()- 获取虚拟目录:/demoString getServletPath()- 获取Servlet路径:/myServletDemo1String getQueryString()- 获取get方式请求参数:name=zhansanString getRequestURI()- 获取请求URI:/demo/myServletDemo1StringBuffer getRequestURL()- 获取请求URL: http://localhost:8080/demo/myServletDemo1String getProtocol()- 获取协议及版本:HTTP/1.1String getRemoteAddr()- 获取客户机的IP地址
最后两个是ServletRequest里的方法,其余的是HttpServletRequest里的方法
URL: 统一资源定位符:http://localhost:8080/demo/myServletDemo1 中华人民共和国
URI: 统一资源标识符:/demo/myServletDemo1 共和国代码展示:
// 获取请求行数据方法演示 @WebServlet("/requestServletDemo1") public class RequestServletDemo1 extends HttpServlet { protected void doPost(HttpServletRequest request, HttpServletResponse response) throws ServletException, IOException { } protected void doGet(HttpServletRequest request, HttpServletResponse response) throws ServletException, IOException { // 1. 获取请求方式:GET String method = request.getMethod(); System.out.println(method); // 2. 获取虚拟目录:/demo String contextPath = request.getContextPath(); System.out.println(contextPath); // 3. 获取Servlet路径:/requestServletDemo1 String servletPath = request.getServletPath(); System.out.println(servletPath); // 4. 获取get方式请求参数:name=zhansan String queryString = request.getQueryString(); System.out.println(queryString); // 5. 获取请求URI:/demo/requestServletDemo1 String requestURI = request.getRequestURI(); System.out.println(requestURI); // 6. 获取请求URL: http://localhost:8080/demo/requestServletDemo1 StringBuffer requestURL = request.getRequestURL(); System.out.println(requestURL); // 7. 获取协议及版本:HTTP/1.1 String protocol = request.getProtocol(); System.out.println(protocol); // 8. 获取客户机的IP地址:0:0:0:0:0:0:0:1 String remoteAddr = request.getRemoteAddr(); System.out.println(remoteAddr); } } -
获取请求头数据
String getHeader(String name): 通过请求头的名称获取请求头的值Enumeration<String> getHeaderNames(): 获取所有的请求头名称
代码展示:
// 获取请求头数据 方法演示 @WebServlet("/requestServletDemo2") public class RequestServletDemo2 extends HttpServlet { protected void doPost(HttpServletRequest request, HttpServletResponse response) throws ServletException, IOException { } protected void doGet(HttpServletRequest request, HttpServletResponse response) throws ServletException, IOException { // 演示获取请求头数据 // 1. 获取所有的请求头名称 Enumeration<String> headerNames = request.getHeaderNames(); // 2. 遍历 while(headerNames.hasMoreElements()){ String name = headerNames.nextElement(); // 根据名称获取请求头的值 String value = request.getHeader(name); System.out.println(name+":"+value); } } } // 利用user-agent解决版本兼容问题 @WebServlet("/requestServletDemo3") public class RequestServletDemo3 extends HttpServlet { protected void doPost(HttpServletRequest request, HttpServletResponse response) throws ServletException, IOException { } protected void doGet(HttpServletRequest request, HttpServletResponse response) throws ServletException, IOException { // 演示获取请求头数据 String agent = request.getHeader("user-agent"); // 判断agent 的浏览器版本 if (agent.contains("Chrome")){ // 谷歌 System.out.println("谷歌来了...."); }else if(agent.contains("Firefox")){ // 火狐 System.out.println("火狐来了...."); } } } // 利用请求头的referer,解决防盗链问题 @WebServlet("/requestServletDemo4") public class RequestServletDemo4 extends HttpServlet { protected void doPost(HttpServletRequest request, HttpServletResponse response) throws ServletException, IOException { } protected void doGet(HttpServletRequest request, HttpServletResponse response) throws ServletException, IOException { // 演示获取请求头数据 referer String referer = request.getHeader("referer"); System.out.println(referer); // 防盗链 if (referer!=null) { if (referer.contains("/demo")) { // 正常访问 System.out.println("播放电影...."); } else { // 盗链 System.out.println("无法观看...."); } } } } -
获取请求体数据
- 只有POST请求方式,才有请求体
- 步骤
- 获取流对象
BufferedReader getReader(): 获取字符输入流,只能操作字符数据ServletInputStream getInputStream(): 获取字节输入流,可以操作所有类型数据(文件上传)
- 再从流对象中拿数据
- 获取流对象
代码展示:
// 获取请求体数据
@WebServlet("/requestServletDemo5")
public class RequestServletDemo5 extends HttpServlet {
    protected void doPost(HttpServletRequest request, HttpServletResponse response) throws ServletException, IOException {
        // 获取请求消息体 -- 请求参数
        // 1. 获取字符流
        BufferedReader reader = request.getReader();
        // 2. 读取数据
        String line = null;
        while((line=reader.readLine())!=null){
            System.out.println(line);
        }
    }

    protected void doGet(HttpServletRequest request, HttpServletResponse response) throws ServletException, IOException {

    }
}
<!-- html页面 --> <form action="/demo/requestServletDemo5" method="post"> 名字:<input type="text" name="username"><br> 密码:<input type="text" name="password"><br> <input type="submit" value="注册"> </form> -
获取请求参数通用方式
String getParameter(String name):根据参数名称获取参数值,username=zs&password=123String[] getParameterValues(String name):根据参数名称获取参数值的数值,hobby=XX&hobby=YYEnumeration<String> getParameterNames():获取所有请求的参数名称Map<String, String[]> getParameterMap():获取所有参数的map集合
中文乱码问题
get方式:tomcat 8 已经将get方式乱码问题解决了
post方式:会乱码,解决:在获取参数前,设置request的编码request.setCharacterEncoding("utf-8");代码展示:
@WebServlet("/requestServletDemo6") public class RequestServletDemo6 extends HttpServlet { protected void doPost(HttpServletRequest request, HttpServletResponse response) throws ServletException, IOException { // 解决中文乱码问题 // get方式:tomcat 8 已经将get方式乱码问题解决了 // post方式:会乱码, // 解决:在获取参数前,设置request的编码 request.setCharacterEncoding("utf-8"); // 根据参数名称获取参数值 String username = request.getParameter("username"); System.out.println("post方式获取username:"+username); System.out.println("------------------------"); // 根据参数名称获取参数值的数值 String[] hobbies = request.getParameterValues("hobby"); System.out.println("hobby:"); for (String hobby : hobbies) { System.out.println(hobby); } System.out.println("------------------------"); // 获取所有请求的参数名称 Enumeration<String> parameterNames = request.getParameterNames(); while(parameterNames.hasMoreElements()){ String name = parameterNames.nextElement(); String[] values = request.getParameterValues(name); System.out.println(name); for (String value : values) { System.out.println(value); } System.out.println("*********"); } System.out.println("------------------------"); // 获取所有参数的map集合 Map<String, String[]> parameterMap = request.getParameterMap(); Set<String> keySet = parameterMap.keySet(); for (String name : keySet) { // 获取键,获取值 String[] values = parameterMap.get(name); System.out.println(name); for (String value : values) { System.out.println(value); } System.out.println("+++++++++"); } } protected void doGet(HttpServletRequest request, HttpServletResponse response) throws ServletException, IOException { // 根据参数名称获取参数值 // String username = request.getParameter("username"); // System.out.println("get方式获取username:"+username); this.doPost(request,response); } }<form action="/demo/requestServletDemo6" method="post"> 名字:<input type="text" name="username"><br> 密码:<input type="text" name="password"><br> 爱好:<input type="checkbox" name="hobby" value="game">游戏 <input type="checkbox" name="hobby" value="study">学习<br> <input type="submit" value="注册"> </form> -
请求转发:一种在服务器内部的资源跳转方式
- 步骤:
- 通过request对象获取请求转发器对象 :
RequestDispatcher getRequestDispatcher(String path) - 使用RequestDispatcher对象进行转发:
void forward(ServletRequest req, ServletResponse resp)
- 通过request对象获取请求转发器对象 :
- 特点:
- 浏览器地址栏路径不发生变化
- 只能转发到当前服务器内部资源中
- 转发是一次请求
代码展示:
// 请求路径 为 http://localhost:8081/demo/requestServletDemo7 @WebServlet("/requestServletDemo7") public class RequestServletDemo7 extends HttpServlet { protected void doPost(HttpServletRequest request, HttpServletResponse response) throws ServletException, IOException { System.out.println("demo777777被访问了。。。。。。。"); // RequestDispatcher requestDispatcher = request.getRequestDispatcher("/requestServletDemo8"); // requestDispatcher.forward(request,response); // 错误写法 // request.getRequestDispatcher("http://www.baidu.com").forward(request,response); request.getRequestDispatcher("/requestServletDemo8").forward(request,response); } protected void doGet(HttpServletRequest request, HttpServletResponse response) throws ServletException, IOException { this.doPost(request,response); } } @WebServlet("/requestServletDemo8") public class RequestServletDemo8 extends HttpServlet { protected void doPost(HttpServletRequest request, HttpServletResponse response) throws ServletException, IOException { System.out.println("demo888888被访问了。。。。。。。"); } protected void doGet(HttpServletRequest request, HttpServletResponse response) throws ServletException, IOException { this.doPost(request,response); } } - 步骤:
-
共享数据
- 域对象:一个有作用范围的对象,可以在范围内共享数据
- request域:代表一次请求的范围,一般用于请求转发的多个资源中共享数据
- 方法:
void setAttribute(String name, Object value):存储数据Object getAttribute(String name):通过键获取数据void removeAttribute(String name):通过键移除数据
代码展示:
// 请求路径 为 http://localhost:8081/demo/requestServletDemo7 @WebServlet("/requestServletDemo7") public class RequestServletDemo7 extends HttpServlet { protected void doPost(HttpServletRequest request, HttpServletResponse response) throws ServletException, IOException { System.out.println("demo777777被访问了。。。。。。。"); request.setAttribute("msg","hello!"); request.getRequestDispatcher("/requestServletDemo8").forward(request,response); } protected void doGet(HttpServletRequest request, HttpServletResponse response) throws ServletException, IOException { this.doPost(request,response); } } @WebServlet("/requestServletDemo8") public class RequestServletDemo8 extends HttpServlet { protected void doPost(HttpServletRequest request, HttpServletResponse response) throws ServletException, IOException { Object msg = request.getAttribute("msg"); System.out.println(msg); System.out.println("demo888888被访问了。。。。。。。"); } protected void doGet(HttpServletRequest request, HttpServletResponse response) throws ServletException, IOException { this.doPost(request,response); } } -
获取ServletContext
ServletContext getServletContext()
8.3 Response
HTTP/1.1 200
Content-Type: text/html;charset=utf-8
Content-Length: 30
Date: Tue, 17 Jan 2023 12:44:25 GMT
Keep-Alive: timeout=20
Connection: keep-alive

<h1>hello response,你好</h1>
数据格式:
-
响应行:
格式:协议/版本 响应状态码 状态码描述
响应状态码:服务器告诉客户端浏览器本次请求和响应的一个状态。响应码都是3位数字
分类:
1XX: 服务器接收客户端消息,但没有接收完成,等待一段事件后,发送1XX状态码
2XX: 成功。代表:200
3XX: 重定向。代表:302(重定向),304(访问缓存)
4XX: 客户端错误。代表:404(请求路径没有对应的资源),405(请求方式没有对应的doXxx方法)
5XX: 服务器端错误。代表:500(服务器内部出现异常) -
响应头:
格式:头名称:值
常见的响应头:Content-Type:服务器告诉客户端本次响应体数据格式以及编码格式
Content-disposition: 服务器告诉客户端以什么格式打开响应体数据。
值:1.in-line:默认值,在当前页面内打开
2.attchment;filename=xxx: 以附件形式打开响应体。文件下载。 -
响应空行:
-
响应体:传输的数据
Response对象
功能:设置响应消息
- 设置响应行
- 格式:HTTP/1.1 200 OK
void setStatus(int var1):设置状态码
- 设置响应头
void setHeader(String name, String value)
- 设置响应体
- 步骤:
- 获取输出流
- 字符输出流:
PrintWriter getWriter() - 字节输出流:
ServletOutputStream getOutputStream()
- 字符输出流:
- 使用输出流,将数据输出到客户端浏览器
案例:
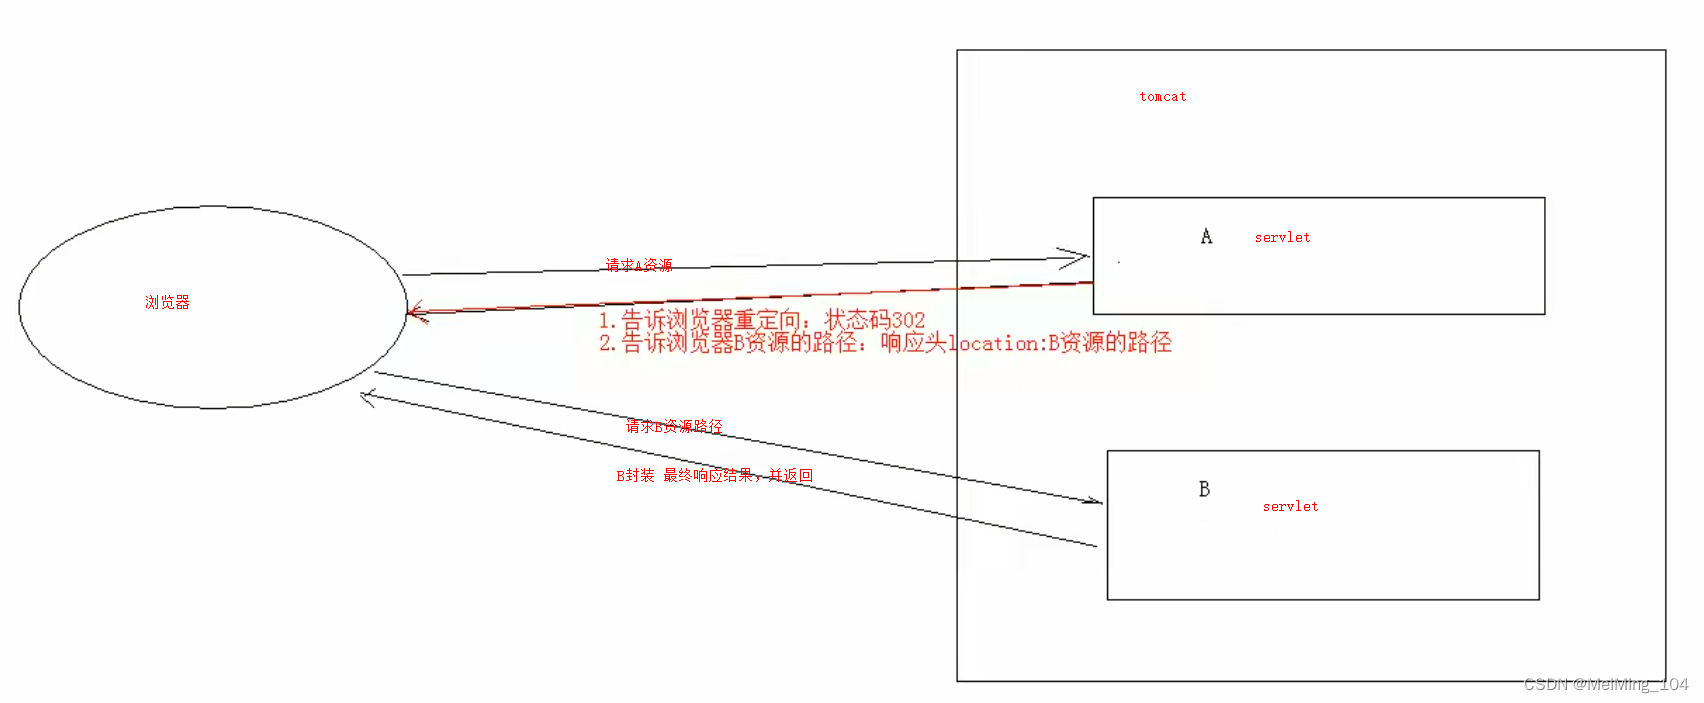
(1) 完成重定向
-
重定向:资源跳转的方式
-
简图展示:
-
代码实现
@WebServlet("/responseServletDemo1") public class ResponseServletDemo1 extends HttpServlet { protected void doPost(HttpServletRequest request, HttpServletResponse response) throws ServletException, IOException { System.out.println("ResponseServletDemo1......."); // 访问responseServletDemo1, 会自动跳转到/responseServletDemo2资源 // 1. 设置状态码为302 // response.setStatus(302); // 2. 设置响应头location // response.setHeader("location","/demo3/responseServletDemo2"); // 简化 response.sendRedirect("/demo3/responseServletDemo2"); } protected void doGet(HttpServletRequest request, HttpServletResponse response) throws ServletException, IOException { this.doPost(request,response); } } @WebServlet("/responseServletDemo2") public class ResponseServletDemo2 extends HttpServlet { protected void doPost(HttpServletRequest request, HttpServletResponse response) throws ServletException, IOException { System.out.println("ResponseServletDemo2......."); } protected void doGet(HttpServletRequest request, HttpServletResponse response) throws ServletException, IOException { this.doPost(request,response); } } -
重定向的特点,(与转发相反)
- 地址栏发送变化
- 重定向可以访问其他站点(服务器)的资源
- 重定向是两次请求。不能使用request对象共享数据。
-
路径的写法:
- 路径分类
- 相对路径:通过相对路径不可以确定唯一资源
- 如:
./index.html - 不以
/开头,以.开头的路径 - 规则:找到当前资源和目标资源之间的相对位置关系
./: 当前目录../: 后退一级目录
- 如:
- 绝对路径:通过绝对路径可以确定唯一资源
- 如:
http://localhost/demo3/responseServletDemo1 - 以
/开头的路径 - 规则:判断定义的路径是给谁用?(判断请求将来从哪儿发出)
- 给客户端浏览器使用,需要加虚拟目录(项目的访问路径),因为存在多个相同的名字,需要在前面限定一下
- 建议虚拟目录动态获取,
request.getContextPath() - 使用场景:a标签,form表单标签,重定向
- 建议虚拟目录动态获取,
- 给服务器使用,不需要加虚拟目录
- 使用场景:转发路径
- 给客户端浏览器使用,需要加虚拟目录(项目的访问路径),因为存在多个相同的名字,需要在前面限定一下
- 如:
(2) 服务器输出字符数据到浏览器
- 步骤:
- 获取字符输出流
- 输出数据
问题:中文乱码
原因:编码解码使用的字符集不一致,浏览器的字符集默认GBK(gb2312),而服务器端response.getWriter(),获取流的编码默认使用ISO-8859-1
- 代码展示:
@WebServlet("/responseServletDemo3")
public class ResponseServletDemo3 extends HttpServlet {
    protected void doPost(HttpServletRequest request, HttpServletResponse response) throws ServletException, IOException {
        // 解决中文乱码问题:
        // 方案1:在获取流对象之前,设置流的默认编码ISO-8859-1 -> GBK(知道浏览器以什么字符集解码时才能用)
//        response.setCharacterEncoding("GBK");

        // 方案2:
//        response.setCharacterEncoding("utf-8");
        // 告诉浏览器,服务器发送的消息体数据的编码,建议浏览器使用该编码解码
//        response.setHeader("content-type","text/html;charset=utf-8");

        // 简化方案2:
        response.setContentType("text/html;charset=utf-8");

        // 1. 获取字符输出流
        PrintWriter pw = response.getWriter();
        // 2. 输出数据
        pw.write("<h1>hello response,你好</h1>");
    }

    protected void doGet(HttpServletRequest request, HttpServletResponse response) throws ServletException, IOException {
        this.doPost(request,response);
    }
}
(3) 服务器输出字节数据到浏览器
- 步骤:
- 获取字节输出流
- 输出数据
- 代码展示:
@WebServlet("/responseServletDemo4")
public class ResponseServletDemo4 extends HttpServlet {
    protected void doPost(HttpServletRequest request, HttpServletResponse response) throws ServletException, IOException {
        response.setContentType("text/html;charset=utf-8");
        ServletOutputStream outputStream = response.getOutputStream();
        outputStream.write("hi,你好".getBytes("utf-8"));
    }

    protected void doGet(HttpServletRequest request, HttpServletResponse response) throws ServletException, IOException {
        this.doPost(request,response);
    }
}
(4) 验证码
- 目的:防止恶意表单注册
- 代码展示:
@WebServlet("/checkCodeServlet") public class CheckCodeServlet extends HttpServlet { protected void doPost(HttpServletRequest request, HttpServletResponse response) throws ServletException, IOException { int width = 100; int height = 50; // 1. 创建 一对象,在内存中图片 BufferedImage image = new BufferedImage(width, height, BufferedImage.TYPE_INT_BGR); // 2. 美化图片 // 2.1 填充背景色 Graphics graphics = image.getGraphics(); // 画笔对象 graphics.setColor(Color.PINK); // 设置画笔颜色 graphics.fillRect(0,0,width,height); // 2.2 画边框 graphics.setColor(Color.BLUE); graphics.drawRect(0,0,width-1,height-1); // 2.3 写验证码 String str = "ABCDEFGHIJKLMNOPQRSTUVWXYZabcdefghijklmnopqrstuvwxyz1234567890"; Random random = new Random(); for (int i = 1; i <=4 ; i++) { int index = random.nextInt(str.length()); // 获取字符 char ch = str.charAt(index); graphics.drawString(ch+"",width/5*i,height/2); } // 2.4 画干扰线 graphics.setColor(Color.GREEN); // 随机生成坐标点 for (int i = 0; i <10 ; i++) { int x1 = random.nextInt(width); int x2 = random.nextInt(width); int y1 = random.nextInt(height); int y2 = random.nextInt(height); graphics.drawLine(x1,y1,x2,y2); } // 3. 将图片输出到页面展示 ImageIO.write(image,"jpg",response.getOutputStream()); } protected void doGet(HttpServletRequest request, HttpServletResponse response) throws ServletException, IOException { this.doPost(request,response); } }<!DOCTYPE html> <html lang="en"> <head> <meta charset="UTF-8"> <title>验证码</title> <script> /** * 分析: * 点击超链接或图片,需要换一张 * 1. 给超链接或图片绑定单击事件 * 2. 重新设置图片的src属性值 */ window.onload = function () { // 获取图片对象 var img = document.getElementById("checkCode"); // 绑定单机事件 img.onclick = function change() { // 加时间戳,保证点击获取不一样的验证码 var date = new Date().getTime() console.log("date:", date) img.src = "/demo3/checkCodeServlet?" + date } } </script> </head> <body> <img id="checkCode" src="/demo3/checkCodeServlet" alt=""> <a id="change" href="javascript:;" onclick="document.getElementById('checkCode').src ='/demo3/checkCodeServlet?dt='+(new Date()).getTime()">看不清,换一张</a> </body> </html>
8.4 ServletContext
- 概念:代表整个web应用,可以和程序的容器(服务器)来通信
- 获取ServletContext对象
- 通过request对象获取
request.getServletContext() - 通过HttpServlet获取
this.getServletContext()
- 通过request对象获取
- 功能
- 获取MIME类型
- MIME 类型: 在互联网通信过程中定义的一种文件数据类型
- 格式: 大类型/小类型 text/html,image/jpeg…
- 获取 :
String getMimeType(String file) - 代码展示
- MIME 类型: 在互联网通信过程中定义的一种文件数据类型
@WebServlet("/servletContextDemo2") public class ServletContextDemo2 extends HttpServlet { protected void doPost(HttpServletRequest request, HttpServletResponse response) throws ServletException, IOException { ServletContext context = this.getServletContext(); String filename = "a.jpg"; String mimeType = context.getMimeType(filename); System.out.println(mimeType); // image/jpeg } protected void doGet(HttpServletRequest request, HttpServletResponse response) throws ServletException, IOException { this.doPost(request,response); } }-
域对象:共享数据
setAttribute(String name,Object value)getAttribute(String name)removeAttribute(String name)
范围:所有用户请求的数据
-
获取文件的真实(服务器)路径
- 代码展示:
@WebServlet("/servletContextDemo5") public class ServletContextDemo5 extends HttpServlet { protected void doPost(HttpServletRequest request, HttpServletResponse response) throws ServletException, IOException { ServletContext context = this.getServletContext(); String bPath = context.getRealPath("/b.txt"); System.out.println(bPath); // E:\Workspaces\IdeaWorkspace\java_web_project\out\artifacts\servlet_demo_3_war_exploded\b.txt String cPath = context.getRealPath("/WEB-INF/c.txt"); System.out.println(cPath); // E:\Workspaces\IdeaWorkspace\java_web_project\out\artifacts\servlet_demo_3_war_exploded\WEB-INF\c.txt String aPath = context.getRealPath("/WEB-INF/classes/a.txt"); System.out.println(aPath); // E:\Workspaces\IdeaWorkspace\java_web_project\out\artifacts\servlet_demo_3_war_exploded\WEB-INF\classes\a.txt } protected void doGet(HttpServletRequest request, HttpServletResponse response) throws ServletException, IOException { this.doPost(request,response); } } - 获取MIME类型
综合案例:文件下载:
需求:
- 页面显示超链接
- 点击超链接后弹出下载提示框
- 完成图片文件下载
分析:
- 超链接指向的资源如果能被浏览器解析,则在浏览器中展示,如果不能解析,则弹出下载提示框。不满足需求
- 任何资源都必须弹出下载提示框
- 使用响应头设置资源的打开方式:
content-disposition:attachment;filename=xxx
步骤:
- 定义页面,编辑超链接
href属性,指向Servlet,传递资源名称filename - 定义Servlet
- 获取文件名称
- 使用字符输入流加载进内存
- 指定response的响应头:
content-disposition:attachment;filename=xxx - 将数据写出到response输出流
注意问题:中文文件名问题
解决思路:
- 获取客户端使用的浏览器版本信息
- 根据不同的版本信息,设置filename的编码方式不同
代码展示:
<!DOCTYPE html>
<html lang="en">
<head>
    <meta charset="UTF-8">
    <title>文件下载</title>
</head>
<body>
<p>浏览器默认解析,如果不能解析,则下载</p>
<a href="/demo4/img/1.jpg">图片</a>
<a href="/demo4/img/1.mp3">音乐</a>
<hr>
<p>不管可否解析,都以文件下载的形式,打开</p>
<a href="/demo4/downLoadServlet?filename=1.jpg">图片2</a>
<a href="/demo4/downLoadServlet?filename=1.mp3">音乐2</a>
<hr>
<p>中文问题</p>
<a href="/demo4/downLoadServlet?filename=图片.jpg">图片3</a>
</body>
</html>
@WebServlet("/downLoadServlet")
public class DownLoadServlet extends HttpServlet {
    protected void doPost(HttpServletRequest request, HttpServletResponse response) throws ServletException, IOException {
        // 1. 获取请求参数
        String filename = request.getParameter("filename");
        // 2. 使用字节输入流加载进内存
        // 2.1 找到文件服务器路径
        ServletContext context = this.getServletContext();
        String realPath = context.getRealPath("/img/" + filename);
        // 2.2 用字节流关联
        FileInputStream fis = new FileInputStream(realPath);

        // 3. 设置response响应头
        // 3.1 设置响应头类型:content-type
        String mimeType = context.getMimeType(filename);  // 获取mime类型
        response.setContentType(mimeType);
        // 3.2 设置响应头打开方式:content-disposition

        // 解决中文文件名问题
        //   1. 获取user-agent请求头
        String agent = request.getHeader("user-agent");
        //   2. 使用工具类方法编码文件名即可
        filename = DownLoadUtils.getFileName(agent,filename);
        response.setHeader("content-disposition","attachment;filename="+filename);
        // 4. 将输入流的数据写出到输出流中
        ServletOutputStream sos = response.getOutputStream();
        byte[] bytes = new byte[1024 * 8];
        int len =0;
        while((len= fis.read(bytes))!=-1){
            sos.write(bytes,0,len);
        }
        fis.close();
    }

    protected void doGet(HttpServletRequest request, HttpServletResponse response) throws ServletException, IOException {
        this.doPost(request, response);
    }
}


 2141
2141


 被折叠的 条评论
为什么被折叠?
被折叠的 条评论
为什么被折叠?
 到【灌水乐园】发言


