


NGINX相关配置
全局配置
NGINX配置信息
nginx 官方帮助文档:http://nginx.org/en/docs/

Nginx的配置文件的组成部分:
主配置文件:/conf/nginx.conf(/nginx/conf/nginx.conf)
子配置文件: include conf.d/*.conf

#事件驱动相关的配置   同步
event {
worker_connections 1024; #一次允许1024个执行
 ...
}

#http/https 协议相关配置段
http {
server{
location{}
}
 ...
}

#默认配置文件不包括下面两个块
#mail 协议相关配置段
mail {
 ...
}

#stream 服务器相关配置段
stream {负载均衡
 ...
}
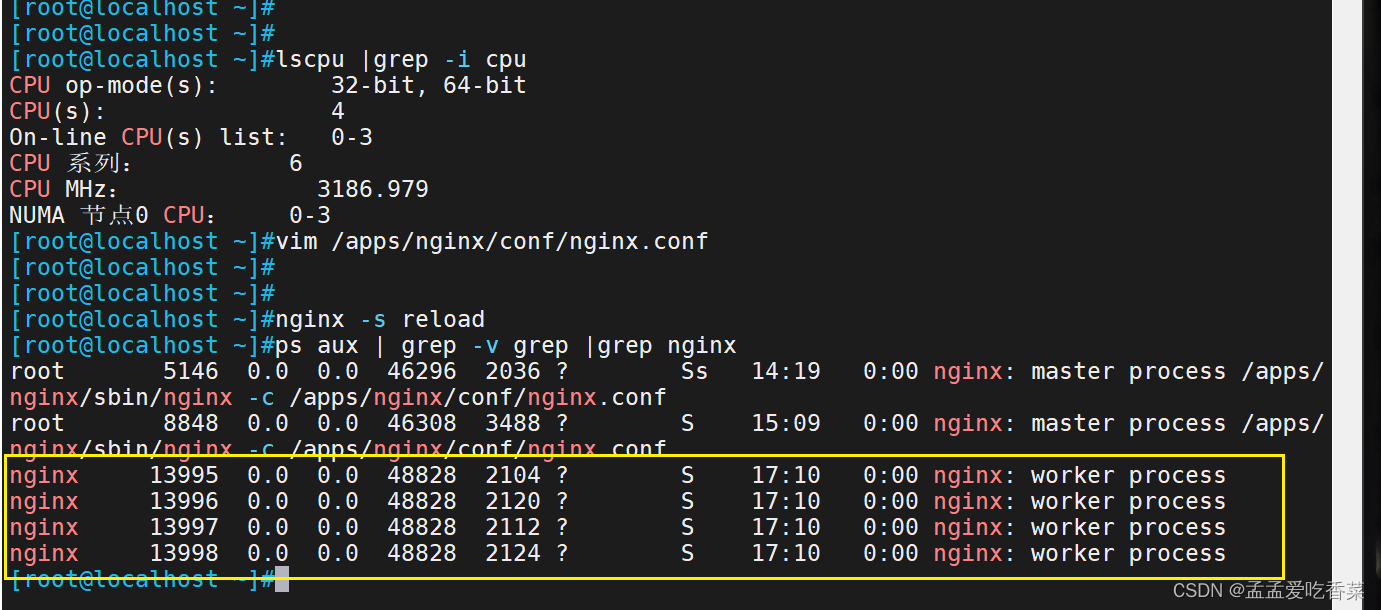
修改启动进程数
lscpu |grep -i cpu  #查看cup核数
[root@localhost ~]vim /apps/nginx/conf/nginx.conf
#开启 两核
#user  nobody;
worker_processes  4;  #根据CPU核数修改
worker_processes auto;  #如果设置为auto  就是你真实的cpu数量
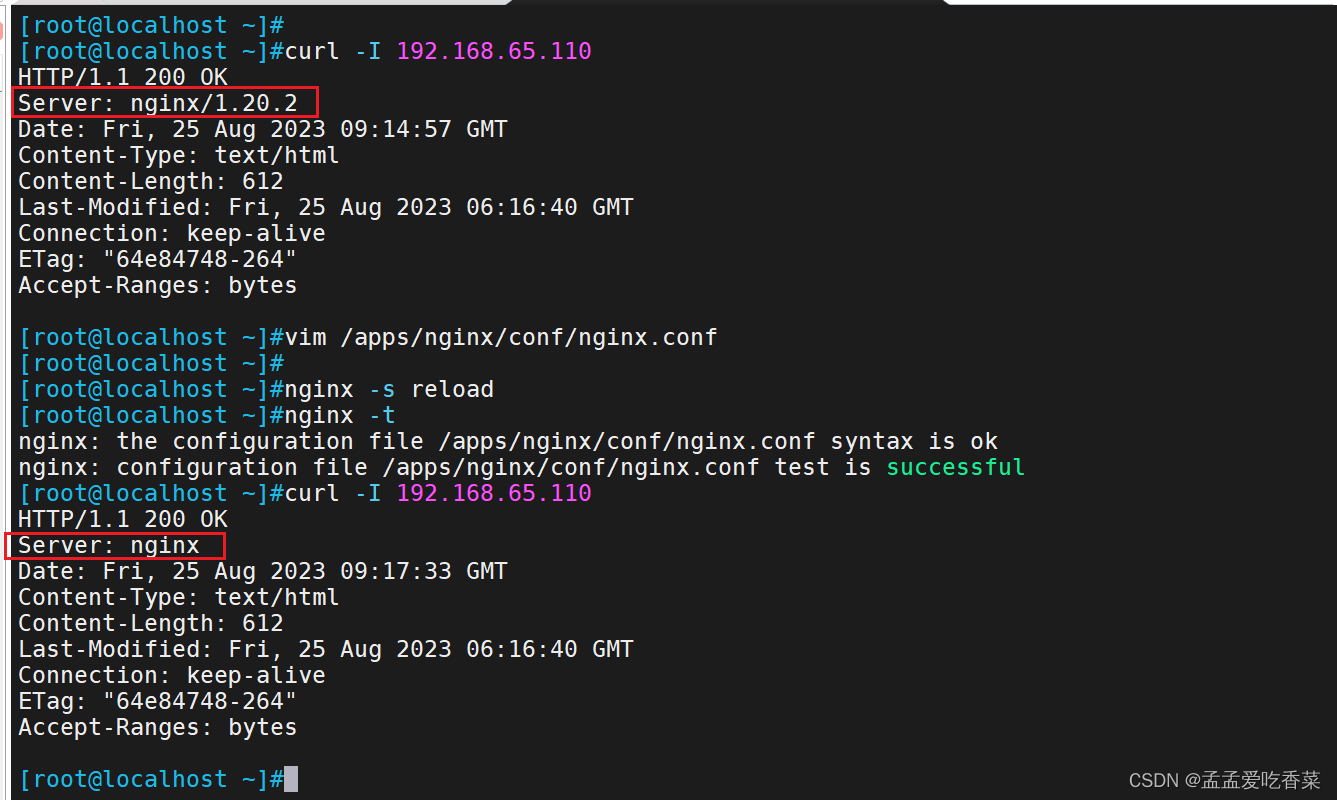
关闭或修改版本
关闭版本
vim /apps/nginx/conf/nginx.conf
#修改配置文件 放在 http语句中
http {
server_tokens off;
}
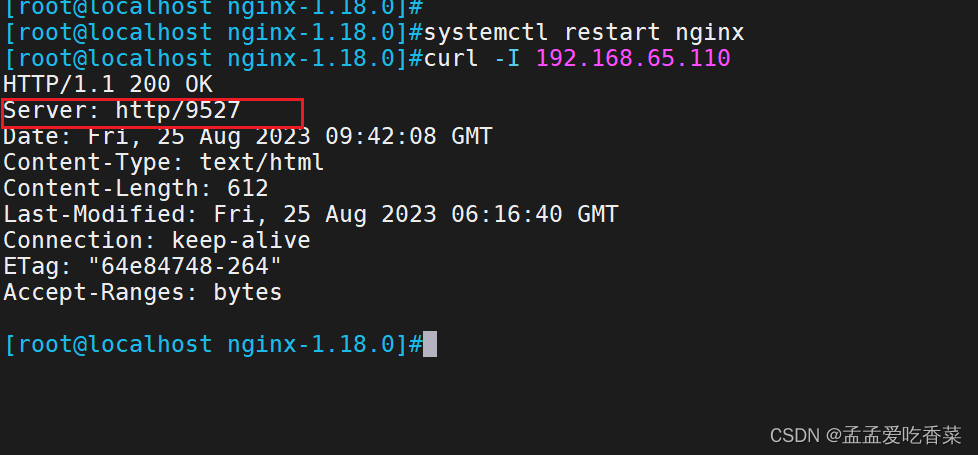
nginx -s reload
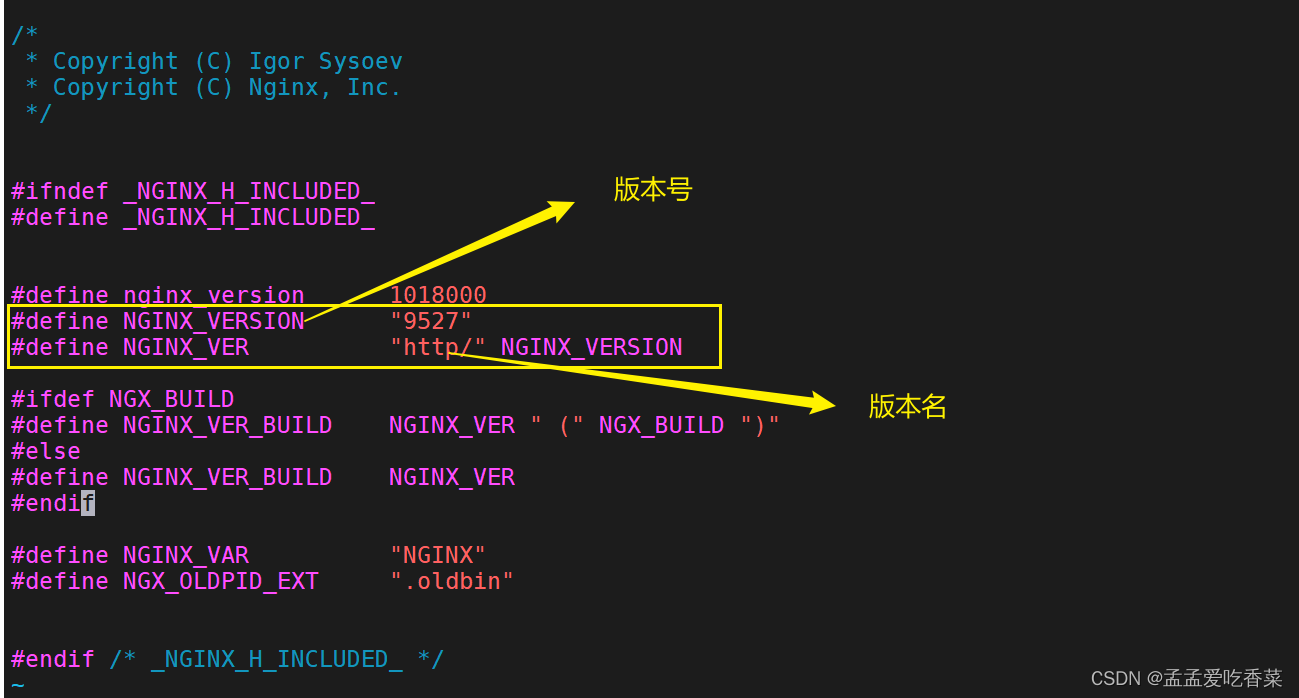
修改版本
#在安装包中
[root@localhost core] vim /opt/nginx-1.18.0/src/core/nginx.h
#define NGINX_VERSION "9527"
#define NGINX_VER "http/" NGINX_VERSION
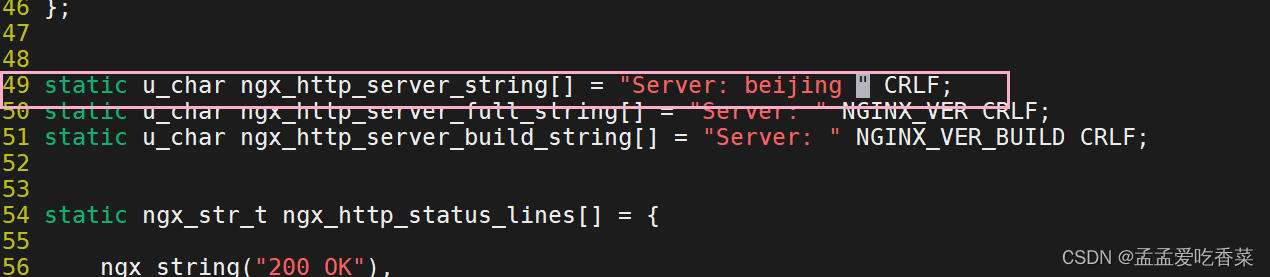
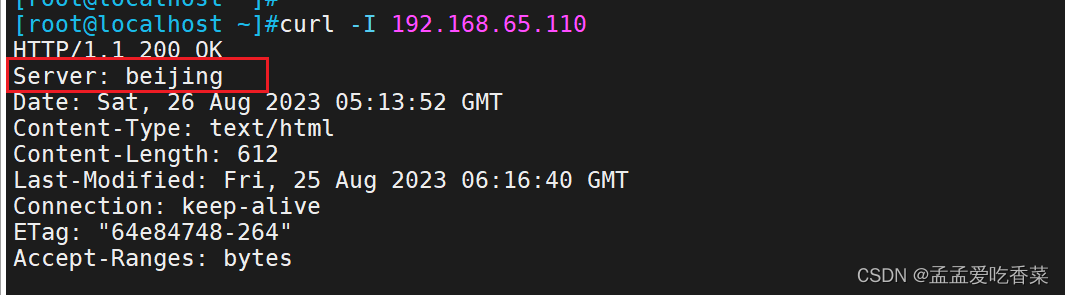
[root@localhost core] vim /opt/nginx-1.18.0/src/http/ngx_http_header_filter_module.c
static u_char ngx_http_server_string[] = "Server: beijing " CRLF;
[root@localhost nginx-1.18.0]./configure --prefix=/apps/nginx --user=nginx --group=nginx --with-http_ssl_module --with-http_v2_module --with-http_realip_module --with-http_stub_status_module --with-http_gzip_static_module --with-pcre --with-stream --with-stream_ssl_module --with-stream_realip_module
[root@localhost nginx-1.18.0]make && make install
修改pid文件路径
mkdir /apps/nginx/run/ #创建目录
vim /apps/nginx/conf/nginx.conf #修改配置文件
pid   /apps/nginx/run/nginx.pid; #找到 pid的位置修改
[root@localhost ~]#nginx -s reload
CPU与work进程绑定
默认Nginx是不进行进程绑定的,但是绑定了以后可以可以保证此进程不会运行在其他核心上,这就极大减少了nginx的工作进程在不同的cpu核心上的来回跳转,减少了CPU对进程的资源分配与回收以及内存管理等,因此可以有效的提升nginx服务器的性能。
CPU序号:
CPU MASK: 00000001:0号CPU
00000010:1号CPU
................
10000000:7号CPU
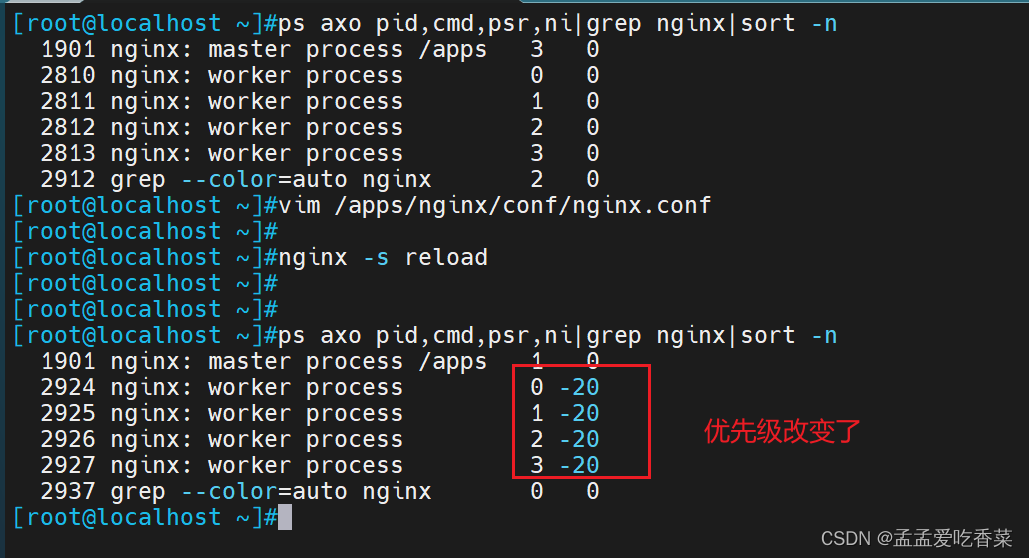
ps axo pid,cmd,psr,ni|grep -v grep |grep nginx|sort -n #这个命令可以查看每个进程占用的是那个CPU
[root@localhost ~]vim /apps/nginx/conf/nginx.conf
worker_cpu_affinity 00000001 00000010 00000100 00001000;
[root@localhost ~]nginx -s reload

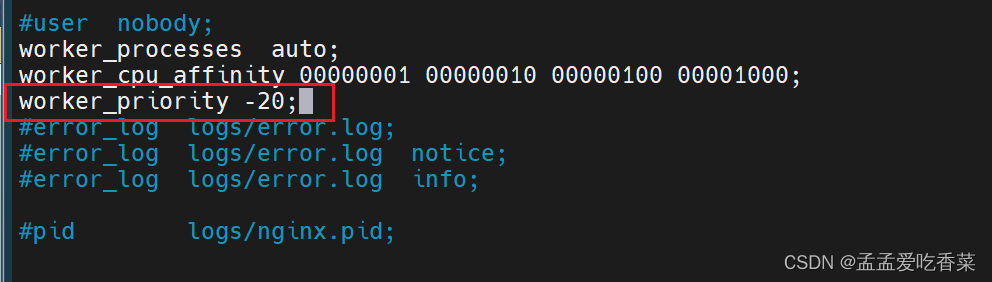
进程的优先级
nice的优先级范围是:-20~19

[root@localhost ~] ps axo pid,cmd,psr,ni|grep nginx|sort -n #查看优先级
[root@localhost ~]vim /apps/nginx/conf/nginx.conf
worker_priority -20; #将优先级调为-20
[root@localhost ~]nginx -s reload
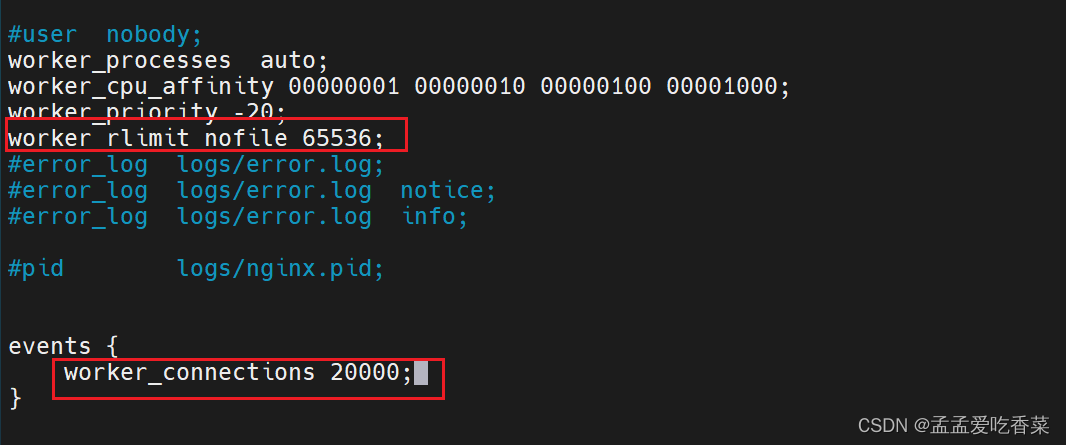
调试work进程打开的文件个数
[root@localhost ~]vim /apps/nginx/conf/nginx.conf
worker_rlimit_nofile 65536; #一次允许65536访问
events {
worker_connections 20000; #最大连接数
}
[root@localhost security]#nginx -s reload
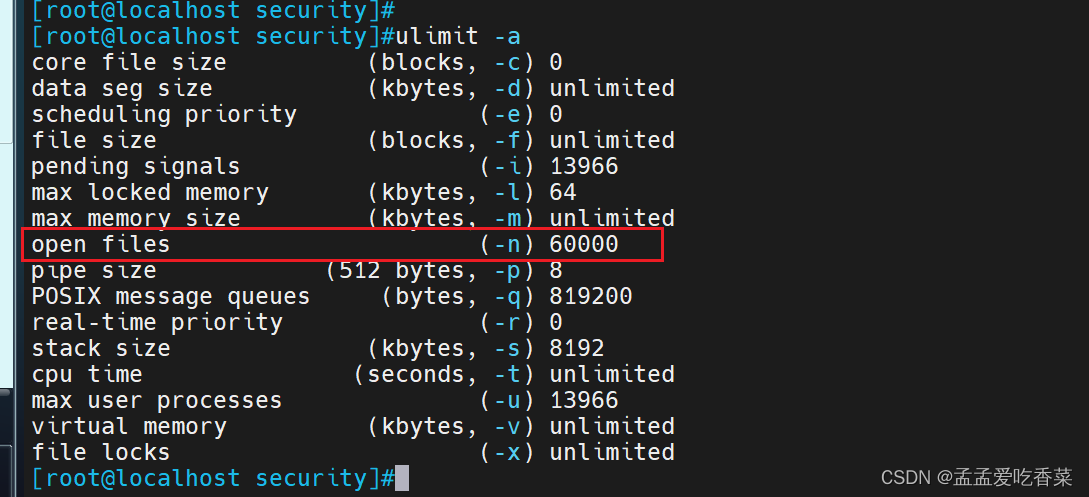
临时修改
[root@localhost ~]#ulimit -n 60000 #只修改当前窗口
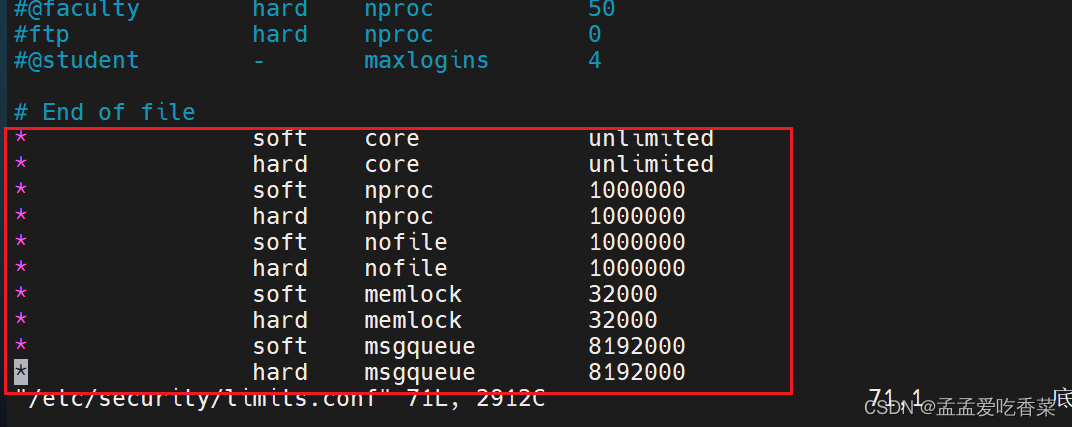
永久修改
[root@localhost security]#vim /etc/security/limits.conf #将下面内容直接写在文件末尾
* soft core unlimited
* hard core unlimited
* soft nproc 1000000
* hard nproc 1000000
* soft nofile 1000000
* hard nofile 1000000
* soft memlock 32000
* hard memlock 32000
* soft msgqueue 8192000
* hard msgqueue 8192000
永久修改后需要重启reboot,才能生效,临时的不用重启
[root@localhost security]ulimit -a #可以查看
服务前后台运行
一般都是后台运行,前台运行容器中会用到
[root@localhost ~]vim /apps/nginx/conf/nginx.conf
daemon off;  #关闭后台运行
root@localhost security]nginx -s reload
event部分
在Nginx的主配置文件中,events部分用于配置Nginx服务器的事件模块相关参数,控制Nginx服务器在处理连接请求时的行为。
常见的events配置参数:
worker_connections:指定每个工作进程可以同时处理的最大连接数。
multi_accept:指定是否一次接受多个连接。默认情况下,Nginx在每个循环中只接受一个连接,但设置multi_accept为"on"后可以同时接受多个连接。
use:指定Nginx使用的事件模块。常见的事件模块有"epoll"、"kqueue"和"eventport"等。
events {
    worker_connections 1024;
    multi_accept on;
    use epoll;
}
#指定了每个工作进程可以处理的最大连接数为1024,启用了多个连接同时接受,以及使用了epoll事件模块
HTTP设置
http协议配置说明
include mime.types; #导入支持的文件类型,是相对于/apps/nginx/conf的目录
sendfile on;#自定义优化参数
gzip on; #开启文件压缩
listen 80; #设置监听地址和端口
server_name localhost; #设置server name
charset koi8-r; #设置编码格式,默认是俄语格式,建议改为utf-8
error_page   500 502 503 504 /50x.html; #定义错误页面
mime
在Nginx中,“mime” 是一种配置指令,用于设置 MIME 类型与文件扩展名的映射关系。
此项为支持的 文件格式,如果不支持的格式 会自动帮你下载,如果支持 就会显示在网页上
vim  /etc/nginx/mime.types
#查看当前Nginx服务器配置的MIME类型列表
server下的root指令
在Nginx配置中,"root"指令用于设置服务器块的根目录,即指明软件的根目录。
通常,"root"指令位于Nginx配置文件中的服务器块中。
server {
    listen 80;
    server_name example.com;
    root /var/www/html;
    #指定了服务器块的根目录为/var/www/html
    location / {
        ...
    }
    ...
}
server 块构建虚拟主机
基于域名
[root@localhost ~] vim /etc/nginx/nginx.conf
#修改配置文件 要放在  http 模块里
 include             /etc/nginx/mime.types;
 include             /apps/nginx/conf.d/*.conf;
 [root@localhost ~] cd /etc/nginx/conf.d
 [root@localhost conf.d] vim test1.conf #编写子配置文件
 server {
   listen 80;
   server_name www.test1.com; #域名
   root /data/nginx/html/test1/; #网页目录位置
}
[root@localhost conf.d] vim test2.conf
server {
   listen 80;
   server_name www.test2.com;
   root /data/nginx/html/test2/;
}

构建数据文件夹
[root@localhost ~] mkdir -p /data/nginx/html/test1
[root@localhost ~] mkdir -p /data/nginx/html/test2
构建数据文件
[root@localhost ~] echo test1 > /data/nginx/html/test1/index.html
[root@localhost ~] echo test2 > /data/nginx/html/test2/index.html

[root@localhost conf.d] nginx -s reload


去第二台机器修改/etc/hosts 文件
[root@localhost ~] vim /etc/hosts
192.168.65.110   www.test1.com
192.168.65.110   www.test2.com
[root@localhost ~] curl www.test1.com
test1
[root@localhost ~] curl www.test2.com
test2
基于端口
[root@localhost conf.d] vim test1.conf
 server {
   listen 80;
   server_name www.test1.com; #域名
   root /data/nginx/html/test1/; #网页目录位置
}
[root@localhost conf.d] vim test2.conf
server {
   listen 8080;
   server_name www.test2.com;
   root /data/nginx/html/test2/;
}
[root@localhost conf.d] nginx -s reload

第二台机器
[root@localhost ~] curl 192.168.65.110
test1
[root@localhost ~] curl 192.168.65.110:8080
test2
基于ip地址
[root@localhost conf.d] vim test1.conf
 server {
   listen 129.168.65.110;
   server_name www.test1.com; #域名
   root /data/nginx/html/test1/; #网页目录位置
}
[root@localhost conf.d] vim test2.conf
server {
   listen 192.168.65.103;
   server_name www.test2.com;
   root /data/nginx/html/test2/;
}
[root@localhost conf.d]#nginx -s reload

[root@localhost conf.d]#ifconfig ens33:0 192.168.65.103/24  #添加虚拟网卡

第二台机器
[root@localhost ~]#curl 192.168.65.110
test1
[root@localhost ~]#curl 192.168.65.103
test2
alias别名
server {
   listen 80;
   server_name www.test.com;
   location /nwes {
        root /data/nginx/html/ag/;
        #相当于追加  将 文件夹news追加到/data/nginx/html/ag/news
        }
   location /study{
        alias /mnt/nginx/sports/;
        #相当于替换 你访问 study  就是访问/mnt/nginx/sports
        }
}
location
http://nginx.org/en/docs/http/ngx_http_core_module.html#location   #官方文档

#匹配优先级从高到低:
=, ^~, ~/~*, 不带符号

=              	#用于标准url前,需要请求字串与uri精确匹配,大小敏感,如果匹配成功就停止向下匹配并立即处理请求
^~            	#用于标准url前,表示包含正则表达式,并且匹配以指定的正则表达式开头,对URI的最左边部分做匹配检查,不区分字符大小写
~              	#用于标准url前,表示包含正则表达式,并且区分大小写
~*            	#用于标准url前,表示包含正则表达式,并且不区分大写
不带符号   	  	 #匹配起始于此url的所有的url
 \             	#用于标准url前,表示包含正则表达式并且转义字符。可以将 . * ?等转义为普通符号


正则表达式匹配:
 location ~* /A.?\.jpg { #匹配 包含A后面一个或没有字符,已.jpg结尾的图片
 root /opt/nginx/html/image;
 }
 这个例子是区分大小写的,一般将大写或小写文件复制一次,避免出现问题
access模块
http://nginx.org/en/docs/http/ngx_http_access_module.html #官方文档

[root@localhost nginx-1.18.0] ./configure --help |grep access
# 可以去源码包中 过滤  access模块  自带 不想要可以 without 去掉
  --without-http_access_module       disable ngx_http_access_module
  --http-log-path=PATH               set http access log pathname
  --without-stream_access_module     disable ngx_stream_access_module
子配置文件谁优先级高谁设置的生效,按开头字母前后优先生效
配置文件修改(在server内)
server {
   listen 80;
   server_name www.test.com;
   allow 192.168.65.0/24; #允许这个网段访问
   deny 192.168.65.101;  #不允许这个地址访问
   location / {
        root /data/nginx/html/ag;
 }
}

配置文件修改(在location内)
server {
   listen 80;
   server_name www.test.com;
   location / {
        root /data/nginx/html/ag;
        allow 192.168.91.0/24;
   		deny 192.168.91.101;
 }
}
验证模块
火狐浏览器有,谷歌没有
yum -y install httpd tools.x86_64 #安装这个包,这个模块在这个包内
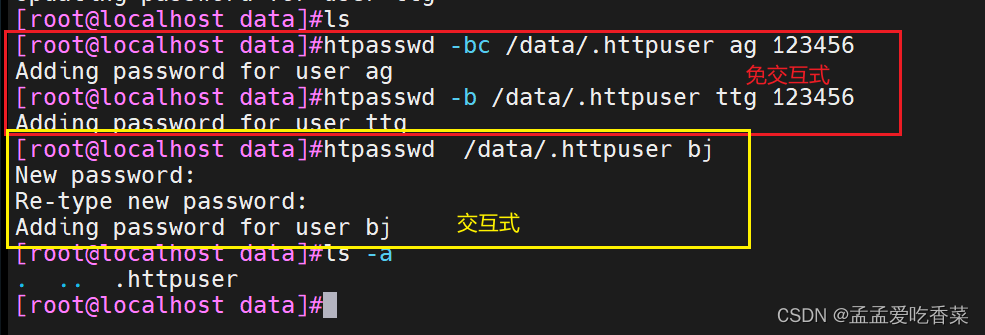
htpasswd
-c 代表新建用户名和密码对应的文件
-b 将密码跟在用户名后
[root@localhost conf.d] htpasswd -bc /data/.httpuser ag 123456 #第一次创建加c
[root@localhost conf.d] htpasswd -b /data/.httpuser ttg 123456 #非第一次创建
cd /data/nginx/html
mkdir admin
cd admin
touch index.html
server {
listen 80;
server_name www.test.com;
root /data/nginx/html;
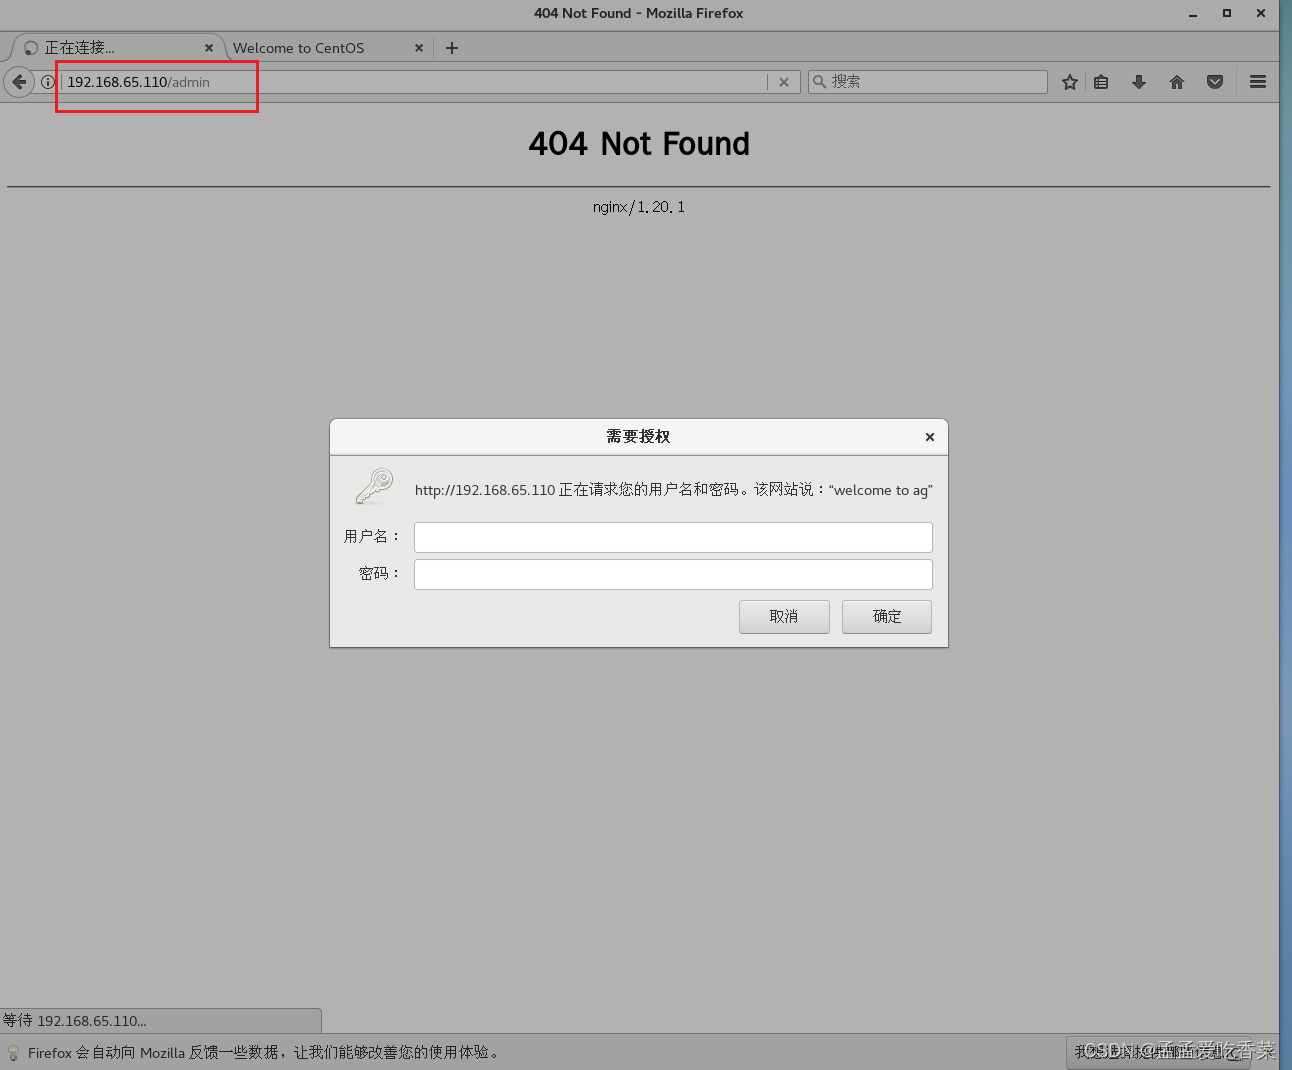
location /admin {
auth_basic "welcome to ag";
auth_basic_user-file /data/.httpuser;
}
}
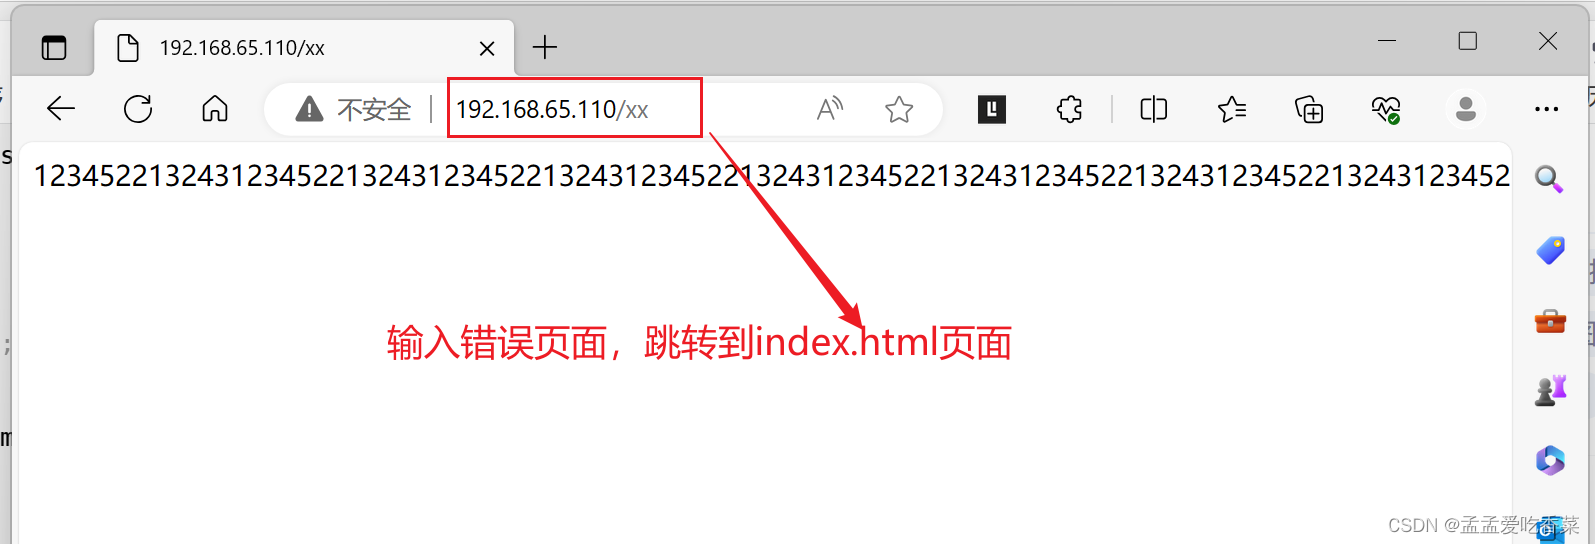
自定义错误页面
格式
error_page code ... [=[response]] uri;
响应码 访问链接
server {
listen 80;
server_name www.test.com;
root /data/nginx/html;
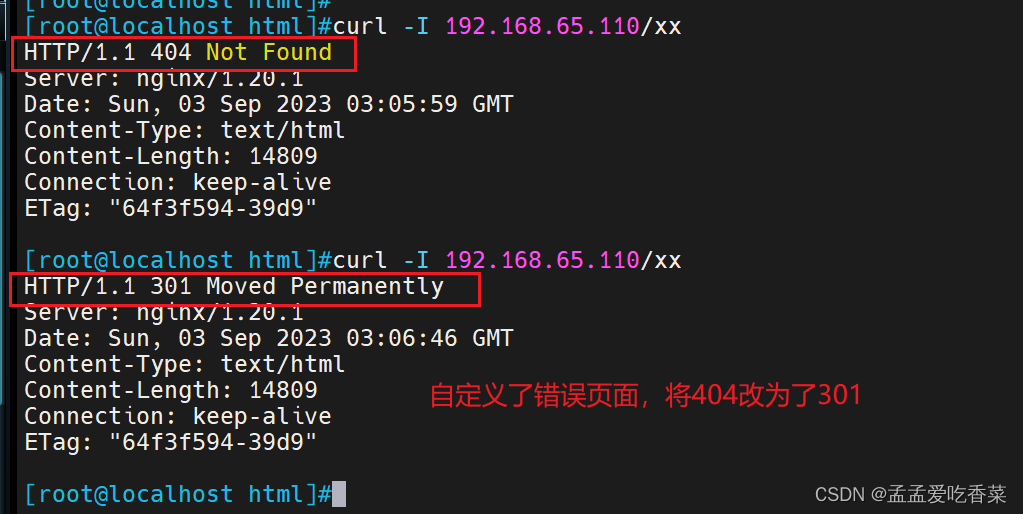
error_page 404 /index.html;#出了错 直接跳转到显示主站点
}
server {
   listen 80;
   server_name www.test.com;
   root /data/nginx/html;
   error_page 404 =301 /index.html;
   }
   #把错误码 404 指定成302  并跳到主页面:/index.html
日志
自定义日志位置
yum安装的日志文件位置 /var/log/nginx
error_log file [level];
固定格式 文件路径 日志级别
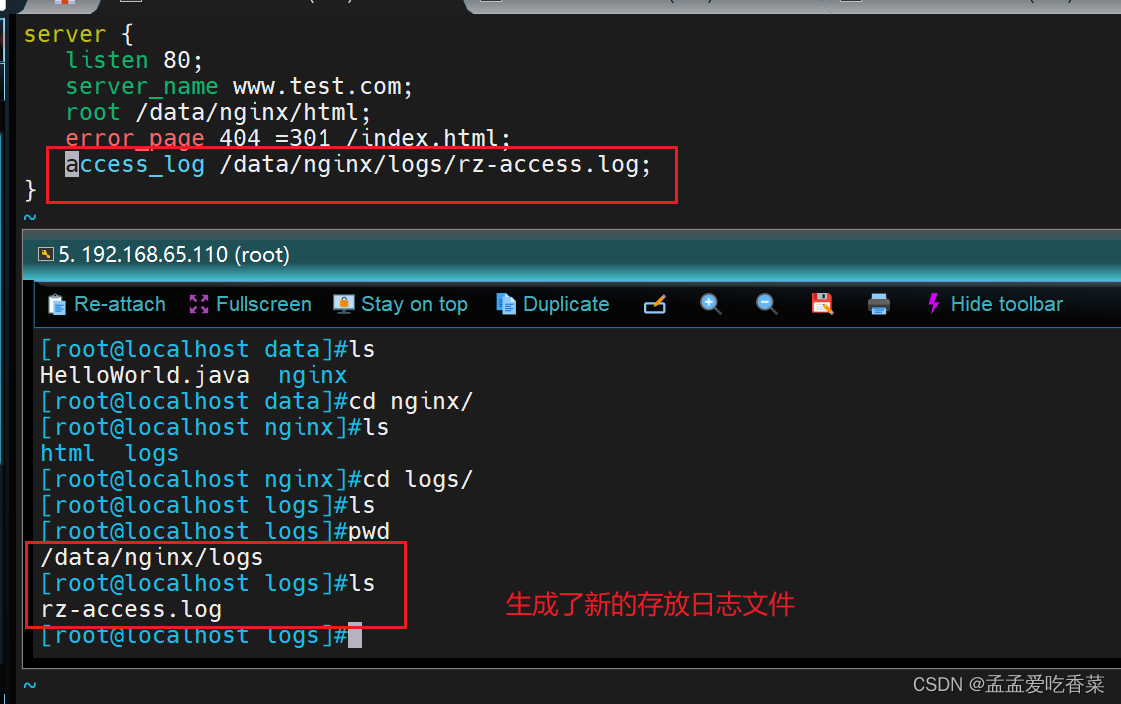
[root@localhost error] vim /etc/nginx/conf.d/test.conf
server {
listen 80;
server_name www.test.com;
root /data/nginx/html;
error_page 404 =301 /index.html;
access_log /data/nginx/logs/rz-access.log;
}#生成了新的存放日志文件
[root@localhost conf.d] nginx -s reload
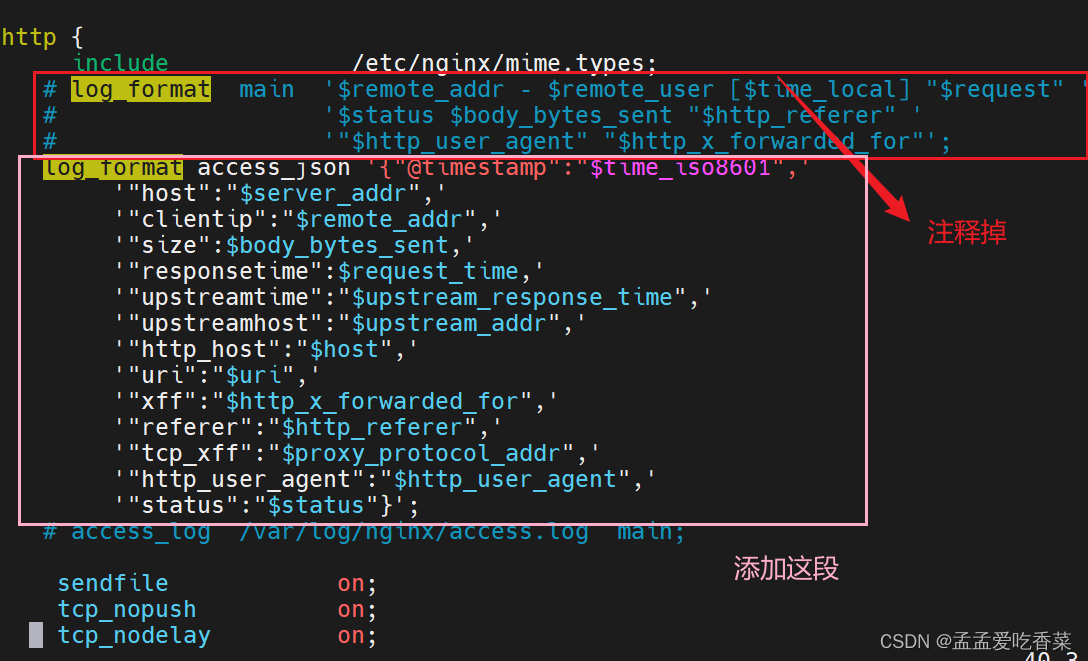
自定义日志格式
vim /etc/nginx/nginx.conf
log_format access_json '{"@timestamp":"$time_iso8601",'
        '"host":"$server_addr",'
        '"clientip":"$remote_addr",'
        '"size":$body_bytes_sent,'
        '"responsetime":$request_time,'
        '"upstreamtime":"$upstream_response_time",'
        '"upstreamhost":"$upstream_addr",'
        '"http_host":"$host",'
        '"uri":"$uri",'
        '"xff":"$http_x_forwarded_for",'
        '"referer":"$http_referer",'
        '"tcp_xff":"$proxy_protocol_addr",'
        '"http_user_agent":"$http_user_agent",'
        '"status":"$status"}';
日志分离
[root@localhost ~] cd /var/log/nginx/
[root@localhost nginx]mv access.log access-old.log
[root@localhost nginx]touch access-new.log
[root@localhost nginx]nginx -s reopen

将两个网站的日志分离
[root@localhost ~] vim/etc/nginx/conf.d/a.conf
server{
        listen 80;
        server_name  www.a.com;
        root /data/nginx/a/;
        error_log    /data/logs/a_error.log;
        access_log  /data/logs/a_access.log;
}
[root@localhost ~] vim/etc/nginx/conf.d/b.conf
server{
        listen 80;
        server_name  www.b.com;
        root /data/nginx/b/;
        error_log    /data/logs/b_error.log;
        access_log  /data/logs/b_access.log;
}
[root@localhost ~] mkdir /data/logs -p
[root@localhost ~] nginx -t
[root@localhost ~] nginx -s reload
检测文件是否存在
location / {
        root /data/nginx/html/pc;
        try_files $uri  $uri.html $uri/index.html /about/default.html;
        }
        #你如果 访问一个路径 /kgc   如果没有这个页面   先去找kgc  kgc.html  然后再去找 kgc/index.html    最后再                           找/about/default.html
长连接
keepalive_timeout timeout [header_timeout];
#设定保持连接超时时长,0表示禁止长连接,默认为75s,通常配置在http字段作为站点全局配置
keepalive_requests number;
#在一次长连接上所允许请求的资源的最大数量,默认为100次,建议适当调大,比如:500
可以加在全局或者 server
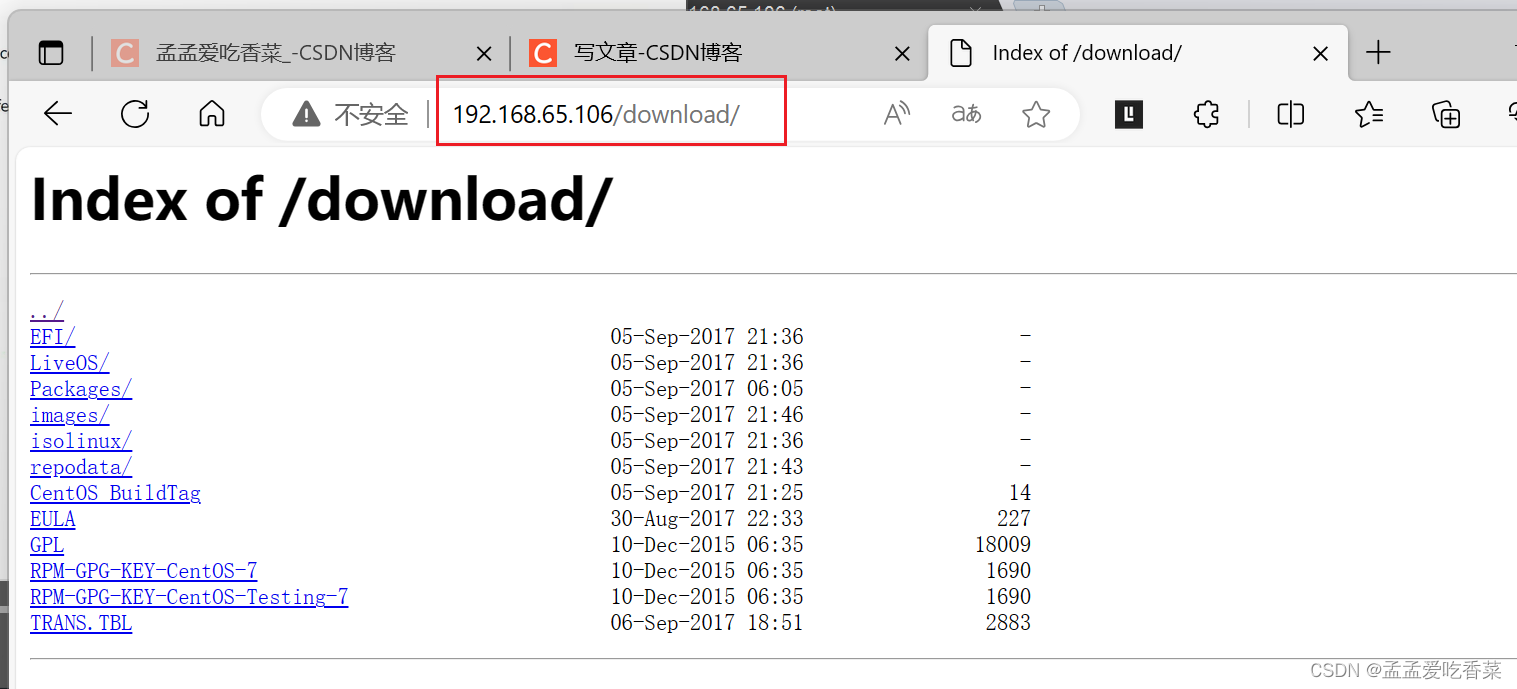
作为下载服务器配置
http://nginx.org/en/docs/http/ngx_http_autoindex_module.html #官方文档

[root@localhost nginx]# cd conf.d/
[root@localhost conf.d]# vim test.conf
location /download {
       autoindex on; #开启下载服务器
       autoindex_exact_size on; #开启确切大小不建议开启
       autoindex_localtime on;  #使用当地时间
       limit_rate 1024k; #所有人限速1024k,默认单位是字节数
       alias /opt/download;
  }

[root@localhost conf.d]# cd /opt
[root@localhost opt]# mkdir download
[root@localhost opt]# nginx -s reload
[root@localhost opt]# mount /dev/sr0 /opt/download/
mount: /dev/sr0 写保护,将以只读方式挂载
用户上传资料
上传需要借助开发小的程序, 并且程序 5M 和 nginx  10M 都会限制。 两者取最小
client_max_body_size 1m;
#设置允许客户端上传单个文件的最大值,默认值为1m,上传文件超过此值会出413错误
client_body_buffer_size size;
#用于接收每个客户端请求报文的body部分的缓冲区大小;默认16k;超出此大小时,其将被暂存到磁盘上的由下面client_body_temp_path指令所定义的位置
client_body_temp_path path [level1 [level2 [level3]]];
#设定存储客户端请求报文的body部分的临时存储路径及子目录结构和数量,目录名为16进制的数字,使用hash之后的值从后往前截取1位、2位、2位作为目录名

上传文件大于限制  错误代码413
高级配置
网页的状态页
[root@localhost html]# vim /etc/nginx/conf.d/test.conf
location /status {
   stub_status;
}
[root@localhost html]# nginx -s reload
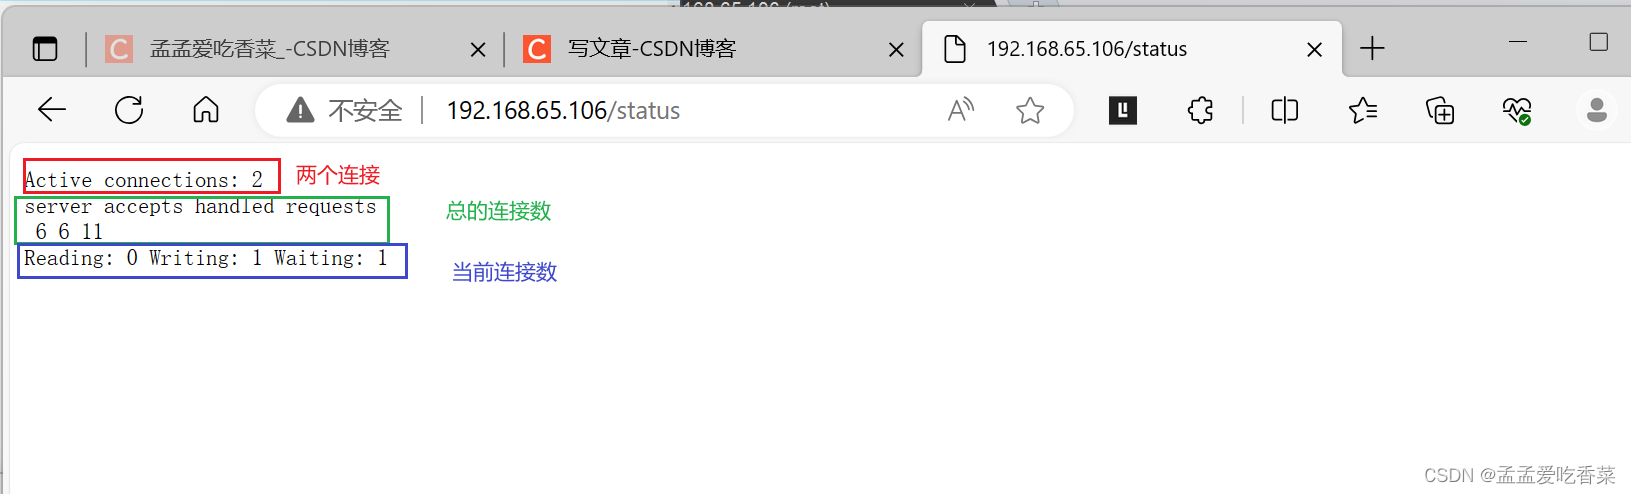
Active connections:
当前处于活动状态的客户端连接数,包括连接等待空闲连接数=reading+writing+waiting
accepts:
统计总值,Nginx自启动后已经接受的客户端请求的总数。
handled:
统计总值,Nginx自启动后已经处理完成的客户端请求总数,通常等于accepts,除非有因worker_connections限制等被拒绝的连接
requests:
统计总值,Nginx自启动后客户端发来的总的请求数。
Reading:
当前状态,正在读取客户端请求报文首部的连接的连接数,数值越大,说明排队现象严重,性能不足
Writing:
当前状态,正在向客户端发送响应报文过程中的连接数,数值越大,说明访问量很大
Waiting:
当前状态,正在等待客户端发出请求的空闲连接数,开启 keep-alive的情况下,这个值等于active – (reading+writing)
nginx第三方模块
echo模块 https://github.com/openresty/echo-nginx-module

编译安装下添加的方法
下载安装包
unzip echo-nginx-module-master.zip  #解压
./configure --prefix=/apps/nginx --user=nginx --group=nginx --with-http_ssl_module --with-http_v2_module --with-http_realip_module --with-http_stub_status_module --with-http_gzip_static_module --with-pcre --with-stream --with-stream_ssl_module --with-stream_realip_module --add-module=/opt/echo-nginx-module-master #到nginx源代码下编译,在编译安装nginx的位置
make && make install
[root@localhost html]# vim /etc/nginx/conf.d/test.conf
location  /hello {
  echo "hello world ";
}
curl    192.168.65.106/hello
会直接出来,不用添加新网页
变量
内置变量
$remote_addr;  #存放了客户端的地址,注意是客户端的公网IP
$proxy_add_x_forwarded_for # 代理中所有经过的服务器的ip
$args;   #变量中存放了URL中的参数
如:http://www.kgc.org/main/index.do?id=20190221&partner=search
#返回结果为: id=20190221&partner=search    存放的就是这个
$document_root; #保存了针对当前资源的请求的系统根目录
例如:/apps/nginx/html。
$document_uri;  #保存了当前请求中不包含参数的URI
如:http://www.kgc.org/main/index.do?id=20190221&partner=search会被定义为/main/index.do
#返回结果为:/main/index.do
$host;   #存放了请求的host名称
limit_rate 10240;
echo $limit_rate;
#如果nginx服务器使用limit_rate配置了显示网络速率,则会显示,如果没有设置, 则显示0
$remote_port;   #客户端请求Nginx服务器时随机打开的端口,这是每个客户端自己的端口
$remote_user;  #已经经过Auth Basic Module验证的用户名
$request_body_file;  #做反向代理时发给后端服务器的本地资源的名称
$request_method;  #请求资源的方式,GET/PUT/DELETE等
$request_filename;  #当前请求的资源文件的磁盘路径,由root或alias指令与URI请求生成的文件绝对路径
如:/apps/nginx/html/main/index.html
$request_uri;   #包含请求参数的原始URI,不包含主机名,相当于:$document_uri?$args,例如:/main/index.do?id=20190221&partner=search
$scheme;   #请求的协议,例如:http,https,ftp等
$server_protocol; #保存了客户端请求资源使用的协议的版本
例如:HTTP/1.0,HTTP/1.1,HTTP/2.0等
$server_addr;  #保存了服务器的IP地址
$server_name;  #请求的服务器的主机名
$server_port;  #请求的服务器的端口号
$http_user_agent;  #客户端浏览器的详细信息
$http_cookie;   #客户端的cookie信息
$cookie_<name>  #name为任意请求报文首部字部cookie的key名
$http_<name>   #name为任意请求报文首部字段,表示记录请求报文的首部字段,ame的对应的首部字段名需要为小写,如果有横线需要替换为下划线
自定义模块
[root@localhost data]# vim /etc/nginx/conf.d/test.conf
location /test {
        set $name  test;
        echo $name;
        set $my_port $server_port;
        echo $my_port;
        }
[root@localhost data]# nginx -s reload
[root@localhost data]#curl 192.168.65.106/tset
test
80
nginx 压缩功能
太小的文件没必要压缩,压缩可能会变大
官方文档: https://nginx.org/en/docs/http/ngx_http_gzip_module.html

gzip on | off;  #启用或禁用gzip压缩,默认关闭
gzip_comp_level level;#压缩比由低到高从1到9,默认为1
gzip_min_length 1k; #gzip压缩的最小文件,小于设置值的文件将不会压缩
gzip_http_version 1.0 | 1.1; #启用压缩功能时,协议的最小版本,默认HTTP/1.1
gzip_buffers number size;  #指定Nginx服务需要向服务器申请的缓存空间的个数和大小,平台不同,默认:32 4k或者16 8k;
gzip_types mime-type ...; #指明仅对哪些类型的资源执行压缩操作;默认为gzip_types text/html,不用显示指定,否则出错
gzip_vary on | off;#如果启用压缩,是否在响应报文首部插入“Vary: Accept-Encoding”,一般建议打开
gzip_static on | off;#预压缩

server {
        root         /usr/share/nginx/html;
        gzip on;
        gzip_comp_level 9;
        gzip_min_length 1k;
        gzip_vary on;
        }
https功能
官方文档https://nginx.org/en/docs/http/ngx_http_ssl_module.html

listen 443 ssl; #为指定的虚拟主机配置启用ssl功能
ssl_certificate /path/to/file;
#指向包含当前虚拟主机和CA的两个证书信息的文件,一般是crt文件
ssl_certificate_key /path/to/file;
#当前虚拟主机使用的私钥文件,一般是key文件
ssl_protocols [SSLv2] [SSLv3] [TLSv1] [TLSv1.1] [TLSv1.2];
#支持ssl协议版本,早期为ssl现在是TLS,默认为后三个
自定义图标
#方法一:服务器不记录访问日志:
location = /favicon.ico {
   log_not_found off;
   access_log off;
}
#方法二:将图标保存到指定目录访问:
#location ~ ^/favicon\.ico$ {
location = /favicon.ico {
     root   /data/nginx/html/pc/images;
     expires 365d;  #设置文件过期时间
}


 3855
3855


 被折叠的 条评论
为什么被折叠?
被折叠的 条评论
为什么被折叠?
 到【灌水乐园】发言


