


最新文档已同步至 : https://book.iamtsm.cn
简介
tl-ops-manage (tl-openresty-web-manage),基于openresty开发的一款基础服务管理工具,支持服务动态扩展,自定义路由规则,健康检查,服务熔断,服务限流,动态配置,数据统计,日志记录,数据版本控制,后台可视化管理,等等…
做这个项目最开始的想法很简单,只是想在造轮子的过程中了解,学习一些新的知识面。到后面完成了大部分基础功能点后,发现可以整理为一个服务管理工具的项目。于是就有了tl-ops-manage
实现源码解析
安装
下载项目 : https://github.com/iamtsm/tl-ops-manage
或者
git clone https://github.com/iamtsm/tl-ops-manage
安装依赖
首先需要安装openresty,可以去官网下载对应包, http://openresty.org/cn/download.html
如果需要将数据同步至redis存储,需要安装redis,https://redis.io/download/, redis启用开关在tl_ops_manage_env.lua中
修改配置
tl-ops-manage/conf/tl_ops_manage.conf
location /tlopsmanage/ {
        # 管理后台目录
        alias /path/to/tl-ops-manage/web/;
}
openresty/conf/nginx.conf
http {
        ...
        # 引入tl_ops_manage.conf
        include "/path/to/tl-ops-manage/conf/*.conf;

        # 引入lua包
        lua_package_path "/path/to/tl-ops-manage/?.lua;;"
        ...
}
tl-ops-manage/tl_ops_manage_env.conf
# 日志输出目录
log_dir = "/path/to/tl-ops-manage/",

# 数据存放目录
store_dir = "/path/to/tl-ops-manage/store/",
启动nginx/openresty
访问 http://your-domain/tlopsmanage/tl_ops_web_index.html 管理后台
以下模块,将以两种方式进行说明,一种是在配置文件中填写配置,另外一种是在管理台填写配置。
在文件中设置的节点会在启动时即可生效,在管理后台设置的节点,将会在各模块依赖的时候同步到其中(稍延时,但最终一致)。
服务节点
服务节点是基础配置,添加好的节点会被用于健康检查,节点限流,熔断降级,路由统计,负载均衡等模块。节点的基础数据可以在文件中设置好,或也可以在管理后台中设置。
在文件中配置
配置节点数据对应的文件在 constant/tl_ops_constant_service.lua,在文件中,我提供了demo示例数据,只需要按照对应的格式放入 list 中即可,需要配置多少个,放置多少个即刻。
list = {
	{
		id = snowflake.generate_id( 100 ),  -- default snow id
		name = "节点1",                      -- 当前节点name
		service = "测试服务",                -- 当前节点所属service
		protocol = "http://",               -- 当前节点协议头
		ip = "127.0.0.1",                   -- 当前节点ip
		port = 6666,                        -- 当前节点port
	},
	{
		id = snowflake.generate_id( 100 ),
		name = "节点2",
		service = "测试服务",
		protocol = "http://",
		ip = "127.0.0.1",
		port = 6667,
	}
	....
}
在管理台配置


健康检查
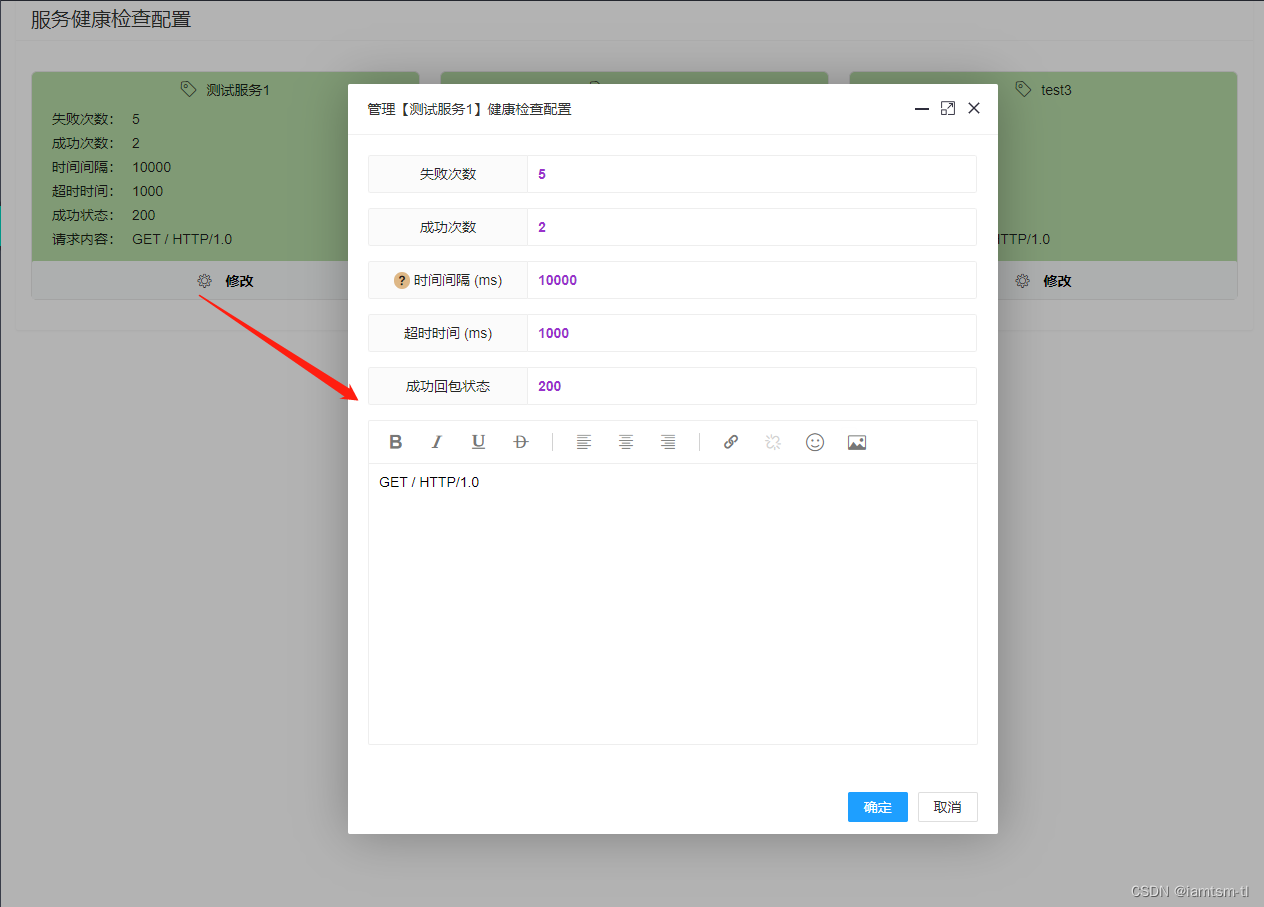
健康检查依赖设置好的节点,对节点依次进行发包检查节点状态,在健康检查中,如检查间隔,发包超时时间,周期内请求成功多少次算正常服务状态,周期内请求失败多少次才需要转变服务状态,接收服务回包时什么状态才算成功,等等… ,这些需要数据根据每个服务的不同,可以做到配置化,并实时更新。
在文件中配置
配置节点数据对应的文件在 constant/tl_ops_constant_health.lua,在文件中,我提供了demo示例数据,只需要按照对应的格式放入 options 中即可,需要配置多少个,放置多少个即刻。
options = {
	{
		check_failed_max_count = 5,         -- 自检周期内失败次数
		check_success_max_count = 2,        -- 自检周期内成功次数
		check_interval = 10 * 1000,         -- 自检服务自检周期 (单位/ms)
		check_timeout = 1000,               -- 自检节点心跳包连接超时时间 (单位/ms)
		check_content = "GET / HTTP/1.0",   -- 自检心跳包内容
		check_success_status = {            -- 自检返回成功状态, 如 201,202(代表成功)
			200
		},
		check_service_name = "测试服务1"	 -- 该配置所属服务
	},
	{
		check_failed_max_count = 5,
		check_success_max_count = 2,
		check_interval = 10 * 1000
		check_timeout = 1000,
		check_content = "GET / HTTP/1.0",
		check_success_status = {
			200
		},
		check_service_name = "测试服务2"
	}
}
在管理台配置
熔断限流
熔断限流,其实是自动化熔断,限流两种配置的组合。对于服务自动化熔断来说,其应该是根据节点 ‘状态’ 来进行一种服务降级的手段。在节点负载过高时,应该对节点减少流量的进入,在服务性能较优时,增加流量的进入,而控制流量的进入就需要用到一些流控手段。所以我将其组合来配置
在文件中配置
熔断配置
options = {
	{
		service_name = "测试服务1",	   -- 该配置所属服务
		interval = 10 * 1000,         -- 检测时间间隔 单位/ms
		node_threshold = 0.3,         -- 切换状态阈值 (node失败占比)
		service_threshold = 0.5,      -- 切换状态阈值 (service切换阈值,取决于node失败状态占比)
		recover = 15 * 1000,          -- 全熔断恢复时间 单位/ms
		depend = depend.token,        -- 默认依赖组件 :token_bucket
		level = level.service,        -- 默认组件级别,服务层级 [限流熔断针对的层级]
	},
	....
},

-- 依赖限流组件
local depend = {
	token = "token",
	leak = "leak"
}

-- 组件级别
local level = {
	service = "service"
}
令牌桶限流配置
-- 限流配置
options = {
        service_name = "测试服务1",        -- 令牌桶配置所属服务
        capacity = 10 * 1024 * 1024,      -- 最大容量 10M (按字节为单位,可做字节整型流控)
        rate = 1024,                      -- 令牌生成速率/秒 (每秒 1KB)
        warm = 100 * 1024,                -- 预热令牌数量 (预热100KB)
        block = 1024,                     -- 流控以1024为单位
        expand = 0.5,                     -- 扩容比例
        shrink = 0.5,                     -- 缩容比例
}
漏桶限流配置
-- 限流配置
options = {
        service_name = "测试服务1",        -- 漏桶配置所属服务
        capacity = 10 * 1024 * 1024,      -- 最大容量 10M (按字节为单位,可做字节整型流控)
        rate = 1024 * 10,                 -- 漏桶流速/秒 (每秒 10KB)
        block = 1024,                     -- 流控以1024为单位
        expand = 0.5,                     -- 扩容比例
        shrink = 0.5,                     -- 缩容比例
}
在管理台配置
熔断配置

限流配置

负载均衡
对于负载均衡,目前分为四个负载策略,在负载时,会按照这个顺序进行负载,URL负载 > 请求参数负载 > 请求COOKIE负载 > 请求头负载
而每个策略分为两种模式 指定路由,随机路由。
对于指定路由,一旦请求命中三个模式中的任意一条规则,即会路由到具体节点。
对于随机路由,一旦请求命中三个模式中的任意一条规则,不会路由到具体节点,而是在命中的服务中随机选取一个节点进行路由。
对于模式的不同,每个随机方式也是不相同,对于URL随机负载,随机模式是根据当前请求url的长度设置随机种子,得到随机数进行随机负载。对于请求参数和请求COOKIE的随机负载,是根据当前命中的key的长度设置随机种子,得到随机数进行随机负载。
在文件中的配置
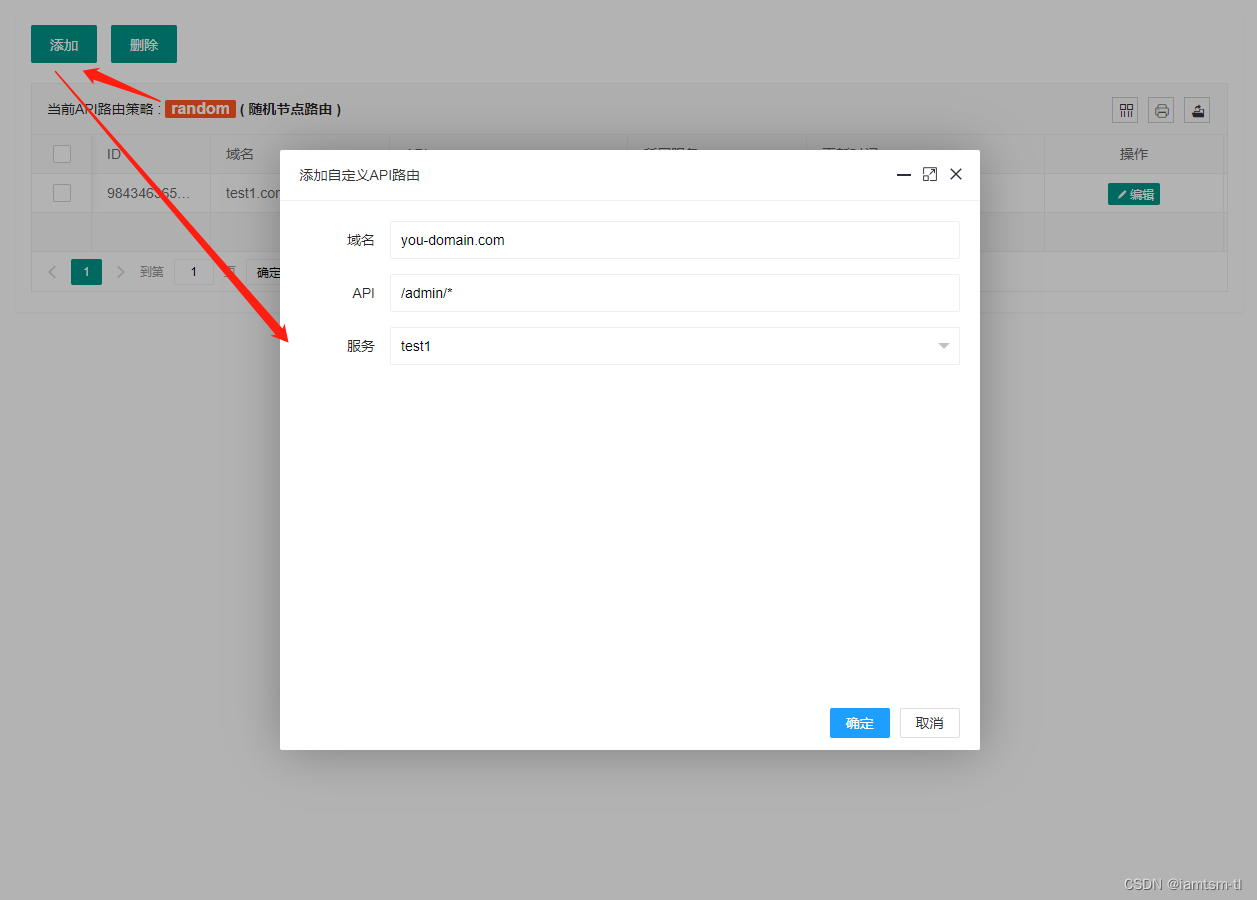
API策略
point = {
	 {
		id = snowflake.generate_id( 100 ),  -- default snow id
		url = "/*",                         -- 当前url匹配规则
		service = "测试服务1",               -- 当前url路由到的service
		node = 0,                           -- 当前url路由到的service下的node的索引
		host = "tlops1.com",                -- 当前url处理的域名范围
	}
},
random = {
	 {
		id = snowflake.generate_id( 100 ),  -- default snow id
		url = "/*",                         -- 当前url匹配规则
		service = "测试服务1",             	 -- 当前url路由到的service
		node = 0,                           -- 当前url路由到的service下的node的索引
		host = "tlops1.com",                -- 当前url处理的域名范围
	}
},
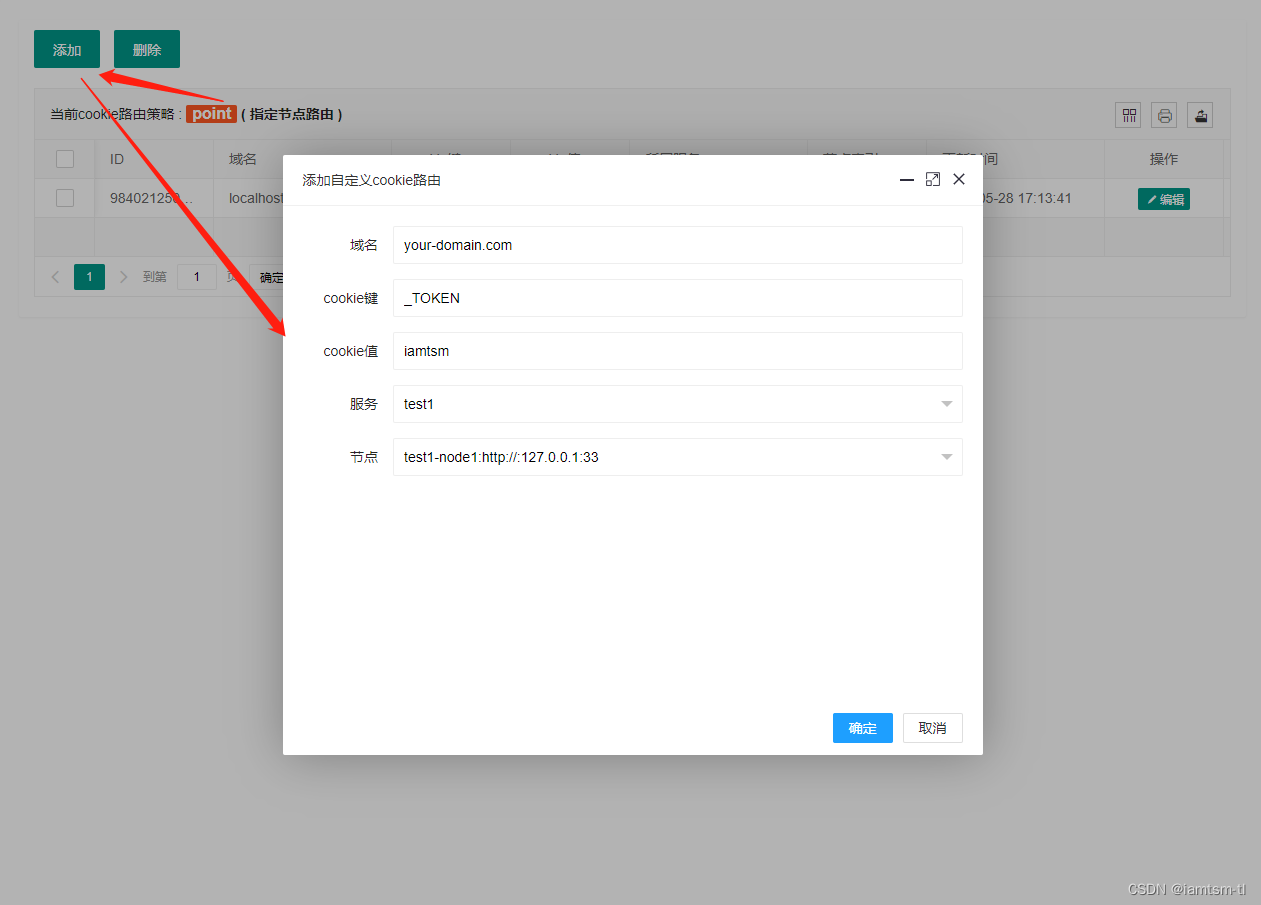
cookie策略
point = {
	 {
		id = snowflake.generate_id( 100 ),  -- default snow id
		key = "_tl_session_id",             -- 当前cookie匹配名称
		value = "session_iamtsm",           -- 当前cookie名称对应值
		service = "测试服务1",               -- 当前cookie路由到的service
		node = 0,                           -- 当前cookie路由到的service下的node的索引
		host = "tlops1.com",                -- 当前cookie处理的域名范围
	}
},
random = {
	 {
		id = snowflake.generate_id( 100 ),  -- default snow id
		key = "_tl_token_id",               -- 当前cookie匹配名称
		value = "token_iamtsm",             -- 当前cookie名称对应值
		service = "测试服务1",               -- 当前cookie路由到的service
		node = 0,                           -- 当前cookie路由到的service下的node的索引
		host = "tlops1.com",                -- 当前cookie处理的域名范围
	}
},
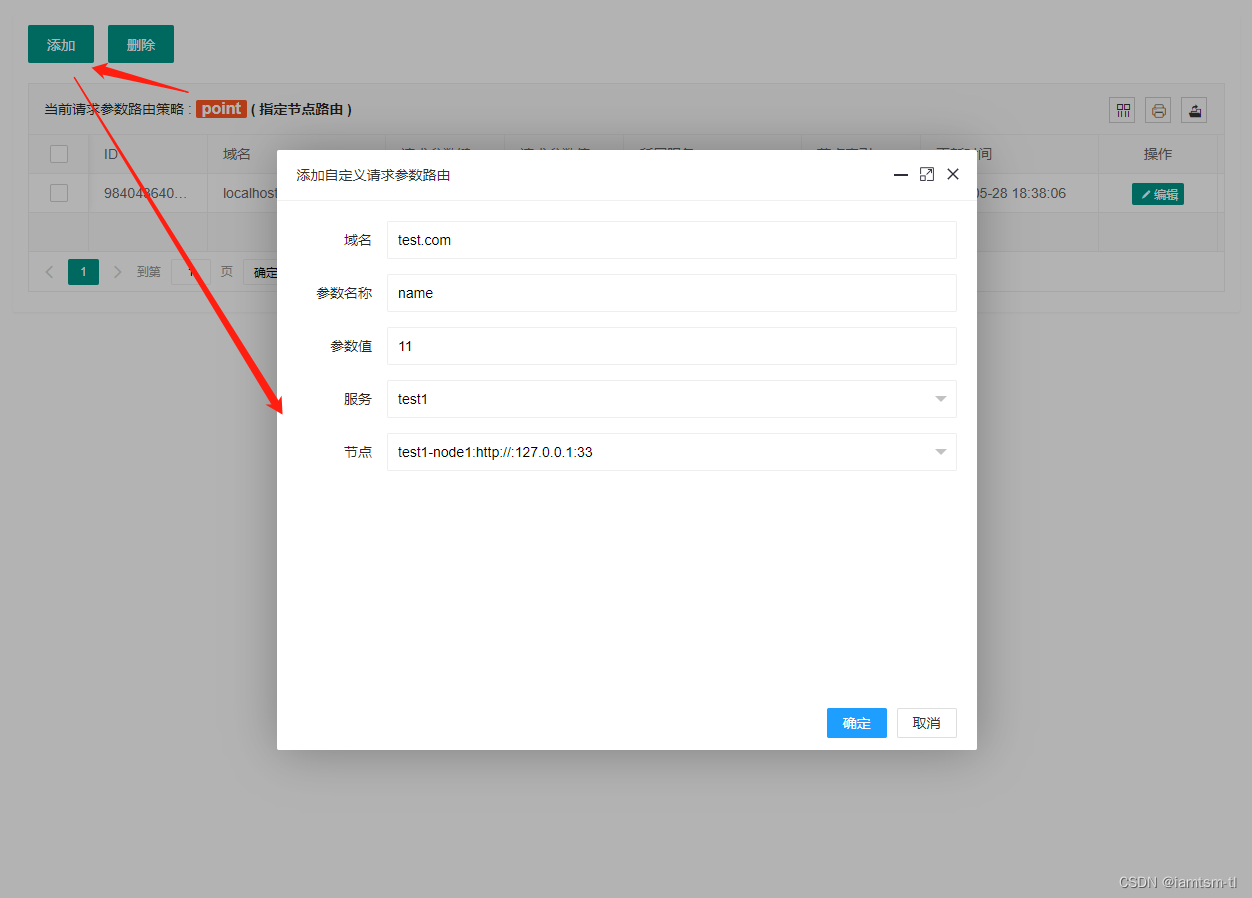
参数策略
point = {
	 {
		id = snowflake.generate_id( 100 ),  -- default snow id
		key = "_tl_id",                     -- 当前请求参数匹配名称
		value = "0",                        -- 当前请求参数名称对应值
		service = "测试服务1",               -- 当前请求参数路由到的service
		node = 0,                           -- 当前请求参数路由到的service下的node的索引
		host = "tlops1.com",                -- 当前请求参数处理的域名范围
	}
},
random = {
	 {
		id = snowflake.generate_id( 100 ),  -- default snow id
		key = "_tl_name",                   -- 当前请求参数匹配名称
		value = "iamtsm",                   -- 当前请求参数名称对应值
		service = "tlops-demo",             -- 当前请求参数路由到的service
		node = 0,                           -- 当前请求参数路由到的service下的node的索引
		host = "tlops1.com",                -- 当前请求参数处理的域名范围
	}
},
在管理台配置
URL模式

请求参数模式

COOKIE模式

路由统计
路由统计,是在负载均衡模块上扩充的一种功能,在服务进行负载逻辑时,可能存在负载成功,或失败,有些情况下可能需要统计负载情况进行展示。其对应的配置在 constant/tl_ops_constant_balance.lua中。
在文件中配置
-- 路由统计时间间隔
count = {
	interval = 5 * 60       -- 统计周期 单位/s, 默认:5min
}
实现源码说明
服务节点
我将服务划分为服务与节点,节点隶属于服务,是一个上下级关系。用如下配置可以展示他们之间的关系
product = { ---- 服务
	{ ---- 节点1
		id = snowflake.generate_id( 100 ),  ---- default snow id
		name = "product-node-1",            ---- 当前节点name
		service = "product",                ---- 当前节点所属service
		protocol = "http://",               ---- 当前节点协议头
		ip = "127.0.0.1",                   ---- 当前节点ip
		port = 6666,                        ---- 当前节点port
	},

	{---- 节点2
		id = snowflake.generate_id( 100 ),  ---- default snow id
		name = "product-node-2",            ---- 当前节点name
		service = "product",                ---- 当前节点所属service
		protocol = "http://",               ---- 当前节点协议头
		ip = "127.0.0.1",                   ---- 当前节点ip
		port = 6667,                        ---- 当前节点port
	}
}
例如在业务场景中会有产品功能,对于产品功能来说,运行他的应该是有一个或多个机器实例,产品业务对应的就是产品服务,这些机器实例对应的就是产品节点。
对于tl-ops-manage来说,服务-节点是基础,其他的路由,检查等模块都需要依赖服务-节点。所以服务-节点可以理解为公共全局配置,仅有一份,其对应的项目文件在 constant/tl_ops_constant_service.lua
健康检查
健康检查的主要逻辑是 定时检查器 的实现。
定时检查器根据配置启动相应定时器执行检查逻辑。配置加载器根据管理端新增或修改的配置动态同步到定时检查器中。实现方式都是通过ngx.timer
首先,我们先了解下健康检查对应的配置,还是以product服务为例
{---- product服务自检配置
	check_failed_max_count = 5,         #自检时心跳包最大失败次数,达到这个次数会将在线节点置为下线。
	check_success_max_count = 2,        #自检时心跳包最大成功次数,达到这个次数会将下线节点置为上线。
	check_interval = 5 * 1000,          #自检周期, 默认单位/ms
	check_timeout = 1000,               #自检心跳包接收超时时间,默认单位/ms
	check_content = "GET / HTTP/1.0",   #自检心跳包内容,可自定义,但是需要被检方处理兼容。
	check_service_name = "product"      #自检服务名称
}
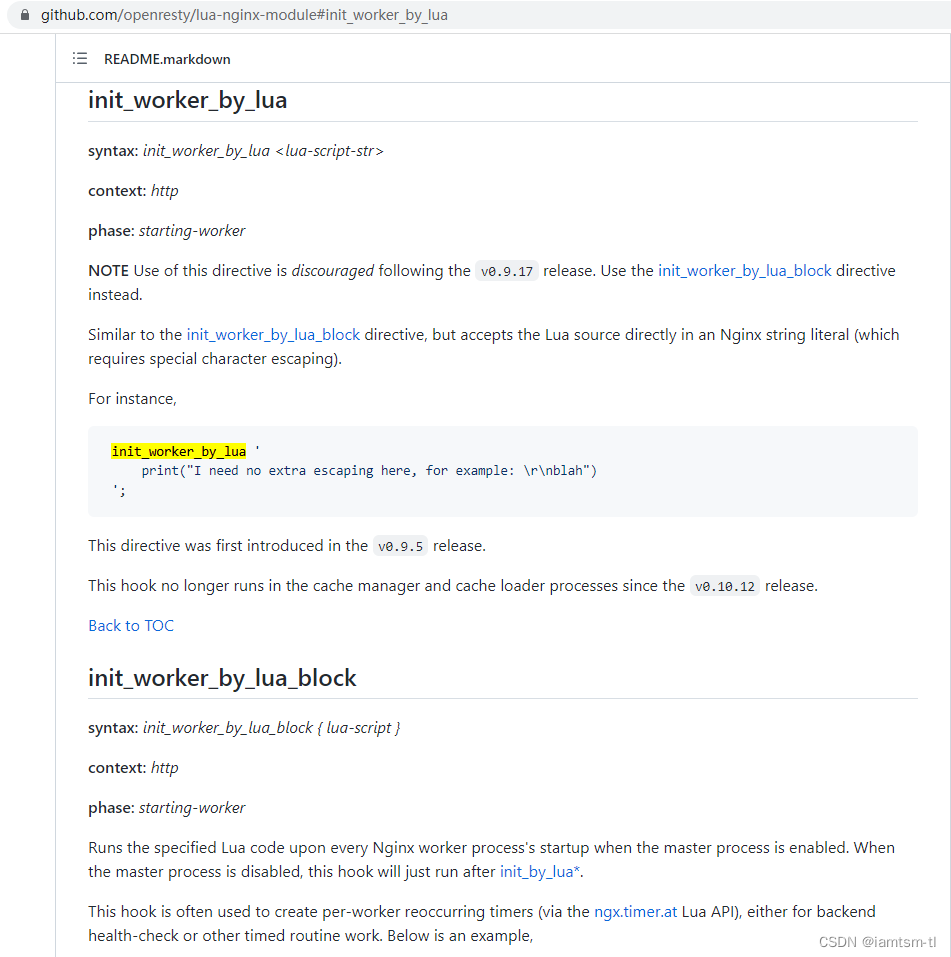
在项目启动时,会首先执行到 conf/tl_ops_manage.conf 中的 init_worker_by_lua_block逻辑,启动相应的定时任务
# 代码位置 : conf/tl_ops_manage.conf

init_worker_by_lua_block {
	-- 启动健康检查
	require("health.tl_ops_health"):init();
	...
}
进入 require("health.tl_ops_health"):init(); 方法后,我们可以看到一系列的启动器,如根据配置启动相应的health-check-timer, 还有配置加载器的启动,以及服务的版本初始化,以及服务健康检查配置版本的初始化
# 代码位置 : health/tl_ops_health.lua

function _M:init(  )

    --动态加载新增配置
    tl_ops_health_check_dynamic_conf.dynamic_conf_add_start()

    --默认初始化一次version
    for i = 1, #tl_ops_constant_health.options do
        local option = tl_ops_constant_health.options[i]
        local service_name = option.check_service_name
        if service_name then
            tl_ops_health_check_version.incr_service_version(service_name)
        end
    end

	tl_ops_health_check_version.incr_service_option_version()

end
我们先从健康检查主逻辑开始,可以看到先执行了一段配置初始化逻辑 tl_ops_health_check_default_confs, 初始化配置中,会检查配置的合法性,以及对服务状态,节点状态的初始值进行定义。
紧接着可以看到根据confs的数量,用ngx.timer.at去启动相应的定时器去执行 tl_ops_health_check 逻辑,而 tl_ops_health_check 也就是执行相应的 tl_ops_health_check_main逻辑, conf 就是每个定时器所需的健康检查配置
# 代码位置 : health/tl_ops_health_check.lua

-- 创建健康检查启动器
function _M:tl_ops_health_check_start()
	if not self.options or not self.services then
		tlog:err("tl_ops_health_check_start no default args ")
		return nil
	end

	local confs, _ = tl_ops_health_check_default_confs(self.options, self.services)
	if not confs then
		tlog:err("tl_ops_health_check_start failed to start , confs nil ", _)
		return nil
	end

	...

	for index, conf in ipairs(confs) do
		local ok, _ = ngx.timer.at(0, tl_ops_health_check, conf)
		if not ok then
			tlog:err("tl_ops_health_check_start failed to run check , create timer failed " , _)
			return nil
		end
		...
	end

	...

	tlog:dbg("tl_ops_health_check_start check end , timer_list=",timer_list)

	return true
end
接下来进入核心逻辑tl_ops_health_check,tl_ops_health_check 对应的核心逻辑是 tl_ops_health_check_main, 可以看到tl_ops_health_check_main逻辑主要由两部分组成,也就是 dynamic_conf_change_start(同步配置),tl_ops_health_check_nodes(心跳包),接下来将对这两个方法进行详细解析
# 代码位置 : health/tl_ops_health_check.lua

-- 健康检查主逻辑
tl_ops_health_check_main = function (conf)
	tlog:dbg("tl_ops_health_check_main start")

	--同步配置
	tl_ops_health_check_dynamic_conf.dynamic_conf_change_start( conf )

	-- 心跳包
	if tl_ops_health_check_get_lock(conf) then

		-- 是否主动关闭自检
		local uncheck_key = tl_ops_utils_func:gen_node_key(tl_ops_constant_health.cache_key.uncheck, conf.check_service_name)
		local uncheck, _ = shared:get(uncheck_key)
		if uncheck and uncheck == true then
			tlog:dbg("tl_ops_health_check_main is uncheck check_service_name=",conf.check_service_name)
			return
		end

		tl_ops_health_check_nodes(conf)
	end

	tlog:dbg("tl_ops_health_check_main end")
end
心跳包
在介绍实现之前,首先有必要铺垫一下openresty的执行阶段相关知识。
由于nginx在启动时是多woker进程来处理请求,而openresty将nginx处理请求分为七个阶段。
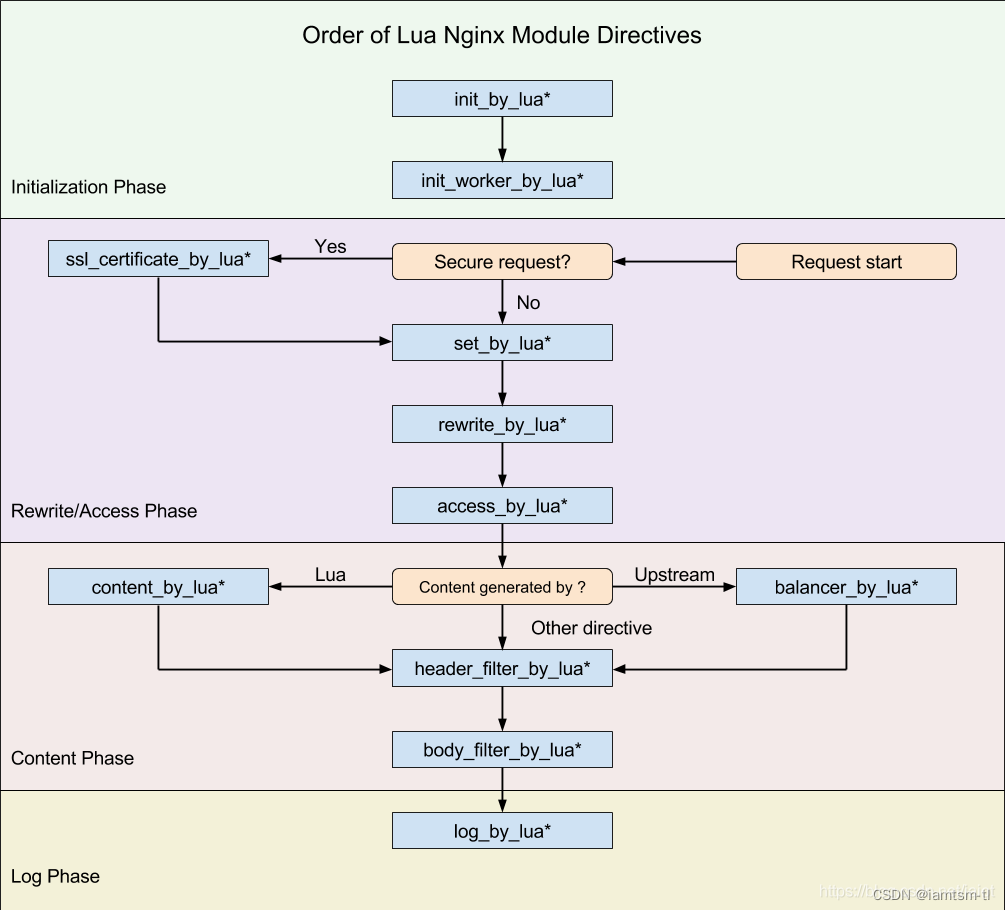
健康检查的启动应与请求阶段无关,所以应该放在 init_by_lua阶段或者init_worker_by_lua阶段较为合适,但是定时器的生命周期只能在init_worker_by_lua阶段(如下图),所以健康检查的启动器就应在init_worker_by_lua阶段来做。

由于init_worker_by_lua阶段是初始化worker进程阶段,所以在此阶段是存在多个worker进程,也就是可能存在抢占执行定时器的情况。而每个定时器有其依赖的配置,多个worker之间数据不共享,就会导致健康检查数据统计、配置不一致的情况。
所以才会有这样一段逻辑,tl_ops_health_check_get_lock对应的就是加锁逻辑,主要方式是通过 ngx.shared 共享内存来实现,有兴趣可以查看下具体实现代码,这里就不细讲了。
---- 心跳包

if tl_ops_health_check_get_lock(conf) then
	tl_ops_health_check_nodes(conf)
end
我们继续看回代码,在抢占锁后,只会有一个worker进程进入锁内,并执行 tl_ops_health_check_nodes,进行发送心跳包。
对于发送心跳包,我们可以看到是对 服务-节点 依次进行遍历发送socket包(心跳包内容自定义),如心跳周期正常结束,进入 tl_ops_health_check_node_ok 成功逻辑,否则进入tl_ops_health_check_node_failed 失败逻辑
# 代码位置 : health/tl_ops_health_check.lua


-- 对配置的路由机器依次发送心跳包
tl_ops_health_check_nodes = function (conf)

	...

	for i = 1, #nodes do
		repeat
			local node = nodes[i]
			local node_id = i - 1
			local name = node.ip .. ":" .. node.port

			tlog:dbg("tl_ops_health_check_nodes start connect socket : name=", name)

			local sock, _ = nx_socket()
			if not sock then
				tlog:err("tl_ops_health_check_nodes failed to create stream socket: ", _)
				break
			end
			sock:settimeout(check_timeout)

			-- 心跳socket
			local ok, _ = sock:connect(node.ip, node.port)
			if not ok then
				tlog:err("tl_ops_health_check_nodes failed to connect socket: ", _)
				tl_ops_health_check_node_failed(conf, node_id, node)
				break;
			end

			tlog:dbg("tl_ops_health_check_nodes connect socket ok : ok=", ok)

			local bytes, _ = sock:send(check_content .. "\r\n\r\n\r\n")
			if not bytes then
				tlog:err("tl_ops_health_check_nodes failed to send socket: ", _)
				tl_ops_health_check_node_failed(conf, node_id, node)
				break
			end

			tlog:dbg("tl_ops_health_check_nodes send socket ok : byte=", bytes)

			-- socket反馈
			local receive_line, _ = sock:receive()
			if not receive_line then
				if _ == "check_timeout" then
					tlog:err("tl_ops_health_check_nodes socket check_timeout: ", _)
					sock:close()
				end
				tl_ops_health_check_node_failed(conf, node_id, node)
				break
			end

			tlog:dbg("tl_ops_health_check_nodes receive socket ok : ", receive_line)

			local from, to, _ = ngx.re.find(receive_line, [[^HTTP/\d+\.\d+\s+(\d+)]], "joi", nil, 1)
			if not from then
				tlog:err("tl_ops_health_check_nodes ngx.re.find receive err: ", from, to, _)
				sock:close()
				tl_ops_health_check_node_failed(conf, node_id, node)
				break
			end

			-- 心跳状态
			local status = tonumber(string.sub(receive_line, from, to))

			tlog:dbg("tl_ops_health_check_nodes get status ok ,name=" ,name, ", status=" , status)
			local statusPass = false;
			for j = 1, #check_success_status do
				if check_success_status[j] == status then
					statusPass = true
				end
			end

			if statusPass == false then
				tlog:err("tl_ops_health_check_nodes status not pass ,name=" ,name, ", status=" , status)
				tl_ops_health_check_node_failed(conf, node_id, node)
				sock:close()
				break
			end

			-- 心跳成功
			tl_ops_health_check_node_ok(conf, node_id, node)

			tlog:dbg("tl_ops_health_check_nodes node ok")

			sock:close()
			break
		until true
	end

	tlog:dbg("tl_ops_health_check_nodes end ,conf=" , conf, ",nodes=",nodes)
end
心跳成功
心跳成功之后,会累加成功的次数,并清空之前累加的失败次数,当成功累加达到一定的次数后,认为该节点可以用于正常处理请求,即可将改节点状态变更为 上线节点,由此该节点就可以用于请求路由负载节点中
# 代码位置 : health/tl_ops_health_check.lua

-- 心跳检查成功
tl_ops_health_check_node_ok = function (conf, node_id, node)
	tlog:dbg("tl_ops_health_check_node_ok start ,conf=" , conf, ",node=" , node)

	local shared = shared
	local check_success_max_count = conf.check_success_max_count
	local check_service_name = conf.check_service_name

	local key = tl_ops_utils_func:gen_node_key(tl_ops_constant_health.cache_key.success, check_service_name, node_id)
	local cur_success_count, _ = shared:get(key)

	if not cur_success_count then
		cur_success_count = 1
		local ok, _ = shared:set(key, cur_success_count)
		if not ok then
			tlog:err("tl_ops_health_check_node_ok failed to set node ok key: " , key)
		end
	else
		cur_success_count = cur_success_count + 1
		local ok, _ = shared:incr(key, 1)
		if not ok then
			tlog:err("tl_ops_health_check_node_ok failed to incr node ok key: "  , key)
		end
	end

	-- 心跳包成功后,重置之前有过累计的失败次数
	if cur_success_count == 1 then
		key = tl_ops_utils_func:gen_node_key(tl_ops_constant_health.cache_key.failed, check_service_name, node_id)
		local fails, _ = shared:get(key)

		if not fails or fails == 0 then
			if _ then
				tlog:err("tl_ops_health_check_node_ok failed to get node nok key: " , key)
			end
		else
			local ok, _ = shared:set(key, 0)
			if not ok then
				tlog:err("tl_ops_health_check_node_ok failed to set node nok key: " , key)
			end
		end
	end

	-- 该机器当前状态:下线 && 心跳包成功次数 > 配置的次数,将shareDict中该机器的状态置为上线,
	-- {tl_ops_health_check_donw_state:resin-site0:nil}
	if not node.state and cur_success_count >= check_success_max_count then
		local name = node.port .. ":" .. node.ip

		key = tl_ops_utils_func:gen_node_key(tl_ops_constant_health.cache_key.state, check_service_name, node_id)
		local ok, _ = shared:set(key, true)
		if not ok then
			tlog:err("tl_ops_health_check_node_ok failed to set node down state:", _)
		end
		node.state = true

		...

	end

	tlog:dbg("tl_ops_health_check_node_ok end ,node=" , node)
end
心跳失败
心跳失败之后,会累加失败的次数,并清空之前累加的成功次数,当失败累加达到一定的次数后,认为该节点不可以用于正常处理请求,即可将改节点状态变更为 下线节点,由此该节点就应该剔除在正常服务中,就不能用于路由负载使用
# 代码位置 : health/tl_ops_health_check.lua

-- 心跳检查失败
tl_ops_health_check_node_failed = function (conf, node_id, node)
	tlog:dbg("tl_ops_health_check_node_failed start ,conf=" , conf, ",node=" , node)

	local check_failed_max_count = conf.check_failed_max_count
	local check_service_name = conf.check_service_name

	-- key=tl_ops_health_check_failed_count:resin-site0 (health check not ok)
	local key = tl_ops_utils_func:gen_node_key(tl_ops_constant_health.cache_key.failed, check_service_name, node_id)
	local cur_failed_count, _ = shared:get(key)

	if not cur_failed_count then
		cur_failed_count = 1
		local ok, _ = shared:set(key, cur_failed_count)
		if not ok then
			tlog:err("tl_ops_health_check_node_failed failed to set node check_failed_max_count key: " , key)
		end
	else
		cur_failed_count = cur_failed_count + 1
		local ok, _ = shared:incr(key, 1)
		if not ok then
			tlog:err("tl_ops_health_check_node_failed failed to incr node check_failed_max_count key: "  , key)
		end
	end

	-- 心跳包失败后,重置之前有过累计的成功次数
	if cur_failed_count == 1 then
		key = tl_ops_utils_func:gen_node_key(tl_ops_constant_health.cache_key.success, check_service_name, node_id)
		local succ, _ = shared:get(key)

		if not succ or succ == 0 then
			tlog:err("tl_ops_health_check_node_failed failed to get node check_success_max_count key: " , key , " or check_success_max_count = 0")
		else
			local ok, _ = shared:set(key, 0)
			if not ok then
				tlog:err("tl_ops_health_check_node_failed failed to set node check_success_max_count key: " .. key)
			end
		end
	end

	-- 该机器当前状态:在线 && 心跳包失败次数 > 配置的次数,将shareDict中该机器的状态置为下线,
	-- {tl_ops_health_check_donw_state:resin-site0:true}
	if node.state and cur_failed_count > check_failed_max_count then
		local name =  node.ip .. ":" .. node.port

		key = tl_ops_utils_func:gen_node_key(tl_ops_constant_health.cache_key.state, check_service_name, node_id)
		local ok, _ = shared:set(key, nil)
		if not ok then
			tlog:err("tl_ops_health_check_node_failed failed to set node down state:", _)
		end
		node.state = false

		...

	end

	tlog:dbg("tl_ops_health_check_node_failed end ,node=" , node)

end
路由负载
负载均衡的实现是本身nginx是支持配置多种轮询机制的,如权重,随机,备份等。tl-ops-manage提供的负载策略是更加细化的负载。目前支持几种策略 api最长前缀正则匹配负载,cookie键值对匹配负载,请求参数键值对匹配负载,请求头部键值对匹配负载,以及每种策略下支持两种模式的动态切换,指定节点负载 ,随机节点负载。
在服务节点列表中,所有节点是依赖健康检查动态上下线。上线节点加入负载列表,下线节点剔除负载列表。在负载列表中的所有有效节点,将被用作根据负载策略进行负载。
通过下面代码,我们可以看到主入口是放置在 conf 文件中的,通过设置一个节点变量 node 在 rewrite_by_lua_block 阶段执行balance逻辑后,得到具体的node值,从而通过proxy_pass转发到具体节点。
# 代码位置 : conf/tl_ops_manage.conf

location / {
	...
	set $node '';
	rewrite_by_lua_block {
		require("balance.tl_ops_balance"):init();
	}
	proxy_pass $node;
}
接下来,我们看回负载核心逻辑代码 : tl_ops_balance_core_balance,可以看到先获取当前所有服务节点,然后根据负载策略依次匹配,直到命中规则,得到具体节点。
策略匹配顺序为 : api策略 > 请求参数策略 > 请求cookie策略 > 请求头策略 。
匹配到具体规则后,转而匹配域名,如果域名匹配也命中,说明当前请求应该被此条规则所配置的节点处理。
当前在实际负载前,应该要考虑当前节点所配置的流控策略,在流控限制下,如果能拿到令牌或正常留出漏桶,说明当前请求已经被允许转发到上游服务了,当然,如果此时,服务状态不佳,不能正常处理请求,那么就无需转发请求,直接丢弃即可。
# 代码位置 : balance/tl_ops_balance_core.lua

-- 负载核心流程
function _M:tl_ops_balance_core_balance()
    -- 服务节点配置列表
    local service_list_str, _ = cache_service:get(tl_ops_constant_service.cache_key.service_list);

    if not service_list_str then
        ngx.header['Tl-Proxy-Server'] = "";
        ngx.header['Tl-Proxy-State'] = "empty"
        ngx.exit(503)
    end

    local service_list_table = cjson.decode(service_list_str);
    if not service_list_table and type(service_list_table) ~= 'table' then
        ngx.header['Tl-Proxy-Server'] = "";
        ngx.header['Tl-Proxy-State'] = "empty"
        ngx.exit(503)
    end

    -- 负载模式
    local balance_mode = "api"

    -- 先走api负载
    local node, node_state, node_id, host = tl_ops_balance_core_api.tl_ops_balance_api_service_matcher(service_list_table)
    if not node then
        -- api不匹配,走param负载
        balance_mode = "param"

        node, node_state, node_id, host = tl_ops_balance_core_param.tl_ops_balance_param_service_matcher(service_list_table)
        if not node then
            -- param不匹配,走cookie负载
            balance_mode = "cookie"

            node, node_state, node_id, host = tl_ops_balance_core_cookie.tl_ops_balance_cookie_service_matcher(service_list_table)
            if not node then
                -- cookie不匹配,走header负载
                balance_mode = "header"

                node, node_state, node_id, host = tl_ops_balance_core_header.tl_ops_balance_header_service_matcher(service_list_table)
                if not node then
                    -- 无匹配
                    ngx.header['Tl-Proxy-Server'] = "";
                    ngx.header['Tl-Proxy-State'] = "empty"
                    ngx.header['Tl-Proxy-Mode'] = balance_mode
                    ngx.exit(503)
                end
            end
        end
    end

    -- 域名负载
    if host == nil or host == '' then
        ngx.header['Tl-Proxy-Server'] = "";
        ngx.header['Tl-Proxy-State'] = "nil"
        ngx.header['Tl-Proxy-Mode'] = balance_mode
        ngx.exit(503)
    end

    -- 域名匹配
    if host ~= "*" and host ~= ngx.var.host then
        ngx.header['Tl-Proxy-Server'] = "";
        ngx.header['Tl-Proxy-State'] = "pass"
        ngx.header['Tl-Proxy-Mode'] = balance_mode
        ngx.exit(503)
    end

    -- 流控介入
    local depend = tl_ops_balance_core_get_limiter(node.service, node_id)
    if depend then
        -- 令牌桶流控
        if depend == tl_ops_constant_limit.depend.token then
            local token_result = tl_ops_limit_fuse_token_bucket.tl_ops_limit_token( node.service, node_id)
            if not token_result or token_result == false then
                ngx.header['Tl-Proxy-Server'] = "";
                ngx.header['Tl-Proxy-State'] = "t-limit"
                ngx.header['Tl-Proxy-Mode'] = balance_mode
                ngx.exit(503)
            end
        end

        -- 漏桶流控
        if depend == tl_ops_constant_limit.depend.leak then
            local leak_result = tl_ops_limit_fuse_leak_bucket.tl_ops_limit_leak( node.service, node_id)
            if not leak_result or leak_result == false then
                ngx.header['Tl-Proxy-Server'] = "";
                ngx.header['Tl-Proxy-State'] = "l-limit"
                ngx.header['Tl-Proxy-Mode'] = balance_mode
                ngx.exit(503)
            end
        end
    end

    -- 节点下线
    if not node_state or node_state == false then
        -- incr failed count
        local balance_req_fail_count_key = tl_ops_utils_func:gen_node_key(tl_ops_constant_balance.cache_key.req_fail, node.service, node_id)
        local failed_count = shared:get(balance_req_fail_count_key)
		if not failed_count then
			shared:set(balance_req_fail_count_key, 0);
        end
        shared:incr(balance_req_fail_count_key, 1)

        local limit_req_fail_count_key = tl_ops_utils_func:gen_node_key(tl_ops_constant_limit.fuse.cache_key.req_fail, node.service, node_id)
        failed_count = shared:get(limit_req_fail_count_key)
		if not failed_count then
			shared:set(limit_req_fail_count_key, 0);
        end
        shared:incr(limit_req_fail_count_key, 1)

        ngx.header['Tl-Proxy-Server'] = node['service'];
        ngx.header['Tl-Proxy-Node'] = node['name'];
        ngx.header['Tl-Proxy-State'] = "offline"
        ngx.header['Tl-Proxy-Mode'] = balance_mode
        ngx.exit(503)
    end

    -- 负载成功
    local balance_req_succ_count_key = tl_ops_utils_func:gen_node_key(tl_ops_constant_balance.cache_key.req_succ, node.service, node_id)
    local success_count = shared:get(balance_req_succ_count_key)
    if not success_count then
        shared:set(balance_req_succ_count_key, 0);
    end
    shared:incr(balance_req_succ_count_key, 1)

    local limit_req_succ_count_key = tl_ops_utils_func:gen_node_key(tl_ops_constant_limit.fuse.cache_key.req_succ, node.service, node_id)
    success_count = shared:get(limit_req_succ_count_key)
    if not success_count then
        shared:set(limit_req_succ_count_key, 0);
    end
    shared:incr(limit_req_succ_count_key, 1)

    ngx.var.node = node['protocol'] .. node["ip"] .. ':' .. node["port"];
    ngx.header['Tl-Proxy-Server'] = node['service'];
    ngx.header['Tl-Proxy-Node'] = node['name'];
    ngx.header['Tl-Proxy-State'] = "online"
    ngx.header['Tl-Proxy-Mode'] = balance_mode
end
以上就是负载核心思路,下面我将对不同策略以及每种策略下的不同模式进行说明
API最长前缀匹配策略
全称,api最长前缀匹配负载策略,通过请求的URI的最长前缀子串,再拿到所有API负载规则进行匹配,得到命中的API匹配规则,进而得到具体匹配的节点。
# 代码位置 : balance/tl_ops_balance_core_api.lua

local tl_ops_balance_api_service_matcher = function(service_list_table)
    local matcher = nil
    local node = nil

    -- 获取当前url
    local request_uri = tl_ops_utils_func:get_req_uri();

    -- api路由策略
    local api_rule, _ = cache_api:get(tl_ops_constant_api.cache_key.rule);
    if not api_rule then
        return nil, nil, nil, nil
    end

    -- api配置列表
    local api_list, _ = cache_api:get(tl_ops_constant_api.cache_key.list);
    if not api_list then
        return nil, nil, nil, nil
    end
    local api_list_table = cjson.decode(api_list);
    if not api_list_table then
        return nil, nil, nil, nil
    end

    -- 根据路由当前策略进行路由, 返回正则命中的api
    if api_rule == tl_ops_constant_api.rule.point then
        matcher = tl_ops_utils_func:get_table_matcher_longer_str_for_api_list(
            api_list_table, tl_ops_constant_api.rule.point, request_uri
        );
    elseif api_rule == tl_ops_constant_api.rule.random then
        matcher = tl_ops_utils_func:get_table_matcher_longer_str_for_api_list(
            api_list_table, tl_ops_constant_api.rule.random, request_uri
        );
    end

    if not matcher or type(matcher) ~= 'table' then
        return nil, nil, nil, nil
    end

    local service_list = service_list_table[matcher.service]

    -- node balance
    local node_id = matcher.node  -- lua index start 1
    if node_id then
        node = service_list[tonumber(node_id) + 1]
    else
        -- random balance
        math.randomseed(#request_uri)
        node_id = tonumber(math.random(0,1) % #service_list_table[matcher.service]) + 1
        node = service_list[node_id]
    end

    local host = matcher.host
    if not host or host == nil then
        host = ""
    end

    -- 获取当前节点健康状态
    local key = tl_ops_utils_func:gen_node_key(tl_ops_constant_health.cache_key.state, matcher.service, node_id)
    local node_state , _ = shared:get(key)

    return node, node_state, node_id, host
end
COOKIE精准匹配策略
这种策略是精准匹配,获取请求内所有cookie后,再拿到所有cookie负载规则进行匹配,得到命中的cookie匹配规则,进而得到具体匹配的节点。
具体实现代码类似 URI 匹配。
请求参数精准匹配策略
这种策略是精准匹配,获取请求内所有请求参数后,再拿到所有请求参数负载规则进行匹配,得到命中的请求参数匹配规则,进而得到具体匹配的节点。
具体实现代码类似 URI 匹配。
请求头部精准匹配策略
这种策略是精准匹配,获取请求内所有请求头后,再拿到所有请求头负载规则进行匹配,得到命中的请求头匹配规则,进而得到具体匹配的节点。
具体实现代码类似 URI 匹配。
路由统计
路由统计,是在负载均衡模块上扩充的一种功能,在服务进行负载逻辑时,可能存在负载成功,或失败,有些情况下可能需要统计负载情况进行展示。在此需求下,用定时任务实现了统计负载数据。
# 代码位置 : conf/tl_ops_manage.conf

init_worker_by_lua_block {
	...

	-- 启动路由统计
    require("balance.tl_ops_balance_count"):init();
}
我们可以看到主入口在 init_worker_by_lua_block 中调用了定时任务启动器。
关于路由统计启动器主要逻辑如下,大家可以看到这里有加锁操作,因为在启动时存在多worker抢占执行,而统计只需要一个worker执行即可。
获取到锁后,先获取所有服务节点,对所有服务节点的负载成功次数,负载失败次数,时间,进行记录,放置在list中并持久化到store文件中(为避免过多内存暂用,之所以只用store持久即可)
# 代码位置 : conf/tl_ops_manage.conf

-- 统计器 : 持久化数据
local tl_ops_balance_count = function()
	-- 统计器加锁
    if not tl_ops_balance_count_lock() then
        return
    end

    local service_list = nil
    local service_list_str, _ = cache_service:get(tl_ops_constant_service.cache_key.service_list);
    if not service_list_str then
        -- use default
        service_list = tl_ops_constant_service.list
    else
        service_list = cjson.decode(service_list_str);
    end

    -- 控制细度 ,以周期为分割,仅用store持久
    local count_name = "tl-ops-balance-count-" .. tl_ops_constant_balance.count.interval;
    local cache_balance_count = require("cache.tl_ops_cache"):new(count_name);

    for service_name, nodes in pairs(service_list) do
        ...

        for i = 1, #nodes do
            local node_id = i-1
            local cur_count_key = tl_ops_utils_func:gen_node_key(tl_ops_constant_balance.cache_key.req_succ, service_name, node_id)
            local cur_count = shared:get(cur_count_key)
            if not cur_count then
                cur_count = 0
                shared:set(cur_count_key, cur_count)
            end

            -- push to list
            local success_key = tl_ops_utils_func:gen_node_key(tl_ops_constant_balance.cache_key.balance_5min_success, service_name, node_id)
            local balance_5min_success = cache_balance_count:get001(success_key)
            if not balance_5min_success then
                balance_5min_success = {}
            else
                balance_5min_success = cjson.decode(balance_5min_success)
            end

            balance_5min_success[os.date("%Y-%m-%d %H:%M:%S", ngx.now())] = cur_count
            local ok, _ = cache_balance_count:set001(success_key, cjson.encode(balance_5min_success))

            ...

        end
    end
end
熔断限流
熔断限流,其实是服务自动化熔断降级,服务限流两种的组合。
为什么称其为自动化熔断 ?
因为我们在判断服务是否处于 `性能不佳` 状态,而不能及时处理请求时,是需要依据一些服务本身的`健康状态`或实际`负载率`来衡量是否将服务降级,但是我们在进行服务降级后,此服务恢复正常,那么此时该服务应该被升级,用于处理更多请求。而此 ‘服务升级/降级’ 步骤应该实现系统自动化。
对于服务自动化熔断来说,其应该是根据节点 ‘状态’ 来进行一种服务降级的手段。在节点负载过高时,应该对节点减少流量的进入,在服务性能较优时,增加流量的进入,而控制流量的进入就需要用到一些流控手段。所以我将其组合设计。
对于这两种服务治理手段,在各大框架中也有不少应用,如java的spring cloud Hystrix,其实现也是做到了自动化熔断恢复。
自动化熔断
假设某个服务在内存溢出时,不断返回504(请求超时),那这个时候如果其他服务存在rpc一直调用此服务,会导致整个系统被拖垮。所以这个时候应该将此服务降级,让其处理更少的请求或不处理请求。
下面我们看回tl-ops-manage实现自动化熔断代码,依然还是用定时任务来实现,主入口如下
# 代码位置 : conf/tl_ops_manage.conf

init_worker_by_lua_block {
	...
	-- 启动限流熔断
	require("limit.fuse.tl_ops_limit_fuse"):init();
	...
}
进入主入口后,我们可以看到代码和健康检查实现类似,都是启动相应定时器,以及服务配置版本初始化,配置版本号的初始化主要是用于加载最新配置到定时任务中。也用于动态同步配置到worker中
# 代码位置 : limit/fuse/tl_ops_limit_fuse.lua

function _M:init(  )
    -- 给定配置启动限流熔断检查,支持动态加载已有服务变更配置
    local limit_fuse = tl_ops_limit_fuse_check:new(
        tl_ops_constant_limit.fuse.options,  tl_ops_constant_limit.fuse.service
    );
    limit_fuse:tl_ops_limit_fuse_start();

    -- 启动动态新增配置检测
    tl_ops_limit_fuse_check_dynamic_conf.dynamic_conf_add_start()

    -- 默认初始化一次version, 启动时读取最新数据
    for i = 1, #tl_ops_constant_limit.fuse.options do
        local option = tl_ops_constant_limit.fuse.options[i]
        local service_name = option.service_name
        if service_name then
            tl_ops_limit_fuse_check_version.incr_service_version(service_name)
        end
    end

    -- 启动动态检测配置版本
    tl_ops_limit_fuse_check_version.incr_service_option_version()
end
接着我们看回主逻辑 tl_ops_limit_fuse_start,这里的主逻辑前部分和健康检查类似,这里直接讲解定时器中的核心逻辑 tl_ops_limit_fuse_main,可以看到在锁内执行了两段逻辑,除了对服务进行降级升级操作外,多了一个自动恢复逻辑块 tl_ops_limit_fuse_auto_recover,也就是靠这个逻辑来做到自动化熔断恢复的。
# 代码位置 : limit/fuse/tl_ops_limit_fuse_check.lua

tl_ops_limit_fuse_main = function( conf )
	--同步配置
	tl_ops_limit_fuse_check_dynamic_conf.dynamic_conf_change_start( conf )

	-- 自动熔断/恢复
	if tl_ops_limit_fuse_get_lock( conf ) then
		tl_ops_limit_fuse_auto_recover( conf )
		tl_ops_limit_fuse_check_nodes( conf )
	end
end
我们先看主要的自检逻辑tl_ops_limit_fuse_check_nodes,和健康检查自检不同,对于熔断的自检我用的是自检周期内节点负载的失败率来衡量节点处于何种状态。
节点熔断
我们可以看到在自检时,是轮询所有节点,获取每个节点的成功负载次数,负载失败次数,并根据得出的失败率和用户设定的节点失败率作对比,如果超过这个阈值,进行节点降级
,代码里面写的是状态升级,也就是从 0 [正常节点] -> 1 [节点半熔断] -> 2 [节点全熔断]。
# 代码位置 : limit/fuse/tl_ops_limit_fuse_check.lua

tl_ops_limit_fuse_check_nodes = function ( conf )

	...

	-- node层级
	for i = 1, #nodes do
		local node_id = i-1

		local success_count_key = tl_ops_utils_func:gen_node_key(tl_ops_constant_limit.fuse.cache_key.req_succ, service_name, node_id)
		local success_count = shared:get(success_count_key)
		if not success_count then
			success_count = 0
		end

		local failed_count_key = tl_ops_utils_func:gen_node_key(tl_ops_constant_limit.fuse.cache_key.req_fail, service_name, node_id)
		local failed_count = shared:get(failed_count_key)
		if not failed_count then
			failed_count = 0
		end

		local total_count = success_count + failed_count
		if total_count == 0 then
			total_count = -1 	-- can not be 0
		end

		-- 超过阈值
		if failed_count / total_count >= node_threshold then
			upgrade_count = upgrade_count + 1

			tl_ops_limit_fuse_node_upgrade( conf, node_id )
		else
			degrade_count = degrade_count + 1

			tl_ops_limit_fuse_node_degrade( conf, node_id )
		end
	end

	...

	tlog:dbg("tl_ops_limit_fuse_check_nodes done")
end
服务熔断
在轮询完所有节点后,得出每个节点的状态,如果降级节点超过设定的服务阈值,那么进行服务降级
,代码里面写的是状态升级,也就是从 0 [正常服务] -> 1 [服务半熔断] -> 2 [服务全熔断]。
# 代码位置 : limit/fuse/tl_ops_limit_fuse_check.lua

tl_ops_limit_fuse_check_nodes = function ( conf )

	...

	-- service层级
	local service_total_count = upgrade_count + degrade_count
	if service_total_count == 0 then
		service_total_count = -1 	-- can not be 0
	end
	-- 节点状态升级比率超过阈值,对服务进行状态升级
	if upgrade_count / service_total_count >= service_threshold then

		tl_ops_limit_fuse_service_upgrade( conf )
	else

		tl_ops_limit_fuse_service_degrade( conf )
	end

	tlog:dbg("tl_ops_limit_fuse_check_nodes done")
end
动态限流器
在处理完节点/服务的状态时,会并行处理限流器的扩缩容。因为要想做到服务升降级,从而减少进入服务节点的流量,限流器是不可缺少的一部分。而要想要限流器做到随着服务升降级而动态进行限流。就需要用到动态扩缩容的概念
在tl-ops-manage中,我提供了两种限流算法,并整合了这两种算法到熔断逻辑中,我称之为熔断限流器,目前有 令牌桶限流器,漏桶限流器。下面我着重说明下两种限流器的扩缩容实现和整合
令牌桶限流器
令牌桶扩容
我们知道令牌桶是一个容器,之所以它能实现限流,是因为他有最大最小边界值,我们假设桶最大容量为capacity, 那么令牌数量的范围就是 [0, capacity],在某一时刻,这里我们假定容量为 [0, capacity/2],也就是服务处理请求的能力将下降一半,发生扩容后,能够存放令牌的数量将变为 [0, (capacity/2) * 扩容比例]
下面我们看具体实现代码,可以看到首先从shared中拿出 capacity,判定是否在合法值内,如果是,再拿到扩容比例,将其扩容,
# 代码位置 : limit/fuse/tl_ops_limit_fuse_token_bucket_.lua

-- 扩容 熔断定时器中保证锁,所以这里不加锁
local tl_ops_limit_token_expand = function( service_name, node_id )

    local token_mode = tl_ops_limit_token_mode( service_name, node_id)

    local capacity_key = tl_ops_utils_func:gen_node_key(token_mode.cache_key.capacity, service_name, node_id)
    local capacity = shared:get(capacity_key)
    if not capacity then
        local res, _ = shared:set(capacity_key, token_mode.options.capacity)
        if not res then
            return false
        end
        capacity = token_mode.options.capacity
    end

    if capacity <= 1 then
        return false
    end

    local expand_key = tl_ops_utils_func:gen_node_key(token_mode.cache_key.expand, service_name, node_id)
    local expand = shared:get(expand_key)
    if not expand then
        local res, _ = shared:set(expand_key, token_mode.options.expand)
        if not res then
            return false
        end
        expand = token_mode.options.expand
    end

    -- 扩容量 = 当前桶容量 * 比例
    local expand_capacity = capacity * expand

    local capacity_key = tl_ops_utils_func:gen_node_key(token_mode.cache_key.capacity, service_name, node_id)
    local res ,_ = shared:incr(capacity_key, expand_capacity)
    if not res or res == false then
        return false
    end

    return true
end
令牌桶缩容
明白了,上面的的扩容,自然也就能明白缩容了,只是将扩容的值补充负号即可。部分代码如下
# 代码位置 : limit/fuse/tl_ops_limit_fuse_token_bucket_.lua

-- 缩容量 = -当前桶容量 * 比例
local shrink_capacity = capacity * shrink

local res ,_ = shared:incr(capacity_key, -shrink_capacity)
if not res or res == false then
	return false
end
漏桶限流器
漏桶扩容
漏桶的扩缩容也是类似于令牌桶,部分代码如下
# 代码位置 : limit/fuse/tl_ops_limit_fuse_leak_bucket_.lua

-- 扩容量 = 当前桶容量 * 比例
local expand_capacity = capacity * expand

local res ,_ = shared:incr(capacity_key, expand_capacity)
if not res or res == false then
	return false
end
漏桶缩容
# 代码位置 : limit/fuse/tl_ops_limit_fuse_leak_bucket_.lua

-- 缩容量 = -当前桶容量 * 比例
local shrink_capacity = capacity * shrink

local res ,_ = shared:incr(capacity_key, -shrink_capacity)
if not res or res == false then
	return false
end
负载均衡流控
明白了上面的扩缩容,对于取用令牌桶的消费和漏桶的消费也是需要了解的。下面将对两种情况分别介绍
我们可以看到流控接入负载均衡逻辑是在负载核心逻辑中,依赖配置的限流器,选择对应的限流策略。
# 代码位置 : balance/tl_ops_balance_core.lua

-- 流控介入
local depend = tl_ops_balance_core_get_limiter(node.service, node_id)
if depend then
	-- 令牌桶流控
	if depend == tl_ops_constant_limit.depend.token then
		local token_result = tl_ops_limit_fuse_token_bucket.tl_ops_limit_token( node.service, node_id)
		if not token_result or token_result == false then
			ngx.header['Tl-Proxy-Server'] = "";
			ngx.header['Tl-Proxy-State'] = "t-limit"
			ngx.header['Tl-Proxy-Mode'] = balance_mode
			ngx.exit(503)
		end
	end

	-- 漏桶流控
	if depend == tl_ops_constant_limit.depend.leak then
		local leak_result = tl_ops_limit_fuse_leak_bucket.tl_ops_limit_leak( node.service, node_id)
		if not leak_result or leak_result == false then
			ngx.header['Tl-Proxy-Server'] = "";
			ngx.header['Tl-Proxy-State'] = "l-limit"
			ngx.header['Tl-Proxy-Mode'] = balance_mode
			ngx.exit(503)
		end
	end
end
令牌桶流控
令牌桶的实现思路之前我额外写过一些文章来讲解,这里就不细说了 具体可查看我的这篇文章 令牌桶的实现思路
这里需要注意的是,实际令牌桶算法应该要在获取令牌时加锁,避免并发问题。tl-ops-manage 接入负载逻辑中的限流器,并未加锁,所以是允许少量请求并发获取的情况。如果对加锁能接受,可以自行补充锁即可。
# 代码位置 : limit/fuse/tl_ops_limit_fuse_token_bucket.lua

-- block 取用令牌数量
local tl_ops_limit_token = function( service_name, node_id )
    ...

    -- 取出令牌
    if token_bucket > block then
        local ok, _ = shared:incr(token_bucket_key, -block)
        if not ok then
            return false
        end

        return true
    end

    -- 距离上次填充时间差 * 生成速率 = 需要补充的令牌
    ngx.update_time()
    local cur_time = ngx.now()
    local duration_token_bucket = (cur_time - pre_time) * rate
    if duration_token_bucket <= 0 then
        return false
    end

    local new_token_bucket = math.min(token_bucket + duration_token_bucket, capacity)

    -- 令牌还是不够
    if new_token_bucket < block then
        local ok, _ = shared:set(token_bucket_key, new_token_bucket)
        if not ok then
            return false
        end

        local ok, _ = shared:set(pre_time_key, cur_time)
        if not ok then
            return false
        end

        return false
    end

    -- 移除一个令牌
    local ok, _ = shared:set(token_bucket_key, new_token_bucket - block)
    if not ok then
        return false
    end

    local ok, _ = shared:set(pre_time_key, cur_time)
    if not ok then
        return false
    end

    return true
end
漏桶流控
和令牌桶不同,漏桶的实现是依靠向外流出令牌的方式,他们的区别可以大致这么理解,令牌桶是从桶中拿令牌,拿到令牌后执行请求,漏桶是将请求当成令牌,一个一个放入桶。
同令牌桶一致,漏桶限流器也未加锁。需要可自行补充
# 代码位置 : limit/fuse/tl_ops_limit_fuse_leak_bucket.lua

-- block 取用漏桶数量
local tl_ops_limit_leak = function( service_name, node_id )

    ...

    -- 当前堆积量
    local leak_bucket_key = tl_ops_utils_func:gen_node_key(leak_mode.cache_key.leak_bucket, service_name, node_id)
    local leak_bucket, _ = shared:get(leak_bucket_key)
    if not leak_bucket then
        local res, _ = shared:set(leak_bucket_key, 0)
        if not res then
            return false
        end
        leak_bucket = 0
    end

    -- 漏桶当前可堆积请求量 = 当前堆积量 - (在此时间区间应该被漏出的请求量)
    -- ==
    -- 漏桶当前可堆积请求量 = 当前堆积量 - (距离上次时间差 * 漏出速率)
    ngx.update_time()
    local cur_time = ngx.now()
    local lave_leak_bucket = math.max(leak_bucket - (cur_time - pre_time) * rate, 0)

    -- 溢出
    if lave_leak_bucket + block > capacity then
        return false
    end

    local new_leak_bucket = math.min(capacity, lave_leak_bucket + block)
    local ok, _ = shared:set(leak_bucket_key, new_leak_bucket)
    if not ok then
        return false
    end

    local ok, _ = shared:set(pre_time_key, cur_time)
    if not ok then
        return false
    end

    return true
end
动态配置
在tl-ops-manage中。动态配置是一大特性,支持动态更新定时任务中的配置,无需重启nginx或定时任务即可修改规则策略等。
依靠shared共享内存实现,多个worker中依赖一个公共的配置版本号,若有某个worker检测到配置的新增或变动,自增版本号,其他worker执行定时任务前,与共享版本号对比自身配置版本号,若存在新增或变动,同步最新配置到worker内即可
以健康检查配置同步为例,我们可以看到代码如下,该文件提供两个接口, tl_ops_health_check_version_incr_service_version,tl_ops_health_check_version_incr_service_option_version,一个用于控制服务节点的配置数据版本号,一个用于控制服务配置数据版本号。
服务节点配置数据版本号 :例如,某服务下新增一个节点,那么此节点应该被自检定时器所识别,并加入自检列表中,这样才能达到动态节点注册的效果。
服务配置数据版本号 : 例如,健康检查配置的某一项变动,如,心跳包状态码新增 203 也为成功,那么这个改动应该同步到自检中的定时器中,以达到动态修改的目的。
# 代码位置 : health/tl_ops_health_check_version.lua

-- 更新当前service的状态版本,用于通知其他worker进程同步最新conf
local tl_ops_health_check_version_incr_service_version = function( service_name )
    if not service_name then
        tlog:err(" service_name nil ")
        return
    end
    local key = tl_ops_utils_func:gen_node_key(tl_ops_constant_health.cache_key.service_version, service_name)
    local service_version, _ = cache_dict:get(key)

    if not service_version then
        service_version, _ = cache_dict:add(key, 1);
        if not service_version then
            tlog:err(" failed to publish new service_version:" , _)
        end
    else
        service_version, _ = cache_dict:incr(key, 1);
        if not service_version then
            tlog:err(" failed to publish new service_version:" , _)
        end
    end

    return service_version
end


-- 对service_options_version更新,通知timer检查是否有新增service
local tl_ops_health_check_version_incr_service_option_version = function(  )
    local res, _ = cache_dict:set(tl_ops_constant_health.cache_key.service_options_version, true)

    if not res then
        tlog:err(" set service_options_version err " , _)
    end
end
目前支持的配置同步为两种,增量配置同步,修改配置同步。即将支持 删除配置同步。对于增量配置同步和修改配置同步所用的定时器逻辑是不同的。因为增量配置同步需要启动新的定时器,而修改配置是在定时器的基础上去同步配置即可,无需新增定时器。
增量配置同步
代码位置 : health/tl_ops_health_check_dynamic_conf.lua

- 获取当前健康检查的所有service,并对新增的service启动定时器
local tl_ops_health_check_dynamic_conf_add_core = function(options, services)

	-- 暂时还有service的option未同步对应的,先不执行,等到option准备完毕再执行后续逻辑
	local all_service_option_asynced = tl_ops_health_check_dynamic_conf_all_service_option_asynced(options, services)
	if not all_service_option_asynced then
		return
	end

	-- 查看现在已有的service timer,如果没有,说明首次启动,为所有service启动timer
	local timers_str = shared:get(tl_ops_constant_health.cache_key.timers)
	if not timers_str then

		require("health.tl_ops_health_check"):new(options, services):tl_ops_health_check_start();
		shared:set(tl_ops_constant_health.cache_key.service_options_version, nil)
		return
	end

	-- 如果有,查看cache service中的所有服务是否都已启动timer,如果没有, 补充启动相应service timer
	local timers_list = cjson.decode(timers_str)
	for service_name, nodes in pairs(services) do
		local service_name_exist = false
		for i = 1, #timers_list do
			if service_name == timers_list[i] then
				service_name_exist = true;
			end
		end
		if service_name_exist == true then
			tlog:dbg("[add-check] timer exist , service_name=",service_name)
		else
			local matcher_options = tl_ops_health_check_dynamic_conf_get_option( options, service_name)

			require("health.tl_ops_health_check"):new(matcher_options, services):tl_ops_health_check_start();
			shared:set(tl_ops_constant_health.cache_key.service_options_version, nil)
		end
	end
end

-- 同步新增的service option
local tl_ops_health_check_dynamic_conf_add_check = function()

	local version, _ = shared:get(tl_ops_constant_health.cache_key.service_options_version)
	if not version then
		return
	end

	local options_str, _ = cache_health:get(tl_ops_constant_health.cache_key.options_list)
	if not options_str then
		tlog:dbg("[add-check] load dynamic options failed , options_str=",options_str)
		return
	end
	local dynamic_options = cjson.decode(options_str)

	local cache_service = require("cache.tl_ops_cache"):new("tl-ops-service");
	local service_str, _ = cache_service:get(tl_ops_constant_service.cache_key.service_list)
	if not service_str then
		tlog:dbg("[add-check] load dynamic service failed , service_str=",service_str)
		return
	end
	local dynamic_service = cjson.decode(service_str)

	if dynamic_options and dynamic_service then
		tl_ops_health_check_dynamic_conf_add_core(dynamic_options, dynamic_service)
		tlog:dbg("[add-check] async dynamic conf done")
	end
end
修改配置同步
代码位置 : health/tl_ops_health_check_dynamic_conf.lua

-- 同步变更的service信息
local tl_ops_health_check_dynamic_conf_change_core = function( conf, service_version )

	-- 保证更新顺序,service/options > service.nodes > node.state
    tl_ops_health_check_dynamic_conf_change_service_options_async(conf)
    tl_ops_health_check_dynamic_conf_change_service_node_async(conf)
    tl_ops_health_check_dynamic_conf_change_state_async(conf)
	conf.service_version = service_version

end

-- 校验是否需要同步conf变更
local tl_ops_health_check_dynamic_conf_change_check = function( conf )
	local key = tl_ops_utils_func:gen_node_key(tl_ops_constant_health.cache_key.service_version, conf.check_service_name)
	local service_version, _ = shared:get(key)

	if not service_version then
		local ok ,_ = shared:add(key, 1)
		if not ok then
			tlog:err("[change-check] failed to init service_version key, " , _)
		end
		return
	end

	if service_version > conf.service_version then

		tl_ops_health_check_dynamic_conf_change_core( conf, service_version )
    end
end


 1068
1068


 被折叠的 条评论
为什么被折叠?
被折叠的 条评论
为什么被折叠?
 到【灌水乐园】发言


