


elasticsearch一站封神
下载链接: https://download.csdn.net/download/Michael_lcf/86263501
1 linux中es单机安装
1) 解压软件
tar -zxvf elasticsearch-7.8.0-linux-x86_64.tar.gz -C /opt/module
改名
mv elasticsearch-7.8.0 es7

2) 创建用户
因为安全问题,Elasticsearch 不允许 root 用户直接运行,所以要创建新用户,在 root 用户中创建新用户
useradd es7 #新增 es7 用户
echo es7 | passwd --stdin es7 #为es7用户设置密码为es7
userdel -r es7 #如果错了,可以删除再加
chown -R es7:es7 /opt/module/es7 #文件夹所有者

3) 修改配置文件/opt/module/es7/config/elasticsearch.yml文件,加入如下配置:
cluster.name: elasticsearch
node.name: node-1
network.host: 0.0.0.0
http.port: 9200
cluster.initial_master_nodes: ["node-1"]

4) 修改/etc/security/limits.conf
# 在文件末尾中增加下面内容
# 每个进程可以打开的文件数的限制
es7 soft nofile 65536
es7 hard nofile 65536
# 重新登录即可生效
# 可使用命令查看是否生效
ulimit  -H -n


5) 修改/etc/security/limits.d/20-nproc.conf
# 在文件末尾中增加下面内容
# 每个进程可以打开的文件数的限制
es7 soft nofile 65536
es7 hard nofile 65536
# 操作系统级别对每个用户创建的进程数的限制
* hard nproc 4096
# 注:* 带表 Linux 所有用户名称


6) 修改/etc/sysctl.conf
# 在文件中增加下面内容
# 一个进程可以拥有的 VMA(虚拟内存区域)的数量,默认值为 65536
vm.max_map_count=655360

重新加载
sysctl -p
7) 使用 es7 用户启动软件
#前台启动
/opt/module/es7/bin/elasticsearch
#后台启动
/opt/module/es7/bin/elasticsearch -d


8) 防火墙相关操作
systemctl stop firewalld
systemctl enable firewalld.service
systemctl disable firewalld.service


9) 测试软件
浏览器中输入地址:http://192.168.168.101:9200
1) 解压安装kibana
tar -zxvf kibana-7.8.0-linux-x86_64.tar.gz -C /opt/kibana-7.8.0
chown -R myes7:myes7 /opt/kibana-7.8.0

2) 修改 config/kibana.yml 文件
# 设置访问ip
erver.host: "0.0.0.0"
# 默认端口
server.port: 5601
# ES 服务器的地址
elasticsearch.hosts: ["http://192.168.168.101:9200"]
# 索引名
kibana.index: ".kibana"
# 支持中文
i18n.locale: "zh-CN"

3) 启动kibana
nohup /opt/kibana-7.8.0/bin/kibana > /dev/null 2>&1 &

4) 通过浏览器访问:
http://192.168.168.101:5601
2 linux中es集群安装
3 windows中elasticsearch单机安装
解压

解压后的目录结构
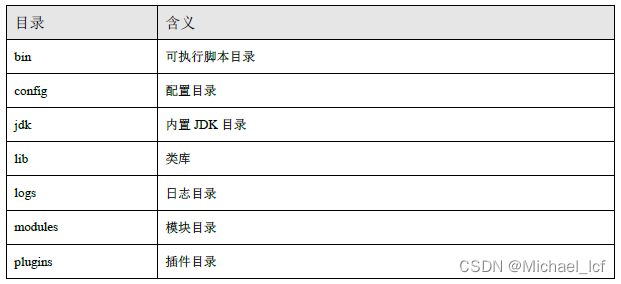
启动elasticsearch
bin/elasticsearch.bat 文件启动 ES 服务
注意:
9300 端口为 elasticsearch 集群间组件的通信端口;
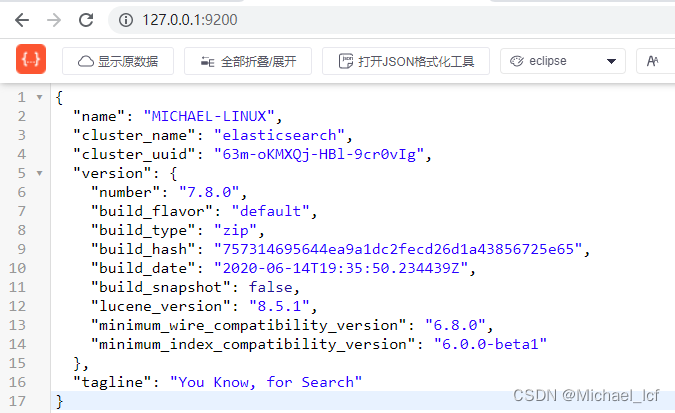
9200 端口为浏览器访问的 http协议 restfull 端口;
浏览器访问:http://localhost:9200
4 kibana安装
1、解压缩下载的 zip 文件
https://artifacts.elastic.co/downloads/kibana/kibana-7.8.0-windows-x86_64.zip
2、修改 config/kibana.yml 文件
# 默认端口
server.port: 5601
# ES 服务器的地址
elasticsearch.hosts: ["http://localhost:9200"]
# 索引名
kibana.index: ".kibana"
# 支持中文
i18n.locale: "zh-CN"
3、 Windows 环境下执行 bin/kibana.bat 文件
4、通过浏览器访问 : http://localhost:5601
3 基本操作
3.1 索引操作
1) 创建索引
PUT:http://127.0.0.1:9200/shopping

============
{
    "acknowledged": true,
    "shards_acknowledged": true,
    "index": "shopping"
}
不可重复创建索引;
2) 查看所有索引
GET:http://127.0.0.1:9200/_cat/indices?v

===========
health status index      uuid                   pri rep  docs.count docs.deleted   store.size    pri.store.size
yellow open   student    rfT7DVzyToSklO3j6FRRRg   1   1          0            0       208b           208b
yellow open   goods      sriB1EQqS5iAvxziJOU9iQ   1   1          0            0       208b           208b

3) 查看单个索引
GET: http://127.0.0.1:9200/shopping

============
{
  "shopping" : {
    "aliases" : { },
    "mappings" : { },
    "settings" : {
      "index" : {
        "creation_date" : "1652014034548",
        "number_of_shards" : "1",
        "number_of_replicas" : "1",
        "uuid" : "_jzlUBikRAiqCrewEi4HJQ",
        "version" : {
          "created" : "7080099"
        },
        "provided_name" : "shopping"
      }
    }
  }
}
4) 删除索引
DELETE /shopping

==============
{
  "acknowledged" : true
}
3.2 文档操作
1) 创建文档
在Postman 中,向 ES 服务器发 POST 请求
http://127.0.0.1:9200/shopping/_doc
如果想要自定义唯一性标识,需要在创建时指定
http://127.0.0.1:9200/shopping/_doc/1
此处需要注意:如果增加数据时明确数据主键,那么请求方式也可以为PUT
# 指定 _id
POST /shopping/_doc/1
# 默认 _id
POST /shopping/_doc
{
	"title":"小米手机",
	"category": "小米",
	"images":"http://www.baidu.com/xm.jpg",
	"price":3999.00
}
====================
{
  "_index" : "shopping",
  "_type" : "_doc",
  "_id" : "_eG3o4AB0LSa-GvBMnym",
  "_version" : 1,
  "result" : "created",
  "_shards" : {
    "total" : 2,
    "successful" : 1,
    "failed" : 0
  },
  "_seq_no" : 0,
  "_primary_term" : 1
}
2)查看文档
查看文档时,需要指明文档的唯一性标识,类似于
MySQL中数据的主键查询
GET /shopping/_doc/1

=============
{
  "_index" : "shopping",
  "_type" : "_doc",
  "_id" : "1",
  "_version" : 10,
  "_seq_no" : 10,
  "_primary_term" : 1,
  "found" : true,
  "_source" : {
    "title" : "小米手机",
    "category" : "小米",
    "images" : "http://www.baidu.com/xm.jpg",
    "price" : 3999.0
  }
}
3)整体修改文档
和新增文档一样,输入相同的
URL地址请求,如果请求体变化,会将原有的数据内容覆盖
在
Postman中,向ES服务器发POST请求http://127.0.0.1:9200/shopping/_doc/1
POST /shopping/_doc/1
{
	"title":"VIVO手机",
	"category": "VIVO",
	"images":"http://www.baidu.com/vivo.jpg",
	"price":6999.00
}

==============
{
  "_index" : "shopping",
  "_type" : "_doc",
  "_id" : "1",
  "_version" : 11,
  "result" : "updated",
  "_shards" : {
    "total" : 2,
    "successful" : 1,
    "failed" : 0
  },
  "_seq_no" : 11,
  "_primary_term" : 1
}
4) 局部修改文档(修改字段值)
修改数据时,也可以只修改某一给条数据的局部信息
POST /shopping/_update/1
{
	"doc":{
		"price":5999.00
	}
}

======================
{
  "_index" : "shopping",
  "_type" : "_doc",
  "_id" : "1",
  "_version" : 12,
  "result" : "updated",
  "_shards" : {
    "total" : 2,
    "successful" : 1,
    "failed" : 0
  },
  "_seq_no" : 12,
  "_primary_term" : 1
}
5) 删除文档
删除一个文档不会立即从磁盘上移除,它只是被标记成已删除(逻辑删除)。
DELETE /shopping/_doc/1

=================
{
  "_index" : "shopping",
  "_type" : "_doc",
  "_id" : "1",
  "_version" : 22,
  "result" : "deleted",
  "_shards" : {
    "total" : 2,
    "successful" : 1,
    "failed" : 0
  },
  "_seq_no" : 22,
  "_primary_term" : 1
}
6) 条件删除文档
先添加数据
POST /shopping/_doc/11
{
	"title":"小米手机",
	"category": "小米",
	"images":"http://www.baidu.com/xm.jpg",
	"price":3999.00
}
POST /shopping/_doc/12
{
	"title":"华为手机",
	"category": "华为",
	"images":"http://www.baidu.com/huawei.jpg",
	"price":6999.00
}
POST /shopping/_doc/13
{
	"title":"VIVO手机",
	"category": "VIVO",
	"images":"http://www.baidu.com/vivo.jpg",
	"price":7999.00
}
==================================
==================================
POST /shopping/_delete_by_query
{
	"query":{
		"match":{
			"price":6999.00
		}
	}
}
=====================
{
  "took" : 39,
  "timed_out" : false,
  "total" : 1,
  "deleted" : 1,
  "batches" : 1,
  "version_conflicts" : 0,
  "noops" : 0,
  "retries" : {
    "bulk" : 0,
    "search" : 0
  },
  "throttled_millis" : 0,
  "requests_per_second" : -1.0,
  "throttled_until_millis" : 0,
  "failures" : [ ]
}
7) 删除全部文档
POST /shopping/_doc/_delete_by_query
{
  "query": {
    "match_all": {}
  }
}
3.3 映射操作
1)创建映射
删除索引
DELETE /student
创建索引
PUT /student
创建文档
POST /student/_doc/11
{
	"name":"李太白",
	"sex": "男",
	"age":"22"
}

创建映射
PUT /student/_mapping

=====================
{
	"properties":{
		"name":{
			"type": "text",
			"index": true
		},
		"sex":{
			"type": "text",
			"index": false
		},
		"age":{
			"type": "long",
			"index": false
		}
	}
}
字段名:任意填写;
type:
String类型:
text:可分词;
keyword:不可分词,数据会作为完整字段进行匹配;
Numerical类型:
基本数据类型:long 、 integer 、 short 、 byte 、 double 、 float 、 half_float;
浮点数的高精度类型:scaled_float;
Date日期类型:
Array数组类型:
Object对象:
index:是否索引,默认为 true(即所有字段都会被索引)。
true:字段会被索引,则可以用来进行搜索
false:字段不会被索引,不能用来搜索
store:是否将数据进行独立存储,默认为 false
原始的文本会存储在_source 里面,默认情况下其他提取出来的字段都不是独立存储的,是从 _source 里面提取出来的。当然你也可以独立的存储某个字段,只要设置"store": true 即可,获取独立存储的字段要比从 _source 中解析快得多,但是也会占用更多的空间,所以要根据实际业务需求来设置。
analyzer:分词器,这里的 ik_max_word 即使用 ik 分词器;
1、ik_max_word:会对文本做最细 力度的拆分,索引时面面俱到。
2、ik_smart:会对文本做最粗粒度的拆分,搜索时精准匹配。
插入文档时,将text类型的字段做分词然后插入倒排索引:
"analyzer": "ik_max_word",
在查询时,先对要查询的text类型的输入做分词,再去倒排索引搜索:
"search_analyzer": "ik_smart",
2) 查看映射
GET /student/_mapping

========================
{
  "student" : {
    "mappings" : {
      "properties" : {
        "age" : {
          "type" : "long",
          "index" : false
        },
        "name" : {
          "type" : "text"
        },
        "sex" : {
          "type" : "text",
          "index" : false
        }
      }
    }
  }
}
3)同时创建索引映射关联
PUT /my_student
{
	"settings":{},
	"mappings":{
		"properties":{
			"name":{
				"type": "keyword",
				"index": true
			},
			nickname:{
				"type": "text",
				"index": false
			}
			"sex":{
				"type": "text",
				"index": false
			},
			"age":{
				"type": "long",
				"index": false
			}
		}
	}
}
3.4 高级查询
Elasticsearch提供了基于 JSON 提供完整的查询 DSL 来定义查询;
// 创建测试数据:
POST /student/_doc/1001
{
	"name":"李太白",
	"nickname":"青莲居士",
	"sex":"男",
	"age":33
}

POST /student/_doc/1002
{
	"name":"李清照",
	"nickname":"易安居士",
	"sex":"女",
	"age":22
}

POST /student/_doc/1003
{
	"name":"白居易",
	"nickname":"香山居士",
	"sex":"男",
	"age":28
}

POST /student/_doc/1004
{
	"name":"李贺",
	"nickname":"诗鬼",
	"sex":"男",
	"age":25
}

POST /student/_doc/1005
{
	"name":"DuFu",
	"nickname":"诗圣",
	"sex":"男",
	"age":36
}
1) 查询所有文档
GET /student/_search

===================
{
  "took" : 857,
  "timed_out" : false,
  "_shards" : {
    "total" : 1,
    "successful" : 1,
    "skipped" : 0,
    "failed" : 0
  },
  "hits" : {
    "total" : {
      "value" : 5,
      "relation" : "eq"
    },
    "max_score" : 1.0,
    "hits" : [
      {
        "_index" : "student",
        "_type" : "_doc",
        "_id" : "11",
        "_score" : 1.0,
        "_source" : {
          "name" : "李太白",
          "sex" : "男",
          "age" : "22"
        }
      },
      。。。。。。
      。。。。。。
    ]
  }
}
2) 单字段匹配查询 match
GET /student/_search
{
  "query":{
    "match":{
      "name": "贺"
    }
  }
}

=========================
{
  "took" : 0,
  "timed_out" : false,
  "_shards" : {
    "total" : 1,
    "successful" : 1,
    "skipped" : 0,
    "failed" : 0
  },
  "hits" : {
    "total" : {
      "value" : 1,
      "relation" : "eq"
    },
    "max_score" : 1.5697745,
    "hits" : [
      {
        "_index" : "student",
        "_type" : "_doc",
        "_id" : "1004",
        "_score" : 1.5697745,
        "_source" : {
          "name" : "李贺",
          "nickname" : "诗鬼",
          "sex" : "男",
          "age" : 25
        }
      }
    ]
  }
}
3) 多字段匹配查询 multi_match
GET /student/_search
{
  "query":{
    "multi_match":{
      "query": "贺",
      "fields": ["name","nickname"]
    }
  }
}

=======================
{
  "took" : 0,
  "timed_out" : false,
  "_shards" : {
    "total" : 1,
    "successful" : 1,
    "skipped" : 0,
    "failed" : 0
  },
  "hits" : {
    "total" : {
      "value" : 1,
      "relation" : "eq"
    },
    "max_score" : 1.5697745,
    "hits" : [
      {
        "_index" : "student",
        "_type" : "_doc",
        "_id" : "1004",
        "_score" : 1.5697745,
        "_source" : {
          "name" : "李贺",
          "nickname" : "诗鬼",
          "sex" : "男",
          "age" : 25
        }
      }
    ]
  }
}
4) 关键字精确查询
term
查询,精确的关键词匹配查询,不对查询条件进行分词。
在
Postman 中,向 ES 服务器发 GET 请求 http://127.0.0.1:9200/student/_search
GET /student/_search
{
  "query":{
    "term":{
      "name": {
        "value": "DuFu"
      }
    }
  }
}

=======================
试验没有查到数据,好奇怪?????????
{
  "took" : 0,
  "timed_out" : false,
  "_shards" : {
    "total" : 1,
    "successful" : 1,
    "skipped" : 0,
    "failed" : 0
  },
  "hits" : {
    "total" : {
      "value" : 0,
      "relation" : "eq"
    },
    "max_score" : null,
    "hits" : [ ]
  }
}
5) 多关键字精确查询
terms 和 term 查询一样,但它允许你指定多值进行匹配。类似于mysql 的 in。
GET /student/_search
{
  "query":{
    "terms":{
      "name": ["DuFu","李太白"]
    }
  }
}

=======================
试验没有查到数据,好奇怪?????????
6) 指定查询字段1
默认情况下,Elasticsearch 在搜索的结果中,会把文档中保存在 _source 的所有字段都返回。
添加_source 的过滤,获取其中的部分字段。
GET /student/_search
{
  "_source": ["name","nickname"],
  "query":{
    "match":{
      "name": "白居易"
    }
  }
}

=====================
{
  "took" : 450,
  "timed_out" : false,
  "_shards" : {
    "total" : 1,
    "successful" : 1,
    "skipped" : 0,
    "failed" : 0
  },
  "hits" : {
    "total" : {
      "value" : 2,
      "relation" : "eq"
    },
    "max_score" : 4.4009094,
    "hits" : [
      {
        "_index" : "student",
        "_type" : "_doc",
        "_id" : "1003",
        "_score" : 4.4009094,
        "_source" : {
          "name" : "白居易",
          "nickname" : "香山居士"
        }
      },
      {
        "_index" : "student",
        "_type" : "_doc",
        "_id" : "1001",
        "_score" : 1.2052968,
        "_source" : {
          "name" : "李太白",
          "nickname" : "青莲居士"
        }
      }
    ]
  }
}
7) 指定查询字段2
includes :来指定想要显示的字段;
excludes :来指定不想要显示的字段;
GET /student/_search
{
  "_source":{
    "excludes": ["name","nickname"]
  },
  "query":{
    "match":{
      "name": "白居易"
    }
  }
}

==============================
{
  "took" : 1,
  "timed_out" : false,
  "_shards" : {
    "total" : 1,
    "successful" : 1,
    "skipped" : 0,
    "failed" : 0
  },
  "hits" : {
    "total" : {
      "value" : 2,
      "relation" : "eq"
    },
    "max_score" : 3.309578,
    "hits" : [
      {
        "_index" : "student",
        "_type" : "_doc",
        "_id" : "1003",
        "_score" : 3.309578,
        "_source" : {
          "sex" : "男",
          "age" : 28
        }
      },
      {
        "_index" : "student",
        "_type" : "_doc",
        "_id" : "1001",
        "_score" : 0.79423964,
        "_source" : {
          "sex" : "男",
          "age" : 33
        }
      }
    ]
  }
}
8) 组合查询
bool 把各种其它查询通过 must、 must_ not、 should 的方式进行组合
GET /student/_search
{
	"query": {
		"bool": {
			"must": [
				{
					"match": {
						"name":"白居易"
					}
				}
			],
			"must_not": [
				{
					"match": {
						"age":"28"
					}
				}
			],
			"should": [
				{
					"match": {
						"sex": "女"
					}
				}
			]
		}
	}
}

==================
{
  "took" : 1,
  "timed_out" : false,
  "_shards" : {
    "total" : 1,
    "successful" : 1,
    "skipped" : 0,
    "failed" : 0
  },
  "hits" : {
    "total" : {
      "value" : 1,
      "relation" : "eq"
    },
    "max_score" : 0.79423964,
    "hits" : [
      {
        "_index" : "student",
        "_type" : "_doc",
        "_id" : "1001",
        "_score" : 0.79423964,
        "_source" : {
          "name" : "李太白",
          "nickname" : "青莲居士",
          "sex" : "男",
          "age" : 33
        }
      }
    ]
  }
}
9) range范围查询

GET /student/_search
{
  "query":{
    "range":{
      "age":{
        "gte": 33,
        "lte": 36
      }
    }
  }
}

===================
{
  "took" : 0,
  "timed_out" : false,
  "_shards" : {
    "total" : 1,
    "successful" : 1,
    "skipped" : 0,
    "failed" : 0
  },
  "hits" : {
    "total" : {
      "value" : 2,
      "relation" : "eq"
    },
    "max_score" : 1.0,
    "hits" : [
      {
        "_index" : "student",
        "_type" : "_doc",
        "_id" : "1001",
        "_score" : 1.0,
        "_source" : {
          "name" : "李太白",
          "nickname" : "青莲居士",
          "sex" : "男",
          "age" : 33
        }
      },
      {
        "_index" : "student",
        "_type" : "_doc",
        "_id" : "1005",
        "_score" : 1.0,
        "_source" : {
          "name" : "DuFu",
          "nickname" : "诗圣",
          "sex" : "男",
          "age" : 36
        }
      }
    ]
  }
}
10) 模糊查询
返回包含与搜索字词相似的字词的文档。
编辑距离是将一个术语转换为另一个术语所需的一个字符更改的次数。这些更改可以包括:
更改字符(
box -> fox)
删除字符(black -> lack)
插入字符(sic -> sick)
转置两个相邻字符(act -> cat)
为了找到相似的术语,
fuzzy 查询会在指定的编辑距离内创建一组搜索词的所有可能的变体或扩展。然后查询返回每个扩展的完全匹配。
通过fuzziness 修改编辑距离。一般使用默认值 AUTO ,根据术语的长度生成编辑距离。
GET /student/_search
{
  "query":{
    "fuzzy":{
      "name":{
        "value": "白"
      }
    }
  }
}

=====================
{
  "took" : 0,
  "timed_out" : false,
  "_shards" : {
    "total" : 1,
    "successful" : 1,
    "skipped" : 0,
    "failed" : 0
  },
  "hits" : {
    "total" : {
      "value" : 2,
      "relation" : "eq"
    },
    "max_score" : 0.79423964,
    "hits" : [
      {
        "_index" : "student",
        "_type" : "_doc",
        "_id" : "1001",
        "_score" : 0.79423964,
        "_source" : {
          "name" : "李太白",
          "nickname" : "青莲居士",
          "sex" : "男",
          "age" : 33
        }
      },
      {
        "_index" : "student",
        "_type" : "_doc",
        "_id" : "1003",
        "_score" : 0.79423964,
        "_source" : {
          "name" : "白居易",
          "nickname" : "香山居士",
          "sex" : "男",
          "age" : 28
        }
      }
    ]
  }
}
11) 单字段排序
sort可以让我们按照不同的字段进行排序,并且通过 order 指定排序的方式。 desc 降序, asc升序。
GET /student/_search
{
  "_source": {
    "excludes": [
      "nickname",
      "sex"
    ]
  },
  "query": {
    "match": {
      "name": "李太白"
    }
  },
  "sort": [
    {
      "age": {
        "order": "desc"
      }
    }
  ]
}

==============================
{
  "took" : 1,
  "timed_out" : false,
  "_shards" : {"total" : 1, "successful" : 1, "skipped" : 0, "failed" : 0 },
  "hits" : {
    "total" : {"value" : 4, "relation" : "eq" },
    "max_score" : null,
    "hits" : [
      {"_index" : "student", "_type" : "_doc", "_id" : "1001", "_score" : null,
	   "_source" : {"name" : "李太白", "age" : 33},
        "sort" : [ 33 ]
      },
      {"_index" : "student", "_type" : "_doc", "_id" : "1003", "_score" : null,
       "_source" : {"name" : "白居易", "age" : 28},
        "sort" : [ 28 ]
      },
      {"_index" : "student", "_type" : "_doc", "_id" : "1004", "_score" : null,
       "_source" : {"name" : "李贺", "age" : 25},
        "sort" : [ 25 ]
      },
      {"_index" : "student", "_type" : "_doc", "_id" : "1002", "_score" : null,
       "_source" : {"name" : "李清照", "age" : 22},
        "sort" : [ 22 ]
      }
    ]
  }
}
12) 多字段排序
GET /student/_search
{
  "_source": {
    "excludes": [
      "nickname",
      "sex"
    ]
  },
  "query": {
    "match_all": {

    }
  },
  "sort": [
    {
      "age": {
        "order": "desc"
      }
    },
    {
      "score": {
        "order": "asc"
      }
    }
  ]
}

=========================
13) 高亮查询
在进行关键字搜索时,搜索出的内容中的关键字会显示不同的颜色,称之为高亮。
在使用
match 查询的同时,加上一个 highlight 属性:
pre_tags :前置标签
post_tags :后置标签
fields :需要高亮的字段
title :这里声明 title 字段需要高亮,后面可以为这个字段设置特有配置, 也可以空
GET /student/_search
{
	"query":{
		"match":{
			"name":"贺"
		}
	},
	"highlight":{
		"pre_tags": "<font color='red'>",
		"post_tags": "</font>",
		"fields":{
			"name":{}
		}
	}
}

======================
{
  "took" : 1,
  "timed_out" : false,
  "_shards" : {
    "total" : 1,
    "successful" : 1,
    "skipped" : 0,
    "failed" : 0
  },
  "hits" : {
    "total" : {
      "value" : 1,
      "relation" : "eq"
    },
    "max_score" : 1.4877305,
    "hits" : [
      {
        "_index" : "student",
        "_type" : "_doc",
        "_id" : "1004",
        "_score" : 1.4877305,
        "_source" : {
          "name" : "李贺",
          "nickname" : "诗鬼",
          "sex" : "男",
          "age" : 25
        },
        "highlight" : {
          "name" : [
            "李<font color='red'>贺</font>"
          ]
        }
      }
    ]
  }
}
14) 分页查询
from:当前页的起始索引,默认从 0 开始。
f
r
o
m
=
(
p
a
g
e
N
u
m
−
1
)
∗
s
i
z
e
from = (pageNum-1) * size
from=(pageNum−1)∗size
size:每页显示多少条
GET /student/_search
{
  "from": 0,
  "size": 2,
  "_source": {
    "excludes": [
      "nickname",
      "sex"
    ]
  },
  "query": {
    "match_all": {

    }
  },
  "sort": [
    {
      "age": {
        "order": "desc"
      }
    }
  ]
}

================
{
  "took" : 1,
  "timed_out" : false,
  "_shards" : {
    "total" : 1,
    "successful" : 1,
    "skipped" : 0,
    "failed" : 0
  },
  "hits" : {
    "total" : {
      "value" : 5,
      "relation" : "eq"
    },
    "max_score" : null,
    "hits" : [
      {
        "_index" : "student",
        "_type" : "_doc",
        "_id" : "1005",
        "_score" : null,
        "_source" : {
          "name" : "DuFu",
          "age" : 36
        },
        "sort" : [
          36
        ]
      },
      {
        "_index" : "student",
        "_type" : "_doc",
        "_id" : "1001",
        "_score" : null,
        "_source" : {
          "name" : "李太白",
          "age" : 33
        },
        "sort" : [
          33
        ]
      }
    ]
  }
}
15) 聚合查询
对某个字段取最大值 max
GET /student/_search
{
  "aggs":{
    "max_age":{
      "max":{"field":"age"}
    }
  },
  "size":0
}
对某个字段取最小值 min
GET /student/_search
{
  "aggs":{
    "min_age":{
      "min":{"field":"age"}
    }
  },
  "size":0
}
对某个字段求和 sum
GET /student/_search
{
  "aggs":{
    "sum_age":{
      "sum":{"field":"age"}
    }
  },
  "size":0
}
对某个字段取平均值 avg
GET /student/_search
{
  "aggs":{
    "avg_age":{
      "avg":{"field":"age"}
    }
  },
  "size":0
}
对某个字段的值进行去重之后再取总数
GET /student/_search
{
  "aggs":{
    "distinct_age":{
      "cardinality":{"field":"age"}
    }
  },
  "size":0
}
State 聚合
stats聚合,对某个字段一次性返回 count max min avg 和 sum 五个指标。
GET /student/_search
{
  "aggs":{
    "stats_age":{
      "stats":{"field":"age"}
    }
  },
  "size":0
}
16) 桶聚合查询
桶聚和相当于sql 中的 group by 语句
terms 聚合,分组统计
GET /student/_search
{
  "aggs":{
    "age_group_by":{
      "terms":{"field":"age"}
    }
  },
  "size":0
}
在 terms 分组下再进行聚合
GET /student/_search
{
  "aggs":{
    "age_group_by":{
      "terms":{"field":"age"}
    }
  },
  "size":0
}
4 我的测试
GET /_cat/indices?v

PUT /mydrug

POST /mydrug/_mapping
{
	"properties":{
		"name":{
			"type": "text",
			"index": true
		},
		"jianpin":{
			"type": "text",
			"index": true
		},
		"quanpin":{
			"type": "text",
			"index": true
		}
	}
}

GET /mydrug/_mapping


POST /mydrug/_doc/1001
{
	"name":"北豆根",
	"jianpin":"bdg",
	"quanpin":"beidougen"
}

POST /mydrug/_doc/1002
{
	"name":"麸炒冬瓜子",
	"jianpin":"fcdgp",
	"quanpin":"fuchaodongguazi"
}

POST /mydrug/_doc/1003
{
	"name":"当归尾",
	"jianpin":"dgw",
	"quanpin":"dangguiwei"
}

POST /mydrug/_doc/1004
{
	"name":"山豆根",
	"jianpin":"sdg",
	"quanpin":"shandougen"
}

POST /mydrug/_doc/1005
{
	"name":"冬瓜皮",
	"jianpin":"dgp",
	"quanpin":"dongguapi"
}

POST /mydrug/_doc/1006
{
	"name":"当归",
	"jianpin":"dg",
	"quanpin":"danggui"
}

GET /mydrug/_search
{
  "query":{
    "match":{
      "jianpin": "dg"
    }
  }
}

GET /mydrug/_search
{
  "query":{
    "match_phrase":{
      "jianpin": "dg"
    }
  }
}

GET /mydrug/_search
{
  "query":{
    "match_phrase_prefix":{
      "jianpin": "dg"
    }
  }
}

GET /mydrug/_search
{
  "query":{
    "match":{
      "name": "当"
    }
  }
}

GET /mydrug/_search
{
  "query":{
    "match":{
      "name": "皮"
    }
  }
}


 1万+
1万+


 被折叠的 条评论
为什么被折叠?
被折叠的 条评论
为什么被折叠?
 到【灌水乐园】发言


