


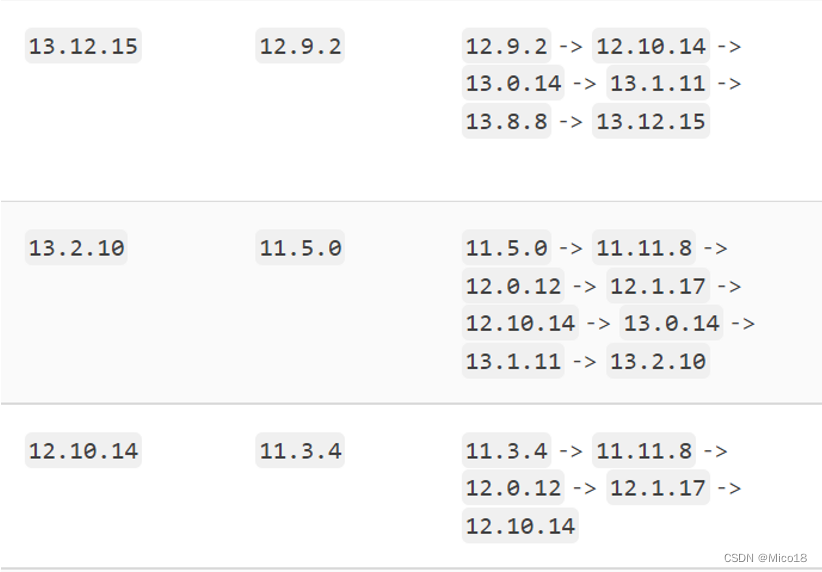
升级顺序
12.10.14—>13.0.14—>13.1.11—>13.8.8—>13.12.15
注意:
在实际生产环境1800个项目出问题了大概5个项目,所以最好手动做好备份,如果真的丢失可以参考我的恢复gitlal项目恢复
1.此顺序参照官方文档
2.升级前会自动备份配置,所以以下没有备份
3.每次升级完请检查以下项目
①ldap账户是否能够登录
②是否能拉取和上传项目
③总在线runners数是否一致
④项目runner是否在线**
一.12.10.14安装
#安装依赖
yum -y install policycoreutils openssh-server openssh-clients postfix policycoreutils-python

cd /tmp
wget https://mirrors.tuna.tsinghua.edu.cn/gitlab-ce/yum/el7/gitlab-ce-12.10.14-ce.0.el7.x86_64.rpm

rpm -ivh gitlab-ce-12.10.14-ce.0.el7.x86_64.rpm

vim /etc/gitlab/gitlab.rb
external_url 'http://ip'
prometheus['enable'] = false

gitlab-ctl  reconfigure
gitlab-ctl  start
gitlab-ctl  status
二.12.10.14—>13.0.14
#停止组件
gitlab-ctl stop unicorn
gitlab-ctl stop sidekiq
gitlab-ctl stop nginx

#下载新版
cd /tmp
wget https://mirrors.tuna.tsinghua.edu.cn/gitlab-ce/yum/el7/gitlab-ce-13.0.14-ce.0.el7.x86_64.rpm

#安装配置重启
rpm -Uvh gitlab-ce-13.0.14-ce.0.el7.x86_64.rpm
gitlab-ctl  reconfigure
gitlab-ctl  restart
三.13.0.14—>13.1.11
#1.下载新版
cd /tmp
wget https://mirrors.tuna.tsinghua.edu.cn/gitlab-ce/yum/el7/gitlab-ce-13.1.11-ce.0.el7.x86_64.rpm

#2.停止组件
gitlab-ctl stop sidekiq
gitlab-ctl stop nginx

#3.安装配置重启
rpm -Uvh gitlab-ce-13.1.11-ce.0.el7.x86_64.rpm
gitlab-ctl  reconfigure
gitlab-ctl  restart
四.13.1.11—>13.8.8
#1.下载新版
cd /tmp
wget https://mirrors.tuna.tsinghua.edu.cn/gitlab-ce/yum/el7/gitlab-ce-13.8.8-ce.0.el7.x86_64.rpm

#2.停止组件
gitlab-ctl stop sidekiq
gitlab-ctl stop nginx

#3.安装配置重启
rpm -Uvh gitlab-ce-13.8.8-ce.0.el7.x86_64.rpm
gitlab-ctl  reconfigure
gitlab-ctl  restart
五.13.8.8—>13.12.15
#1.下载新版
cd /tmp
wget https://mirrors.tuna.tsinghua.edu.cn/gitlab-ce/yum/el7/gitlab-ce-13.12.15-ce.0.el7.x86_64.rpm

#2.停止组件
gitlab-ctl stop sidekiq
gitlab-ctl stop nginx

#3.安装配置重启
rpm -Uvh gitlab-ce-13.12.15-ce.0.el7.x86_64.rpm
gitlab-ctl  reconfigure
gitlab-ctl  restart


 399
399


 被折叠的 条评论
为什么被折叠?
被折叠的 条评论
为什么被折叠?
 到【灌水乐园】发言


