


自己动手实现一个MVVM库
我们知道的,常见的数据绑定的实现方法
1、数据劫持(vue):通过Object.defineProperty() 去劫持数据每个属性对应的getter和setter
2、脏值检测(angular):通过特定事件比如input,change,xhr请求等进行脏值检测。
3、发布-订阅模式(backbone):通过发布消息,订阅消息进行数据和视图的绑定监听。具体代码实现可以参考我github个人仓库overwrite->my-observer
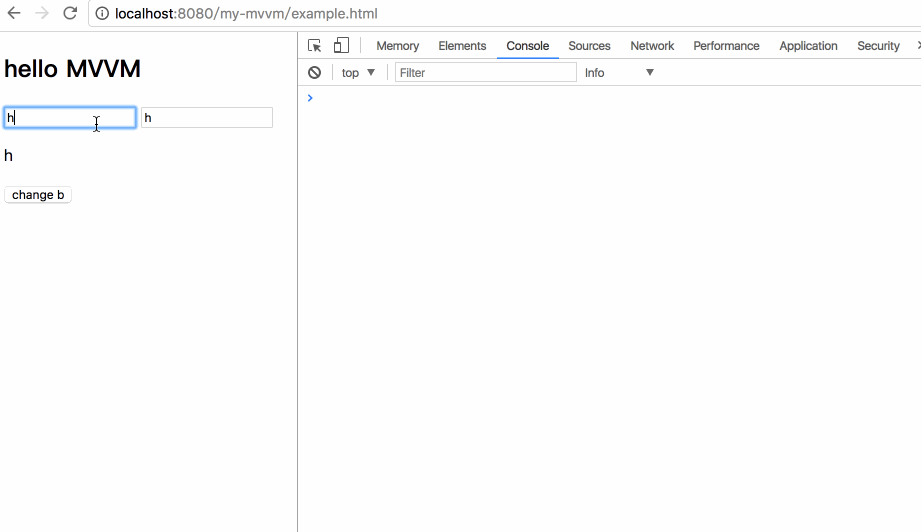
一言不合先上代码和效果图吧
code
<!DOCTYPE html>
<html lang="en">
<head>
  <meta charset="UTF-8">
  <meta name="viewport" content="width=device-width, initial-scale=1.0">
  <meta http-equiv="X-UA-Compatible" content="ie=edge">
  <title>example</title>
  <script src="./mvvm.js" charset="utf-8"></script>
</head>
<body>
  <div id="mvvm">
    <h2>{{b}}</h2>
    <input type="text" x-model="a">
    <input type="text" name="" value="" x-model="a">
    <p x-html="a">{{ a }}</p>
    <button type="button" name="button" x-on:click="testToggle">change b</button>
  </div>
</body>
<script>
var vm = new MVVM({
  el: '#mvvm',
  data: {
    a: 'test model',
    b: 'hello MVVM',
    flag: true
  },
  methods: {
    testToggle: function () {
      this.flag = !this.flag;
      this.b = this.flag ? 'hello MVVM' : 'test success'
    }
  }
});
</script>
</html>
效果图
看完效果图之后,接下来我们直接搞事情吧
一、总体大纲
要实现一个我们自己的mvvm库,我们首先需要做的事情不是写代码,而是整理一下思路,捋清楚之后再动手绝对会让你事半功倍。先上流程图,我们对着流程图来捋思路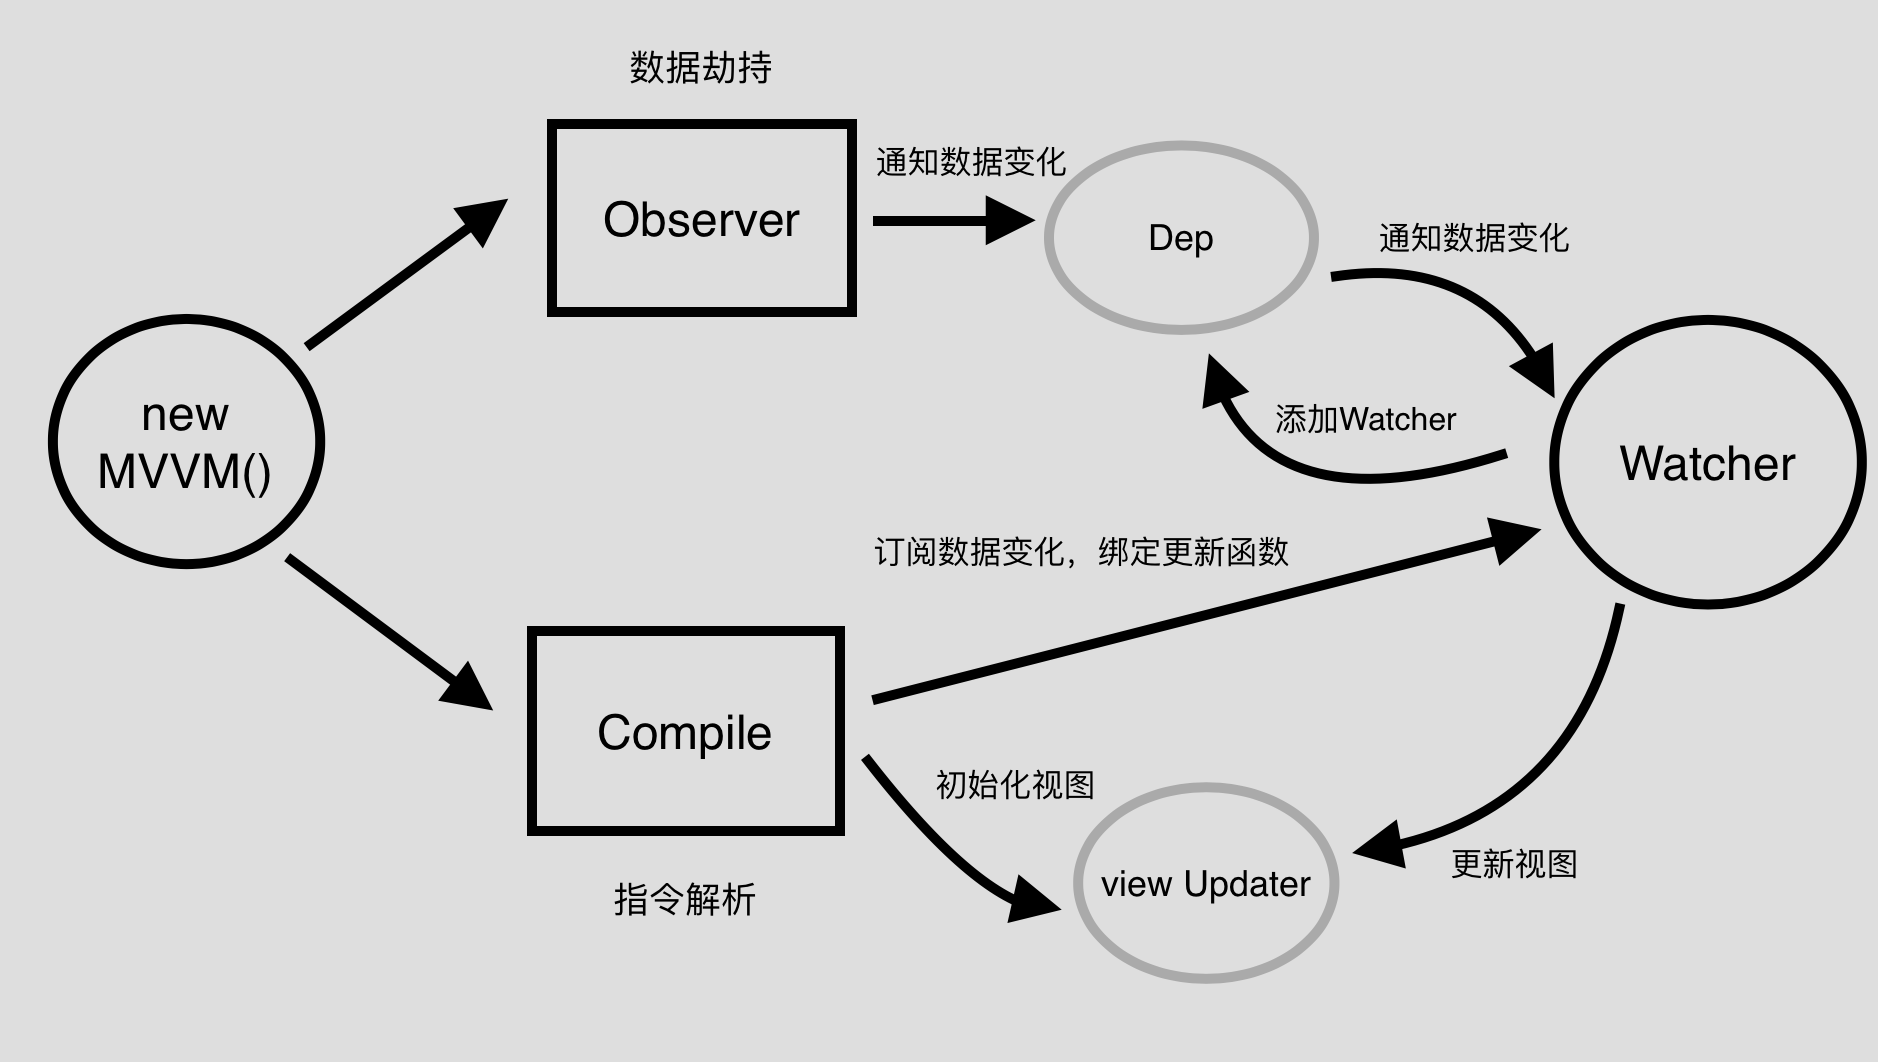
如上图所示,我们可以看到,整体实现分为四步
1、实现一个Observer,对数据进行劫持,通知数据的变化
2、实现一个Compile,对指令进行解析,初始化视图,并且订阅数据的变更,绑定好更新函数
3、实现一个Watcher,将其作为以上两者的一个中介点,在接收数据变更的同时,让Dep添加当前Watcher,并及时通知视图进行update
4、实现MVVM,整合以上三者,作为一个入口函数
二、动手时间
思路捋清楚了,接下来要做的事就是开始动手。 能动手的我决不动口
1、实现Observer
这里我们需要做的事情就是实现数据劫持,并将数据变更给传递下去。那么这里将会用到的方法就是Object.defineProperty()来做这么一件事。先不管三七二十一,咱先用用Object.defineProperty()试试手感。
function observe (data) {
  if (!data || typeof data !== 'object') {
    return;
  }
  Object.keys(data).forEach(key => {
    observeProperty(data, key, data[key])
  })
}
function observeProperty (obj, key, val) {
  observe(val);
  Object.defineProperty(obj, key, {
    enumerable: true,   // 可枚举
    configurable: true, // 可重新定义
    get: function () {
      return val;
    },
    set: function (newVal) {
      if (val === newVal || (newVal !== newVal && val !== val)) {
        return;
      }
      console.log('数据更新啦 ', val, '=>', newVal);
      val = newVal;
    }
  });
}
调用
var data = {
  a: 'hello'
}
observe(data);
效果如下
看完是不是发现JavaScript提供给我们的Object.defineProperty()方法功能巨强大巨好用呢。
其实到这,我们已经算是完成了数据劫持,完整的Observer则需要将数据的变更传递给Dep实例,然后接下来的事情就丢给Dep去通知下面完成接下来的事情了,完整代码如下所示
/**
 * @class 发布类 Observer that are attached to each observed
 * @param {[type]} value [vm参数]
 */
 function observe(value, asRootData) {
   if (!value || typeof value !== 'object') {
     return;
   }
   return new Observer(value);
 }

function Observer(value) {
  this.value = value;
  this.walk(value);
}

Observer.prototype = {
  walk: function (obj) {
    let self = this;
    Object.keys(obj).forEach(key => {
      self.observeProperty(obj, key, obj[key]);
    });
  },
  observeProperty: function (obj, key, val) {
    let dep = new Dep();
    let childOb = observe(val);
    Object.defineProperty(obj, key, {
      enumerable: true,
      configurable: true,
      get: function() {
        if (Dep.target) {
          dep.depend();
        }
        if (childOb) {
          childOb.dep.depend();
        }
        return val;
      },
      set: function(newVal) {
        if (val === newVal || (newVal !== newVal && val !== val)) {
          return;
        }
        val = newVal;
        // 监听子属性
        childOb = observe(newVal);
        // 通知数据变更
        dep.notify();
      }
    })
  }
}
/**
 * @class 依赖类 Dep
 */
let uid = 0;
function Dep() {
  // dep id
  this.id = uid++;
  // array 存储Watcher
  this.subs = [];
}
Dep.target = null;
Dep.prototype = {
  /**
   * [添加订阅者]
   * @param  {[Watcher]} sub [订阅者]
   */
  addSub: function (sub) {
    this.subs.push(sub);
  },
  /**
   * [移除订阅者]
   * @param  {[Watcher]} sub [订阅者]
   */
  removeSub: function (sub) {
    let index = this.subs.indexOf(sub);
    if (index !== -1) {
      this.subs.splice(index ,1);
    }
  },
  // 通知数据变更
  notify: function () {
    this.subs.forEach(sub => {
      // 执行sub的update更新函数
      sub.update();
    });
  },
  // add Watcher
  depend: function () {
    Dep.target.addDep(this);
  }
}
// 结合Watcher
/**
* Watcher.prototype = {
*   get: function () {
*     Dep.target = this;
*     let value = this.getter.call(this.vm, this.vm);
*     Dep.target = null;
*     return value;
*   },
*   addDep: function (dep) {
*     dep.addSub(this);
*   }
* }
*/
至此,我们已经实现了数据的劫持以及notify数据变化的功能了。
2、实现Compile
按理说我们应该紧接着实现Watcher,毕竟从上面代码看来,Observer和Watcher关联好多啊,但是,我们在捋思路的时候也应该知道了,Watcher和Compile也是有一腿的哦。所以咱先把Compile也给实现了,这样才能更好的让他们3P。

我不是老司机,我只是一个纯洁的开电动车的孩子?
废话不多说,干实事。
Compile需要做的事情也很简单
a、解析指令,将指令模板中的变量替换成数据,对视图进行初始化操作
b、订阅数据的变化,绑定好更新函数
c、接收到数据变化,通知视图进行view update
咱先试着写一个简单的指令解析方法,实现解析指令初始化视图。
js部分
function Compile (el, value) {
  this.$val = value;
  this.$el = this.isElementNode(el) ? el : document.querySelector(el);
  if (this.$el) {
    this.compileElement(this.$el);
  }
}
Compile.prototype = {
  compileElement: function (el) {
    let self = this;
    let childNodes = el.childNodes;
    [].slice.call(childNodes).forEach(node => {
      let text = node.textContent;
      let reg = /\{\{((?:.|\n)+?)\}\}/;
      // 如果是element节点
      if (self.isElementNode(node)) {
        self.compile(node);
      }
      // 如果是text节点
      else if (self.isTextNode(node) && reg.test(text)) {
        // 匹配第一个选项
        self.compileText(node, RegExp.$1.trim());
      }
      // 解析子节点包含的指令
      if (node.childNodes && node.childNodes.length) {
        self.compileElement(node);
      }
    })
  },
  // 指令解析
  compile: function (node) {
    let nodeAttrs = node.attributes;
    let self = this;

    [].slice.call(nodeAttrs).forEach(attr => {
      var attrName = attr.name;
      if (self.isDirective(attrName)) {
        var exp = attr.value;
        node.innerHTML = typeof this.$val[exp] === 'undefined' ? '' : this.$val[exp];
        node.removeAttribute(attrName);
      }
    });
  },
  // {{ test }} 匹配变量 test
  compileText: function (node, exp) {
    node.textContent = typeof this.$val[exp] === 'undefined' ? '' : this.$val[exp];
  },
  // element节点
  isElementNode: function (node) {
    return node.nodeType === 1;
  },
  // text纯文本
  isTextNode: function (node) {
    return node.nodeType === 3
  },
  // x-XXX指令判定
  isDirective: function (attr) {
    return attr.indexOf('x-') === 0;
  }
}
html部分
<body>
<div id="test">
  <h2 x-html="a"></h2>
  <p>{{ a }}</p>
</div>
</body>
<script>
var data = {
  a: 'hello'
}
new Compile('#test', data)
</script>
结果如图所示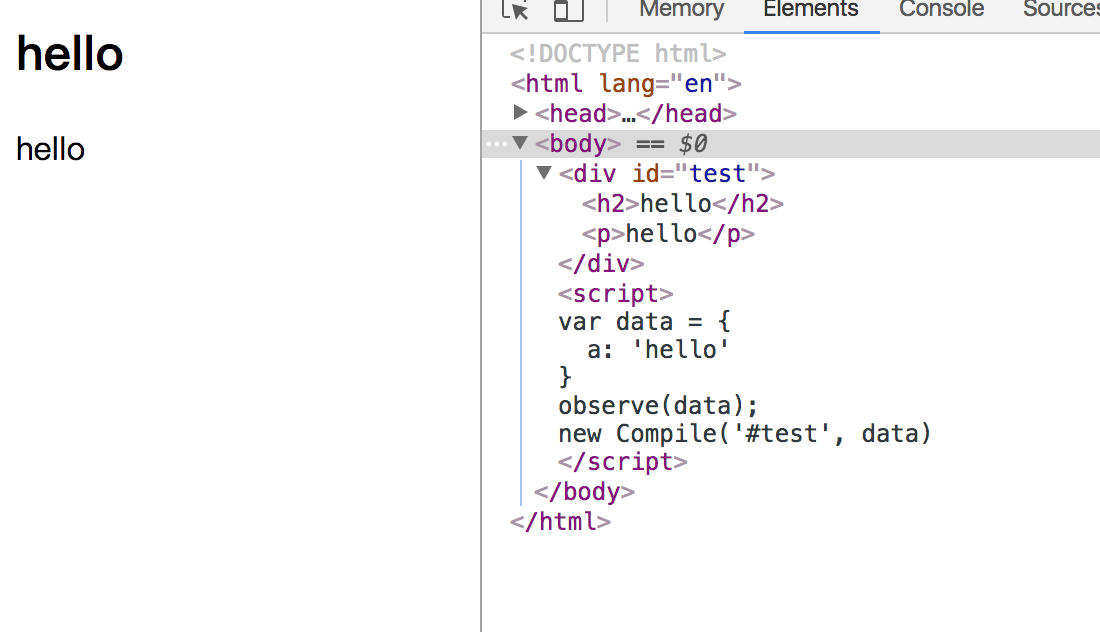
 按照步骤走的我已经实现了指令解析!
这里我们只是实现了指令的解析以及视图的初始化,并没有实现数据变化的订阅以及视图的更新。完整的Compile则实现了这些功能,详细代码如下
/**
 * @class 指令解析类 Compile
 * @param {[type]} el [element节点]
 * @param {[type]} vm [mvvm实例]
 */
function Compile(el, vm) {
  this.$vm = vm;
  this.$el = this.isElementNode(el) ? el : document.querySelector(el);

  if (this.$el) {
    this.$fragment = this.nodeFragment(this.$el);
    this.compileElement(this.$fragment);
    // 将文档碎片放回真实dom
    this.$el.appendChild(this.$fragment)
  }
}
Compile.prototype = {
  compileElement: function (el) {
    let self = this;
    let childNodes = el.childNodes;
    [].slice.call(childNodes).forEach(node => {
      let text = node.textContent;
      let reg = /\{\{((?:.|\n)+?)\}\}/;

      // 如果是element节点
      if (self.isElementNode(node)) {
        self.compile(node);
      }
      // 如果是text节点
      else if (self.isTextNode(node) && reg.test(text)) {
        // 匹配第一个选项
        self.compileText(node, RegExp.$1);
      }
      // 解析子节点包含的指令
      if (node.childNodes && node.childNodes.length) {
        self.compileElement(node);
      }
    });
  },
  // 文档碎片,遍历过程中会有多次的dom操作,为提高性能我们会将el节点转化为fragment文档碎片进行解析操作
  // 解析操作完成,将其添加回真实dom节点中
  nodeFragment: function (el) {
    let fragment = document.createDocumentFragment();
    let child;

    while (child = el.firstChild) {
      fragment.appendChild(child);
    }
    return fragment;
  },
  // 指令解析
  compile: function (node) {
    let nodeAttrs = node.attributes;
    let self = this;

    [].slice.call(nodeAttrs).forEach(attr => {
      var attrName = attr.name;
      if (self.isDirective(attrName)) {
        var exp = attr.value;
        var dir = attrName.substring(2);
        // 事件指令
        if (self.isEventDirective(dir)) {
          compileUtil.eventHandler(node, self.$vm, exp, dir);
        }
        // 普通指令
        else {
          compileUtil[dir] && compileUtil[dir](node, self.$vm, exp);
        }

        node.removeAttribute(attrName);
      }
    });
  },
  // {{ test }} 匹配变量 test
  compileText: function (node, exp) {
    compileUtil.text(node, this.$vm, exp);
  },
  // element节点
  isElementNode: function (node) {
    return node.nodeType === 1;
  },
  // text纯文本
  isTextNode: function (node) {
    return node.nodeType === 3
  },
  // x-XXX指令判定
  isDirective: function (attr) {
    return attr.indexOf('x-') === 0;
  },
  // 事件指令判定
  isEventDirective: function (dir) {
    return dir.indexOf('on') === 0;
  }
}
// 定义$elm,缓存当前执行input事件的input dom对象
let $elm;
let timer = null;
// 指令处理集合
const compileUtil = {
  html: function (node, vm, exp) {
    this.bind(node, vm, exp, 'html');
  },
  text: function (node, vm, exp) {
    this.bind(node, vm, exp, 'text');
  },
  class: function (node, vm, exp) {
    this.bind(node, vm, exp, 'class');
  },
  model: function(node, vm, exp) {
    this.bind(node, vm, exp, 'model');

    let self = this;
    let val = this._getVmVal(vm, exp);
    // 监听input事件
    node.addEventListener('input', function (e) {
      let newVal = e.target.value;
      $elm = e.target;
      if (val === newVal) {
        return;
      }
      // 设置定时器  完成ui js的异步渲染
      clearTimeout(timer);
      timer = setTimeout(function () {
        self._setVmVal(vm, exp, newVal);
        val = newVal;
      })
    });
  },
  bind: function (node, vm, exp, dir) {
    let updaterFn = updater[dir + 'Updater'];

    updaterFn && updaterFn(node, this._getVmVal(vm, exp));

    new Watcher(vm, exp, function(value, oldValue) {
      updaterFn && updaterFn(node, value, oldValue);
    });
  },
  // 事件处理
  eventHandler: function(node, vm, exp, dir) {
    let eventType = dir.split(':')[1];
    let fn = vm.$options.methods && vm.$options.methods[exp];

    if (eventType && fn) {
      node.addEventListener(eventType, fn.bind(vm), false);
    }
  },
  /**
   * [获取挂载在vm实例上的value]
   * @param  {[type]} vm  [mvvm实例]
   * @param  {[type]} exp [expression]
   */
  _getVmVal: function (vm, exp) {
    let val = vm;
    exp = exp.split('.');
    exp.forEach(key => {
      key = key.trim();
      val = val[key];
    });
    return val;
  },
  /**
   * [设置挂载在vm实例上的value值]
   * @param  {[type]} vm    [mvvm实例]
   * @param  {[type]} exp   [expression]
   * @param  {[type]} value [新值]
   */
  _setVmVal: function (vm, exp, value) {
    let val = vm;
    exps = exp.split('.');
    exps.forEach((key, index) => {
      key = key.trim();
      if (index < exps.length - 1) {
        val = val[key];
      }
      else {
        val[key] = value;
      }
    });
  }
}
// 指令渲染集合
const updater = {
  htmlUpdater: function (node, value) {
    node.innerHTML = typeof value === 'undefined' ? '' : value;
  },
  textUpdater: function (node, value) {
    node.textContent = typeof value === 'undefined' ? '' : value;
  },
  classUpdater: function () {},
  modelUpdater: function (node, value, oldValue) {
    // 不对当前操作input进行渲染操作
    if ($elm === node) {
      return false;
    }
    $elm = undefined;
    node.value = typeof value === 'undefined' ? '' : value;
  }
}

好了,到这里两个和Watcher相关的“菇凉”已经出场了
3、实现Watcher
作为一个和Observer和Compile都有关系的“蓝银”,他做的事情有以下几点
a、通过Dep接收数据变动的通知,实例化的时候将自己添加到dep中
b、属性变更时,接收dep的notify,调用自身update方法,触发Compile中绑定的更新函数,进而更新视图
这里的代码比较简短,所以我决定直接上代码
/**
 * @class 观察类
 * @param {[type]}   vm      [vm对象]
 * @param {[type]}   expOrFn [属性表达式]
 * @param {Function} cb      [回调函数(一半用来做view动态更新)]
 */
function Watcher(vm, expOrFn, cb) {
  this.vm = vm;
  expOrFn = expOrFn.trim();
  this.expOrFn = expOrFn;
  this.cb = cb;
  this.depIds = {};

  if (typeof expOrFn === 'function') {
    this.getter = expOrFn
  }
  else {
    this.getter = this.parseGetter(expOrFn);
  }
  this.value = this.get();
}
Watcher.prototype = {
  update: function () {
    this.run();
  },
  run: function () {
    let newVal = this.get();
    let oldVal = this.value;
    if (newVal === oldVal) {
      return;
    }
    this.value = newVal;
    // 将newVal, oldVal挂载到MVVM实例上
    this.cb.call(this.vm, newVal, oldVal);
  },
  get: function () {
    Dep.target = this;  // 将当前订阅者指向自己
    let value = this.getter.call(this.vm, this.vm); // 触发getter,将自身添加到dep中
    Dep.target = null;  // 添加完成 重置
    return value;
  },
  // 添加Watcher to Dep.subs[]
  addDep: function (dep) {
    if (!this.depIds.hasOwnProperty(dep.id)) {
      dep.addSub(this);
      this.depIds[dep.id] = dep;
    }
  },
  parseGetter: function (exp) {
    if (/[^\w.$]/.test(exp)) return;

    let exps = exp.split('.');

    // 简易的循环依赖处理
    return function(obj) {
        for (let i = 0, len = exps.length; i < len; i++) {
            if (!obj) return;
            obj = obj[exps[i]];
        }
        return obj;
    }
  }
}
没错就是Watcher这么一个简短的“蓝银”和Observer和Compile两位“菇凉”牵扯不清
4、实现MVVM
可以说MVVM是Observer,Compile以及Watcher的“boss”了,他才不会去管他们员工之间的关系,只要他们三能给干活,并且干好活就行。他需要安排给Observer,Compile以及Watche做的事情如下
a、Observer实现对MVVM自身model数据劫持,监听数据的属性变更,并在变动时进行notify
b、Compile实现指令解析,初始化视图,并订阅数据变化,绑定好更新函数
c、Watcher一方面接收Observer通过dep传递过来的数据变化,一方面通知Compile进行view update
具体实现如下
/**
 * @class 双向绑定类 MVVM
 * @param {[type]} options [description]
 */
function MVVM (options) {
  this.$options = options || {};
  let data = this._data = this.$options.data;
  let self = this;

  Object.keys(data).forEach(key => {
    self._proxyData(key);
  });
  observe(data, this);
  new Compile(options.el || document.body, this);
}
MVVM.prototype = {
  /**
   * [属性代理]
   * @param  {[type]} key    [数据key]
   * @param  {[type]} setter [属性set]
   * @param  {[type]} getter [属性get]
   */
  _proxyData: function (key, setter, getter) {
    let self = this;
    setter = setter ||
    Object.defineProperty(self, key, {
      configurable: false,
      enumerable: true,
      get: function proxyGetter() {
        return self._data[key];
      },
      set: function proxySetter(newVal) {
        self._data[key] = newVal;
      }
    })
  }
}
至此,一个属于我们自己的mvvm库也算是完成了。由于本文的代码较多,又不太好分小部分抽离出来讲解,所以我将代码的解析都直接写到了代码中。文中一些不够严谨的思考和错误,还请各位小伙伴们拍砖指出,大家一起纠正一起学习。
三、源码链接
最后完整代码来源(再发一次)
github-https://github.com/xuqiang521/overwrite
码云-https://git.oschina.net/qiangdada_129/overwrite
前言
上一篇文章我们实现了一个属于自己的简易MVVM库,里面实现了一个mvvm库应有基本功能,里面对数据进行了数据劫持,但是仅仅只是对对象进行了数据劫持,并没有实现数组的一个监听。今天我将带着大家实现数组的observe。
一、整体思路
1、定义变量arrayProto接收Array的prototype
2、定义变量arrayMethods,通过Object.create()方法继承arrayProto
3、重新封装数组中push,pop等常用方法。(这里我们只封装我们需要监听的数组的方法,并不做JavaScript原生Array中原型方法的重写的这么一件暴力的事情)
4、更多的奇淫技巧探究
二、监听数组变化实现
这里我们首先需要确定的一件事情就是,我们只需要监听我们需要监听的数据数组的一个变更,而不是针对原生Array的一个重新封装。
其实代码实现起来会比较简短,这一部分代码我会直接带着注释贴出来
// 获取Array原型
const arrayProto = Array.prototype;
const arrayMethods = Object.create(arrayProto);
const newArrProto = [];
[
  'push',
  'pop',
  'shift',
  'unshift',
  'splice',
  'sort',
  'reverse'
].forEach(method => {
  // 原生Array的原型方法
  let original = arrayMethods[method];

  // 将push,pop等方法重新封装并定义在对象newArrProto的属性上
  // 这里需要注意的是封装好的方法是定义在newArrProto的属性上而不是其原型属性
  // newArrProto.__proto__ 没有改变
  newArrProto[method] = function mutator() {
    console.log('监听到数组的变化啦!');

    // 调用对应的原生方法并返回结果(新数组长度)
    return original.apply(this, arguments);
  }
})

let list = [1, 2];
// 将我们要监听的数组的原型指针指向上面定义的空数组对象
// newArrProto的属性上定义了我们封装好的push,pop等方法
list.__proto__ = newArrProto;
list.push(3);  // 监听到数组的变化啦! 3

// 这里的list2没有被重新定义原型指针,所以这里会正常执行原生Array上的原型方法
let list2 = [1, 2];
list2.push(3);  // 3
目前为止我们已经实现了数组的监听。从上面我们看出,当我们将需要监听的数组的原型指针指向newArrProto对象上的时候(newArrProto的属性上定义了我们封装好的push,pop等方法)。这样做的好处很明显,不会污染到原生Array上的原型方法。
三、更多的奇淫技巧
1、分析实现的机制
从上面我们看出,其实我们做了一件非常简单的事情,首先我们将需要监听的数组的原型指针指向newArrProto,然后它会执行原生Array中对应的原型方法,与此同时执行我们自己重新封装的方法。
那么问题来了,这种形式咋这么眼熟呢?这不就是我们见到的最多的继承问题么?子类(newArrProto)和父类(Array)做的事情相似,却又和父类做的事情不同。但是直接修改__proto__隐式原型指向总感觉心里怪怪的(因为我们可能看到的多的还是prototype),心里不(W)舒(T)服(F)。
那么接下来的事情就是尝试用继承(常见的prototype)来实现数组的变更监听。对于继承这一块可以参考我之前写过的一篇文章浅析JavaScript继承。
2、利用ES6的extends实现
首先这里我们会通过ES6的关键字extends实现继承完成Array原型方法的重写,咱总得先用另外一种方式来实现一下我们上面实现的功能,证明的确还有其他方法可以做到这件事。OK,废话不多说,直接看代码
class NewArray extends Array {
  constructor(...args) {
    // 调用父类Array的constructor()
    super(...args)
  }
  push (...args) {
    console.log('监听到数组的变化啦!');

    // 调用父类原型push方法
    return super.push(...args)
  }
  // ...
}

let list3 = [1, 2];

let arr = new NewArray(...list3);
console.log(arr)
// (2) [1, 2]

arr.push(3);
// 监听到数组的变化啦!
console.log(arr)
// (3) [1, 2, 3]
3、ES5及以下的方法能实现么?
OK,终于要回到我们常见的带有prototype的继承了,看看它究竟能不能也实现这件事情呢。这里我们直接上最优雅的继承方式-寄生式组合继承,看看能不能搞定这件事情。代码如下
/**
 * 寄生式继承 继承原型
 * 传递参数 subClass 子类
 * 传递参数 superClass 父类
 */
function inheritObject(o){
  //声明一个过渡函数
  function F(){}
  //过渡对象的原型继承父对象
  F.prototype = o;
  return new F();
}
function inheritPrototype(subClass,superClass){
  //复制一份父类的原型副本保存在变量
  var p = inheritObject(superClass.prototype);
  //修正因为重写子类原型导致子类的constructor指向父类
  p.constructor = subClass;
  //设置子类的原型
  subClass.prototype = p;
}

function ArrayOfMine (args) {
  Array.apply(this, args);
}
inheritPrototype(ArrayOfMine, Array);
// 重写父类Array的push,pop等方法
ArrayOfMine.prototype.push = function () {
  console.log('监听到数组的变化啦!');
  return Array.prototype.push.apply(this, arguments);
}
var list4 = [1, 2];
var newList = new ArrayOfMine(list4);
console.log(newList, newList.length, newList instanceof Array, Array.isArray(newList));
newList.push(3);
console.log(newList, newList.length, newList instanceof Array, Array.isArray(newList));目前我们这么看来,的的确确是利用寄生式组合继承完成了一个类的继承,那么console.log的结果又是如何的呢?是不是和我们预想的一样呢,直接看图说话吧

我擦嘞,这特么什么鬼,教练,我们说好的,不是这个结果。这是典型的买家秀和卖家秀吗?
那么我们来追溯一下为什么会是这种情况,我们预想中的情况应该是这样的
newList => [1, 2] newList.length => 2 Array.isArray(newList) => truepush执行之后的理想结果
newList => [1, 2, 3] newList.length => 3 Array.isArray(newList) => true
我们先抛弃Array的apply之后的结果,我们先用同样的方式继承我们自定义的父类Father,代码如下
function inheritObject(o){
  function F(){};
  F.prototype = o;
  return new F();
}
function inheritPrototype(subClass,superClass){
  var p = inheritObject(superClass.prototype);
  p.constructor = subClass;
  subClass.prototype = p;
}

function Father() {
  // 这里我们暂且就先假定参数只有一个
  this.args = arguments[0];
  return this.args;
}
Father.prototype.push = function () {
  this.args.push(arguments);
  console.log('我是父类方法');
}
function ArrayOfMine () {
  Father.apply(this, arguments);
}
inheritPrototype(ArrayOfMine, Father);
// 重写父类Array的push,pop等方法
ArrayOfMine.prototype.push = function () {
  console.log('监听到数组的变化啦!');
  return Father.prototype.push.apply(this, arguments);
}
var list4 = [1, 2];
var newList = new ArrayOfMine(list4, 3);
console.log(newList, newList instanceof Father);
newList.push(3);
console.log(newList, newList instanceof Father);
结果如图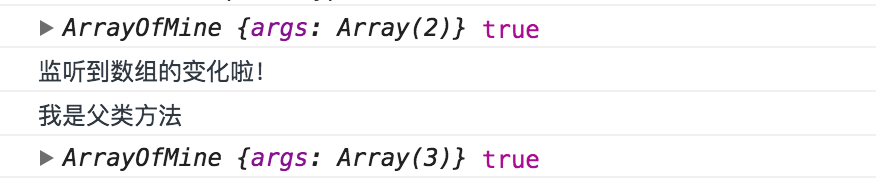
结果和我们之前预想的是一样的,我们自己定义的类的话,这种做法是可以行的通的,那么问题就来了,为什么将父类改成Array就行不通了呢?
为了搞清问题,查阅各种资料后。得出以下结论:
因为Array构造函数执行时不会对传进去的this做任何处理。不止Array,String,Number,Regexp,Object等等JS的内置类都不行。。这也是著名问题 ES5及以下的JS无法完美继承数组 的来源,不清楚的小伙伴可以Google查查这个问题。那么,为什么不能完美继承呢?
1、数组有个响应式的length,一方面它会跟进你填入的元素的下表进行一个增长,另一方面如果你将它改小的话,它会直接将中间的元素也删除掉
var arr1 = [1];
arr1[5] = 1;
console.log(arr1.length === 6);  // true
// 以及
var arr2 = [1,2,3];
arr2.length = 1
console.log(arr2);
// [1] 此时元素2,3被删除了2、数组内部的[[class]] 属性,这个属性是我们用Array.isArray(someArray)和Object.prototype.String.call(someArray) 来判定someArray是否是数组的根源,而这又是内部引擎的实现,用任何JS方法都是无法改变的。而为啥要用这两种方法进行数组的判定,相信大家从前面的代码结果可以看出来,利用instanceof去判定是否为数组,结果是有问题的。
因为数组其响应式的length属性以及内部的[[class]]属性我们无法再JS层面实现,这就导致我们无法去用任何一个对象来“模仿”一个数组,而我们想要创建一个ArrayOfMine继承Array的话又必须直接用Array的构造函数,而上面我提到了Array构造函数执行时是不会对传进去的this做任何处理,也就是说这样你根本就不能继承他。而利用__proto__隐式原型的指针变更却能实现,因为他是一个非标准的属性(已在ES6语言规范中标准化),详请请点击链接__proto__。
所以要实现最上面我们实现的功能,我们还是需要用到__proto__属性。变更后代码如下
function inheritObject(o){
  function F(){}
  F.prototype = o;
  return new F();
}
function inheritPrototype(subClass,superClass){
  var p = inheritObject(superClass.prototype);
  p.constructor = subClass;
  subClass.prototype = p;
}

function ArrayOfMine () {
  var args = arguments
    , len = args.length
    , i = 0
    , args$1 = [];   // 保存所有arguments
  for (; i < len; i++) {
    // 判断参数是否为数组,如果是则直接concat
    if (Array.isArray(args[i])) {
      args$1 = args$1.concat(args[i]);
    }
    // 如果不是数组,则直接push到
    else {
      args$1.push(args[i])
    }
  }
  // 接收Array.apply的返回值,刚接收的时候arr是一个Array
  var arr = Array.apply(null, args$1);
  // 将arr的__proto__属性指向 ArrayOfMine的 prototype
  arr.__proto__ = ArrayOfMine.prototype;
  return arr;
}
inheritPrototype(ArrayOfMine, Array);
// 重写父类Array的push,pop等方法
ArrayOfMine.prototype.push = function () {
  console.log('监听到数组的变化啦!');
  return Array.prototype.push.apply(this, arguments);
}
var list4 = [1, 2];
var newList = new ArrayOfMine(list4, 3);
console.log(newList, newList.length, newList instanceof Array, Array.isArray(newList));
newList.push(4);
console.log(newList, newList.length, newList instanceof Array, Array.isArray(newList));
结果如图
自此,我所知道几种实现数组监听的方法便得于实现了。
总结
总结以上几点方案,基于上篇文章的基础,完整的数组监听代码如下
// Define Property
function def (obj, key, val, enumerable) {
  Object.defineProperty(obj, key, {
    value: val,
    enumerable: !!enumerable,
    configurable: true,
    writable: true
  })
}
// observe array
let arrayProto = Array.prototype;
let arrayMethods = Object.create(arrayProto);
[
  'push',
  'pop',
  'shift',
  'unshift',
  'splice',
  'sort',
  'reverse'
].forEach(method => {
  // 原始数组操作方法
  let original = arrayMethods[method];
  def(arrayMethods, method, function () {
    let arguments$1 = arguments;
    let i = arguments.length;
    let args = new Array(i);

    while (i--) {
      args[i] = arguments$1[i]
    }
    // 执行数组方法
    let result = original.apply(this, args);
    // 因 arrayMethods 是为了作为 Observer 中的 value 的原型或者直接作为属性,所以此处的 this 一般就是指向 Observer 中的 value
    // 当然,还需要修改 Observer,使得其中的 value 有一个指向 Observer 自身的属性,__ob__,以此将两者关联起来
    let ob = this.__ob__;
    // 存放新增数组元素
    let inserted;
    // 为add 进arry中的元素进行observe
    switch (method) {
      case 'push':
        inserted = args;
        break;
      case 'unshift':
        inserted = args;
        break;
      case 'splice':
        // 第三个参数开始才是新增元素
        inserted = args.slice(2);
        break;
    }
    if (inserted) {
      ob.observeArray(inserted);
    }
    // 通知数组变化
    ob.dep.notify();
    // 返回新数组长度
    return result;
  })

})
mvvm库的完整代码链接:
github:https://github.com/xuqiang521/overwrite/tree/master/my-mvvm
码云:https://git.oschina.net/qiangdada_129/overwrite/tree/master/my-mvvm
在线JS Bin预览地址:http://jsbin.com/tixekufaha/edit?html,js,output


 855
855


 被折叠的 条评论
为什么被折叠?
被折叠的 条评论
为什么被折叠?
 到【灌水乐园】发言


