


1、创建web的maven项目;类型 maven-archetype-webapp

2、加入maven的依赖
(1)spring依赖
(2)mybatis依赖
(3)mysql驱动
(4)spring的事务依赖
(5)mybatis和spring集成依赖
(6)加入jsp,servlet依赖
pom.xml文件
<dependencies>

    <!-- 单元测试依赖 -->
    <dependency>
      <groupId>junit</groupId>
      <artifactId>junit</artifactId>
      <version>4.11</version>
      <scope>test</scope>
    </dependency>

    <!--spring依赖  核心IoC-->
    <dependency>
      <groupId>org.springframework</groupId>
      <artifactId>spring-context</artifactId>
      <version>5.2.5.RELEASE</version>
    </dependency>
    <!-- spring事务 -->
    <dependency>
      <groupId>org.springframework</groupId>
      <artifactId>spring-tx</artifactId>
      <version>5.2.5.RELEASE</version>
    </dependency>
    <dependency>
      <groupId>org.springframework</groupId>
      <artifactId>spring-jdbc</artifactId>
      <version>5.2.5.RELEASE</version>
    </dependency>

    <!-- mybatis事务 -->
    <dependency>
      <groupId>org.mybatis</groupId>
      <artifactId>mybatis</artifactId>
      <version>3.5.1</version>
    </dependency>

    <!-- spring和mybatis集成依赖 -->
    <dependency>
      <groupId>org.mybatis</groupId>
      <artifactId>mybatis-spring</artifactId>
      <version>2.0.1</version>
    </dependency>

    <!-- mysql驱动 -->
    <dependency>
      <groupId>mysql</groupId>
      <artifactId>mysql-connector-java</artifactId>
      <version>5.1.9</version>
    </dependency>

    <!-- 阿里数据库连接池Druid -->
    <dependency>
      <groupId>com.alibaba</groupId>
      <artifactId>druid</artifactId>
      <version>1.2.6</version>
    </dependency>

    <!-- servlet依赖 -->
    <dependency>
      <groupId>javax.servlet</groupId>
      <artifactId>javax.servlet-api</artifactId>
      <version>3.1.0</version>
      <scope>provided</scope>
    </dependency>

    <!-- jsp依赖 -->
    <dependency>
      <groupId>javax.servlet.jsp</groupId>
      <artifactId>jsp-api</artifactId>
      <version>2.2.1-b03</version>
      <scope>provided</scope>
    </dependency>

  </dependencies>
3、创建domain实体类
public class User {
    private int userId;
    private String userName;
    private String email;
    private int age;

    public int getUserId() {
        return userId;
    }

    public void setUserId(int userId) {
        this.userId = userId;
    }

    public String getUserName() {
        return userName;
    }

    public void setUserName(String userName) {
        this.userName = userName;
    }

    public String getEmail() {
        return email;
    }

    public void setEmail(String email) {
        this.email = email;
    }

    public int getAge() {
        return age;
    }

    public void setAge(int age) {
        this.age = age;
    }
}
4、创建dao接口和mapper文件
public interface UserDao {
    /**
     * 插入一条user记录
     * @param user
     * @return
     */
    int insertUser(User user);

    /**
     * 查询所有用户
     * @param user
     * @return
     */
    List<User> selectUsers(User user);
}
<?xml version="1.0" encoding="UTF-8" ?>
<!DOCTYPE mapper
PUBLIC "-//mybatis.org//DTD Mapper 3.0//EN"
"http://mybatis.org/dtd/mybatis-3-mapper.dtd">
<mapper namespace="com.mycompany.dao.UserDao">
<insert id="insertUser">
insert into user values(#{userId},#{userName},#{email},#{age})
</insert>
<select id="selectUsers" resultType="User">
select user_id,user_name,email,age
from user
order by user_id desc
</select>
</mapper>5、创建mybatis主配置文件
<?xml version="1.0" encoding="UTF-8" ?>
<!DOCTYPE configuration
        PUBLIC "-//mybatis.org//DTD Config 3.0//EN"
        "http://mybatis.org/dtd/mybatis-3-config.dtd">
<configuration>

    <!-- settings:控制mybatis全局行为 -->
    <settings>
        <!-- 设置mybatis输出日志 -->
        <setting name="logImpl" value="STDOUT_LOGGING"/>
    </settings>

    <!-- 定义别名 -->
    <typeAliases>
        <!-- 第一种方式
            指定一个类型为一个自定义别名
            type:自定义类型的全限定名称
            alias:别名
         -->
        <!--        <typeAlias type="com.mycompany.domain.User" alias="user" />-->

        <!-- 第二种方式
             <package>
             name:包名,这个包中所有的类,类名就是别名(不区分大小写)
         -->
        <package name="com.mycompany.domain" />
    </typeAliases>


    <!--
        数据源DataSource 放在spring配置文件中
    -->
    <!--<environments default="development">
        <environment id="online">
            <transactionManager type="JDBC"/>
            <dataSource type="POOLED">
                <property name="driver" value="com.mysql.jdbc.Driver"/>
                <property name="url" value="jdbc:mysql://localhost:3306/onlinedb"/>
                <property name="username" value="root"/>
                <property name="password" value="admin123456"/>
            </dataSource>
        </environment>
    </environments>-->


    <!-- sql mapper(SQL映射文件)的位置 -->
    <mappers>
        <!-- 第一种方式:指定多个mapper文件
            一个mapper标签指定一个文件位置
                从类路径开始(target/classes)
        -->
        <!--        <mapper resource="com/mycompany/dao/UserDao.xml" />-->

        <!-- 第二种方式:使用包名
            name:xml(mapper)文件所在的包名,这个包中所有xml文件一次都能加载给mybatis
            使用package要求:
            (1)mapper文件名称需要和接口名称一样(区分大小写)
            (2)mapper文件和dao接口需要在同一目录
        -->
        <package name="com.mycompany.dao" />

    </mappers>

</configuration>
6、创建service接口和实现类,属性是dao
public class UserServiceImpl implements UserService {
    private UserDao userDao;

    public void setUserDao(UserDao userDao) {
        this.userDao = userDao;
    }

    @Override
    public int insertUser(User user) {
        int nums = userDao.insertUser(user);
        return nums;
    }

    @Override
    public List<User> selectUsers(User user) {
        List<User> userList = userDao.selectUsers(user);
        return userList;
    }
}
7、创建spring的配置文件:声明mybatis对象交给spring创建
(1)数据源DataSource
(2)SqlSessionFactory
(3)Dao对象
(4)声明自定义的service
spring.xml
<?xml version="1.0" encoding="UTF-8"?>
<beans xmlns="http://www.springframework.org/schema/beans"
       xmlns:xsi="http://www.w3.org/2001/XMLSchema-instance"
       xmlns:context="http://www.springframework.org/schema/context"
       xsi:schemaLocation="http://www.springframework.org/schema/beans
       http://www.springframework.org/schema/beans/spring-beans.xsd
       http://www.springframework.org/schema/context
       https://www.springframework.org/schema/context/spring-context.xsd">

    <!-- spring 加载数据的属性配置文件
    -->
    <context:property-placeholder location="classpath:jdbc.properties"/>

    <!-- 1、声明数据源DataSource,作用:连接数据库
        将mybatis主配置文件 configuration 下的environments 标签内容移到了这里
        Druid官网:https://github.com/alibaba/druid
        DruidDataSource配置:https://github.com/alibaba/druid/wiki/DruidDataSource%E9%85%8D%E7%BD%AE
    -->
    <bean id="myDataSource" class="com.alibaba.druid.pool.DruidDataSource"
          init-method="init" destroy-method="close" >
        <!-- set注入给DruidDataSource提供数据库连接信息 -->
        <!-- 使用和塑型配置文件中的数据,语法 ${key} -->
        <property name="url" value="${jdbc.url}"/>
        <property name="username" value="${jdbc.user}"/>
        <property name="password" value="${jdbc.password}"/>
        <property name="maxActive" value="${jdbc.maxActive}"/>
    </bean>

    <!-- 2、声明mybatis中提供的SQLSessionFactoryBean类
    -->
    <bean id="sqlSessionFactory" class="org.mybatis.spring.SqlSessionFactoryBean">
        <!-- set注入,将数据库中连接池赋给dataSource属性 -->
        <property name="dataSource" ref="myDataSource"/>

        <!-- mybatis主配置文件位置
            configLocation 属性是Resource类型,读取配置文件
            使用value赋值,指定文件路径,使用classpath: 表示文件位置
        -->
        <property name="configLocation" value="classpath:mybatis.xml"/>
    </bean>

    <!-- 3、创建dao对象,使用SqlSession的getMapper(XXDao.class)方法
        MapperScannerConfigurer:内部调用getMapper(XXDao.class)方法生成每个dao接口的代理对象
    -->
    <bean class="org.mybatis.spring.mapper.MapperScannerConfigurer">
        <!-- 指定SqlSession对象的id -->
        <property name="sqlSessionFactoryBeanName" value="sqlSessionFactory" />

        <!-- 指定包名,dao接口所在的包名
            MapperScannerConfigurer会扫描这个包的所有接口,把每个接口都执行一次getMapper(XXDao.class)方法,得到每个接口的dao对象
            创建好的dao对象放入到spring容器中;dao对象默认名称:接口名首字母小写!!!
         -->
        <property name="basePackage" value="com.mycompany.dao"/>
    </bean>

    <!-- 4、声明service
    -->
    <bean id="userService" class="com.mycompany.service.impl.UserServiceImpl">
        <!-- 通过MapperScannerConfigurer 扫描包;dao对象的默认名称是 接口名首字母小写!!! -->
        <property name="userDao" ref="userDao"/>
    </bean>

</beans>
8、创建一个jsp发起请求,参数是domain包中实体类的参数
<%@ page contentType="text/html;charset=UTF-8" language="java" %>
<html>
<head>
    <title>Title</title>
</head>
<body>
    <p>注册用户</p>
    <form action="register" method="post">
        <table>
            <tr>
                <td>id</td>
                <td><input type="text" name="userId"></td>
            </tr>
            <tr>
                <td>姓名:</td>
                <td><input type="text" name="userName"></td>
            </tr>
            <tr>
                <td>邮箱:</td>
                <td><input type="text" name="email"></td>
            </tr>
            <tr>
                <td>年龄:</td>
                <td><input type="text" name="age"></td>
            </tr>
            <tr>
                <td><input type="submit" value="注册学生"></td>
            </tr>
        </table>
    </form>
</body>
</html>
9、创建Servlet,接收请求参数
public class RegisterServlet extends HttpServlet {

    protected void doPost(HttpServletRequest req, HttpServletResponse resp) throws ServletException, IOException {
//        String userId = req.getParameter("userId");
        String userName = req.getParameter("userName");
        String email = req.getParameter("email");
        String age = req.getParameter("age");

        User user = new User();
//        user.setUserId(Integer.parseInt(userId));
        user.setUserName(userName);
        user.setEmail(email);
        user.setAge(Integer.valueOf(age));

        //创建spring容器
        String config = "spring.xml";
        ApplicationContext wac = new ClassPathXmlApplicationContext(config);

        System.out.println("容器对象的信息========" + wac);

        //获取UserService
        UserService userService = (UserService) wac.getBean("userService");
        userService.insertUser(user);

        //反馈请求结果页面
        req.getRequestDispatcher("/result.jsp").forward(req,resp);
    }

    protected void doGet(HttpServletRequest request, HttpServletResponse response) throws ServletException, IOException {

    }
}10、配置web.xml文件,web.xml 注册 Servlet
<?xml version="1.0" encoding="UTF-8"?>
<web-app xmlns="https://jakarta.ee/xml/ns/jakartaee"
         xmlns:xsi="http://www.w3.org/2001/XMLSchema-instance"
         xsi:schemaLocation="https://jakarta.ee/xml/ns/jakartaee
         https://jakarta.ee/xml/ns/jakartaee/web-app_5_0.xsd"
         version="5.0">

    <!-- <web-app> :根元素
       DTD文件规定<web-app>元素的子元素的语法如下
        style= "font-family:Times New Roman;" <!ELEMENT web-app (icon?, display-name?, description?,
        distributable?, context-param*, filter*, filter-mapping* ,listener*, servlet*, servlet- mapping*,
        session -config? ,mime-mapping*, welcome-file-list?,error-page*,
        taglib*, resource-env-ref*, resource-ref*,se curity- constraint*,
        login-config?, security-role* , env-entry* , ejb-ref*, ejb-1local-ref*)
       该元素含23个子元素。而且子元素都是可选的。问号(?)表示子元素是可选的,而且只能出现一次。
        星号(*)表示子元素可在部署描述符中出现零次或多次。有些子元素还可以有它们自己的子元素。
        web.xml文件中<web-app>元素声明的是下面每个子元素的声明。

       在Servlet2.3中,子元素必须按照DTD文件描述中指定的顺序出现。
        比如:如果部署描述符中的<web-app>元素有<servlet>和<servlet-mapping>两个子元素,
        则<servlet>子元素必须出现在<servlet-mapping>子元素之前。在Servlet2.4之后,顺序并不重要
    -->

    <!-- <servlet> 用来声明一个servlet的数据,主要有以下子元素:
            <servlet-name> 指定servlet的名称
            <servlet-class> 指定servlet的类名称
            <jsp-file> 指定web站台中的某个JSP网页的完整路径
            <init-param> 用来定义参数,可有多个init-param。在servlet类中通过getInitParamenter(String name)方法访问初始化参数
            <load-on-startup> 指定当Web应用启动时,装载Servlet的次序。当值为正数或零时:Servlet容器先加载数值小的servlet,再依次加载其他数值大的servlet。当值为负或未定义:Servlet容器将在Web客户首次访问这个servlet时加载它。
            <servlet-mapping> 用来定义servlet所对应的URL,包含两个子元素
                <servlet-name></servlet-name> 指定servlet的名称
                <url-pattern></url-pattern> 指定servlet所对应的URL
    -->
    <servlet>
        <servlet-name>RegisterServlet</servlet-name>
        <servlet-class>com.mycompany.controller.RegisterServlet</servlet-class>
    </servlet>
    <servlet-mapping>
        <!-- 这个Servlet的名字是dispatcher,可以有多个DispatcherServlet,是通过名字来区分的。
                每一个DispatcherServlet有自己的WebApplicationContext上下文对象。
                同时保存的ServletContext中和Request对象中
            ApplicationContext是Spring的核心,Context我们通常解释为上下文环境(容器)
                ApplicationContext则是“应用的容器”了;Spring把Bean放在这个容器中,在需要的时候,用getBean方法取出
        -->
        <servlet-name>RegisterServlet</servlet-name>
        <!--Servlet拦截匹配规则可以自定义,当映射为@RequestMapping("/user/add")时
            1、拦截*.do, 例如:/user/add.do,这是最传统的方式,最简单也最实用。不会导致静态文件(jpg,js,css)被拦截
            2、拦截/,例如:/user/add,可以实现现在很流行的REST风格。很多互联网类型的应用很喜欢这种风格的URL。弊端:会导致静态文件(jpg,js,css)被拦截后不能正常显示
        -->
        <url-pattern>/register</url-pattern><!--会拦截URL中带“/register”的请求-->
    </servlet-mapping>

</web-app>
项目自带web.xml文件如下;使用的是最低版本2.3,因此需要更改版本

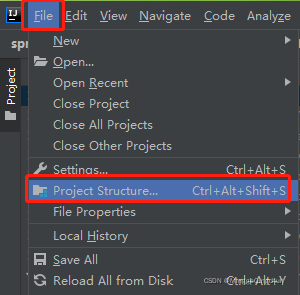
(1)File ----> Project Structure...
(2)删掉项目自带的web.xml文件

(3)新增web.xml文件,并且选择版本
注:这里需要重新命名web.xml文件,如web1111.xml,如果还是使用web.xml名称,新建之后还是最低版本,因此需要重新命名!!!
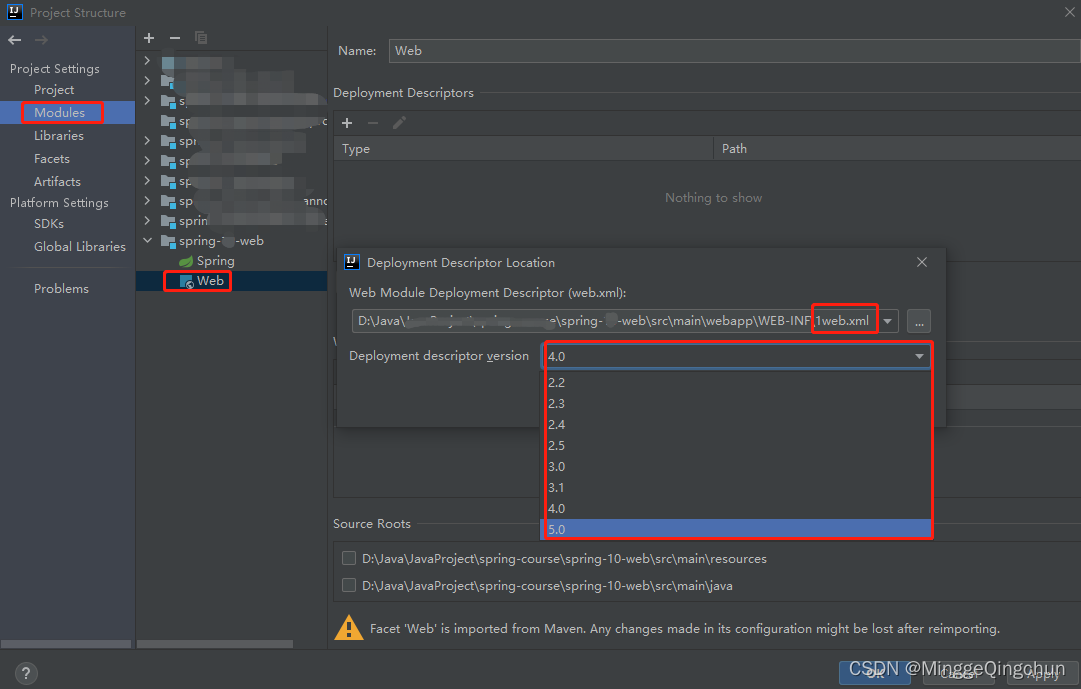
(4)更改新增之后的web.xml文件名称,将其改为“web.xml”

11、调用Service,调用DAO完成注册,创建一个jsp作为显示结果页面
这里需要注意
JavaSE项目有main方法的,执行代码是执行main方法的,在main里面创建的容器对象
ApplicationContext ctx = new ClassPathXmlApplicationContext("applicationContext.xml");web项目是在tomcat服务器上运行的;只要 tomcat一起动,项目就会一直运行
安装配置Tomcat可自行百度,这里只说明IDEA上启动Tomcat
(1)工具栏上 【Run】----> 【Edit Configurations...】

或者 运行按钮旁边,选择【Edit Configurations...】

(2)点击添加,选择Tomcat Server ----> Local

如果这里没有Tomcat Server 选项 ;有可能是tomcat插件没启用,我们点击
file---->setting---->搜索tomcat---->勾选上

(3)配置Tomcat的信息

(4)点击Deployment----加号➕----Artifact...,配置访问路径
对应web.xml文件中的url-pattern 访问的路径
输入的访问地址为 网址+端口号+工程名+访问的路径;如:
启动Tomcat 输入 :http://localhost:8888/spring-web/

当表单提交,跳转成功后,多刷新几次页面,查看后台输出,发现每刷新一次页面,就 new 出一个新的Spring 容器。即每提交一次请求,就会创建一个新的 Spring 容器。对于一个应用来说,只需要一个 Spring 容器即可。所以,将 Spring 容器的创建语句放在 Servlet 的 doGet()或 doPost()方法中是有问题的

此时,可以考虑,将 Spring 容器的创建放在 Servlet 进行初始化时进行,即执行 init()方法时执行。并且,Servlet 还是单例多线程的,即一个业务只有一个 Servlet 实例,所有执行该业务的用户执行的都是这一个 Servlet 实例。这样,Spring 容器就具有了唯一性了。
但是,Servlet 是一个业务一个 Servlet 实例,即 LoginServlet 只有一个,但还会StudentServlet、TeacherServlet 等。每个业务都会有一个 Servlet,都会执行自己的 init()方法,也就都会创建一个 Spring 容器了。这样一来,Spring 容器就又不唯一了
对于 Web 应用,ServletContext 对象是唯一的,一个 Web 应用,只有一个ServletContext 对象,该对象是在 Web 应用装载时初始化的。若将 Spring 容器的创建时机,放在 ServletContext 初始化时,就可以保证 Spring 容器的创建只会执行一次,也就保证了Spring 容器在整个应用中的唯一性。
当 Spring 容器创建好后,在整个应用的生命周期过程中,Spring 容器应该是随时可以被访问的。即,Spring 容器应具有全局性。而放入 ServletContext 对象的属性,就具有应用的全局性。所以,将创建好的 Spring 容器,以属性的形式放入到 ServletContext 的空间中,就保证了 Spring 容器的全局性
(1)pom.xml加载监听器对象依赖
<!-- 监听器对象依赖 -->
    <dependency>
      <groupId>org.springframework</groupId>
      <artifactId>spring-web</artifactId>
      <version>5.2.5.RELEASE</version>
</dependency>(2)注册监听器 ContextLoaderListener
在 ServletContext 初 始 化 时 创 建 Spring 容 器 , 就 需 要 使 用 监 听 器 接口
ServletContextListener 对 ServletContext 进行监听。在 web.xml 中注册该监听器。
<listener>
        <listener-class>org.springframework.web.context.ContextLoaderListener</listener-class>
    </listener>
ContextLoaderListener 的源码。看到一共四个方法,两个是构造方法,一个初始化方法,一个销毁方法

初始化容器;创建容器对象,并将容器对象放入到了 ServletContext 的空间中
public void contextInitialized(ServletContextEvent event) {
        this.initWebApplicationContext(event.getServletContext());
    }
创建容器对象
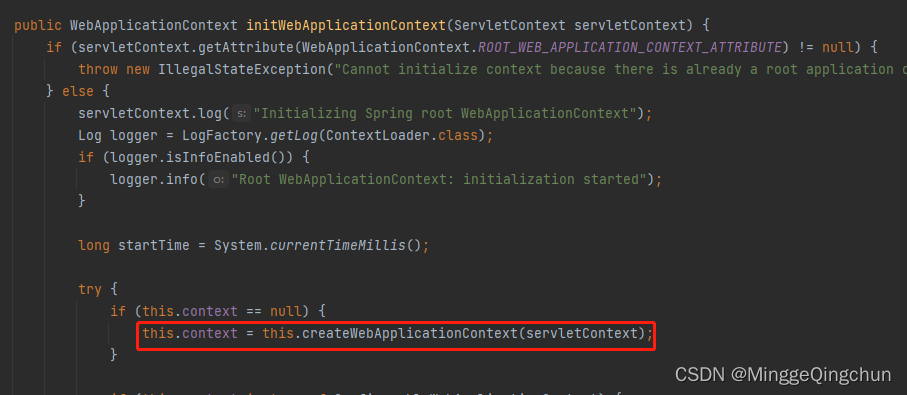
且将创建好的对象放入容器中
servletContext.setAttribute(WebApplicationContext.ROOT_WEB_APPLICATION_CONTEXT_ATTRIBUTE, this.context);(3)指定Spring配置文件位置
默认的 Spring 配置文件位置与名称为:WEB-INF/applicationContext.xml。但,一般会将该配置文件放置于项目的 classpath 下,即 src 下,所以需要在 web.xml 中对 Spring 配置文件的位置及名称进行指定
<!-- 注册监听器:ContextLoaderListener
        监听器被创建对象后,会读取 /WEB-INF/spring.xml(在监听器中要创建ApplicationContext对象,需要加载配置文件)
        /WEB-INF/applicationContext.xml就是监听器默认读取的spring配置文件路径

        可修改默认的配置文件位置,使用context-param重新制定文件的位置
        配置监听器:目的是创建容器对象,就能把spring.xml配置文件中的所有对象都创建好;用户发起请求就可以直接使用对象
    -->
    <context-param>
        <!-- contextConfigLocation:表示配置文件的路径 -->
        <param-name>contextConfigLocation</param-name>
        <!--自定义配置文件的路径-->
        <param-value>classpath:spring.xml</param-value>
</context-param>监听器ContextLoaderListener的父类ContextLoader的中,其要读取的配置文件位置参数名称contextConfigLocation

(4)获取Spring容器对象
【1】直接从ServletContext中获取
WebApplicationContext wac = null;

//获取ServletContext中的容器对象
String key = WebApplicationContext.ROOT_WEB_APPLICATION_CONTEXT_ATTRIBUTE;
Object attr = getServletContext().getAttribute(key);
    if (attr != null){
        wac = (WebApplicationContext) attr;
    }
【2】通过WebApplicationContextUtils获取
WebApplicationContextUtils调用关系
public abstract class WebApplicationContextUtils {
    private static final boolean jsfPresent = ClassUtils.isPresent("javax.faces.context.FacesContext", RequestContextHolder.class.getClassLoader());

    public WebApplicationContextUtils() {
    }

    public static WebApplicationContext getRequiredWebApplicationContext(ServletContext sc) throws IllegalStateException {
        WebApplicationContext wac = getWebApplicationContext(sc);
        if (wac == null) {
            throw new IllegalStateException("No WebApplicationContext found: no ContextLoaderListener registered?");
        } else {
            return wac;
        }
    }

    @Nullable
    public static WebApplicationContext getWebApplicationContext(ServletContext sc) {
        return getWebApplicationContext(sc, WebApplicationContext.ROOT_WEB_APPLICATION_CONTEXT_ATTRIBUTE);
    }

    @Nullable
    public static WebApplicationContext getWebApplicationContext(ServletContext sc, String attrName) {
        Assert.notNull(sc, "ServletContext must not be null");
        Object attr = sc.getAttribute(attrName);
        if (attr == null) {
            return null;
        } else if (attr instanceof RuntimeException) {
            throw (RuntimeException)attr;
        } else if (attr instanceof Error) {
            throw (Error)attr;
        } else if (attr instanceof Exception) {
            throw new IllegalStateException((Exception)attr);
        } else if (!(attr instanceof WebApplicationContext)) {
            throw new IllegalStateException("Context attribute is not of type WebApplicationContext: " + attr);
        } else {
            return (WebApplicationContext)attr;
        }
    }
WebApplicationContext wac = null;
//使用框架中方法,获取容器对象
ServletContext sc = getServletContext();
wac = WebApplicationContextUtils.getRequiredWebApplicationContext(sc);这时在多次刷新页面,发现对象始终是那一个


 428
428


 被折叠的 条评论
为什么被折叠?
被折叠的 条评论
为什么被折叠?
 到【灌水乐园】发言


