


<RelativeLayout xmlns:android="http://schemas.android.com/apk/res/android"
xmlns:tools="http://schemas.android.com/tools"
android:layout_width="match_parent"
android:layout_height="match_parent"
android:paddingBottom="@dimen/activity_vertical_margin"
android:paddingLeft="@dimen/activity_horizontal_margin"
android:paddingRight="@dimen/activity_horizontal_margin"
android:paddingTop="@dimen/activity_vertical_margin"
tools:context=".MainActivity" >
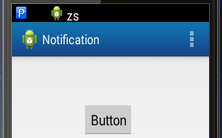
<Button
android:id="@+id/button1"
android:layout_width="wrap_content"
android:layout_height="wrap_content"
android:layout_alignParentLeft="true"
android:layout_alignParentTop="true"
android:layout_marginLeft="99dp"
android:layout_marginTop="48dp"
android:text="Button" />
</RelativeLayout>
</pre><pre name="code" class="html">
package com.example.notification;
import android.os.Bundle;
import android.app.Activity;
import android.app.Notification;
import android.app.NotificationManager;
import android.view.Menu;
import android.view.View;
import android.view.View.OnClickListener;
import android.widget.Button;
public class MainActivity extends Activity implements OnClickListener{
@Override
protected void onCreate(Bundle savedInstanceState) {
super.onCreate(savedInstanceState);
setContentView(R.layout.activity_main);
Button btn=(Button) findViewById(R.id.button1);
btn.setOnClickListener(this);
}
@Override
public void onClick(View arg0) {
// TODO Auto-generated method stub
switch (arg0.getId()) {
case R.id.button1:
NotificationManager manager=(NotificationManager) getSystemService(NOTIFICATION_SERVICE);
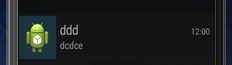
Notification notification=new Notification(R.drawable.ic_launcher,"zs",System.currentTimeMillis());
notification.setLatestEventInfo(this, "ddd", "dcdce", null);
manager.notify(1,notification);
break;
default:
break;
}
}
@Override
public boolean onCreateOptionsMenu(Menu menu) {
// Inflate the menu; this adds items to the action bar if it is present.
getMenuInflater().inflate(R.menu.main, menu);
return true;
}
}
dingIntent 从名字上看起来就和 Intent 有些类似,它们之间也确实存在着不少共同点。比如它们都可以去指明某一个“意图” ,都可以用于启动活动、启动服务以及发送广
播等。不同的是,Intent 更加倾向于去立即执行某个动作,而 PendingIntent 更加倾向于在某个合适的时机去执行某个动作。所以,也可以把 PendingIntent 简单地理解为延迟执行的 Intent。
PendingIntent 的 用 法 同 样 很 简 单 , 它 主 要 提 供 了 几 个 静 态 方 法 用 于 获 取PendingIntent 的实例,可以根据需求来选择是使用 getActivity()方法、getBroadcast()
方法、还是 getService()方法。这几个方法所接收的参数都是相同的,第一个参数依旧是Context,不用多做解释。第二个参数一般用不到,通常都是传入 0 即可。第三个参数是一个 Intent 对象,我们可以通过这个对象构建出 PendingIntent 的“意图” 。第四个参数用于 确 定 PendingIntent 的 行 为 , 有 FLAG_ONE_SHOT 、 FLAG_NO_CREATE 、
FLAG_CANCEL_CURRENT 和 FLAG_UPDATE_ CURRENT 这四种值可选, 每种值的含义你可以查看文档,我就不一一进行解释了。
public class MainActivity extends Activity implements OnClickListener{

    @Override
    protected void onCreate(Bundle savedInstanceState) {
        super.onCreate(savedInstanceState);
        setContentView(R.layout.activity_main);

        Button btn=(Button) findViewById(R.id.button1);
        btn.setOnClickListener(this);
    }

	@Override
			public void onClick(View arg0) {
				// TODO Auto-generated method stub
			switch (arg0.getId()) {
			case R.id.button1:
				NotificationManager manager=(NotificationManager) getSystemService(NOTIFICATION_SERVICE);
				Notification notification=new Notification(R.drawable.ic_launcher,"zs",System.currentTimeMillis());
			Intent intent=new Intent(this,SecondActivity.class);
			PendingIntent pi=PendingIntent.getActivity(this, 0, intent, PendingIntent.FLAG_CANCEL_CURRENT);
				notification.setLatestEventInfo(this, "ddd", "dcdce", pi);
				manager.notify(1,notification);
				break;

			default:
				break;
			}

    }
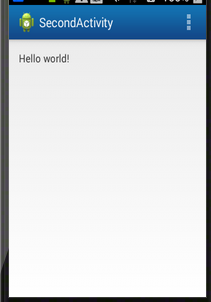
怎么系统状态上的通知图标还没有消失呢?是这样的, 如果我们没有在代码中对该通知进行取消,它就会一直显示在系统的状态栏上显示。解决的方法也很简单,调用NotificationManager 的 cancel()方法就可以取消通知
public class SecondActivity extends Activity {

	@Override
	protected void onCreate(Bundle savedInstanceState) {
		super.onCreate(savedInstanceState);
		setContentView(R.layout.activity_second);
		NotificationManager notificationManager=(NotificationManager) getSystemService(NOTIFICATION_SERVICE);
	  notificationManager.cancel(1);
	}
可以看到,这里我们在 cancel()方法中传入了 1,这个 1 是什么意思呢?还记得在创建通知的时候给每条通知指定的 id 吗?当时我们给这条通知设置的 id 就是 1。因此,如果你想要取消哪一条通知,就在 cancel()方法中传入该通知的 id 就行了
通知的高级技巧
通知音:
Uri soundUri = Uri.fromFile(new File("/system/media/audio/ringtones/ Basic_tone.ogg"));
notification.sound = soundUri;
long[] vibrates = {0, 1000, 1000, 1000};
notification.vibrate = vibrates;<uses-permission android:name="android.permission.VIBRATE" />
现在的手机基本上都会前置一个 LED 灯,当有未接电话或未读短信,而此时手机又处于锁屏状态时,LED 灯就会不停地闪烁,提醒用户去查看。我们可以使用 ledARGB、
ledOnMS、ledOffMS 以及 flags 这几个属性来实现这种效果。ledARGB 用于控制 LED灯的颜色,一般有红绿蓝三种颜色可选。ledOnMS 用于指定 LED 灯亮起的时长,以毫秒为单位。ledOffMS 用于指定 LED 灯暗去的时长,也是以毫秒为单位。flags 可用于指定通知的一些行为, 其中就包括显示 LED 灯这一选项。 所以, 当通知到来时, 如果想要实现 LED灯以绿色的灯光一闪一闪的效果,就可以写成
notification.ledARGB = Color.GREEN;
notification.ledOnMS = 1000;
notification.ledOffMS = 1000;
notification.flags = Notification.FLAG_SHOW_LIGHTS;
当然,如果你不想进行那么多繁杂的设置,也可以直接使用通知的默认效果,它会根据当前手机的环境来决定播放什么铃声,以及如何振动,写法如下:
notification.defaults = Notification.DEFAULT_ALL;接收和发送短信
<RelativeLayout xmlns:android="http://schemas.android.com/apk/res/android"
    xmlns:tools="http://schemas.android.com/tools"
    android:layout_width="match_parent"
    android:layout_height="match_parent"
    tools:context=".MainActivity" >

    <TextView
        android:id="@+id/textView3"
        android:layout_width="wrap_content"
        android:layout_height="wrap_content"
        android:layout_alignParentLeft="true"
        android:layout_alignParentTop="true"
        android:layout_marginLeft="44dp"
        android:layout_marginTop="29dp"
        android:text="From" />

    <TextView
        android:id="@+id/textView1"
        android:layout_width="wrap_content"
        android:layout_height="wrap_content"
        android:layout_alignBaseline="@+id/textView1"
        android:layout_alignBottom="@+id/textView1"
        android:layout_marginLeft="68dp"
        android:layout_toRightOf="@+id/textView1" />

    <TextView
        android:id="@+id/textView2"
        android:layout_width="wrap_content"
        android:layout_height="wrap_content"
        android:layout_alignBaseline="@+id/textView3"
        android:layout_alignBottom="@+id/textView3"
        android:layout_alignLeft="@+id/textView2" />

    <TextView
        android:layout_width="wrap_content"
        android:layout_height="wrap_content"
        android:layout_alignLeft="@+id/textView3"
        android:layout_below="@+id/textView2"
        android:layout_marginTop="24dp"
        android:text="Content:" />

</RelativeLayout>
public class MainActivity extends Activity {

	TextView txt1,txt2;
    @Override
    protected void onCreate(Bundle savedInstanceState) {
        super.onCreate(savedInstanceState);
        setContentView(R.layout.activity_main);


        txt1=(TextView) findViewById(R.id.textView1);
         txt2=(TextView) findViewById(R.id.textView2);

    }


    class MessageReceiver extends BroadcastReceiver{

		@Override
		public void onReceive(Context arg0, Intent arg1) {
			// TODO Auto-generated method stub
			Bundle bundle=arg1.getExtras();
			Object[] pdus=(Object[]) bundle.get("pdus");
			SmsMessage[] messages=new SmsMessage[pdus.length];
			for (int i = 0; i < messages.length; i++) {
				messages[i]=SmsMessage.createFromPdu((byte[])pdus[i]);

			}
            String address=messages[0].getOriginatingAddress();
            String fullMessage="";
            for (SmsMessage message:messages) {
				fullMessage+= message.getMessageBody();
			}
            txt1.setText(address);
            txt2.setText(fullMessage);

		}

    }
首先我们从 Intent 参数中取出了一个 Bundle 对象,然后使用 pdu 密钥来提取一个 SMS pdus 数组, 其中每一个 pdu 都表示一条短信消息。 接着使用 SmsMessage
的 createFromPdu()方法将每一个 pdu 字节数组转换为 SmsMessage 对象, 调用这个对象 的 getOriginatingAddress() 方 法 就 可 以 获 取 到 短 信 的 发 送 方 号 码 , 调 用
getMessageBody()方法就可以获取到短信的内容,然后将每一个 SmsMessage 对象中的短信内容拼接起来,就组成了一条完整的短信。最后将获取到的发送方号码和短信内容显示在 TextView 上。完成了 MessageReceiver 之后,我们还需要对它进行注册才能让它接收到短信广播,
 protected void onCreate(Bundle savedInstanceState) {
        super.onCreate(savedInstanceState);
        setContentView(R.layout.activity_main);


        txt1=(TextView) findViewById(R.id.textView1);
         txt2=(TextView) findViewById(R.id.textView2);
         intentFilter=new IntentFilter();
         intentFilter.addAction("android.provider.Telephony.SMS_RECEIVED");
        messageReceiver=new MessageReceiver();
        registerReceiver(messageReceiver, intentFilter);
    }
<uses-permission android:name="android.permission.RECEIVE_SMS" />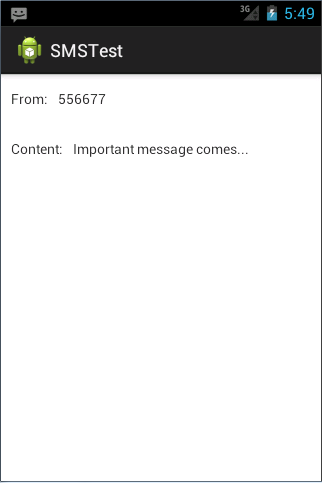
拦截短信
   public class MainActivity extends Activity {

         @Override
           protected void onCreate(Bundle savedInstanceState) {
  ...
           receiveFilter = new IntentFilter();
           receiveFilter.addAction("android.provider.Telephony.SMS_RECEIVED");
           receiveFilter.setPriority(100);
           messageReceiver = new MessageReceiver();
           registerReceiver(messageReceiver, receiveFilter);
        }
 ...
          class MessageReceiver extends BroadcastReceiver {
          @Override
          public void onReceive(Context context, Intent intent) {
  ...
          abortBroadcast();
     }
 }
发送短信
     to = (EditText) findViewById(R.id.to);
     msgInput = (EditText) findViewById(R.id.msg_input);
     send = (Button) findViewById(R.id.send);
     send.setOnClickListener(new OnClickListener() {
      @Override
            public void onClick(View v) {
            SmsManager smsManager = SmsManager.getDefault();
            smsManager.sendTextMessage(to.getText().toString(), null,
            msgInput.getText().toString(), null, null);
        }
      });
 }
⋯⋯
<uses-permission android:name="android.permission.RECEIVE_SMS" />
<uses-permission android:name="android.permission. SEND_SMS" /> sendFilter = new IntentFilter();
sendFilter.addAction("SENT_SMS_ACTION");
sendStatusReceiver = new SendStatusReceiver();
registerReceiver(sendStatusReceiver, sendFilter);
send.setOnClickListener(new OnClickListener() {
@Override
public void onClick(View v) {
SmsManager smsManager = SmsManager.getDefault();
Intent sentIntent = new Intent("SENT_SMS_ACTION");
PendingIntent pi = PendingIntent.getBroadcast (MainActivity.this, 0,
sentIntent, 0);
smsManager.sendTextMessage(to.getText().toString(), null,
msgInput.getText().toString(), pi, null);
}
});
}
@Override
protected void onDestroy() {
super.onDestroy();
unregisterReceiver(messageReceiver);
unregisterReceiver(sendStatusReceiver);
}
⋯⋯
class SendStatusReceiver extends BroadcastReceiver {
@Override
public void onReceive(Context context, Intent intent) {
if (getResultCode() == RESULT_OK) {
// 短信发送成功
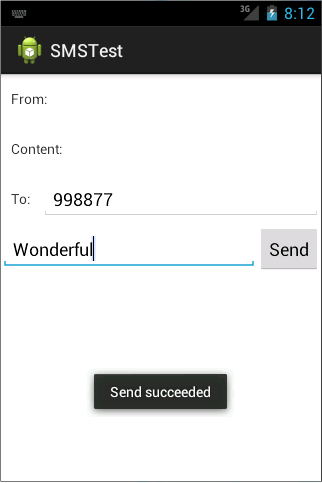
Toast.makeText(context, "Send succeeded",Toast.LENGTH_LONG).show();
} else {
// 短信发送失败
Toast.makeText(context, "Send failed", Toast.LENGTH_LONG).show();
}
}
}
调用摄像头和相册
<RelativeLayout xmlns:android="http://schemas.android.com/apk/res/android"
    xmlns:tools="http://schemas.android.com/tools"
    android:layout_width="match_parent"
    android:layout_height="match_parent"
    tools:context=".MainActivity" >

    <Button
        android:id="@+id/button1"
        android:layout_width="wrap_content"
        android:layout_height="wrap_content"
        android:layout_alignParentLeft="true"
        android:layout_alignParentTop="true"
        android:layout_marginLeft="54dp"
        android:layout_marginTop="44dp"
        android:text="Button" />

    <ImageView
        android:id="@+id/imageView1"
        android:layout_width="wrap_content"
        android:layout_height="wrap_content"
        android:layout_alignLeft="@+id/button1"
        android:layout_below="@+id/button1"
        android:layout_marginTop="68dp"
        android:src="@drawable/ic_launcher" />

</RelativeLayout>
import java.io.File;

import android.net.Uri;
import android.os.Bundle;
import android.os.Environment;
import android.provider.MediaStore;
import android.app.Activity;
import android.content.Intent;
import android.graphics.Bitmap;
import android.graphics.BitmapFactory;
import android.view.Menu;
import android.view.View;
import android.widget.Button;
import android.widget.ImageView;

public class MainActivity extends Activity {

	public static final int TAKE_PHOTO = 1;
	public static final int CROP_PHOTO = 2;
	Button btn;
	ImageView img;
	Uri imageuri;
    @Override
    protected void onCreate(Bundle savedInstanceState) {
        super.onCreate(savedInstanceState);
        setContentView(R.layout.activity_main);


        btn=(Button) findViewById(R.id.button1);
        img=(ImageView) findViewById(R.id.imageView1);
        btn.setOnClickListener(new View.OnClickListener() {

			@Override
			public void onClick(View arg0) {
				// TODO Auto-generated method stub
				File outimage=new File(Environment.getExternalStorageDirectory(),"templmage.jpg");
				try {

					if (outimage.exists()) {
						outimage.delete();
					}
					outimage.createNewFile();
				} catch (Exception e) {
					// TODO: handle exception
					e.printStackTrace();
				}
				imageuri=Uri.fromFile(outimage);
				Intent intent=new Intent("android.media.action. IMAGE_CAPTURE");
				intent.putExtra(MediaStore.EXTRA_OUTPUT, imageuri);
				startActivityForResult(intent, TAKE_PHOTO);
			}
		});
    }


 @Override
protected void onActivityResult(int requestCode, int resultCode, Intent data) {
	// TODO Auto-generated method stub
	switch (requestCode) {
	case TAKE_PHOTO:
		if (resultCode==RESULT_OK) {
			Intent intent = new Intent("com.android.camera.action.CROP");
			intent.setDataAndType(imageuri, "image/*");
			intent.putExtra("scale", true);
			intent.putExtra(MediaStore.EXTRA_OUTPUT, imageuri);
			startActivityForResult(intent, CROP_PHOTO);

		}
		break;

	case CROP_PHOTO:
		if (requestCode==RESULT_OK) {
			try {
				Bitmap bitmap=BitmapFactory.decodeStream(getContentResolver().openInputStream(imageuri));
				img.setImageBitmap(bitmap);
			} catch (Exception e) {
				// TODO: handle exception
				e.printStackTrace();
			}
		}
		break;
		default:
			break;
	}
}

}
上述代码稍微有点复杂,我们来仔细地分析一下。在 MainActivity 中要做的第一件事自然是分别获取到 Button 和 ImageView 的实例,并给 Button 注册上点击事件,然后在
Button 的点击事件里开始处理调用摄像头的逻辑,我们重点看下这部分代码。首先这里创建了一个 File 对象,用于存储摄像头拍下的图片,这里我们把图片命名为
output_image.jpg,并将它存放在手机 SD 卡的根目录下,调用 Environment 的getExternalStorageDirectory()方法获取到的就是手机 SD 卡的根目录。然后再调用 Uri
的 fromFile()方法将 File 对象转换成 Uri 对象, 这个 Uri 对象标识着 output_image.jpg 这张图片的唯一地址。接着构建出一个 Intent 对象,并将这个 Intent 的 action 指定为
android.media.action. IMAGE_CAPTURE,再调用 Intent 的 putExtra()方法指定图片的输出地址,这里填入刚刚得到的 Uri 对象,最后调用 startActivityForResult()来启动活
动。由于我们使用的是一个隐式 Intent,系统会找出能够响应这个 Intent 的活动去启动,这样照相机程序就会被打开,拍下的照片将会输出到 output_image.jpg 中。注意刚才我们是使用 startActivityForResult()来启动活动的,因此拍完照后会有结果回到 onActivityResult()方法中。如果发现拍照成功,则会再次构建出一个 Intent 对象,
并把它的 action 指定为 com.android.camera.action.CROP。这个 Intent 是用于对拍出的照片进行裁剪的,因为摄像头拍出的照片都比较大,而我们可能只希望截取其中的一小部分。然后给这个 Intent 设置上一些必要的属性,并再次调用 startActivityForResult()来启动裁剪程序。裁剪后的照片同样会输出到 output_image.jpg 中。裁剪操作完成之后,程序又会回调到 onActivityResult()方法中,这个时候我们就可以调用 BitmapFactory 的 decodeStream()方法将 output_image.jpg 这张照片解析成Bitmap 对象,然后把它设置到 ImageView 中显示出来。由 于 这 个 项 目 涉 及 到 了 向 SD 卡 中 写 数 据 的 操 作 , 因 此 我 们 还 需 要 在
AndroidManifest.xml 中声明权限
<uses-permission android:name="android.permission.WRITE_EXTERNAL_STORAGE" />从相册中选择照片
<RelativeLayout xmlns:android="http://schemas.android.com/apk/res/android"
    xmlns:tools="http://schemas.android.com/tools"
    android:layout_width="match_parent"
    android:layout_height="match_parent"
    tools:context=".MainActivity" >

    <Button
        android:id="@+id/button1"
        android:layout_width="wrap_content"
        android:layout_height="wrap_content"
        android:layout_alignParentLeft="true"
        android:layout_alignParentTop="true"
        android:layout_marginTop="36dp"
        android:text="Button" />

    <Button
        android:id="@+id/button2"
        android:layout_width="wrap_content"
        android:layout_height="wrap_content"
        android:layout_alignParentLeft="true"
        android:layout_below="@+id/button1"
        android:layout_marginTop="28dp"
        android:text="Button" />

    <ImageView
        android:id="@+id/imageView1"
        android:layout_width="wrap_content"
        android:layout_height="wrap_content"
        android:layout_alignParentLeft="true"
        android:layout_centerVertical="true"
        android:layout_marginLeft="14dp"
        android:src="@drawable/ic_launcher" />

</RelativeLayout>
package com.example.photo;

import java.io.File;

import android.app.Activity;
import android.content.Intent;
import android.net.Uri;
import android.os.Bundle;
import android.os.Environment;
import android.provider.MediaStore;
import android.view.Menu;
import android.view.View;
import android.widget.Button;

public class MainActivity extends Activity {


	Button choose;
    @Override
    protected void onCreate(Bundle savedInstanceState) {
        super.onCreate(savedInstanceState);
        setContentView(R.layout.activity_main);
        choose=(Button) findViewById(R.id.button1);
        choose.setOnClickListener(new View.OnClickListener() {

			@Override
			public void onClick(View arg0) {
				// TODO Auto-generated method stub
				File outimage=new File(Environment.getExternalStorageDirectory(),"out_image.jpg");
				try {

					if (outimage.exists()) {
						outimage.delete();
					}
					outimage.createNewFile();
				} catch (Exception e) {
					// TODO: handle exception
					e.printStackTrace();
				}
				imageUri = Uri.fromFile(outputImage);
				Intent intent = new Intent("android.intent.action. GET_CONTENT");
				intent.setType("image/*");
				intent.putExtra("crop", true);
				intent.putExtra("scale", true);
				intent.putExtra(MediaStore.EXTRA_OUTPUT, imageUri);
				startActivityForResult(intent, CROP_PHOTO);
			}
		});
    }


    @Override
    public boolean onCreateOptionsMenu(Menu menu) {
        // Inflate the menu; this adds items to the action bar if it is present.
        getMenuInflater().inflate(R.menu.main, menu);
        return true;
    }

}
播放多媒体文件
<LinearLayout xmlns:android="http://schemas.android.com/apk/res/android"
android:layout_width="match_parent"
android:layout_height="match_parent" >
<Button
android:id="@+id/play"
android:layout_width="0dp"
android:layout_height="wrap_content"
android:layout_weight="1"
android:text="Play" />
<Button
android:id="@+id/pause"
android:layout_width="0dp"
android:layout_height="wrap_content"
android:layout_weight="1"
android:text="Pause" />
<Button
android:id="@+id/stop"
android:layout_width="0dp"
android:layout_height="wrap_content"
android:layout_weight="1"
android:text="Stop" />
</LinearLayout>
布局文件中横向放置了三个按钮,分别用于对音频文件进行播放、暂停和停止操作。然后修改 MainActivity 中的代码
public class MainActivity extends Activity implements OnClickListener {
private Button play;
private Button pause;
private Button stop;
private MediaPlayer mediaPlayer = new MediaPlayer();
@Override
protected void onCreate(Bundle savedInstanceState) {
super.onCreate(savedInstanceState);
setContentView(R.layout.activity_main);
play = (Button) findViewById(R.id.play);
pause = (Button) findViewById(R.id.pause);
stop = (Button) findViewById(R.id.stop);
play.setOnClickListener(this);
pause.setOnClickListener(this);
stop.setOnClickListener(this);
initMediaPlayer(); // 初始化MediaPlayer
}
private void initMediaPlayer() {
try {
File file = new File(Environment.getExternalStorageDirectory(),"music.mp3");
mediaPlayer.setDataSource(file.getPath()); // 指定音频文件的路径
mediaPlayer.prepare(); // 让MediaPlayer进入到准备状态
} catch (Exception e) {
e.printStackTrace();
}
}
@Override
public void onClick(View v) {
switch (v.getId()) {
case R.id.play:
if (!mediaPlayer.isPlaying()) {
mediaPlayer.start(); // 开始播放
}
break;
case R.id.pause:
if (mediaPlayer.isPlaying()) {
mediaPlayer.pause(); // 暂停播放
}
break;
case R.id.stop:
if (mediaPlayer.isPlaying()) {
mediaPlayer.reset(); // 停止播放
initMediaPlayer();
}
break;
default:
break;
}
}
@Override
protected void onDestroy() {
super.onDestroy();
if (mediaPlayer != null) {
mediaPlayer.stop();
mediaPlayer.release();
}
}
}


<LinearLayout xmlns:android="http://schemas.android.com/apk/res/android"
          android:layout_width="match_parent"
          android:layout_height="match_parent"
          android:orientation="vertical" >
    <VideoView
         android:id="@+id/video_view"
         android:layout_width="match_parent"
         android:layout_height="wrap_content" />
    <LinearLayout
         android:layout_width="match_parent"
         android:layout_height="match_parent" >
    <Button
         android:id="@+id/play"
         android:layout_width="0dp"
         android:layout_height="wrap_content"
android:layout_weight="1"
android:text="Play" />
<Button
android:id="@+id/pause"
android:layout_width="0dp"
android:layout_height="wrap_content"
android:layout_weight="1"
android:text="Pause" />
<Button
android:id="@+id/replay"
android:layout_width="0dp"
android:layout_height="wrap_content"
android:layout_weight="1"
android:text="Replay" />
</LinearLayout>
</LinearLayout>public class MainActivity extends Activity implements OnClickListener {
private VideoView videoView;
private Button play;
private Button pause;
private Button replay;
@Override
protected void onCreate(Bundle savedInstanceState) {
super.onCreate(savedInstanceState);
setContentView(R.layout.activity_main);
play = (Button) findViewById(R.id.play);
pause = (Button) findViewById(R.id.pause);
replay = (Button) findViewById(R.id.replay);
videoView = (VideoView) findViewById(R.id.video_view);
play.setOnClickListener(this);
pause.setOnClickListener(this);
replay.setOnClickListener(this);
initVideoPath();
}
private void initVideoPath() {
File file = new File(Environment.getExternalStorageDirectory(), "movie.3gp");
videoView.setVideoPath(file.getPath()); // 指定视频文件的路径
}
@Override
public void onClick(View v) {
switch (v.getId()) {
case R.id.play:
if (!videoView.isPlaying()) {
videoView.start(); // 开始播放
}
break;
case R.id.pause:
if (videoView.isPlaying()) {
videoView.pause(); // 暂时播放
}
break;
case R.id.replay:
if (videoView.isPlaying()) {
videoView.resume(); // 重新播放
}
break;
}
}
@Override
protected void onDestroy() {
super.onDestroy();
if (videoView != null) {
videoView.suspend();
}
}
}


 8544
8544

 被折叠的 条评论
为什么被折叠?
被折叠的 条评论
为什么被折叠?
 到【灌水乐园】发言


