


一、Linux中的用户和用户组:
1)用户的类型:
1、Linux中用户的类型
Linux系统是一个多用户多任务的操作系统,每个用户都有一个独立的身份号码,这个就是用户ID(UID)。在Linux中用户并不会去认识用户的用户名,它认识的其实是用户ID---------UID。
Linux中用户分为三类:超级用户、系统用户、普通用户
超级用户: root,具有一切操作权力,所以不要轻易在root账户下面对文件进行操作。在Linux在操作系统的字符界面,root账户的提示符为#,在默认情况下,root用户的UID为0.
系统用户: 系统用户是Linux系统正常工作所必需的内建的用户,一般是用于管理服务所用。系统用户不能用来登陆,如bin、daemon、lp等用户。系统用户的UID一般为1~499,它们的shell为/sbin/nologin。
普通用户: 普通用户是为了让使用者能够使用Linux系统资源而建立的,用户新建的账号一般就是普通账号。在Linux操作系统的字符界面,普通用户的提示符为$,且普通用户的UID默认为1000~60000。
Linux系统也继承了Unix系统的做法,采用纯文本文件保存账户的各种信息,用户可以通过修改文本文件来管理用户和组。
2)Linux中用户组的类型:
用户组分为两类:基本组(私有组)、附加组(共有组)
基本组(私有组): 在创建用户的同时就自动会建一个与用户同名的组。如建立mike用户会同时建立一个mike组,mike这个用户就属于mike组。
附加组(共有组) :用户所属的除基本组外的其他组
3)Linux中存储用户信息的文件:
- 存储用户信息的文件:/etc/passwd 文件
/etc/passwd 文件是系统用户配置文件,存储了系统中所有用户的基本信息,并且所有用户都可以对此文件执行读操作。
Linux etc是用来存放系统主要的配置文件,例如用户的账号密码文件、各种服务的起始文件等,一般来说这个目录下的各文件属性是可以让一般用户进行查阅的,但是只有root才有权利进行修改。
- 每行用户信息都以 “:” 作为分隔符,划分为 7 个字段,每个字段所表示的含义如下:
用户名:密码:UID(用户ID):GID(组ID):描述性信息:主目录:默认Shell
例:
[root@VM-4-5-centos /]# more /etc/passwd
root:x:0:0:root:/root:/bin/bash
bin:x:1:1:bin:/bin:/sbin/nologin
daemon:x:2:2:daemon:/sbin:/sbin/nologin
....省略部分输出....
tcpdump:x:72:72::/:/sbin/nologin
syslog:x:996:994::/home/syslog:/bin/false
二、创建下列用户、组和组成员资格:
-
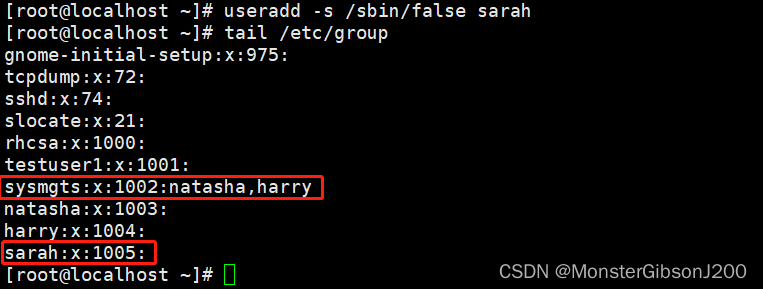
1.创建名为 sysmgrs 的组

-
2.创建用户 natasha 同时指定sysmgrs作为natasha的附加组

-
3.创建用户 harry 同时指定 sysmgrs作为harry的附加组

-
4.创建用户 sarah 指定shell类型为/sbin/false(无权访问系统上的交互式 shell)且不是 sysmgrs 的成员
-
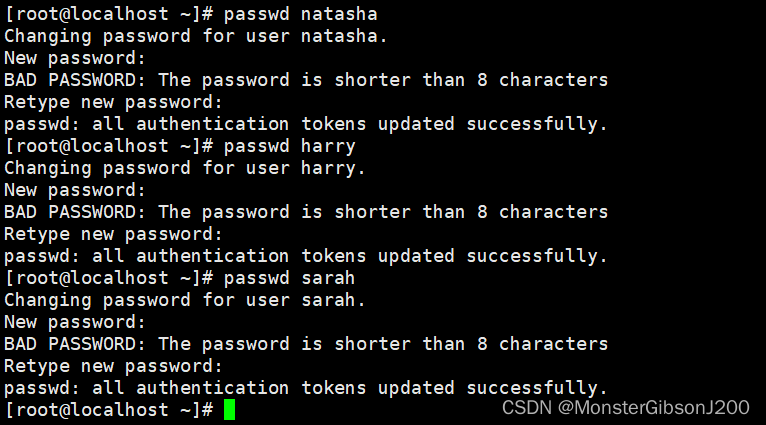
5.设置natasha 、 harry 和 sarah 的密码都是 123
-
6.创建用户lockuser, 并指定家目录为/home/lock, 然后锁定该用户

-
7.创建用户limituser, gid为1555,userid为1666, 让其密码在10天后过期

-
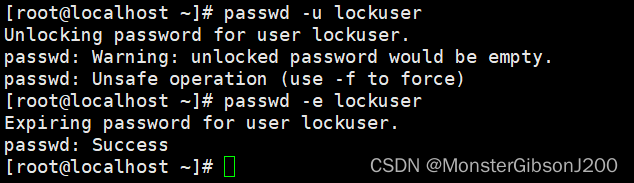
8.解锁lockuser, 并设定下次登录时必须修改密码
-
9.让natasha具备修改 harry 密码的权限(sudo)
[root@VM-4-5-centos ~]# su - natasha
Last login: Wed Jul 20 02:06:11 EDT 2022 on pts/0
[natasha@VM-4-5-centos ~]$ sudo passwd harry
[sudo] password for natasha:
- 10.创建用户testuser并设置密码,修改用户名为normaluser

- 11.删除lockuser

三、创建文件或目录并设置权限:
1.创建文件,并赋予权限611(两种方式,一种guoa,一种nnn):
[root@VM-4-5-centos ~]# touch file
[root@VM-4-5-centos ~]# ls -l file
-rw-r--r-- 1 root root 0 Jul 20 02:53 file
[root@VM-4-5-centos ~]# chmod g=x file
[root@VM-4-5-centos ~]# ls -l file
-rw---xr-- 1 root root 0 Jul 20 02:53 file
[root@VM-4-5-centos ~]# chmod o=x file
[root@VM-4-5-centos ~]# ls -l file
-rw---x--x 1 root root 0 Jul 20 02:53 file
[root@VM-4-5-centos ~]# chmod 611 file
[root@VM-4-5-centos ~]# ls -l file
-rw---x--x 1 root root 0 Jul 20 02:53 file
2.创建目录,并赋予权限755(两种方式,一种guoa,一种nnn):
[root@VM-4-5-centos ~]# mkdir chmod_dir/
[root@VM-4-5-centos ~]# ls -dl chmod_dir/
drwxr-xr-x 2 root root 4096 Jul 20 02:57 chmod_dir/
[root@VM-4-5-centos ~]# chmod g-w chmod_dir/
[root@VM-4-5-centos ~]# ls -dl chmod_dir/
drwxr-xr-x 2 root root 4096 Jul 20 02:57 chmod_dir/
[root@VM-4-5-centos ~]# chmod 755 chmod_dir/
[root@VM-4-5-centos ~]# ls -dl chmod_dir/
drwxr-xr-x 2 root root 4096 Jul 20 02:57 chmod_dir/
3.创建文件,并将文件的属主和属组修改其他用户:
[root@VM-4-5-centos ~]# touch chmod_test02
[root@VM-4-5-centos ~]# chown rhcsa:rhcsa chmod_test02
4.设置suid,为文件设置suid(两种方式 u+s和nnnn)的方式:
[root@VM-4-5-centos ~]# chmod u+s chmod_test02
[root@VM-4-5-centos ~]# ls -l chmod_test02
-rwSr--r-- 1 root root 0 Jul 20 03:18 chmod_test02
[root@VM-4-5-centos ~]# chmod u+x chmod_test02
[root@VM-4-5-centos ~]# ls -l chmod_test02
-rwsr--r-- 1 root root 0 Jul 20 03:18 chmod_test02
[root@VM-4-5-centos ~]# chmod 4744 chmod_test02
[root@VM-4-5-centos ~]# ls -l chmod_test02
-rwsr--r-- 1 root root 0 Jul 20 03:18 chmod_test02
5.设置sgid, 为文件设置sgid(两种方式 g+s和nnnn)的方式:
[root@VM-4-5-centos ~]# touch chmod_test03
[root@VM-4-5-centos ~]# chmod g+x chmod_test03
[root@VM-4-5-centos ~]# chmod g+s chmod_test03
[root@VM-4-5-centos ~]# ls -l chmod_test03
-rw-r-sr-- 1 root root 0 Jul 20 03:22 chmod_test03
[root@VM-4-5-centos ~]# chmod 2654 chmod_test03
[root@VM-4-5-centos ~]# ls -l chmod_test03
-rw-r-sr-- 1 root root 0 Jul 20 03:22 chmod_test03
6.设置sbit,为目录设置sbit(两种方式 o+t和nnnn)的方式:
[root@VM-4-5-centos ~]# touch chmod_test04
[root@VM-4-5-centos ~]# chmod o+x chmod_test04
[root@VM-4-5-centos ~]# chmod o+t chmod_test04
[root@VM-4-5-centos ~]# ls -l chmod_test04
-rw-r--r-t 1 root root 0 Jul 20 03:24 chmod_test04
[root@VM-4-5-centos ~]# chmod 1645 chmod_test04
[root@VM-4-5-centos ~]# ls -l chmod_test04
-rw-r--r-t 1 root root 0 Jul 20 03:24 chmod_test04
7.创建文件:
1)查询文件的acl:
[root@VM-4-5-centos ~]# touch acl_test01
[root@VM-4-5-centos ~]# getfacl acl_test01

2)为文件设置acl 用户为testuser1 权限为 rwx:
[root@VM-4-5-centos ~]# useradd testuser1
[root@VM-4-5-centos ~]# setfacl -m u:testuser1:rwx acl_test01
[root@VM-4-5-centos ~]# getfacl acl_test01

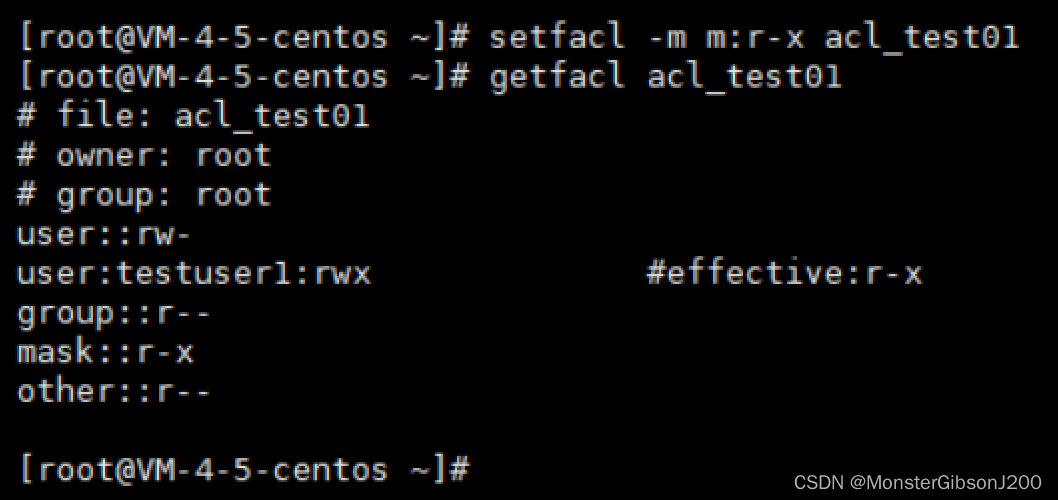
3)为文件设置acl的mask: 权限为r-x:
[root@VM-4-5-centos ~]# setfacl -m m:r-x acl_test01
[root@VM-4-5-centos ~]# getfacl acl_test01


 3842
3842


 被折叠的 条评论
为什么被折叠?
被折叠的 条评论
为什么被折叠?
 到【灌水乐园】发言


