


1、准备
下载安装redis。
创建springboot项目。
2、引入redis依赖
        <!--redis-->
        <dependency>
            <groupId>org.springframework.boot</groupId>
            <artifactId>spring-boot-starter-data-redis</artifactId>
        </dependency>
3、配置
配置application.properties。根据自己实际情况配置相关信息。
spring.redis.port=6379
spring.redis.host=localhost
#redis密码,没有密码可以不加
spring.redis.password=123456
spring.redis.jedis.pool.max-active=100
spring.redis.jedis.pool.max-idle=5
spring.redis.jedis.pool.max-wait=60000
spring.redis.database=0
spring.redis.timeout=10000
4、代码实现
创建一个redis服务类。
package com.service;

import org.springframework.beans.factory.annotation.Autowired;
import org.springframework.data.redis.core.StringRedisTemplate;
import org.springframework.data.redis.core.ValueOperations;
import org.springframework.stereotype.Service;

import java.util.concurrent.TimeUnit;

@Service
public class RedisService {

    @Autowired
    protected StringRedisTemplate redisTemplate;

    /**
     * 写入redis缓存(不设置expire存活时间)
     * @param key
     * @param value
     * @return
     */
    public boolean set(final String key, String value){
        boolean result = false;
        try {
            ValueOperations operations = redisTemplate.opsForValue();
            operations.set(key, value);
            result = true;
        } catch (Exception e) {
            System.out.println("写入redis缓存失败!" + e.getMessage());
        }
        return result;
    }

    /**
     * 获取redis缓存
     * @param key
     * @return
     */
    public Object get(final String key){
        Object result = null;
        try {
            ValueOperations operations = redisTemplate.opsForValue();
            result = operations.get(key);
        } catch (Exception e) {
            System.out.println("读取redis缓存失败!" + e.getMessage());
        }
        return result;
    }
}
创建Controller类:
import org.springframework.web.bind.annotation.*;
import com.service.RedisService;

@RestController
public class HelloController {
    /*redis服务类*/
    @Resource
    private RedisService redisService;

    @RequestMapping(value = "redisSet/{key}/{v}")
    public String redisSet(@PathVariable String key,@PathVariable String v){
        //eg: http://localhost:8080/redisSet/c/d
        System.out.println(key+":"+v);
        redisService.set(key,v);
        return redisService.get(key).toString();
    }
}
启动redis:

最后启动Springboot项目。
打开浏览器,输入网址:http://localhost:8080/redisSet/hello/world
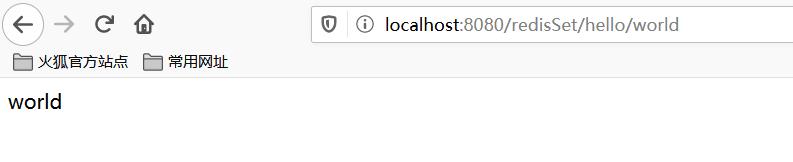 返回得到world,表示写入成功。
也可在命令行窗口确认,如图:

完!


 21万+
21万+


 被折叠的 条评论
为什么被折叠?
被折叠的 条评论
为什么被折叠?
 到【灌水乐园】发言


