


 本文介绍了Ansible自动化运维工具,它基于Python开发,具有部署简单、使用SSH协议管理等特点。文中讲述了其安装方法,包括yum安装、配置主机清单和密钥对等,还详细介绍了命令行模块,如主机连通性测试、command模块、cron模块等的功能及使用。
文章目录
一、Ansible 简介
1.1 ansible 是什么?
ansible是新出现的自动化运维工具,基于Python开发,集合了众多运维工具(puppet、chef、func、fabric)的优点,实现了批量系统配置、批量程序部署、批量运行命令等功能。
- ansible是基于 paramiko开发的,并且基于模块化工作,本身没有批量部署的能力。真正具有批量部署的是ansible所运行的模块,ansible只是提供一种框架。
- ansible不需要在远程主机上安装client/agents,因为它们是基于ssh来和远 程主机通讯的。
- ansible目前已经已经被红帽官方收购,是自动化运维工具中大家认可度最高的,并且上手容易,学习简单。是每位运维工程师必须掌握的技能之一。
1.2 ansible 特点
- 部署简单,只需在主控端部署Ansible环境,被控端无需做任何操作;
- 默认使用SSH协议对设备进行管理;
- 有大量常规运维操作模块,可实现日常绝大部分操作;
- 配置简单、功能强大、扩展性强;
- 支持API及自定义模块,可通过Python轻松扩展;
- 通过Playbooks来定制强大的配置、状态管理;
- 轻量级,无需在客户端安装agent,更新时,只需在操作机上进行一次更新即可;
- 提供一个功能强大、操作性强的Web管理界面和REST API接口——AWX平台。
1.3 ansible 架构图
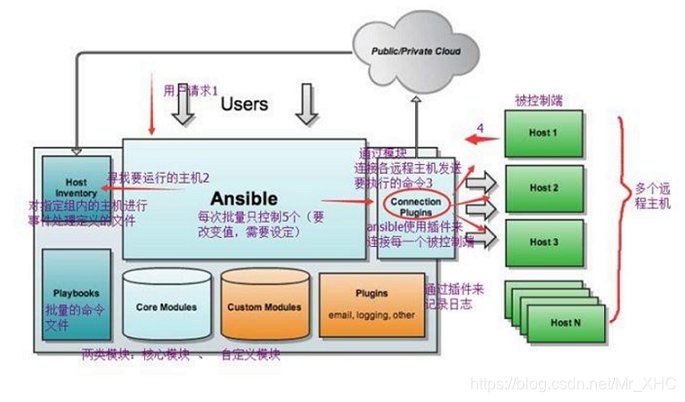
上图中我们看到的主要模块如下
Ansible:Ansible核心程序。
HostInventory:记录由Ansible管理的主机信息,包括端口、密码、ip等。
Playbooks:“剧本”YAML格式文件,多个任务定义在一个文件中,定义主机需要调用哪些模块来完成的功能。
CoreModules:核心模块,主要操作是通过调用核心模块来完成管理任务。
CustomModules:自定义模块,完成核心模块无法完成的功能,支持多种语言。
ConnectionPlugins:连接插件,Ansible和Host通信使用。
二、Ansible的安装
| 设备 | 名称 | IP地址 |
|---|---|---|
| 管理端 | master | 192.168.40.11 |
| 被管理端 | node1 | 192.168.40.12 |
| 被管理端 | node2 | 192.168.40.13 |
| 1.使用 yum 安装 |
yum 安装是我们很熟悉的安装方式了。我们需要在管理端先安装一个epel-release包,然后再安装 ansible 即可。
[root@master ~]# yum -y install epel-release #安装epel源
[root@master ~]# yum -y install ansible

[root@master ~]# ansible --version	#查看ansible版本
2.通过安装tree软件来查看此时安装的ansiblede目录结构
[root@master ~]# yum -y install tree
[root@master ~]# tree /etc/ansible/	#树状结构展示文件夹
/etc/ansible/
├── ansible.cfg	#ansible的配置文件
├── hosts	    #ansible的主仓库,用于存储需要管理的远程主机的相关信息
└── roles	    #角色
3.配置主机清单
[root@master ~]# vi /etc/ansible/hosts
添加:	两个标签名随便配置
[webservers]
192.168.40.12
[mysql]
192.168.40.13
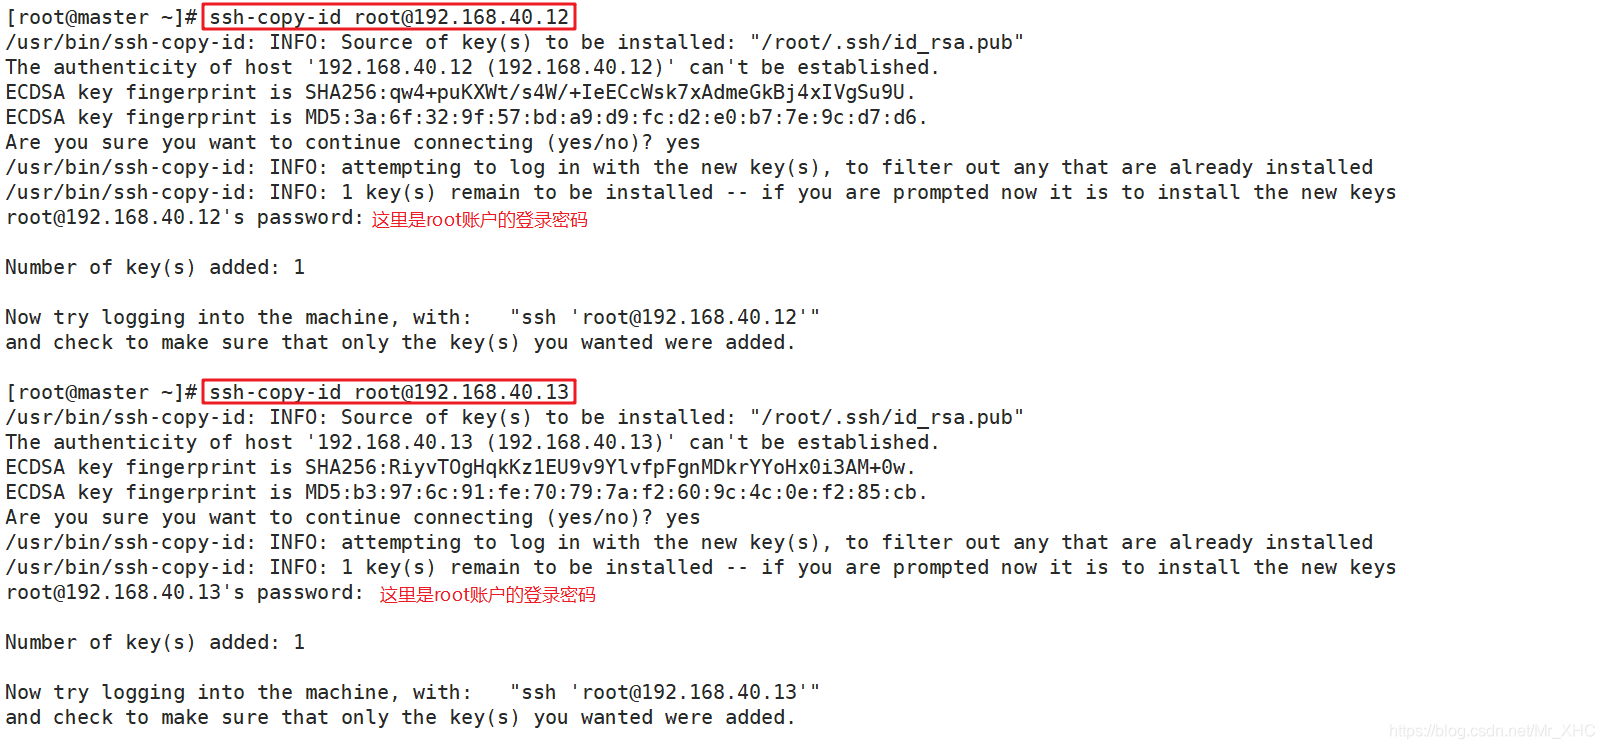
4.配置密钥对
[root@master ~]# ssh-keygen -t rsa	#生成密钥对
[root@master ~]# ssh-copy-id root@192.168.40.12	#配置密钥对验证
[root@master ~]# ssh-copy-id root@192.168.40.13

[root@node1 ~]# ll .ssh/authorized_keys	#已经收到master的ssh公钥
-rw-------. 1 root root 393 1月  11 19:15 .ssh/authorized_keys
[root@node2 ~]# ll .ssh/authorized_keys
-rw-------. 1 root root 393 1月  11 19:15 .ssh/authorized_keys

若设置的时候为设置密码,此时可以实现免交互代理,若设置的时候设置密码,还要进行免交互代理的设置,方才可以实现免交互的功能。
免交互代理
[root@master ~]# ssh-agent bash
[root@master ~]# ssh-add
Enter passphrase for /root/.ssh/id_rsa: 	#密钥密码
Identity added: /root/.ssh/id_rsa (/root/.ssh/id_rsa)
三、Ansible命令行模块
命令的具体格式如下:
ansible 主机/ip -m 模块 -a '参数'
3.1 ansible的命令工具
ansible-doc -l	#获取全部模块的信息 注:按q退出

ansible-doc -s 模块名  #获取指定模块的使用帮助
3.2 ansible 常用模块功能
(1)主机连通性测试
ansible all -m ping #匹配所有主机
效果如下:
[root@master ~]# ansible all -m ping
192.168.40.13 | SUCCESS => {
    "ansible_facts": {
        "discovered_interpreter_python": "/usr/bin/python"
    },
    "changed": false,
    "ping": "pong"
}
192.168.40.12 | SUCCESS => {
    "ansible_facts": {
        "discovered_interpreter_python": "/usr/bin/python"
    },
    "changed": false,
    "ping": "pong"
}
这样就说明所有主机是连通状态的。接下来的操作才可以正常进行。
(2)command模块
这个模块可以直接在远程主机上执行命令,并将结果返回本主机。
[root@master ~]# ansible mysql -m command -a 'date'	#主机名
192.168.40.13 | CHANGED | rc=0 >>
2021年 01月 11日 星期一 19:50:31 CST

[root@master ~]# ansible 192.168.40.12 -m command -a 'date'	#ip地址
192.168.40.12 | CHANGED | rc=0 >>
2021年 01月 11日 星期一 19:52:28 CST

[root@master ~]# ansible all -m command -a 'date' 	#所有主机执行date命令
192.168.40.12 | CHANGED | rc=0 >>
2021年 01月 11日 星期一 22:10:32 CST
192.168.40.13 | CHANGED | rc=0 >>
2021年 01月 11日 星期一 22:10:32 CST
如果忽略-m模块,则默认远行command模块
[root@master ~]# ansible all -a 'date'
192.168.40.13 | CHANGED | rc=0 >>
2021年 01月 11日 星期一 23:17:07 CST
192.168.40.12 | CHANGED | rc=0 >>
2021年 01月 11日 星期一 23:17:08 CST
(3)cron模块
该模块适用于管理计划任务。
支持时间参数:minute,hour,day,mounth,weekday
cron模块有 两种状态(state): presnet表示添加 (可以省略),abent表示移除。
① 通过ansible管理器设置任务计划
[root@master ~]# ansible mysql -m cron -a 'minute="*/1" job="/usr/bin/echo hello >> /opt/hello.txt" name="cron hello"'
192.168.40.13 | CHANGED => {
    "ansible_facts": {
        "discovered_interpreter_python": "/usr/bin/python" #会自动转换成python语言
    },
    "changed": true, 	--->表示执行成功
    "envs": [],
    "jobs": [
        "cron hello"
    ]
}
[root@master ~]# ansible mysql -a 'crontab -l'
192.168.40.13 | CHANGED | rc=0 >>
#Ansible: cron hello
*/1 * * * * /usr/bin/echo hello >> /opt/hello.txt
[root@node2 ~]# cd /opt/	#查看
[root@node2 opt]# ls
hello.txt  rh
[root@node2 opt]# cat hello.txt
hello
hello
② 删除创建的任务计划
[root@master ~]# ansible mysql -m cron -a 'name="cron hello" state=absent'
192.168.40.13 | CHANGED => {
    "ansible_facts": {
        "discovered_interpreter_python": "/usr/bin/python"
    },
    "changed": true,
    "envs": [],
    "jobs": []
}
[root@master ~]# ansible mysql -a 'crontab -l' #任务计划已经删除
192.168.40.13 | CHANGED | rc=0 >>
(4)user 模块
该模块主要是用来管理用户账号。
① 创建新用户并指定其 uid
[root@master ~]# ansible all -m user -a 'name=tom uid=1010'
192.168.40.12 | CHANGED => {
    "ansible_facts": {
        "discovered_interpreter_python": "/usr/bin/python"
    },
    "changed": true,
    "comment": "",
    "create_home": true,
    "group": 1010,
    "home": "/home/tom",
    "name": "tom",
    "shell": "/bin/bash",
    "state": "present",
    "system": false,
    "uid": 1010
}
192.168.40.13 | CHANGED => {
    "ansible_facts": {
        "discovered_interpreter_python": "/usr/bin/python"
    },
    "changed": true,
    "comment": "",
    "create_home": true,
    "group": 1010,
    "home": "/home/tom",
    "name": "tom",
    "shell": "/bin/bash",
    "state": "present",
    "system": false,
    "uid": 1010
}
添加完成,可以去查看一下:
[root@node1 ~]# id tom	##查看用户状态
uid=1010(tom) gid=1010(tom) 组=1010(tom)
[root@node2 ~]# id tom
uid=1010(tom) gid=1010(tom) 组=1010(tom)
② 删除用户
[root@master ~]# ansible mysql -m user -a 'name=tom state=absent'
192.168.40.13 | CHANGED => {
    "ansible_facts": {
        "discovered_interpreter_python": "/usr/bin/python"
    },
    "changed": true,
    "force": false,
    "name": "tom",
    "remove": false,
    "state": "absent"
}
删除之后,查看一下:
[root@node2 ~]# id tom	#查看用户情况
id: tom: no such user
(5)group 模块
该模块主要用于添加或删除组。
① 创建一个系统组
[root@master ~]# ansible webserver -m group -a 'name=zhong gid=1050 system=yes'
192.168.40.12 | CHANGED => {
    "ansible_facts": {
        "discovered_interpreter_python": "/usr/bin/python"
    },
    "changed": true,
    "gid": 1050,
    "name": "zhong",
    "state": "present",
    "system": true
}
创建过后,查看一下:
[root@node1 ~]# getent group | grep zhong
zhong:x:1050:
② 更改用户所属组
[root@master ~]# ansible webserver -m user -a 'name=tom uid=1050 group=zhong system=yes'
192.168.40.12 | CHANGED => {
    "ansible_facts": {
        "discovered_interpreter_python": "/usr/bin/python"
    },
    "append": false,
    "changed": true,
    "comment": "",
    "group": 1050,
    "home": "/home/tom",
    "move_home": false,
    "name": "tom",
    "shell": "/bin/bash",
    "state": "present",
    "uid": 1050
}


[root@node1 ~]# id tom
uid=1050(tom) gid=1050(zhong) 组=1050(zhong)
(6)copy 模块
这个模块将给定内容生成文件和修改权限,同时支持将文件复制到远程主机。
① 复制文件,并指定用户,权限
[root@master ~]# ansible webserver -m copy -a 'src=/etc/fstab dest=/opt/fstab.bak owner=tom mode=600'
192.168.40.12 | CHANGED => {
    "ansible_facts": {
        "discovered_interpreter_python": "/usr/bin/python"
    },
    "changed": true,
    "checksum": "2df1fbb13893789752b7cf8791884a3be501780e",
    "dest": "/opt/fstab.bak",
    "gid": 0,
    "group": "root",
    "md5sum": "ba38945d60d2a7c8662437199c0facd1",
    "mode": "0600",
    "owner": "tom",
    "size": 689,
    "src": "/root/.ansible/tmp/ansible-tmp-1610400136.64-50397-139608019342787/source",
    "state": "file",
    "uid": 1050
}
查看复制生成的文件及其权限
[root@node1 ~]# cd /opt/
[root@node1 opt]# ll
总用量 4
-rw------- 1 tom root 689 1月  12 18:52 fstab.bak
可以看出文件已经生成,并且权限为600。
② 给定内容生成文件,并指定地址
[root@master ~]# ansible webserver -m copy -a 'content="this is ky07" dest=/opt/ky07.txt'
192.168.40.12 | CHANGED => {
    "ansible_facts": {
        "discovered_interpreter_python": "/usr/bin/python"
    },
    "changed": true,
    "checksum": "d73dc4a3a528a22cdac0965e7cfa484261340d02",
    "dest": "/opt/ky07.txt",
    "gid": 0,
    "group": "root",
    "md5sum": "1974a7958156c221901a7adc9ebcde56",
    "mode": "0644",
    "owner": "root",
    "size": 12,
    "src": "/root/.ansible/tmp/ansible-tmp-1610400515.7-50503-198709984808254/source",
    "state": "file",
    "uid": 0
}
查看内容写入情况
[root@node1 ~]# cd /opt/
[root@node1 opt]# ll
总用量 4
-rw-r--r-- 1 root root 12 1月  12 18:58 ky07.txt
[root@node1 opt]# cat ky07.txt
this is ky07
(7)file 模块
该模块主要用于设置文件的属性,比如创建文件、创建链接文件、删除文件等。
① 创建目录
[root@master ~]# ansible webserver -m file -a 'path=/opt/temp state=directory mode=755'
192.168.40.12 | CHANGED => {
    "ansible_facts": {
        "discovered_interpreter_python": "/usr/bin/python"
    },
    "changed": true,
    "gid": 0,
    "group": "root",
    "mode": "0755",
    "owner": "root",
    "path": "/opt/temp",
    "size": 6,
    "state": "directory",
    "uid": 0
}

[root@node1 ~]# cd /opt/	#生成空目录
[root@node1 opt]# ll
总用量 0
drwxr-xr-x 2 root root 6 1月  12 19:03 temp
② 创建文件:
[root@master ~]# ansible webserver -m file -a 'path=/opt/test state=touch'
192.168.40.12 | CHANGED => {
    "ansible_facts": {
        "discovered_interpreter_python": "/usr/bin/python"
    },
    "changed": true,
    "dest": "/opt/test",
    "gid": 0,
    "group": "root",
    "mode": "0644",
    "owner": "root",
    "size": 0,
    "state": "file",
    "uid": 0
}


[root@node1 ~]# cd /opt/
[root@node1 opt]# ll
总用量 0
-rw-r--r-- 1 root root 0 1月  12 19:05 test  #空文件
③ 创建链接文件
[root@master ~]# ansible mysql -m file -a 'path=/fstab.link src=/opt/fstab.bak state=link'
192.168.40.13 | CHANGED => {
    "ansible_facts": {
        "discovered_interpreter_python": "/usr/bin/python"
    },
    "changed": true,
    "dest": "/fstab.link",
    "gid": 0,
    "group": "root",
    "mode": "0777",
    "owner": "root",
    "secontext": "unconfined_u:object_r:root_t:s0",
    "size": 14,
    "src": "/opt/fstab.bak",
    "state": "link",
    "uid": 0
}
查看链接情况
[root@node2 ~]# ll /
总用量 30
lrwxrwxrwx    1 root root   14 1月  12 19:29 fstab.link -> /opt/fstab.bak
④ 修改文件的属主属组权限
[root@master ~]# ansible webserver -m file -a 'owner=root group=zhong mode=666 path=/opt/test'
192.168.40.12 | CHANGED => {
    "ansible_facts": {
        "discovered_interpreter_python": "/usr/bin/python"
    },
    "changed": true,
    "gid": 1050,
    "group": "zhong",
    "mode": "0666",
    "owner": "root",
    "path": "/opt/test",
    "size": 0,
    "state": "file",
    "uid": 0
}

[root@node1 ~]# cd /opt/
[root@node1 opt]# ll
总用量 0
-rw-rw-rw- 1 root zhong   0 1月  12 19:05 test
(8)yum 模块
顾名思义,该模块主要用于软件的安装。
**① yum安装 **
[root@master ~]# ansible webserver -m yum -a 'name=httpd'
192.168.40.12 | CHANGED => {
    "ansible_facts": {
        "discovered_interpreter_python": "/usr/bin/python"
    },
    "changed": true,
    "changes": {
        "installed": [
            "httpd"
        ]

[root@node1 ~]# rpm -q httpd		#查看安装情况
httpd-2.4.6-67.el7.centos.x86_64
② 卸载
[root@master ~]# ansible webserver -m yum -a 'name=httpd state=absent'
192.168.40.12 | CHANGED => {
    "ansible_facts": {
        "discovered_interpreter_python": "/usr/bin/python"
    },
    "changed": true,
    "changes": {
        "removed": [
            "httpd"
        ]

[root@node1 ~]# rpm -q httpd
未安装软件包 httpd
(9)service 模块
该模块用于服务程序的管理。
① 开启服务并设置自启动
[root@master ~]# ansible webserver -m service -a 'name=httpd state=started enabled=true'
192.168.40.12 | CHANGED => {
    "ansible_facts": {
        "discovered_interpreter_python": "/usr/bin/python"
    },
    "changed": true,
    "enabled": true,
    "name": "httpd",
    "state": "started",
查看一下端口是否打开:
[root@master ~]# ansible webserver -m shell -a 'ss -ntl | grep 80'
192.168.40.12 | CHANGED | rc=0 >>
LISTEN     0      128         :::80                      :::*
② 关闭服务
可以通过该模块来关闭我们的服务:
[root@master ~]# ansible webserver -m service -a 'name=httpd state=stopped'
192.168.40.12 | CHANGED => {
    "ansible_facts": {
        "discovered_interpreter_python": "/usr/bin/python"
    },
    "changed": true,
    "name": "httpd",
    "state": "stopped",

一样的,查看一下端口:
[root@master ~]# ansible webserver -m shell -a 'ss -ntl | grep 80'
192.168.40.12 | FAILED | rc=1 >>
non-zero return code
(10)shell 模块
shell模块可以在远程主机上调用shell解释器运行命令,支持shell的各种功能。
作用:和command相似,用shell来执行命令,但是可以进行多条命令的执行,并且可以进行重写以及追加操作,但是command没有这两项功能。
chdir∶指定工作目录,在执行对应的命令之前,会先进入到chdir 参数指定的目录中。
creates∶指定一个文件,当指定的文件存在时,就不执行对应命令。
removes∶ 使用此参数指定一个文件,当指定的文件不存在时,就不执行对应命令。
① 重定向
默认command模块不识别重定向符号
[root@master ~]# ansible webserver -m shell -a 'chdir=/opt echo hello > /opt/ky07.txt'
192.168.40.12 | CHANGED | rc=0 >>

[root@node1 ~]# cd /opt/	#查看
[root@node1 opt]# ll
总用量 4
-rw-r--r-- 1 root root 6 1月  12 21:32 ky07.txt
[root@node1 opt]# cat ky07.txt
hello
只要是shell命令,都可以通过这个模块在远程主机上运行,这里就不一一举例了。
(11) script 模块
该模块用于将本机的脚本在被管理端的机器上运行;
该模块直接指定脚本的路径即可。
[root@master ~]# vi abc.sh
#!/bin/bash
echo "it is hello world" > /opt/script.txt

[root@master ~]# chmod +x abc.sh
[root@master ~]# ansible webserver -m script -a 'abc.sh'
192.168.40.12 | CHANGED => {
    "changed": true,
    "rc": 0,
    "stderr": "Shared connection to 192.168.40.12 closed.\r\n",
    "stderr_lines": [
        "Shared connection to 192.168.40.12 closed."
    ],
    "stdout": "",
    "stdout_lines": []
}
查看一下文件内容:
[root@node1 ~]# cd /opt/
[root@node1 opt]# ll
总用量 4
-rw-r--r-- 1 root root 18 1月  12 22:16 script.txt
[root@node1 opt]# cat script.txt
it is hello world
(12)setup 模块
该模块主要用于收集信息,是通过调用facts组件来实现的。
facts组件是Ansible用于采集被管机器设备信息的一个功能,我们可以使用setup模块查机器的所有facts信息,可以使用filter来查看指定信息。整个facts信息被包装在一个JSON格式的数据结构中,ansible_facts是最上层的值。
facts就是变量,内建变量 。每个主机的各种信息,cpu颗数、内存大小等。会存在facts中的某个变量中。调用后返回很多对应主机的信息,在后面的操作中可以根据不同的信息来做不同的操作。如redhat系列用yum安装,而debian系列用apt来安装软件。
查看信息
ansible webserver -m setup #获取主机的facts信息
总结
ansible是基于模块工作的,本身没有批量部署的能力。真正具有批量部署的是ansible所运行的模块,ansible只是提供一种框架。


 1615
1615

 被折叠的 条评论
为什么被折叠?
被折叠的 条评论
为什么被折叠?
 到【灌水乐园】发言


