


Android View初始化基本流程
问题起因是来源于困扰我的一个问题,前段时间研究了View的绘制流程,突然想搞明白Activity中是如何启动view的绘制。所以就去学习了Activity的源码。
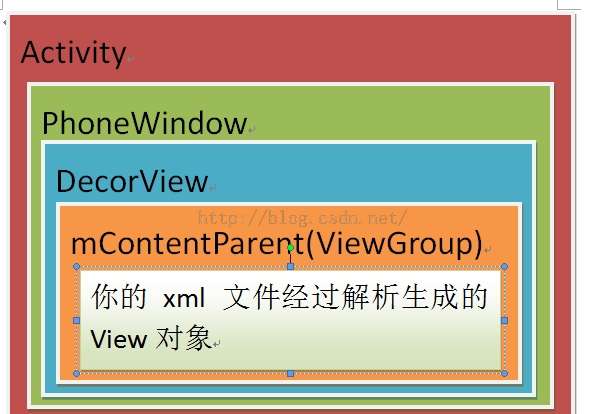
首先看一张Activity的界面关系图:
public class MyActivity extends Activity {
@Override
protected void onCreate(Bundle savedInstanceState) {
super.onCreate(savedInstanceState);
setContentView(R.layout.my_layout);
}
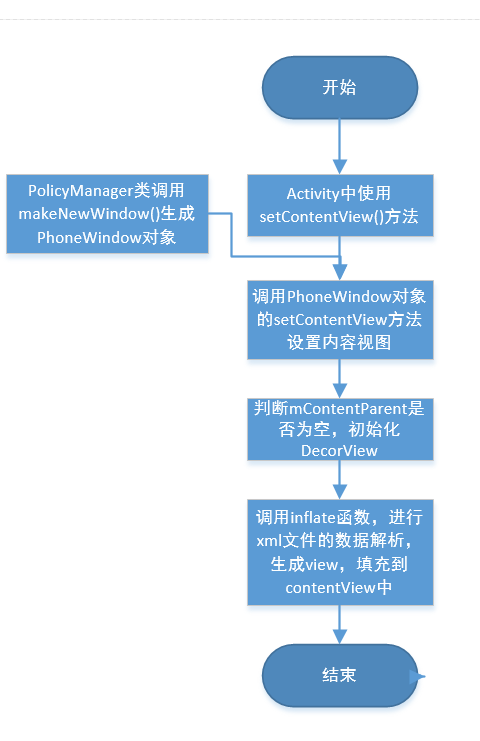
}我们就从这里开始,我们通过setContentView方法设置Activity的显示view视图。那这个方法里做了什么呢?
    public void setContentView(int layoutResID) {
        getWindow().setContentView(layoutResID);
        initWindowDecorActionBar();
    }
这个方法用于设置activity的content(内容)视图,设置给谁呢?这里就需要看看getWindow().setContentView(layoutResID);到底搞的什么鬼?
    public Window getWindow() {
        return mWindow;
    }
getWindow方法返回一个Window对象mWindow,这个对象是怎么来的呢?在哪里实例化的呢?我们继续在Activity的源码中寻找,找到final类型的attach方法,我们只看我们需要的部分。
     final void attach(Context context, ActivityThread aThread,
            Instrumentation instr, IBinder token, int ident,
            Application application, Intent intent, ActivityInfo info,
            CharSequence title, Activity parent, String id,
            NonConfigurationInstances lastNonConfigurationInstances,
            Configuration config, IVoiceInteractor voiceInteractor) {
        ....
        mWindow = PolicyManager.makeNewWindow(this);
        mWindow.setCallback(this);
        mWindow.setOnWindowDismissedCallback(this);
        mWindow.getLayoutInflater().setPrivateFactory(this);
        if (info.softInputMode != WindowManager.LayoutParams.SOFT_INPUT_STATE_UNSPECIFIED) {
            mWindow.setSoftInputMode(info.softInputMode);
        }
        if (info.uiOptions != 0) {
            mWindow.setUiOptions(info.uiOptions);
        }
        ...
        mWindow.setWindowManager(
                (WindowManager)context.getSystemService(Context.WINDOW_SERVICE),
                mToken, mComponent.flattenToString(),
                (info.flags & ActivityInfo.FLAG_HARDWARE_ACCELERATED) != 0);
        if (mParent != null) {
            mWindow.setContainer(mParent.getWindow());
        }
        mWindowManager = mWindow.getWindowManager();
        ...
    }
在这个方法中,进行了mWindow的创建,同时对mWindow进行设置一些监听操作,最后为这个Window对象设置了WindowManager。我们着重看下mWindow对象的创建。 首先我们必须明白,Window类是一个抽象类,在mWindow = PolicyManager.makeNewWindow(this);这里就涉及到一个类PolicyManager类,这个类设计很简单,就是用于创建一些与Window有关的对象。
    public final class PolicyManager {
        private static final String POLICY_IMPL_CLASS_NAME =
            "com.android.internal.policy.impl.Policy";

        private static final IPolicy sPolicy;

        static {
            // Pull in the actual implementation of the policy at run-time
            try {
                Class policyClass = Class.forName(POLICY_IMPL_CLASS_NAME);
                sPolicy = (IPolicy)policyClass.newInstance();
            } catch (ClassNotFoundException ex) {
                throw new RuntimeException(
                        POLICY_IMPL_CLASS_NAME + " could not be loaded", ex);
            } catch (InstantiationException ex) {
                throw new RuntimeException(
                        POLICY_IMPL_CLASS_NAME + " could not be instantiated", ex);
            } catch (IllegalAccessException ex) {
                throw new RuntimeException(
                        POLICY_IMPL_CLASS_NAME + " could not be instantiated", ex);
            }
        }

        // Cannot instantiate this class
        private PolicyManager() {}

        // The static methods to spawn new policy-specific objects
        public static Window makeNewWindow(Context context) {
            return sPolicy.makeNewWindow(context);
        }

        public static LayoutInflater makeNewLayoutInflater(Context context) {
            return sPolicy.makeNewLayoutInflater(context);
        }

        public static WindowManagerPolicy makeNewWindowManager() {
            return sPolicy.makeNewWindowManager();
        }

        public static FallbackEventHandler makeNewFallbackEventHandler(Context context) {
            return sPolicy.makeNewFallbackEventHandler(context);
        }
    }
这段源码是我截取的api15版本上的,api15以后PolicyManager类的实现就发生了改变,如下截取自api22
    public class PolicyManager {

        public static Window makeNewWindow(Context context) {
            // this will likely crash somewhere beyond so we log it.
            Bridge.getLog().error(LayoutLog.TAG_UNSUPPORTED,
                    "Call to PolicyManager.makeNewWindow is not supported", null);
            return null;
        }

        public static LayoutInflater makeNewLayoutInflater(Context context) {
            return new BridgeInflater(context, RenderAction.getCurrentContext().getProjectCallback());
        }

        public static WindowManagerPolicy makeNewWindowManager() {
            // this will likely crash somewhere beyond so we log it.
            Bridge.getLog().error(LayoutLog.TAG_UNSUPPORTED,
                    "Call to PolicyManager.makeNewWindowManager is not supported", null);
            return null;
        }

        public static FallbackEventHandler makeNewFallbackEventHandler(Context context) {
            return new FallbackEventHandler() {
                @Override
                public void setView(View v) {
                }

                @Override
                public void preDispatchKeyEvent(KeyEvent event) {
                }

                @Override
                public boolean dispatchKeyEvent(KeyEvent event) {
                    return false;
                }
            };
        }
    }
我们先来分析api15里的源码,在PolicyManager类是一个final类,它中包含一个IPolicy接口的引用,然后调用该引用的sPolicy.makeNewWindow()方法进行创建一个PhoneWindow对象。在api15以后这段代码就发生改变,这个方法里面返回为null,我一直没搞懂这个原因?希望各位多多指导一下。
饶了半天,我们最后得知Activity里的mWindow最后是一个PhoneWindow对象。下面开始我们的继续前进,回到setContentView()方法中,在这个方法中mWindow调用setContentView方法设置我们设置的ResourceID,本质就是调用PhoneWindow对象的setContentView()方法,我们来谈个究竟。
        @Override
    public void setContentView(int layoutResID) {
        // Note: FEATURE_CONTENT_TRANSITIONS may be set in the process of installing the window
        // decor, when theme attributes and the like are crystalized. Do not check the feature
        // before this happens.
        if (mContentParent == null) {
            installDecor();
        } else if (!hasFeature(FEATURE_CONTENT_TRANSITIONS)) {
            mContentParent.removeAllViews();
        }

        if (hasFeature(FEATURE_CONTENT_TRANSITIONS)) {
            final Scene newScene = Scene.getSceneForLayout(mContentParent, layoutResID,
                    getContext());
            transitionTo(newScene);
        } else {
            mLayoutInflater.inflate(layoutResID, mContentParent);
        }
        final Callback cb = getCallback();
        if (cb != null && !isDestroyed()) {
            cb.onContentChanged();
        }
    }
在这个方法中,首先判断mContentParent对象是否为空,这里我们需要注意下这个对象,这个对象是一个ViewGroup类型,它就是我们window内容要放置的地方,这里我们需要明白另外一个对象DecorView,它是包含在PhoneWindow对象中的一个顶级视图,是PhoneWindow中的一个内部类,PhoneWindow类中持有它的一个引用,private DecorView mDecor;所以最终我们的mContentParent会转换为DecorView对象。这句话不理解没关系,我们接着往下看。如何这个mContentView为null,系统调用installDecor()方法。由于这个方法太长,我就简要说下里面的流程:首先这个方法判断mDecor是否为null,如果为null就通过generateDecor()方法生成一个对象,然后判断mContentParent这个ViewGroup对象是否为null,如果为null,调用generateLayout(mDecor)方法进行生成一个mContentParent对象,在这个方法中有这么一段代码:
     View in = mLayoutInflater.inflate(layoutResource, null);
     decor.addView(in, new ViewGroup.LayoutParams(MATCH_PARENT, MATCH_PARENT));
     mContentRoot = (ViewGroup) in;
     ViewGroup contentParent = (ViewGroup)findViewById(ID_ANDROID_CONTENT);
在这里实例化我们的mContentParent对象。执行完installDecor()方法后,判断window是否设置了FEATURE_CONTENT_TRANSITIONS,如果没有,就对我们设置的ResourceID进行 mLayoutInflater.inflate(layoutResID, mContentParent)。
    public View inflate(XmlPullParser parser, ViewGroup root) {
        return inflate(parser, root, root != null);
    }
在inflate方法中调用inflate的重载函数,进行xml文件的解析。
     public View inflate(XmlPullParser parser, ViewGroup root, boolean attachToRoot) {
        synchronized (mConstructorArgs) {
            Trace.traceBegin(Trace.TRACE_TAG_VIEW, "inflate");

            final AttributeSet attrs = Xml.asAttributeSet(parser);
            Context lastContext = (Context)mConstructorArgs[0];
            mConstructorArgs[0] = mContext;
            View result = root;

            try {
                // Look for the root node.
                int type;
                while ((type = parser.next()) != XmlPullParser.START_TAG &&
                        type != XmlPullParser.END_DOCUMENT) {
                    // Empty
                }

                if (type != XmlPullParser.START_TAG) {
                    throw new InflateException(parser.getPositionDescription()
                            + ": No start tag found!");
                }

                final String name = parser.getName();

                if (DEBUG) {
                    System.out.println("**************************");
                    System.out.println("Creating root view: "
                            + name);
                    System.out.println("**************************");
                }

                if (TAG_MERGE.equals(name)) {
                    if (root == null || !attachToRoot) {
                        throw new InflateException("<merge /> can be used only with a valid "
                                + "ViewGroup root and attachToRoot=true");
                    }

                    rInflate(parser, root, attrs, false);
                } else {
                    // Temp is the root view that was found in the xml
                    View temp;
                    if (TAG_1995.equals(name)) {
                        temp = new BlinkLayout(mContext, attrs);
                    } else {
                        temp = createViewFromTag(root, name, attrs);
                    }

                    ViewGroup.LayoutParams params = null;

                    if (root != null) {
                        if (DEBUG) {
                            System.out.println("Creating params from root: " +
                                    root);
                        }
                        // Create layout params that match root, if supplied
                        params = root.generateLayoutParams(attrs);
                        if (!attachToRoot) {
                            // Set the layout params for temp if we are not
                            // attaching. (If we are, we use addView, below)
                            temp.setLayoutParams(params);
                        }
                    }

                    if (DEBUG) {
                        System.out.println("-----> start inflating children");
                    }
                    // Inflate all children under temp
                    rInflate(parser, temp, attrs, true);
                    if (DEBUG) {
                        System.out.println("-----> done inflating children");
                    }

                    // We are supposed to attach all the views we found (int temp)
                    // to root. Do that now.
                    if (root != null && attachToRoot) {
                        root.addView(temp, params);
                    }

                    // Decide whether to return the root that was passed in or the
                    // top view found in xml.
                    if (root == null || !attachToRoot) {
                        result = temp;
                    }
                }

            } catch (XmlPullParserException e) {
                InflateException ex = new InflateException(e.getMessage());
                ex.initCause(e);
                throw ex;
            } catch (IOException e) {
                InflateException ex = new InflateException(
                        parser.getPositionDescription()
                        + ": " + e.getMessage());
                ex.initCause(e);
                throw ex;
            } finally {
                // Don't retain static reference on context.
                mConstructorArgs[0] = lastContext;
                mConstructorArgs[1] = null;
            }

            Trace.traceEnd(Trace.TRACE_TAG_VIEW);

            return result;
        }
    }
在这个方法里,首先判断xml文件是否为空等一些列的判断,然后调用rInflate(parser, root, attrs, false);方法实行真正的解析。
    void rInflate(XmlPullParser parser, View parent, final AttributeSet attrs,
            boolean finishInflate) throws XmlPullParserException, IOException {

        final int depth = parser.getDepth();
        int type;

        while (((type = parser.next()) != XmlPullParser.END_TAG ||
                parser.getDepth() > depth) && type != XmlPullParser.END_DOCUMENT) {

            if (type != XmlPullParser.START_TAG) {
                continue;
            }

            final String name = parser.getName();

            if (TAG_REQUEST_FOCUS.equals(name)) {
                parseRequestFocus(parser, parent);
            } else if (TAG_INCLUDE.equals(name)) {
                if (parser.getDepth() == 0) {
                    throw new InflateException("<include /> cannot be the root element");
                }
                parseInclude(parser, parent, attrs);
            } else if (TAG_MERGE.equals(name)) {
                throw new InflateException("<merge /> must be the root element");
            } else if (TAG_1995.equals(name)) {
                final View view = new BlinkLayout(mContext, attrs);
                final ViewGroup viewGroup = (ViewGroup) parent;
                final ViewGroup.LayoutParams params = viewGroup.generateLayoutParams(attrs);
                rInflate(parser, view, attrs, true);
                viewGroup.addView(view, params);
            } else {
                final View view = createViewFromTag(parent, name, attrs);
                final ViewGroup viewGroup = (ViewGroup) parent;
                final ViewGroup.LayoutParams params = viewGroup.generateLayoutParams(attrs);
                rInflate(parser, view, attrs, true);
                viewGroup.addView(view, params);
            }
        }

        if (finishInflate) parent.onFinishInflate();
    }
这里我们就可以直白的看到系统利用XmlPullParser对象进行xml文件的解析。根据对应的节点去生成响应的view,然后添加,这样就走到了view的创建流程。


 941
941

 被折叠的 条评论
为什么被折叠?
被折叠的 条评论
为什么被折叠?
 到【灌水乐园】发言


