


在类的原理分析中提到过类的成员变量,其中就包含了cache_t,那么本篇就从cache_t开始分析
一.cache_t结构分析
首先附一张cache_t原理分析图

1.cache_t的源码分析
首先在源码中看一下cache的大致结构
struct cache_t {
private:
    explicit_atomic<uintptr_t> _bucketsAndMaybeMask; // 8
    union {
        struct {
            explicit_atomic<mask_t>    _maybeMask; // 4
#if __LP64__
            uint16_t                   _flags;  // 2
#endif
            uint16_t                   _occupied; // 2
        };
        explicit_atomic<preopt_cache_t *> _originalPreoptCache; // 8
    };
    //部分代码
通过源码大致分析尝试一下,通过LLDB调式打印,代码如下
int main(int argc, const char * argv[]) {
    @autoreleasepool {

        LGPerson *p  = [LGPerson alloc];
        Class pClass = [LGPerson class];
        [p saySomething];
        NSLog(@"%@",pClass);


    }
    return 0;
}
开始断点调试
//获取cache_t 内部属性
(lldb) p/x pClass
(Class) $0 = 0x0000000100004518 LGPerson
(lldb) x/4gx $0
0x100004518: 0x0000000100004540 0x0000000100353140
0x100004528: 0x000000010034b380 0x0000802800000000

(lldb) p (cache_t *)0x000000010034b380
(cache_t *) $2 = 0x000000010034b380
(lldb) p *$2
(cache_t) $3 = {
  _bucketsAndMaybeMask = {
    std::__1::atomic<unsigned long> = {
      Value = 0
    }
  }
   = {
     = {
      _maybeMask = {
        std::__1::atomic<unsigned int> = {
          Value = 0
        }
      }
      _flags = 0
      _occupied = 0
    }
    _originalPreoptCache = {
      std::__1::atomic<preopt_cache_t *> = {
        Value = 0x0000000000000000
      }
    }
  }
}
(lldb)
通过上面的调试发现,似乎没有什么有用的数据,那么只能继续查看源码,看有没有什么方法可以获取想要的数据,参照之前分析bit一样
    static constexpr uintptr_t bucketsMask = ~0ul;
    static_assert(!CONFIG_USE_PREOPT_CACHES, "preoptimized caches not supported");
#elif CACHE_MASK_STORAGE == CACHE_MASK_STORAGE_HIGH_16_BIG_ADDRS
    static constexpr uintptr_t maskShift = 48;
    static constexpr uintptr_t maxMask = ((uintptr_t)1 << (64 - maskShift)) - 1;//平移
    static constexpr uintptr_t bucketsMask = ((uintptr_t)1 << maskShift) - 1;

    static_assert(bucketsMask >= MACH_VM_MAX_ADDRESS, "Bucket field doesn't have enough bits for arbitrary pointers.");
#if CONFIG_USE_PREOPT_CACHES
    static constexpr uintptr_t preoptBucketsMarker = 1ul;
    static constexpr uintptr_t preoptBucketsMask = bucketsMask & ~preoptBucketsMarker;
#endif
#elif CACHE_MASK_STORAGE == CACHE_MASK_STORAGE_HIGH_16
    // _bucketsAndMaybeMask is a buckets_t pointer in the low 48 bits
    // _maybeMask is unused, the mask is stored in the top 16 bits.

    // How much the mask is shifted by.
    static constexpr uintptr_t maskShift = 48;

    // Additional bits after the mask which must be zero. msgSend
    // takes advantage of these additional bits to construct the value
    // `mask << 4` from `_maskAndBuckets` in a single instruction.
    static constexpr uintptr_t maskZeroBits = 4;

    // The largest mask value we can store.
    static constexpr uintptr_t maxMask = ((uintptr_t)1 << (64 - maskShift)) - 1;

    // The mask applied to `_maskAndBuckets` to retrieve the buckets pointer.
    static constexpr uintptr_t bucketsMask = ((uintptr_t)1 << (maskShift - maskZeroBits)) - 1;

    // Ensure we have enough bits for the buckets pointer.
    static_assert(bucketsMask >= MACH_VM_MAX_ADDRESS,
            "Bucket field doesn't have enough bits for arbitrary pointers.");

#if CONFIG_USE_PREOPT_CACHES
    static constexpr uintptr_t preoptBucketsMarker = 1ul;
#if __has_feature(ptrauth_calls)
	//注释意思 应该是注明内存中64位分别代表什么,参考之前isa内存分析
    // 63..60: hash_mask_shift
    // 59..55: hash_shift
    // 54.. 1: buckets ptr + auth
    //      0: always 1
    static constexpr uintptr_t preoptBucketsMask = 0x007ffffffffffffe;
    static inline uintptr_t preoptBucketsHashParams(const preopt_cache_t *cache) {
        uintptr_t value = (uintptr_t)cache->shift << 55;
        // masks have 11 bits but can be 0, so we compute
        // the right shift for 0x7fff rather than 0xffff
        return value | ((objc::mask16ShiftBits(cache->mask) - 1) << 60);
    }
通过这段源码判断发现,cache_t的结构里面似乎某些数据也可以通过内存平移获取
    void reallocate(mask_t oldCapacity, mask_t newCapacity, bool freeOld);
    void collect_free(bucket_t *oldBuckets, mask_t oldCapacity);

    static bucket_t *emptyBuckets();
    static bucket_t *allocateBuckets(mask_t newCapacity);
    static bucket_t *emptyBucketsForCapacity(mask_t capacity, bool allocate = true);
    static struct bucket_t * endMarker(struct bucket_t *b, uint32_t cap);
    void bad_cache(id receiver, SEL sel) __attribute__((noreturn, cold));

public:
    // The following four fields are public for objcdt's use only.
    // objcdt reaches into fields while the process is suspended
    // hence doesn't care for locks and pesky little details like this
    // and can safely use these.
    unsigned capacity() const;
    struct bucket_t *buckets() const;//结构体指针
    Class cls() const;
发现bucket_t的使用非常频繁,那么就点进去看看
struct bucket_t {
private:
    // IMP-first is better for arm64e ptrauth and no worse for arm64.
    // SEL-first is better for armv7* and i386 and x86_64.
#if __arm64__
    explicit_atomic<uintptr_t> _imp;
    explicit_atomic<SEL> _sel;
#else
    explicit_atomic<SEL> _sel;
    explicit_atomic<uintptr_t> _imp;
#endif

    // Compute the ptrauth signing modifier from &_imp, newSel, and cls.
    uintptr_t modifierForSEL(bucket_t *base, SEL newSel, Class cls) const {
        return (uintptr_t)base ^ (uintptr_t)newSel ^ (uintptr_t)cls;
    }
终于找到了,我们感兴趣的数据了,_imp,_sel,而且每一个sel对应一个imp,那么接下来就继续通过LLDB调试
2.LLDB调试分析cache_t
通过cache_t中的buckets()进行内存平移 ,首先得明白buckets()这里不是数组,通过前面的结构分析,是结构体指针,那么这里的平移,自然也是以(bucket_t *)作为单位进行平移,获取另1个bucket_t 的内存地址,而每一个结构体bucket_t 里面都有对应的_imp,_sel,结果如下
//查找cache_t 内部方法
(lldb) p/x pClass
(Class) $0 = 0x0000000100004500 LGPerson
(lldb) p (cache_t *)0x0000000100004510
(cache_t *) $1 = 0x0000000100004510
(lldb) p *$1
(cache_t) $2 = {
  _bucketsAndMaybeMask = {
    std::__1::atomic<unsigned long> = {
      Value = 4301545824
    }
  }
   = {
     = {
      _maybeMask = {
        std::__1::atomic<unsigned int> = {
          Value = 3
        }
      }
      _flags = 32808
      _occupied = 1
    }
    _originalPreoptCache = {
      std::__1::atomic<preopt_cache_t *> = {
        Value = 0x0001802800000003
      }
    }
  }
}
(lldb) p $2.buckets()[0]//内存平移 这里buckets()不是数组
(bucket_t) $3 = {
  _sel = {
    std::__1::atomic<objc_selector *> = (null) {
      Value = (null)
    }
  }
  _imp = {
    std::__1::atomic<unsigned long> = {
      Value = 0
    }
  }
}
(lldb) p $2.buckets()[1]
(bucket_t) $4 = {
  _sel = {
    std::__1::atomic<objc_selector *> = (null) {
      Value = (null)
    }
  }
  _imp = {
    std::__1::atomic<unsigned long> = {
      Value = 0
    }
  }
}
(lldb) p $2.buckets()[2]
(bucket_t) $5 = {
  _sel = {
    std::__1::atomic<objc_selector *> = "" {
      Value = ""
    }
  }
  _imp = {
    std::__1::atomic<unsigned long> = {
      Value = 30976
    }
  }
}
相信大家也发现了问题,就是打印p $2.buckets()[2]时,Value才是有值的,而前面都没有,而通过你添加调用更多的方法之后,这些Value有值的顺序的并不是有序的,这里面就涉及到哈希函数和拉链法,这方面大家可以自行查阅,简单来说,通过这种方式主要目的是为了加快方法的插入读取效率,因为如果用数组去存取方法列表,就会非常影响插入和读取的效率,而哈希函数会使得每个buckets地址都有一个对应的哈希值,通过拉链法解决哈希算法的冲突问题,以便于增删改查
那么现在的问题是如何获取buckets里面的sel,imp,继续源码走起
 inline SEL sel() const { return _sel.load(memory_order_relaxed); }
 inline IMP imp(UNUSED_WITHOUT_PTRAUTH bucket_t *base, Class cls) const {
通过源码就可以看出调用对应函数即可
(lldb) p $6.imp(nil,pClass)
(IMP) $7 = 0x0000000100003c30 (KCObjcBuild`-[LGPerson sayNoBB])
(lldb) p $6.sel()
(SEL) $8 = "sayNoBB"
二.cache_t脱离源码结构分析
1.为什么要脱离源码分析
相信通过这几天的学习,大家都会发现,源码中各种数据,如结构体中,都会参杂很多静态变量,一些环境判断,又或者是函数的定义,实现等等,以至于我们在查看过程会很懵,有干扰,那么如果去掉这些我们不关心的代码,专心致志的分析我们想探索的内容,是不是更容易理清关系呢,那么接下我们就尝试一下,总结如下
- 源码无法调试
- 结构关系复杂,LLDB调试繁琐
- 小规模取样 (不会因为内部其他的因素产生影响,理解更加简单清晰)
2.脱离源码分析
首先我们都知道_objc_class,主要的成员变量,那么我们也定义以下,说白了就是简化代码
// cache class
struct ycx_objc_class {
    Class isa;
    Class superclass;
    struct ycx_cache_t cache;             // formerly cache pointer and vtable
    struct ycx_class_data_bits_t bits;
};
然后是_class_data_bits_t
struct ycx_class_data_bits_t {
    uintptr_t bits;
};
接着是cache_t
typedef uint32_t mask_t;  // x86_64 & arm64 asm are less efficient with 16-bits

//struct bucket_t *cache_t::buckets() const
//{
//    uintptr_t addr = _bucketsAndMaybeMask.load(memory_order_relaxed);
//    return (bucket_t *)(addr & bucketsMask);
//}
//_bukets 替代_bucketsAndMaybeMask
struct ycx_cache_t {
    struct ycx_bucket_t *_bukets; // 8
    mask_t    _maybeMask; // 4
    uint16_t  _flags;  // 2
    uint16_t  _occupied; // 2
};
因为我们是要分析cache_t的bucket_t,我们也定义一下
struct ycx_bucket_t {
    SEL _sel;
    IMP _imp;
};
接下来就开始代码尝试了,当然了以下代码是结合源码,经过多次尝试的结果
LGPerson *p  = [[LGPerson alloc]init];
Class pClass = p.class;  // objc_clas
[p say1];
[p say2];
[p say3];
[p say4];
[p say5];
[p say6];

[pClass sayHappy];
struct ycx_objc_class *ycx_class = (__bridge struct ycx_objc_class *)(pClass);
NSLog(@"%hu - %u",ycx_class->cache._occupied,ycx_class->cache._maybeMask);

for (mask_t i = 0; i<ycx_class->cache._maybeMask; i++) {
	struct ycx_bucket_t bucket = ycx_class->cache._bukets[i];
	NSLog(@"%@ - %pf",NSStringFromSelector(bucket._sel),bucket._imp);
}
打印结果如下
2021-06-24 15:55:12.950582+0800 003-cache_t脱离源码环境分析[17820:270757] 5 - 7
2021-06-24 15:55:12.950650+0800 003-cache_t脱离源码环境分析[17820:270757] say4 - 0x5910f
2021-06-24 15:55:12.950742+0800 003-cache_t脱离源码环境分析[17820:270757] say6 - 0x59b0f
2021-06-24 15:55:12.950788+0800 003-cache_t脱离源码环境分析[17820:270757] say3 - 0x5920f
2021-06-24 15:55:12.950854+0800 003-cache_t脱离源码环境分析[17820:270757] (null) - 0x0f
2021-06-24 15:55:12.950914+0800 003-cache_t脱离源码环境分析[17820:270757] say5 - 0x5940f
2021-06-24 15:55:12.950966+0800 003-cache_t脱离源码环境分析[17820:270757] say2 - 0x58f0f
2021-06-24 15:55:12.950997+0800 003-cache_t脱离源码环境分析[17820:270757] (null) - 0x0f
3.通过多次测试发现几个问题
- 为什么会存在(null) - 0x0f
- 类方法去哪里了
- 5-7是什么意思
- 为什么会有方法调用了没有打印出来
三.分析cache插入数据原理
1.cache插入
首先查找insert主要流程代码
void cache_t::insert(SEL sel, IMP imp, id receiver)
{
    runtimeLock.assertLocked();

    // Never cache before +initialize is done
    if (slowpath(!cls()->isInitialized())) {
        return;
    }

    if (isConstantOptimizedCache()) {
        _objc_fatal("cache_t::insert() called with a preoptimized cache for %s",
                    cls()->nameForLogging());
    }

#if DEBUG_TASK_THREADS
    return _collecting_in_critical();
#else
#if CONFIG_USE_CACHE_LOCK
    mutex_locker_t lock(cacheUpdateLock);
#endif

    ASSERT(sel != 0 && cls()->isInitialized());

    // Use the cache as-is if until we exceed our expected fill ratio.
    mask_t newOccupied = occupied() + 1; // 1+1
    unsigned oldCapacity = capacity(), capacity = oldCapacity;
    if (slowpath(isConstantEmptyCache())) {
        // Cache is read-only. Replace it. 缓存是只读的  只能替换
        if (!capacity) capacity = INIT_CACHE_SIZE;//4
        reallocate(oldCapacity, capacity, /* freeOld */false);
    }
    // CACHE_END_MARKER 1 这里是和+1之后比较计算 做了预留
    else if (fastpath(newOccupied + CACHE_END_MARKER <= cache_fill_ratio(capacity))) {
        // Cache is less than 3/4 or 7/8 full. Use it as-is.
        //超过75% 就扩容
    }
#if CACHE_ALLOW_FULL_UTILIZATION
    else if (capacity <= FULL_UTILIZATION_CACHE_SIZE && newOccupied + CACHE_END_MARKER <= capacity) {
        // Allow 100% cache utilization for small buckets. Use it as-is.
    }
#endif
    else { //超过75%情况下  双倍扩容
        capacity = capacity ? capacity * 2 : INIT_CACHE_SIZE;
        if (capacity > MAX_CACHE_SIZE) {
            capacity = MAX_CACHE_SIZE;
        }
        //这里传的是true 说明扩容的情况下,就会清理旧的buckets内存
        reallocate(oldCapacity, capacity, true);
    }

    bucket_t *b = buckets();
    mask_t m = capacity - 1; // 4-1=3
    mask_t begin = cache_hash(sel, m);//哈希地址
    mask_t i = begin;

    // Scan for the first unused slot and insert there.
    // There is guaranteed to be an empty slot.
    //防止哈希冲突,循环哈希,知道与初始不同
    do {
        if (fastpath(b[i].sel() == 0)) {
            incrementOccupied();//_occupied++;  说白了每次插入一个新的bucket_t  _occupied++
            b[i].set<Atomic, Encoded>(b, sel, imp, cls());
            return;
        }
        if (b[i].sel() == sel) {
            // The entry was added to the cache by some other thread
            // before we grabbed the cacheUpdateLock.
            return;
        }
    } while (fastpath((i = cache_next(i, m)) != begin));

    bad_cache(receiver, (SEL)sel);
#endif // !DEBUG_TASK_THREADS
}
重新分配cache函数cache_t::reallocate代码
void cache_t::reallocate(mask_t oldCapacity, mask_t newCapacity, bool freeOld)
{
    bucket_t *oldBuckets = buckets();
    bucket_t *newBuckets = allocateBuckets(newCapacity);

    // Cache's old contents are not propagated.
    // This is thought to save cache memory at the cost of extra cache fills.
    // fixme re-measure this

    //缓存的旧内容不会传播
    //这被认为是以额外的缓存填充为代价来节省缓存内存。
    //再测量一下
    ASSERT(newCapacity > 0);
    ASSERT((uintptr_t)(mask_t)(newCapacity-1) == newCapacity-1);
	//设置BucketsAndMask  插入空的容器(桶子)
    setBucketsAndMask(newBuckets, newCapacity - 1);
    //是否清空原来内存
    if (freeOld) {
        collect_free(oldBuckets, oldCapacity);
    }
}
2.源码分析cache插入算法并验证
通过上面的源码分析得出以下结论
- 1.每个bucket_t(桶)对应一个sel,imp内存地址
- 2.存储bucket_t(桶)的基础数值是capacity = INIT_CACHE_SIZE = 4
- 3.等于3/4就双倍扩容(capacity = capacity ? capacity * 2 : INIT_CACHE_SIZE)
- 4.每次扩容是重新开辟新的空间存储(setBucketsAndMask(newBuckets, newCapacity - 1))
- 5.每次扩容会清空原有的缓存collect_free(oldBuckets, oldCapacity),重新开始存储;
- 6.每个bucket_t(桶)地址都是由哈希函数cache_hash(sel, m)计算得出(所以打印会发现并不是有序的)
接下来我们一起验证一下:
1.先不调用任何方法,可以看到默认会调用class

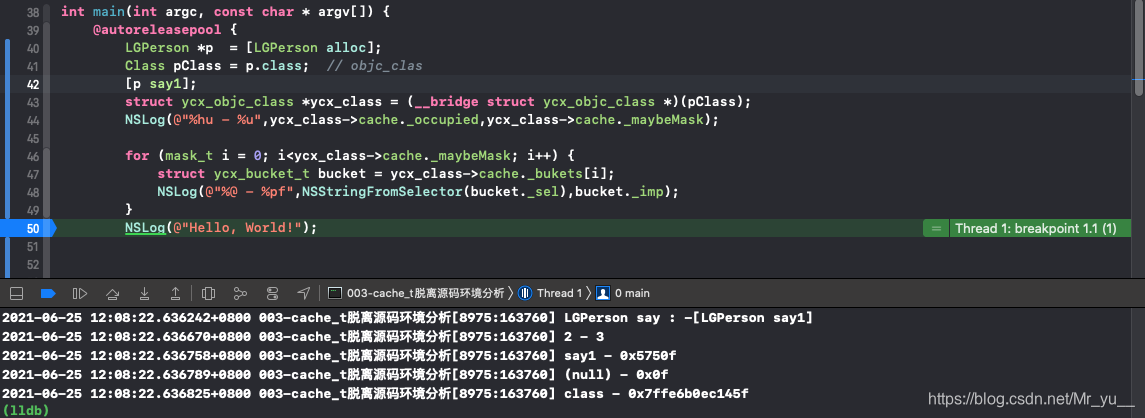
2.补充方法say1,可以发现_occupied是2,没有超过4的3/4也就是3,所以打印的方法say1,class
3.继续补充方法say2,等于3/4后,扩容翻倍在减1就是7,然后清空旧方法,就只剩下say2了

4.再让他扩容一次,确定我们结论是否正确

今天就分析到这里了,更多精彩请听下回分解cache结构分析(下)!!!


 2034
2034


 被折叠的 条评论
为什么被折叠?
被折叠的 条评论
为什么被折叠?
 到【灌水乐园】发言


