


文章目录
1 摘要
Nacos 作为阿里开源的微服务分布式组件,除了作为服务注册中心之外,自身也提供分布式配置功能,而且还是自动刷新的。这比基于 Netflix Eureka 实现的 Config 配置使用起来要方便的多。本文将介绍基于 Spring Cloud Alibaba 2.2 集成分布式配置服务。
Spring Cloud Alibaba Github: https://github.com/alibaba/spring-cloud-alibaba
准备工作:
2 核心 Maven 依赖
./cloud-alibaba-config/pom.xml
    <dependencies>
        <!-- cloud alibaba -->
        <dependency>
            <groupId>com.alibaba.cloud</groupId>
            <artifactId>spring-cloud-starter-alibaba-nacos-discovery</artifactId>
            <version>${spring-cloud-alibaba.version}</version>
        </dependency>
        <dependency>
            <groupId>com.alibaba.cloud</groupId>
            <artifactId>spring-cloud-starter-alibaba-nacos-config</artifactId>
            <version>${spring-cloud-alibaba.version}</version>
        </dependency>

        <!-- 省略其他依赖 -->

    </dependencies>

    <dependencyManagement>
        <dependencies>
            <dependency>
                <groupId>com.alibaba.cloud</groupId>
                <artifactId>spring-cloud-alibaba-dependencies</artifactId>
                <version>${spring-cloud-alibaba.version}</version>
                <type>pom</type>
                <scope>import</scope>
            </dependency>
        </dependencies>
    </dependencyManagement>
其中 ${spring-cloud-alibaba.version} 的版本为 2.2.3.RELEASE
注意事项: Spring Cloud Alibaba 2.2.3.RELEASE 版本支持的 Spring Boot 版本为 2.3.1.RELEASE ,建议在搭建项目时要保持版本的一致性,Spring Boot 版本过高或过低都可能导致不兼容问题
3 核心代码
3.1 bootstrap 配置文件
Spring Boot 加载配置文件的顺序: bootstrap.properties > bootstrap.yml > application.properties > application.yml
bootstrap.properties/yml 的配置信息不会被 application.properties/yml 中的配置所覆盖
这里若要使 Spring Cloud Alibaba Nacos 的 Config 配置生效,必须使用 bootstrap.properties 配置文件
./cloud-alibaba-config/src/main/resources/bootstrap.properties
## bootstrap config

## spring
spring.profiles.active=test
spring.application.name=cloud-alibaba-config
spring.cloud.nacos.server-addr=172.16.140.10:8688
spring.cloud.nacos.config.file-extension=yaml
配置简要说明:
spring.profiles.active : 指定当前的环境,Nacos Config 是支持多环境的,和 SpringBoot 的配置类似
spring.application.name: 应用名称,Nacos 服务注册中心的服务名称,Nacos Config 配置文件的文件名(不包含后缀)
spring.cloud.nacos.server-addr:Nacos 服务注册中心地址,包括 ip 和端口
spring.cloud.nacos.config.file-extension: Nacos Config 配置文件的文件后缀(常用 propertiess/yaml)
3.2 application 配置文件
./cloud-alibaba-config/src/main/resources/application.yml
## config

## server
server:
  port: 8614
这里既用了 bootstrap 配置,又用了 application 配置,是因为 Nacos Config 的配置必须放在 bootstrap 中才会生效,application 配置中用于服务端口以及其他Spring 相关的配置项。
3.3 配置测试类 - Controller 层
./cloud-alibaba-config/src/main/java/com/ljq/demo/springboot/alibaba/config/controller/NacosConfigController.java
package com.ljq.demo.springboot.alibaba.config.controller;

import lombok.extern.slf4j.Slf4j;
import org.springframework.beans.factory.annotation.Value;
import org.springframework.cloud.context.config.annotation.RefreshScope;
import org.springframework.http.MediaType;
import org.springframework.http.ResponseEntity;
import org.springframework.web.bind.annotation.GetMapping;
import org.springframework.web.bind.annotation.RequestMapping;
import org.springframework.web.bind.annotation.RestController;

/**
 * @Description: Spring Cloud Alibaba Nacos 分布式配置中心控制层
 * @Author: junqiang.lu
 * @Date: 2020/12/9
 */
@Slf4j
@RestController
@RefreshScope
@RequestMapping("/api/cloud/alibaba/config")
public class NacosConfigController {

    /**
     * 用户名
     */
    @Value("${userInfo.name: default}")
    private String userName;
    /**
     * 用户年龄
     */
    @Value("${userInfo.age: 0}")
    private Integer userAge;
    /**
     * 用户手机号
     */
    @Value("${userInfo.phone: default}")
    private String userPhone;

    /**
     * 用户信息
     *
     * @return
     */
    @GetMapping(value = "/user", produces = {MediaType.APPLICATION_JSON_VALUE})
    public ResponseEntity<String> queryUserInfo() {
        StringBuilder userBuilder = new StringBuilder();
        userBuilder.append("用户名:").append(userName)
                .append(",年龄:").append(userAge)
                .append(",手机号:").append(userPhone);
        log.info("@Value 用户信息: {}", userBuilder.toString());

        return ResponseEntity.ok(userBuilder.toString());
    }


}
简要说明:
@Value :Spring 注解,用于读取配置信息
@RefreshScope: Spring 注解,表示配置更新后能够同步刷新,保证当前使用的配置是最新的。只有添加这个注解,当配置中心的信息修改时才能够同步到程序中。
为了测试 Nacos Config 的多环境配置,这里单独写了一个测试类
./cloud-alibaba-config/src/main/java/com/ljq/demo/springboot/alibaba/config/controller/NacosConfigProfileController.java
package com.ljq.demo.springboot.alibaba.config.controller;

import lombok.extern.slf4j.Slf4j;
import org.springframework.beans.factory.annotation.Value;
import org.springframework.cloud.context.config.annotation.RefreshScope;
import org.springframework.http.MediaType;
import org.springframework.http.ResponseEntity;
import org.springframework.web.bind.annotation.GetMapping;
import org.springframework.web.bind.annotation.RequestMapping;
import org.springframework.web.bind.annotation.RestController;

/**
 * @Description: Spring Cloud Alibaba Config 多环境测试控制层
 * @Author: junqiang.lu
 * @Date: 2020/12/13
 */
@Slf4j
@RestController
@RefreshScope
@RequestMapping("/api/cloud/alibaba/config")
public class NacosConfigProfileController {

    /**
     * 当前环境
     */
    @Value("${currentProfile: default}")
    private String currentProfile;

    /**
     * 当前环境
     *
     * @return
     */
    @GetMapping(value = "/profile", produces = {MediaType.APPLICATION_JSON_VALUE})
    public ResponseEntity<String> queryUserInfo() {
        log.info("当前环境: {}", this.currentProfile);
        return ResponseEntity.ok(this.currentProfile);
    }

}
3.4 Nacos 配置中心
打开 Nacos 控制台,点击「配置管理」下的「配置列表」项,在右侧界面添加配置。
Nacos 控制台配置列表界面

Nacos 控制台添加配置界面
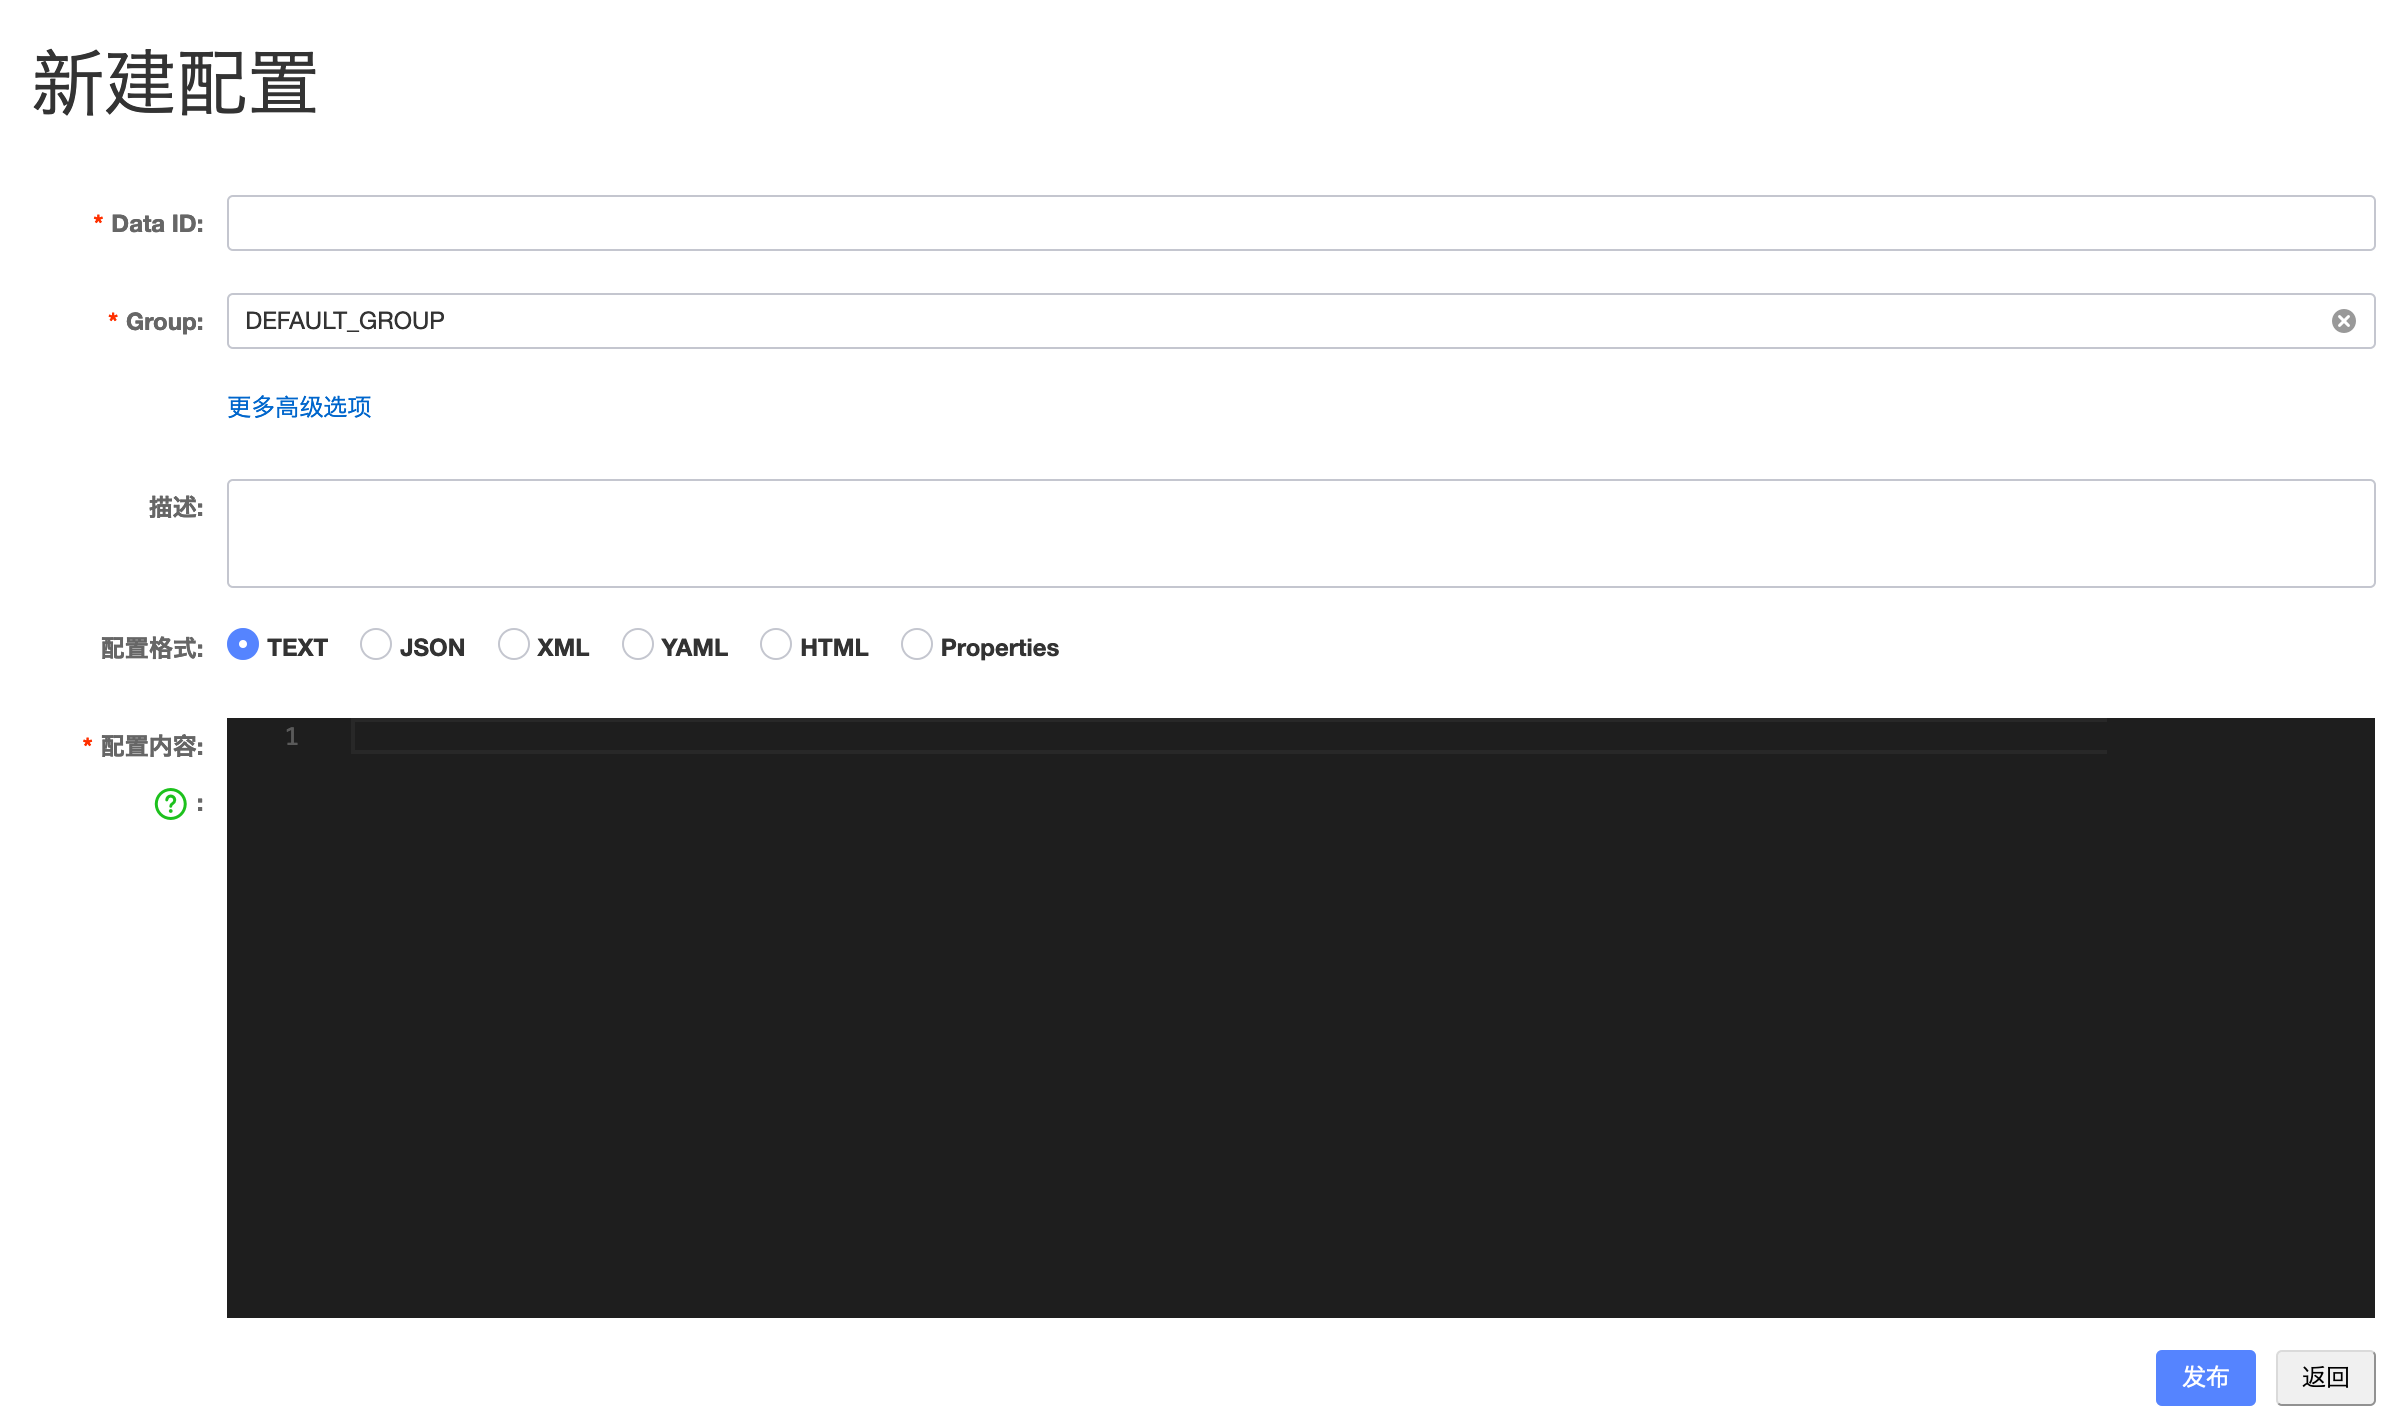
这里作为测试示例,添加了三个配置,分别是:
配置一:
Data ID: cloud-alibaba-config
Group: DEFAULT_GROUP
配置格式: YAML
配置内容:
## endpoint
management:
  endpoints:
    web:
      exposure:
        include: "*"


## user
userInfo:
  name: xxx
  age: 0
  phone: xxx
配置二:
Data ID: cloud-alibaba-config-dev
Group: DEFAULT_GROUP
配置格式: YAML
配置内容:
## endpoint
management:
  endpoints:
    web:
      exposure:
        include: "*"


## user
userInfo:
  name: 张三疯
  age: 36
  phone: 13123453333

currentProfile: dev
配置三:
Data ID: cloud-alibaba-config-test.yaml
Group: DEFAULT_GROUP
配置格式: YAML
配置内容:
## endpoint
management:
  endpoints:
    web:
      exposure:
        include: "*"


## user
userInfo:
  name: 马保国
  age: 69
  phone: 13123456666

currentProfile: test
4 测试配置
4.1 测试配置中心是否生效
在 Spring Boot 项目中的 bootstrap 配置中不设置激活环境,即:
## 注释掉当前行
#spring.profiles.active=test
启动配置服务(cloud-alibaba-config)
部分启动日志:
2020-12-20 10:48:49.148  WARN 86608 --- [           main] c.a.c.n.c.NacosPropertySourceBuilder     : Ignore the empty nacos configuration and get it based on dataId[cloud-alibaba-config.yaml] & group[DEFAULT_GROUP]
2020-12-20 10:48:49.150  INFO 86608 --- [           main] b.c.PropertySourceBootstrapConfiguration : Located property source: [BootstrapPropertySource {name='bootstrapProperties-cloud-alibaba-config.yaml,DEFAULT_GROUP'}, BootstrapPropertySource {name='bootstrapProperties-cloud-alibaba-config,DEFAULT_GROUP'}]
2020-12-20 10:48:49.156  INFO 86608 --- [           main] .l.d.s.a.c.CloudAlibabaConfigApplication : No active profile set, falling back to default profiles: default
日志显示已经读取到 Nacos 配置中心的配置,并且表明没事设置当前环境
接口请求测试:
请求地址:
http://127.0.0.1:8614/api/cloud/alibaba/config/user
请求方式: GET
返回结果:
用户名:xxx,年龄: 0,手机号:xxx
对比上边的配置 cloud-alibaba-config 发现,Nacos 配置已经生效
4.2 测试配置修改实时刷新
在 Nacos 控制台修改 cloud-alibaba-config 中的配置,将 userInfo.name 由 xxx 改为 xxx666
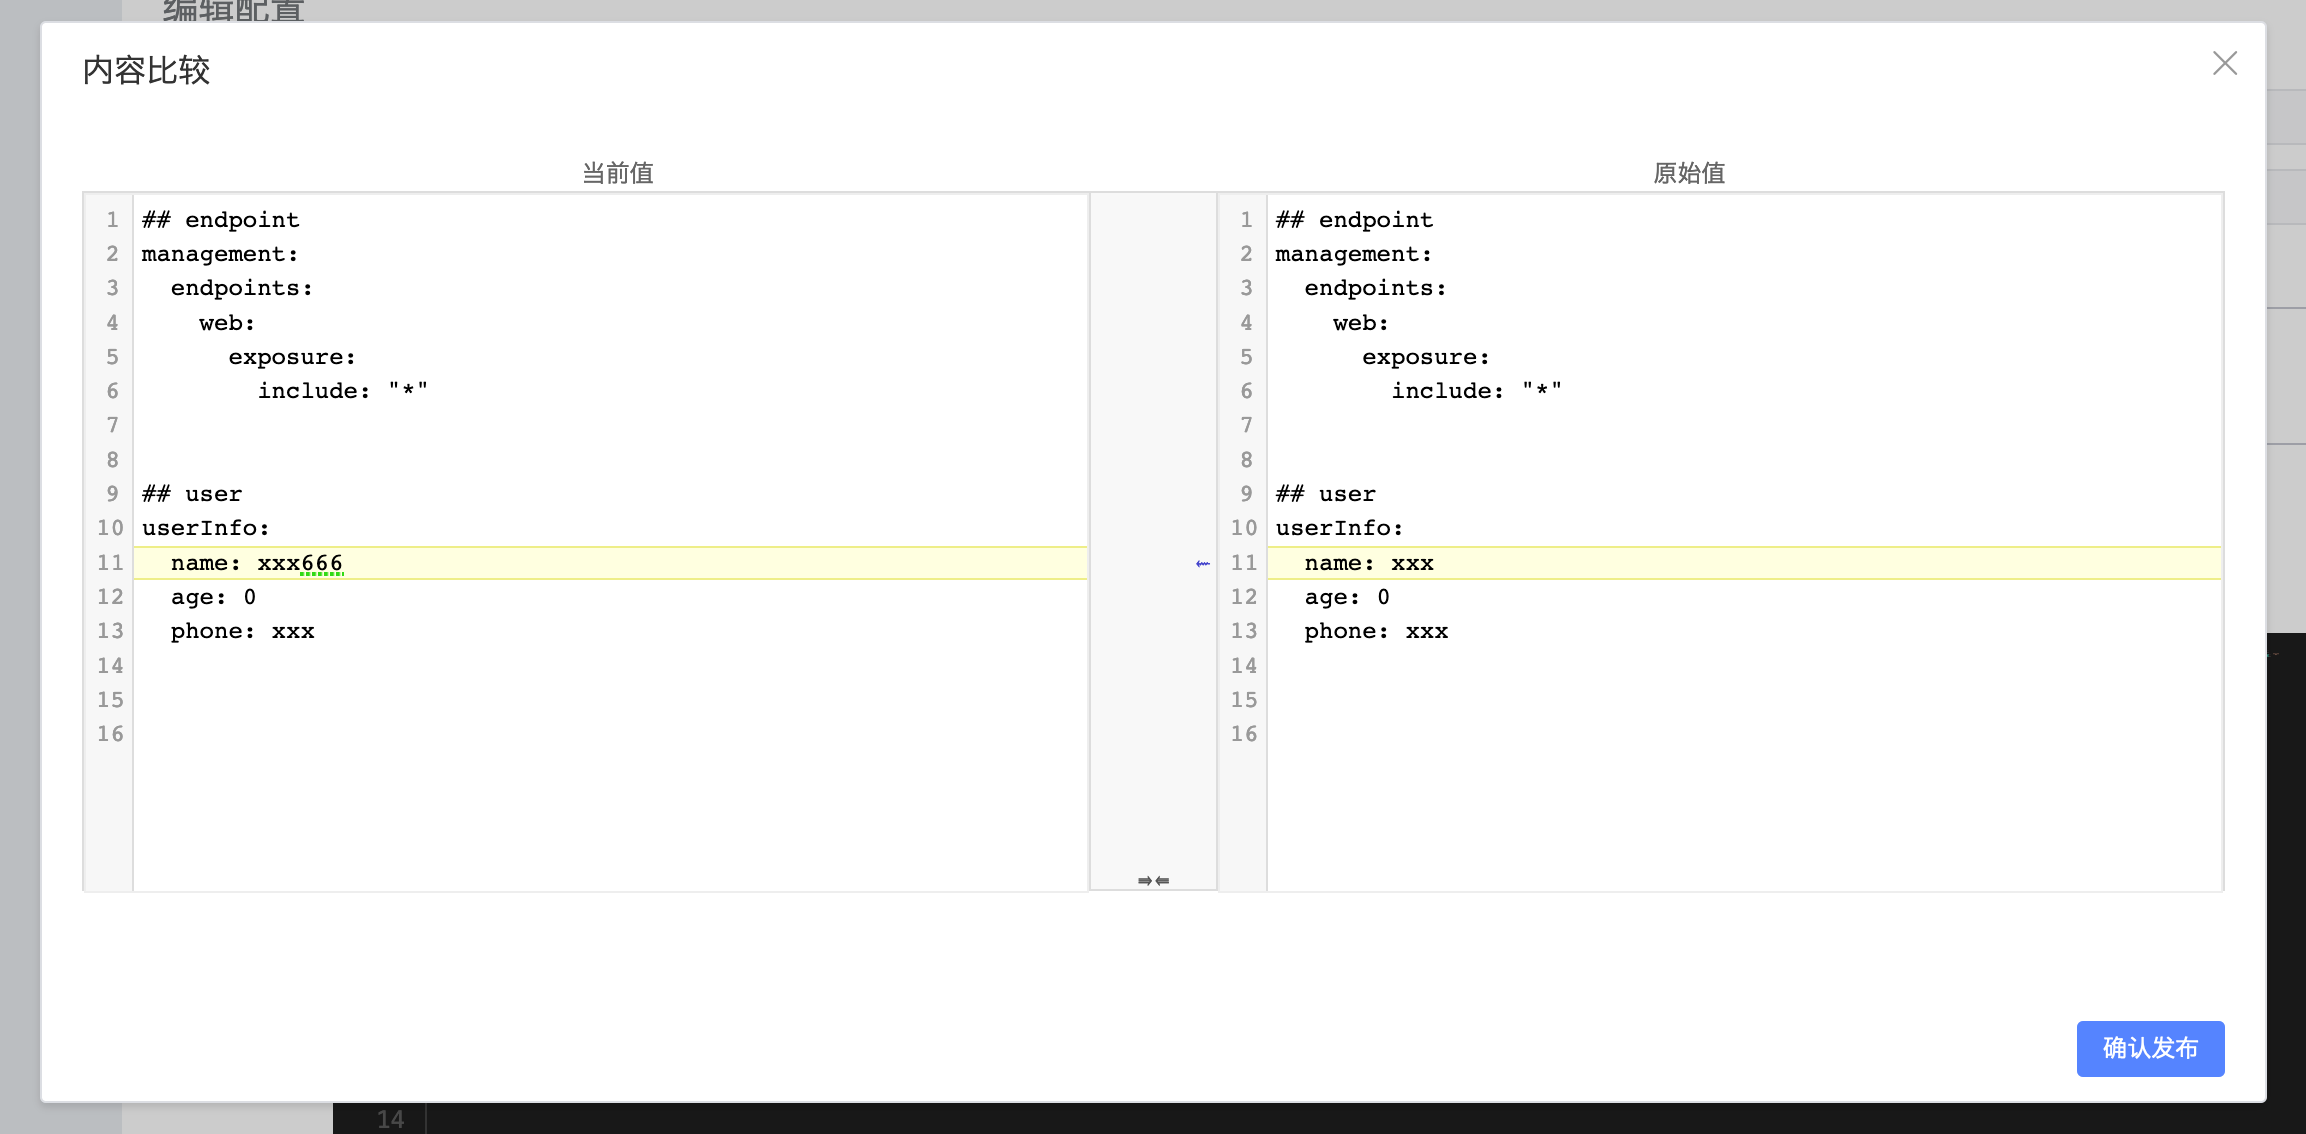
在修改发布之后,后台已经接受到修改的信息,并在控制台打印出相关日志
2020-12-20 10:59:05.755 INFO 86608 --- [.16.140.10_8688] o.s.c.e.event.RefreshEventListener : Refresh keys changed: [userInfo.name]
再一次测试 4.1 中的接口
返回结果:
用户名:xxx666,年龄: 0,手机号:xxx
此时,更新后的配置已经生效
至此,一个分布式配置中心已经搭建完成
4.3 多环境配置测试
在 Spring Boot 项目中的 bootstrap 配置中激活环境设置为 dev,即:
spring.profiles.active=dev
重新启动配置服务(cloud-alibaba-config)
接口请求测试:
接口一:
使用 4.1 中的接口配置,返回结果为:
用户名:xxx666,年龄: 0,手机号:xxx
从返回结果可以看出, cloud-alibaba-config-dev 中的配置并没有生效,而生效的依然是 cloud-alibaba-config 中的配置。
那么是不是 Nacos Config 不支持环境配置?
且看下边的测试
将 Spring Boot 项目中的 bootstrap 配置中激活环境设置为 test,即:
spring.profiles.active=test
重新启动配置服务(cloud-alibaba-config)
接口请求测试:
接口一:
使用 4.1 中的接口配置,返回结果为:
用户名:马保国,年龄: 69,手机号: 13123456666
接口二:
请求只有 cloud-alibaba-config-test.yaml 中才有的配置
接口请求测试:
请求地址:
http://127.0.0.1:8614/api/cloud/alibaba/config/profile
请求方式: GET
返回结果:
test
这一次的测试结果显示,多环境的配置时生效的,如果指定环境的配置中包含默认的配置,则会覆盖掉默认的配置
即 cloud-alibaba-config-test.yaml 中的配置会覆盖 cloud-alibaba-config 中的配置
测试到这里,基本可以下一个结论了:
在使用 Nacos Config 在配置多环境的时候,指定环境的配置文件必须包含后缀名,否则不会生效
(这真是个大坑,作者当时添加 cloud-alibaba-config 配置的时候没有添加后缀名,测试生效了,以为多环境的配置也可以不用后缀名,结果折腾了半天,一直找不到原因,最后再一次仔细看了官方文档,然后用对比测试的方法才发现这一特性)
至此,基于 Spring Cloud Alibaba 2.2 的分布式配置中心已经搭建完成了。
5 推荐参考资料
官方文档: Spring Cloud Alibaba Nacos Config
Spring Cloud Alibaba系列教程 - Spring Cloud Alibaba 服务配置
6 Github 源码
Gtihub 源码地址 : https://github.com/Flying9001/springBootDemo
个人公众号:404Code,分享半个互联网人的技术与思考,感兴趣的可以关注.


 428
428

 被折叠的 条评论
为什么被折叠?
被折叠的 条评论
为什么被折叠?
 到【灌水乐园】发言


