


1. 环境说明:分别在两个节点上实现部署httpd,在两个节点分别安装corosync和pacemaker用于实现web的高可用,通过pcs程序对pacemaker进行配置,当其中一个节点出现问题时用于前端访问的VIP地址将被移到另一个节点,然后启动web应用程序,以实现在两个节点上实现web高可用,本例没有使用共享存储。
2. 环境部署:
| 服务器地址 | 主机名 | 服务器角色 |
| 192.168.188.223 | centosnode1 | 主服务器 |
| 192.168.188.226 | centosnode2 | 备服务器 |
3. 在安装corosync和pacemaker之前,要在主备节点上都做dns解析和ssh免密登录。
##dns解析
vim /etc/hosts

127.0.0.1   localhost localhost.localdomain localhost4 localhost4.localdomain4
::1         localhost localhost.localdomain localhost6 localhost6.localdomain6
192.168.188.223 centosnode1
192.168.188.226 centosnode2

##ssh免密登录
[root@centosnode1 ~]# ssh-keygen -f ~/.ssh/id_rsa -P '' -q
[root@centosnode1 ~]# ssh-copy-id centosnode1
[root@centosnode1 ~]# ssh-copy-id centosnode2
4. 主备节点上安装corosync,pacemaker,httpd,并配置web页面:
##主备节点上安装corosync,pacemaker,httpd
[root@centosnode1 ~]# yum install corosync pacemaker httpd -y

##配置web页面
[root@centosnode1 ~]# echo "this is page ip: 192.168.188.223" > /var/www/html/index.html

[root@centosnode2 ~]# echo "this is page ip: 192.168.188.226" > /var/www/html/index.html
5. 安装pcs并进行验证,主备节点同时操作:
[root@centosnode1 ~]# yum install pcs -y

[root@centosnode1 ~]# systemctl enable pcs --now

##安装组件生成的hacluster用户,用来本地启动pcs进程,因此我们需要设定密码。
[root@centosnode1 ~]# echo "123456" | passwd --stdin hacluster

##节点验证,只在主节点验证
[root@centosnode1 ~]# pcs cluster auto centosnode1 centosnode2
6. 创建并启动集群:
##创建名为webcluster的集群,其中有centosnode1,centosnode2两个节点,若节点已经存在
于别的集群,可以用--force选项强制创建,会覆盖之前的操作
[root@centosnode1 ~]# pcs cluster setup --name webcluster centosnode1
centosnode2 --force

##启动所有集群
[root@centosnode1 ~]# pcs cluster start --all

##设置集群开机自启
[root@centosnode1 ~]# pcs cluster enable --all

##查看集群状态
[root@centosnode1 ~]# pcs status

##查看corosync:
[root@centosnode1 ~]# corosync-cfgtool -s

##查看corosync成员信息:
[root@centosnode1 ~]# corosync-cmapctl | grep members

##查看corosync状态:
[root@centosnode1 ~]# pcs status corosync

##查看pacemaker
[root@centosnode1 ~]# ps -ef | grep pacemaker
7. 没有Fencing设备时,禁用STONITH组件功能:
[root@centosnode1 ~]# pcs property set stonith-enabled=false
8. 查看当前配置的合法性,确保配置无误:
[root@centosnode1 ~]# crm_verify -L -V9. 建立集群资源:
##配置vip资源
[root@centosnode1 ~]# pcs resource create vip ocf:heartbeat:IPaddr2
ip=192.168.188.100 cidr_netmask=24

##配置web资源
[root@centosnode1 ~]# pcs resource create web systemd:httpd

##查找资源的用法:
1.先通过资源的关键字查找出资源的准确名字,如:
[root@centosnode1 ~]# pcs resource list | grep httpd

2.查找资源的用法:
[root@centosnode1 ~]# pcs resource describe systemd:httpd
10. 查看集群状态:
[root@centosnode1 ~]# pcs status
由此发现,我们刚刚创建的两个资源不在同一台服务器上,因此要调整集群资源到同一台服务器上。
11. 调整集群资源:
##目的:将资源运行在同一台节点上
方式一:配置一个资源组,组中的资源会在同一节点上运行
      语法:pcs resource group add 资源组名 资源1 资源2 ...
      [root@centosnode1 ~]# pcs resource group add WEB web vip

方式二:配置资源的捆绑(约束)关系,这里配置的是主机约束:
      语法:pcs constraint 约束规则 add 资源1 资源2 ... INFINITY
      [root@centosnode1 ~]# pcs constraint colocation add web vip INFINITY

##查看资源的约束规则,即一致性状态
[root@centosnode2 ~]# pcs constraint

Location Constraints:
Ordering Constraints:
Colocation Constraints:
Ticket Constraints:

##定义排列约束:绑定服务资源和vip始终在同一个节点上
[root@centosnode1 ~]# pcs constraint colocation add web with vip

##定义顺序约束:约束服务资源始终在vip启动之后才启动
[root@centosnode1 ~]# pcs constraint order vip then web

##定义位置约束:约束vip资源首先被分配到优先级高的节点上,这里是centosnode2
[root@centosnode1 ~]# pcs constraint location vip prefers centosnode2=100
12. 再次查看集群状态:
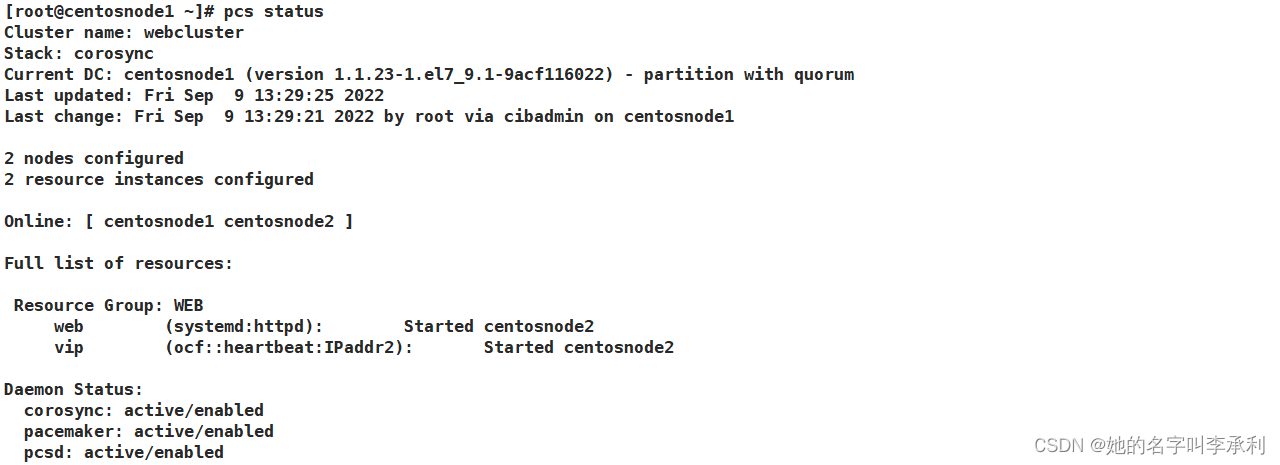
此时,资源就运行在同一节点上了。
13. 停止centosnode2节点的所有集群服务,以此来模拟故障转移:
[root@centosnode2 ~]# pcs cluster stop centosnode2

主节点降级,验证资源漂移
[root@centosnode2 ~]# pcs cluster standby centosnode2

[root@centosnode2 ~]# pcs status

centosnode2上线
[root@centosnode2 ~]# pcs cluster unstandby centosnode2

[root@centosnode2 ~]# pcs status

此时就会发现资源都转移到了另一个节点上。
14. 清空集群操作:
##清空集群错误日志
[root@centosnode1 ~]# pcs resource cleanup

##销毁集群配置
[root@centosnode1 ~]# pcs cluster destroy --all
实际上pcs管理程序也是可以通过web客户端来进行操作的,pcs的默认端口是2224,并且是加密的,因此要通过https访问。

用户名就是之前的hacluster,密码是123456。

登陆进去后就可以进行集群,资源,节点的管理。


 798
798


 被折叠的 条评论
为什么被折叠?
被折叠的 条评论
为什么被折叠?
 到【灌水乐园】发言


