


Bilibili移动端APP
简介
此Demo采用Android Compose声明式UI编写而成,主体采用MVVM设计框架,Demo涉及到的主要技术包括:Flow、Coroutines、Retrofit、Okhttp、Hilt以及适配了深色模式等;主要数据来源于Bilibili API。
依赖
Demo中所使用的依赖如下表格所示
| 库名称 | 备注 |
|---|---|
| Flow | 流 |
| Coroutines | 协程 |
| Retrofit | 网络 |
| Okhttp | 网络 |
| Hilt | 依赖注入 |
| room | 数据存储 |
| coil | 异步加载图片 |
| paging | 分页加载 |
| media3-exoplayer | 视频 |
效果
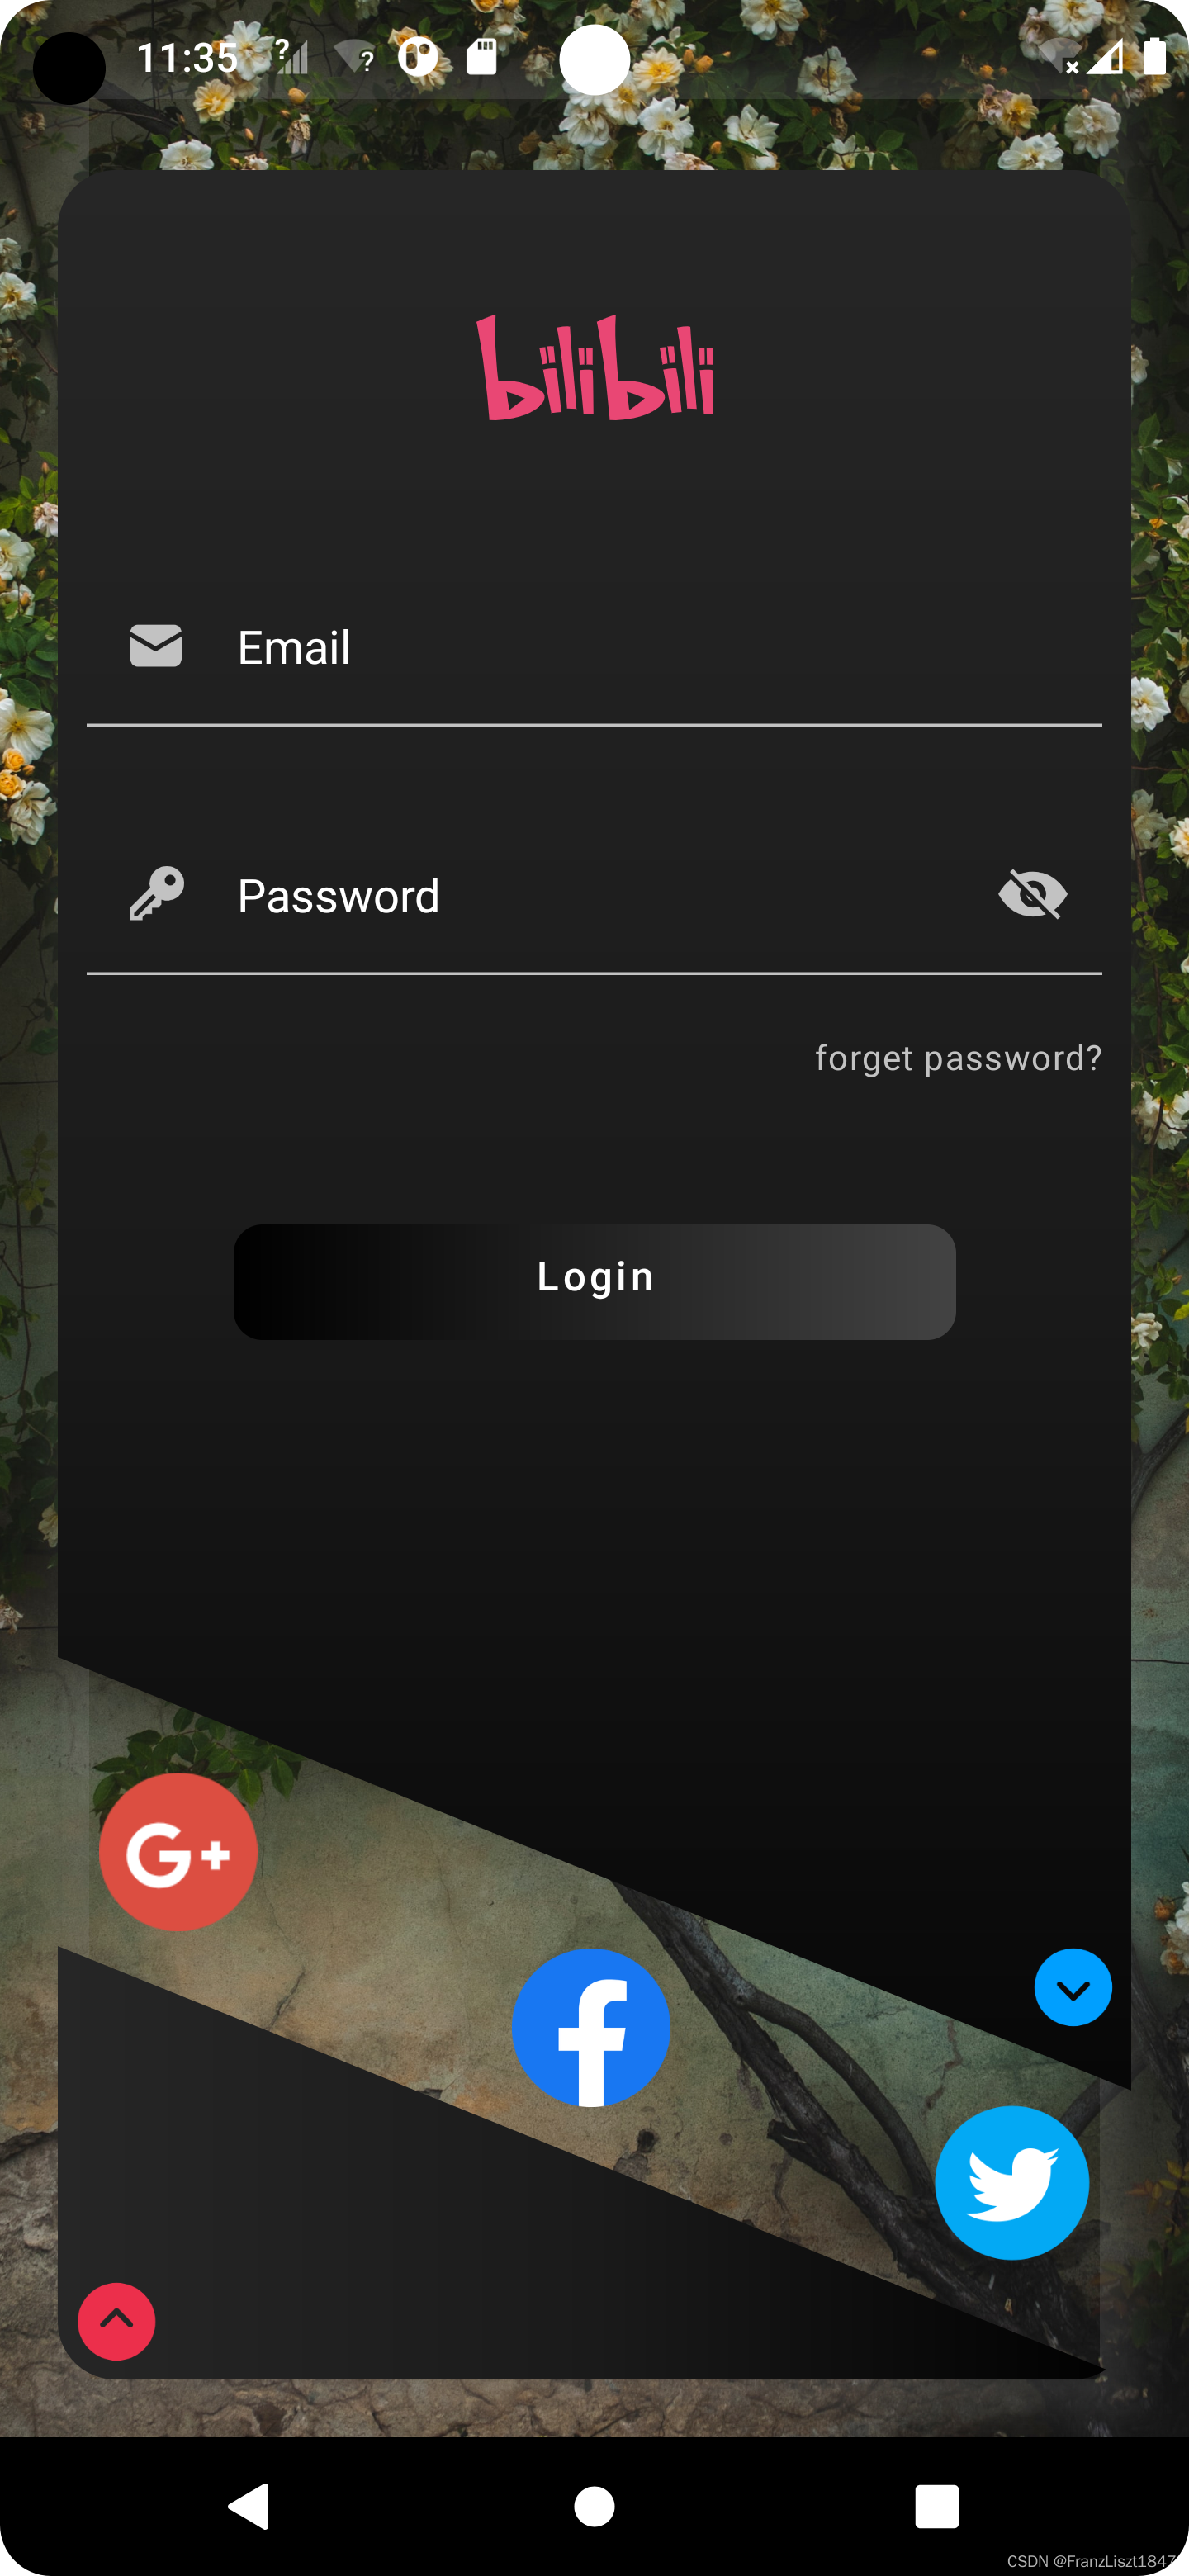
登录
登录在Demo中分为WebView嵌入B站网页实现获取Cookie和自主实现登录,由于后者需要通过极验API验证,所以暂且采用前者获取Cookie,后者绘制了基本view和基本逻辑
效果

WebView
由于登录暂未实现,故而此处就介绍使用WebView获取Cookie。由于在Compose中并未直接提供WebView组件,故使用AndroidView进行引入。以下代码对WebView进行了一个简单的封装,我们只需要在onPageFinished方法中回调所获的cookie即可,然后保存到缓存文件即可
@Composable
fun CustomWebView(
    modifier: Modifier = Modifier,
    url:String,
    onBack: (webView: WebView?) -> Unit,
    onProgressChange: (progress:Int)->Unit = {},
    initSettings: (webSettings: WebSettings?) -> Unit = {},
    onReceivedError: (error: WebResourceError?) -> Unit = {},
    onCookie:(String)->Unit = {}
){
    val webViewChromeClient = object: WebChromeClient(){
        override fun onProgressChanged(view: WebView?, newProgress: Int) {
            //回调网页内容加载进度
            onProgressChange(newProgress)
            super.onProgressChanged(view, newProgress)
        }
    }
    val webViewClient = object: WebViewClient(){
        override fun onPageStarted(view: WebView?, url: String?, favicon: Bitmap?) {
            super.onPageStarted(view, url, favicon)
            onProgressChange(-1)
        }
        override fun onPageFinished(view: WebView?, url: String?) {
            super.onPageFinished(view, url)
            onProgressChange(100)
            //监听获取cookie
            val cookie = CookieManager.getInstance().getCookie(url)
            cookie?.let{ onCookie(cookie) }
        }
        override fun shouldOverrideUrlLoading(
            view: WebView?,
            request: WebResourceRequest?
        ): Boolean {
            if(null == request?.url) return false
            val showOverrideUrl = request.url.toString()
            try {
                if (!showOverrideUrl.startsWith("http://")
                    && !showOverrideUrl.startsWith("https://")) {
                    Intent(Intent.ACTION_VIEW, Uri.parse(showOverrideUrl)).apply {
                        addFlags(Intent.FLAG_ACTIVITY_NEW_TASK)
                        view?.context?.applicationContext?.startActivity(this)
                    }
                    return true
                }
            }catch (e:Exception){
                return true
            }
            return super.shouldOverrideUrlLoading(view, request)
        }

        override fun onReceivedError(
            view: WebView?,
            request: WebResourceRequest?,
            error: WebResourceError?
        ) {
            super.onReceivedError(view, request, error)
            onReceivedError(error)
        }
    }
    var webView:WebView? = null
    val coroutineScope = rememberCoroutineScope()
    AndroidView(modifier = modifier,factory = { ctx ->
        WebView(ctx).apply {
            this.webViewClient = webViewClient
            this.webChromeClient = webViewChromeClient
            initSettings(this.settings)
            webView = this
            loadUrl(url)
        }
    })
    BackHandler {
        coroutineScope.launch {
            onBack(webView)
        }
    }
}
自定义TobRow的Indicator大小
由于在compose中TobRow的指示器宽度被写死,如果需要更改指示器宽度,则需要自己进行重写,将源码拷贝一份,然后根据自己需求进行定制,具体代码如下
@ExperimentalPagerApi
fun Modifier.customIndicatorOffset(
    pagerState: PagerState,
    tabPositions: List<TabPosition>,
    width: Dp
): Modifier = composed {
    if (pagerState.pageCount == 0) return@composed this

    val targetIndicatorOffset: Dp
    val indicatorWidth: Dp

    val currentTab = tabPositions[minOf(tabPositions.lastIndex, pagerState.currentPage)]
    val targetPage = pagerState.targetPage
    val targetTab = tabPositions.getOrNull(targetPage)

    if (targetTab != null) {
        val targetDistance = (targetPage - pagerState.currentPage).absoluteValue
        val fraction = (pagerState.currentPageOffset / max(targetDistance, 1)).absoluteValue

        targetIndicatorOffset = lerp(currentTab.left, targetTab.left, fraction)
        indicatorWidth = lerp(currentTab.width, targetTab.width, fraction).value.absoluteValue.dp
    } else {
        targetIndicatorOffset = currentTab.left
        indicatorWidth = currentTab.width
    }

    fillMaxWidth()
        .wrapContentSize(Alignment.BottomStart)
        .padding(horizontal = (indicatorWidth - width) / 2)
        .offset(x = targetIndicatorOffset)
        .width(width)
}
使用就变得很简单了,因为是采用modifier的扩展函数进行编写,而modifier在每一个compose组件都拥有,所以只需要在tabrow的指示器调用即可,具体代码如下
TabRow(
            ...
            indicator = { pos ->
                TabRowDefaults.Indicator(
                    color = BilibiliTheme.colors.tabSelect,
                    modifier = Modifier.customIndicatorOffset(
                        pagerState = pageState,
                        tabPositions = pos,
                        32.dp
                    )
                )
            }
            ...
      )
首页
整个首页页面由BottomNavbar构成,包含四个子界面,其中第一个界面又由两个子界面组成,通过TabRow+HorizontalPager完成子页面滑动,子页面分为推荐和热门两个页面
推荐
推荐页面由上面的Banner和下方的LazyGridView组成,由于Compose中不允许同向滑动,所以就将Banner作为LazyGridView的一个item,进而进行包裹


LazyGridView使用Paging3
由于在现在Compose版本中LazyGridView并不支持Paging3,所以如果有此类需求,则需要自己动手,具体代码如下
fun <T : Any> LazyGridScope.items(
    items: LazyPagingItems<T>,
    key: ((item: T) -> Any)? = null,
    span: ((item: T) -> GridItemSpan)? = null,
    contentType: ((item: T) -> Any)? = null,
    itemContent: @Composable LazyGridItemScope.(value: T?) -> Unit
) {
    items(
        count = items.itemCount,
        key = if (key == null) null else { index ->
            val item = items.peek(index)
            if (item == null) {
                //PagingPlaceholderKey(index)
            } else {
                key(item)
            }
        },
        span = if (span == null) null else { index ->
            val item = items.peek(index)
            if (item == null) {
                GridItemSpan(1)
            } else {
                span(item)
            }
        },
        contentType = if (contentType == null) {
            { null }
        } else { index ->
            val item = items.peek(index)
            if (item == null) {
                null
            } else {
                contentType(item)
            }
        }
    ) { index ->
        itemContent(items[index])
    }
}
热门
热门页面代码与推荐页面代码类似,此处不在阐述


排行榜
排行界面与上述类似,Tab+HorizontalPager完成所有子页面滑动切换,此处也不在继续阐述


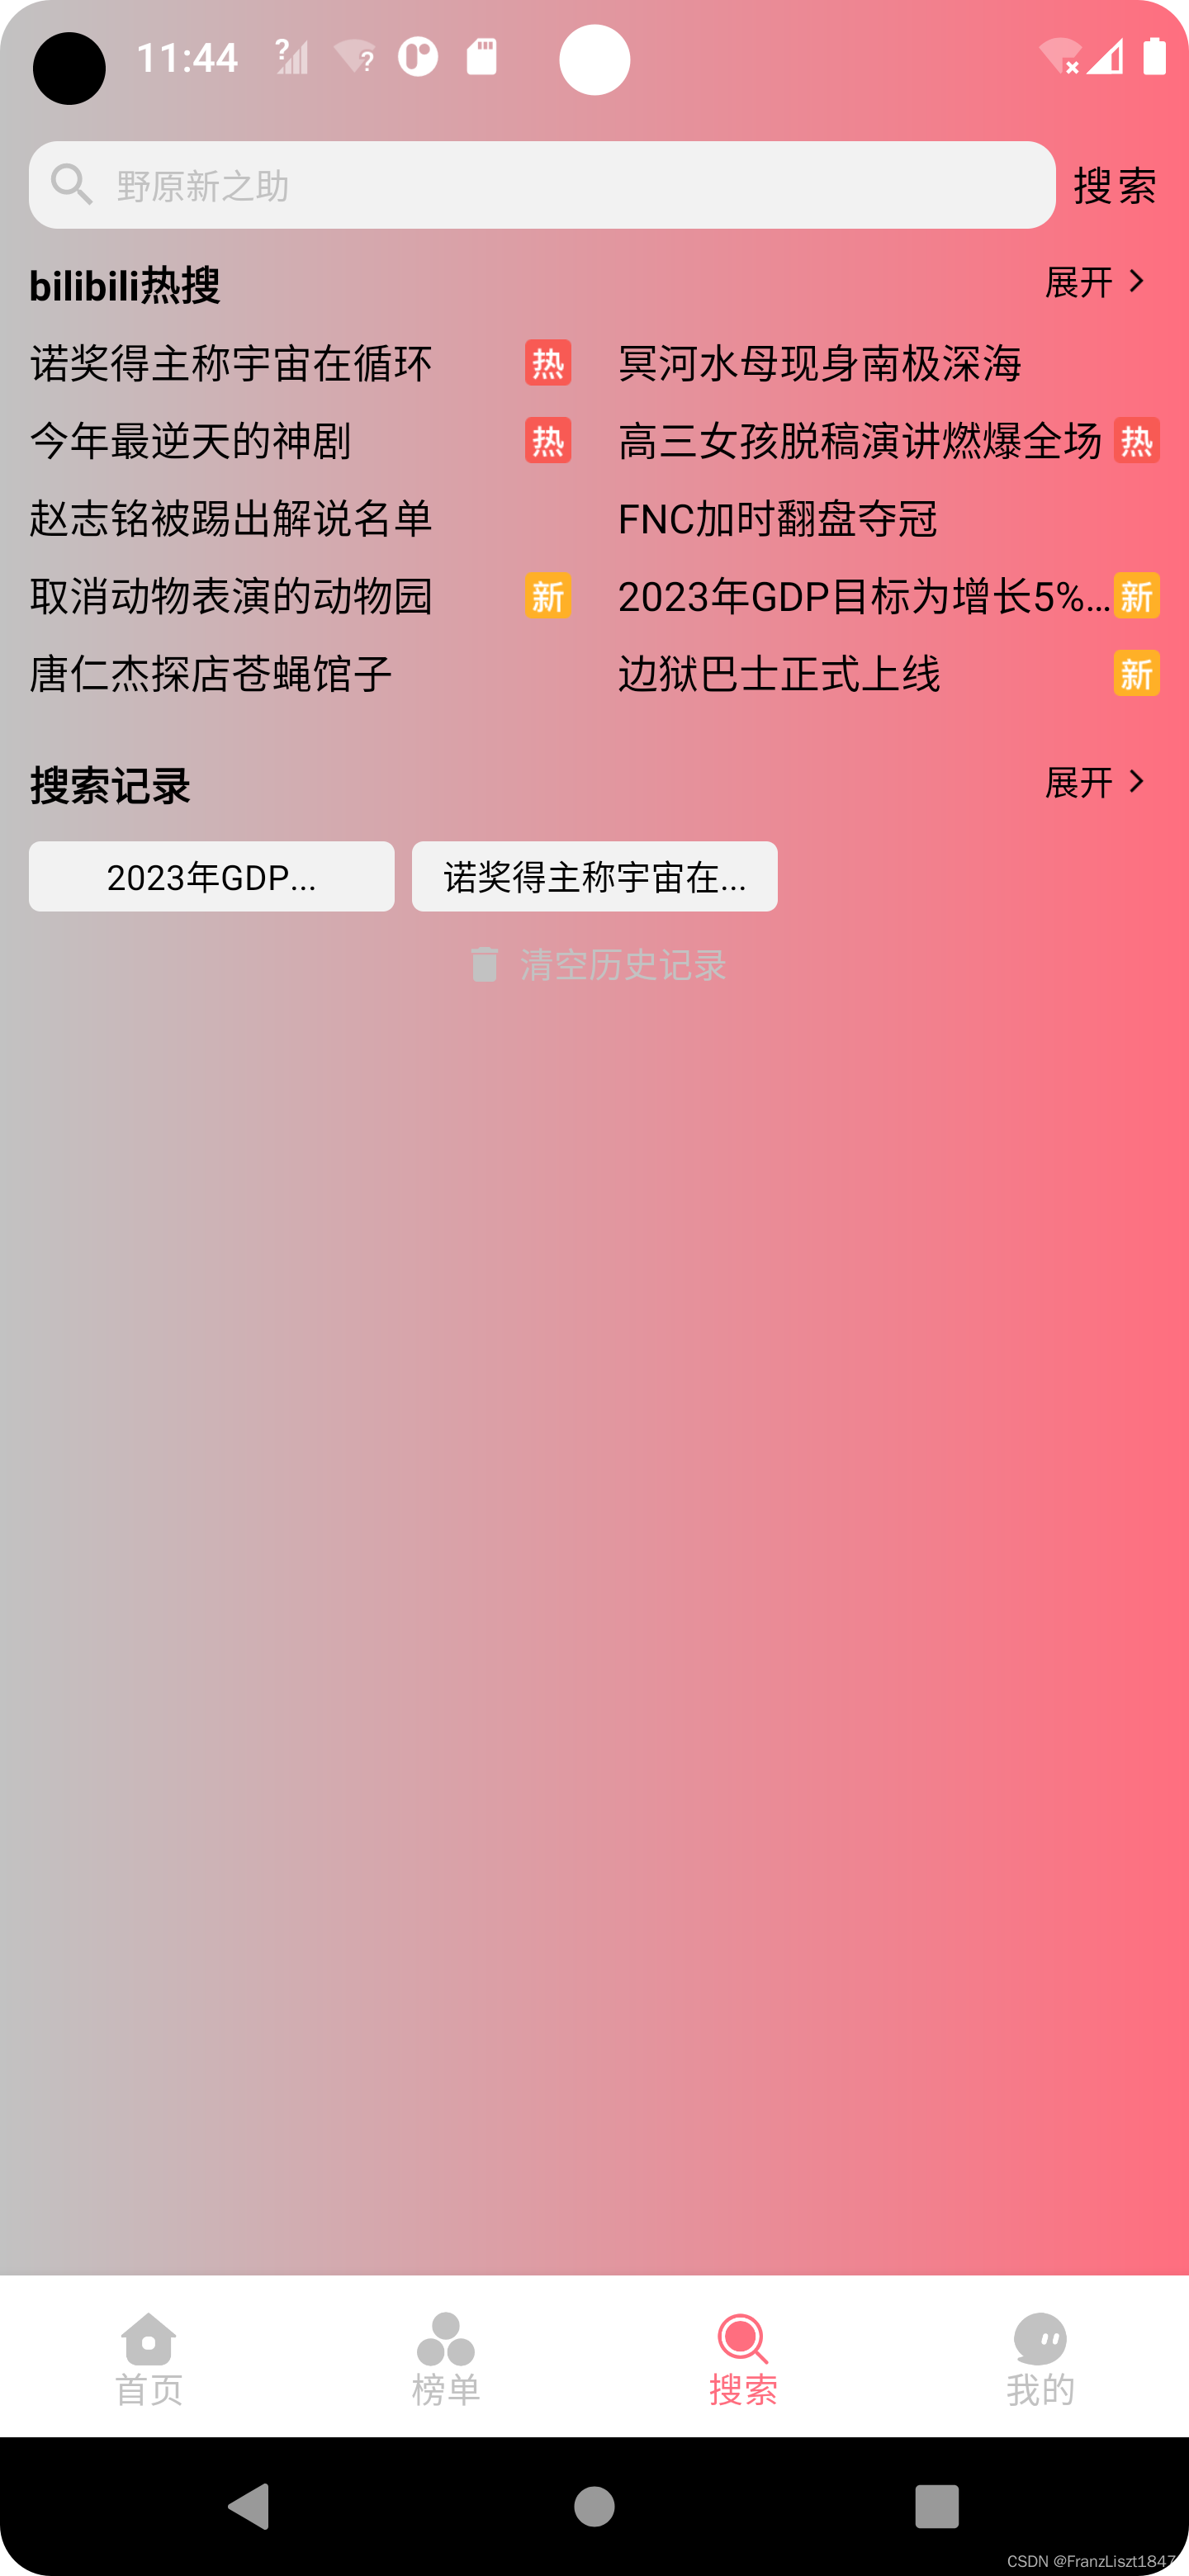
搜索
搜索界面主要分为四个模块:搜索栏、热搜内容、搜索记录、搜索列表;搜索框内字符改变,搜索列表显示并以富文本显示,热搜内容展开与折叠、搜索记录内容展开与折叠、清空记录等操作都在ViewModel中完成,然后view通过监听VM中状态值进行重组

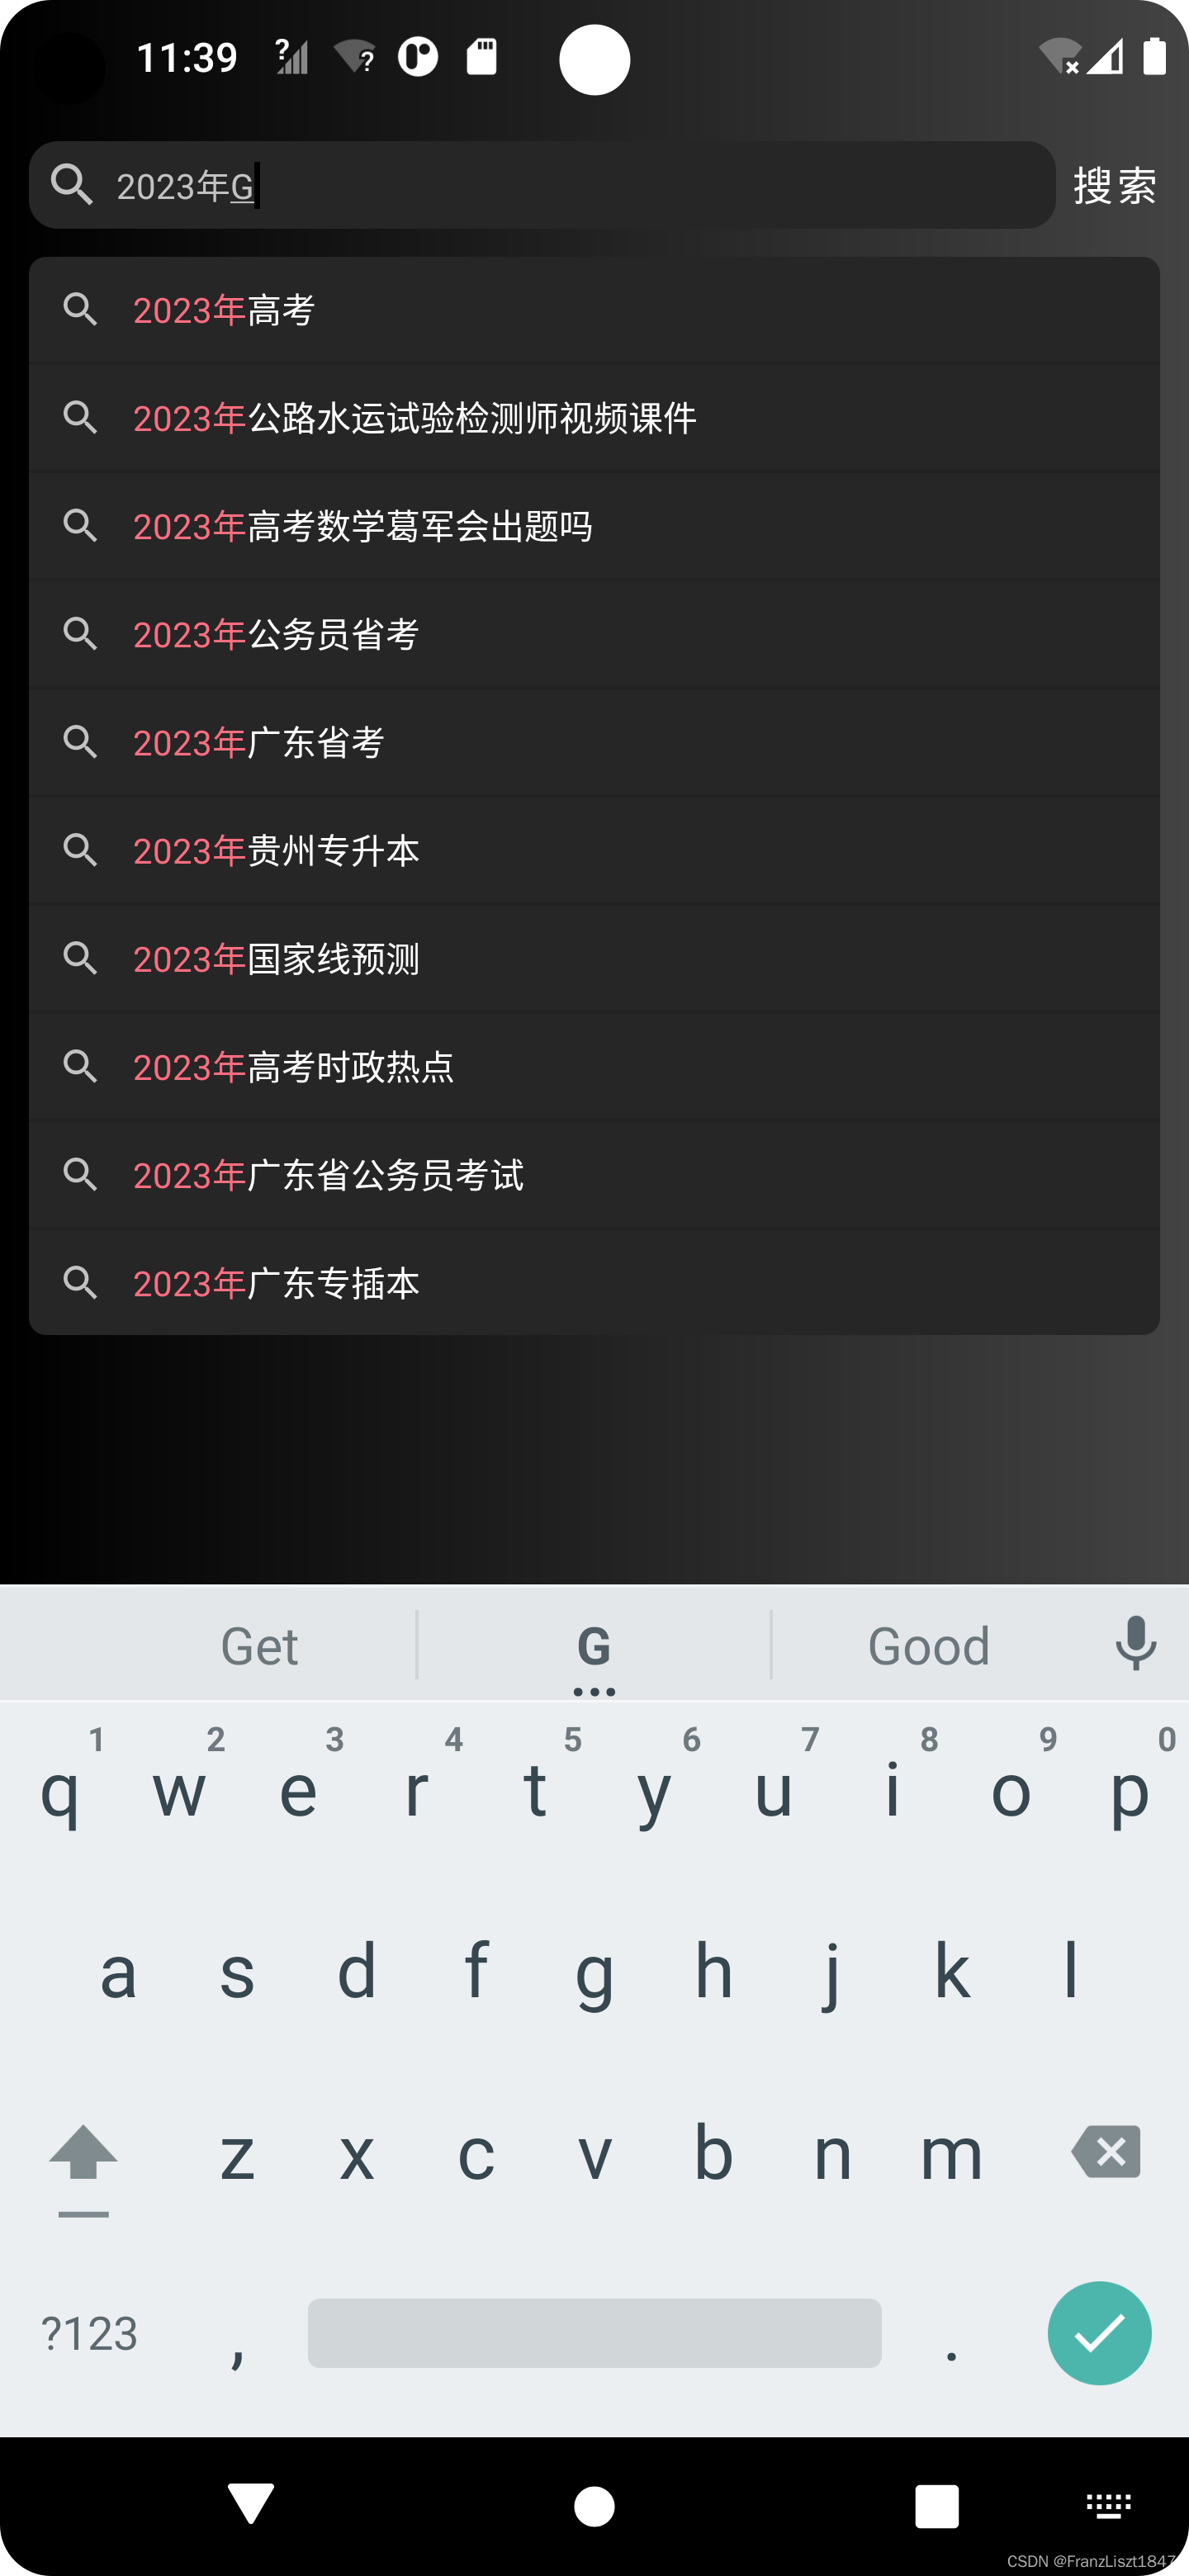
模糊搜索
在搜索框内键入字符,然后通过字符的改变,获取相应的网络请求数据,最后通过AnimatedVisibility显示与隐藏搜索建议列表
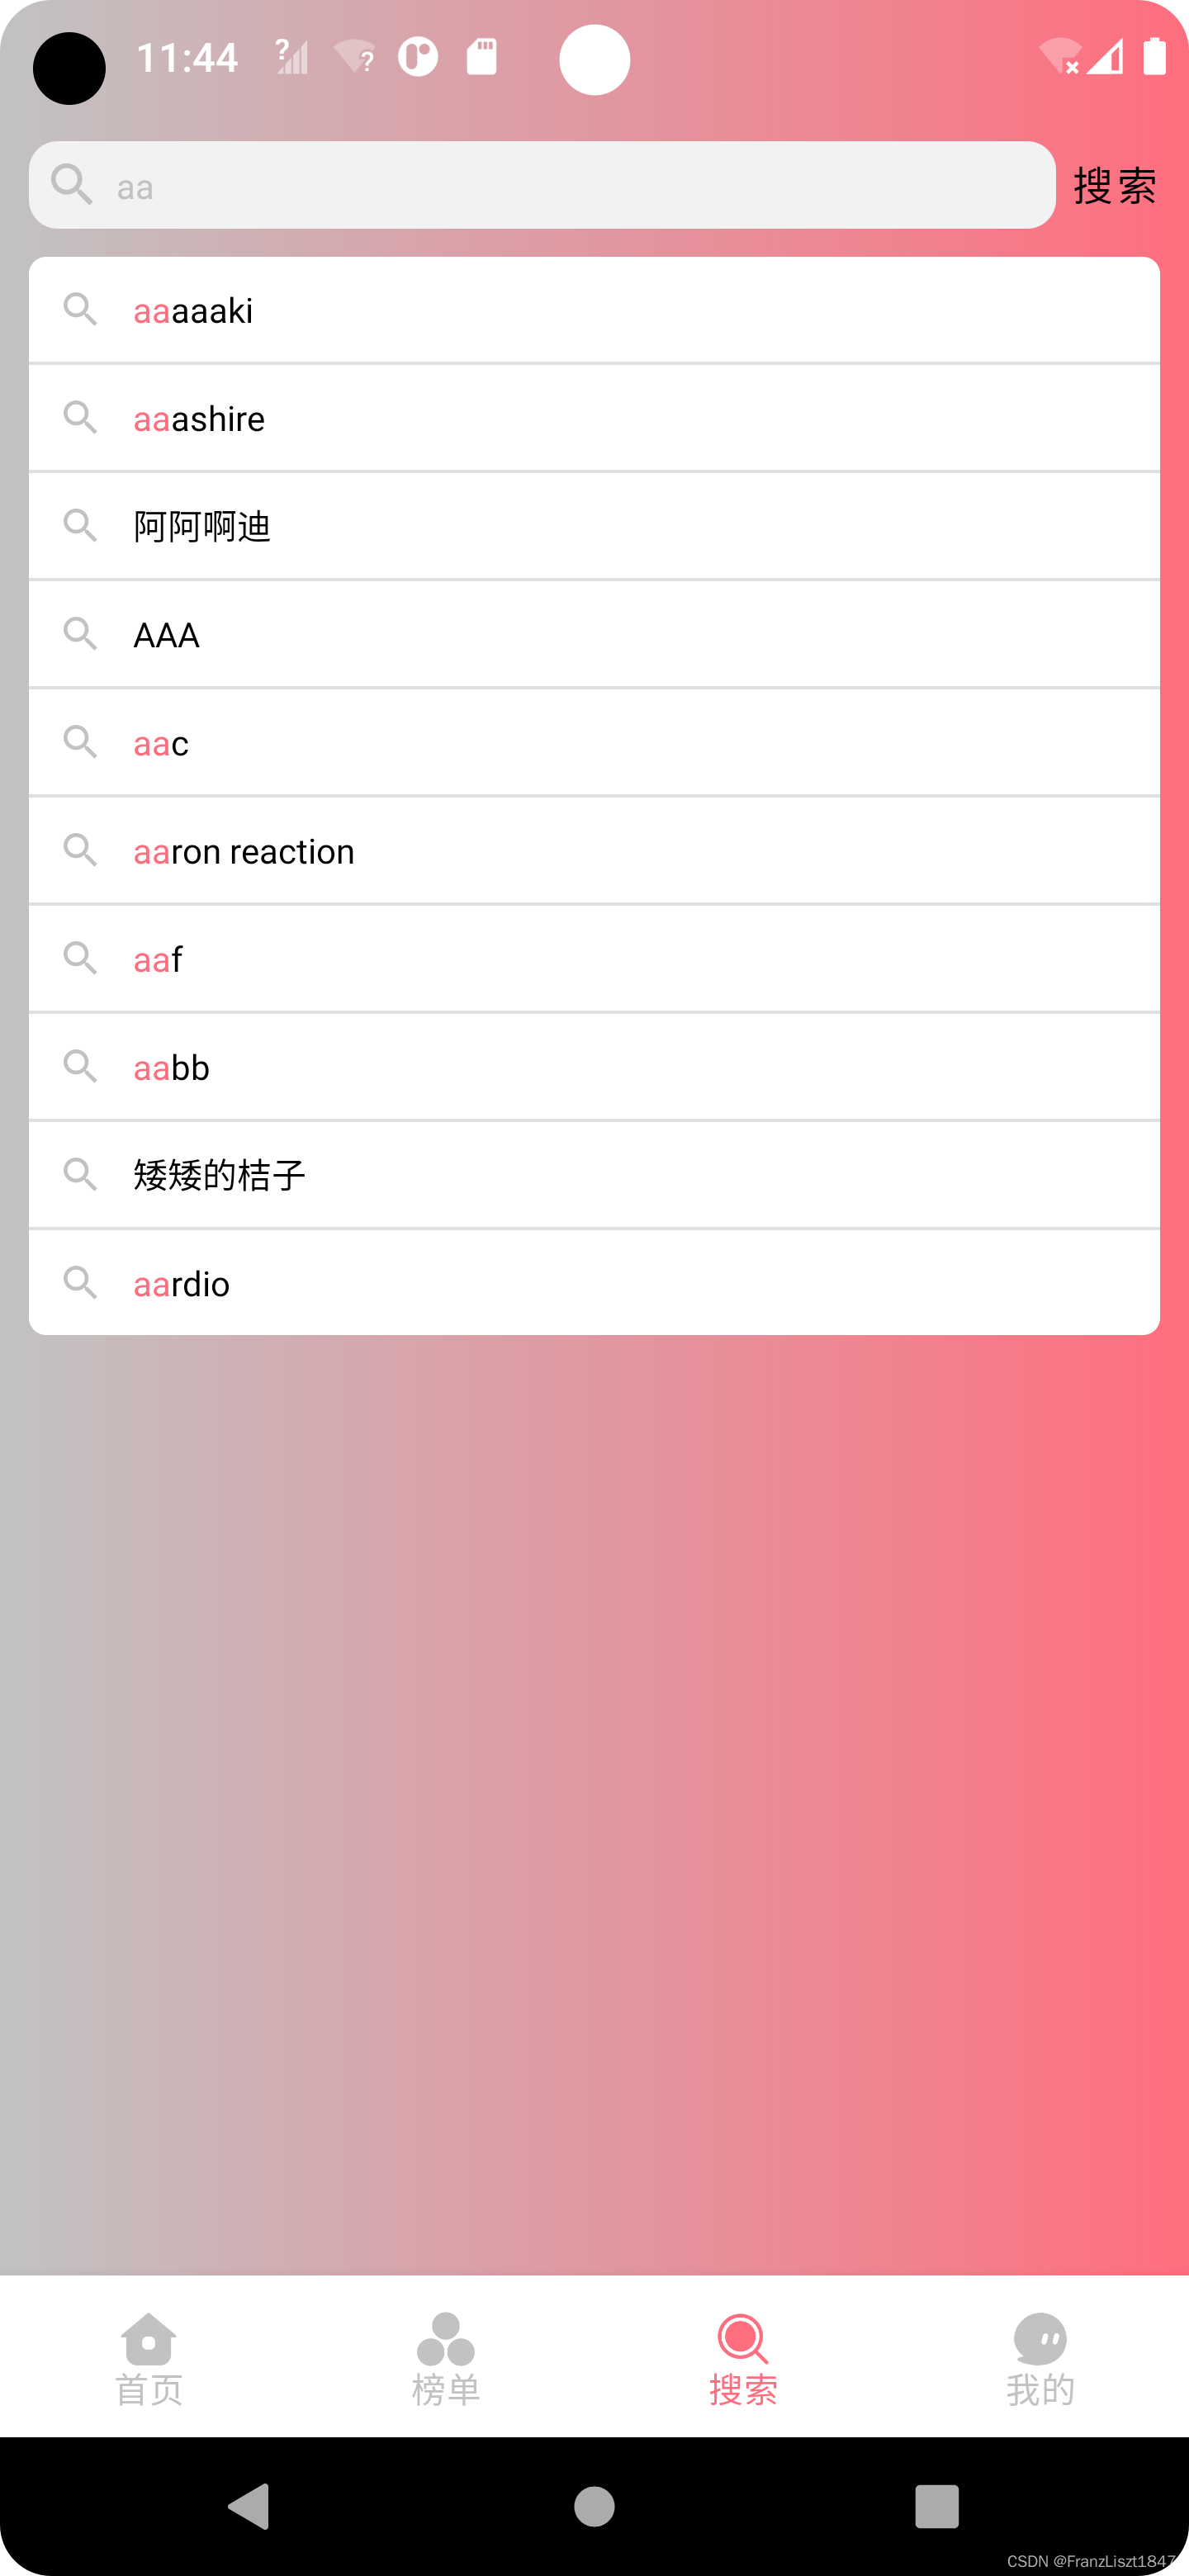
富文本
通过逐字匹配输入框内的字符与搜索建议item内容,然后输入框的字符存在搜索建议列表中的文字就加入高亮显示列表中,因为采用buildAnnotatedString,可以让文本显示多种不同风格,所以最后将字符内容区别为高亮颜色和普通文本两种文本,并让其进行显示
@Composable
fun RichText(
    selectColor: Color,
    unselectColor: Color,
    fontSize:TextUnit = TextUnit.Unspecified,
    searchValue: String,
    matchValue: String
){
    val richText = buildAnnotatedString {
        repeat(matchValue.length){
            val index = if (it < searchValue.length) matchValue.indexOf(searchValue[it]) else -1
            if (index == -1){
                withStyle(style = SpanStyle(
                    fontSize = fontSize,
                    color = unselectColor,
                )
                ){
                    append(matchValue[it])
                }
            }else{
                withStyle(style = SpanStyle(
                    fontSize = fontSize,
                    color = selectColor,
                )
                ){
                    append(matchValue[index])
                }
            }
        }
    }
    Text(
        text = richText,
        maxLines = 1,
        overflow = TextOverflow.Ellipsis,
        modifier = Modifier.fillMaxWidth(),
    )
}
搜索结果
搜索结果也是由ScrollableTabRow+HorizontalPager完成子页面的滑动切换,但是与上述不同的是,所展现的Tab与内容并不是固定,而是根据后端返回的数据进行自动生成的。由于其他子页面的内容都是由LazyColumn进行展现,而综合界面有需要将其他界面的数据进行集中,所以就必须LazyColumn嵌套LazyColumn,然后这在Compose中是不被允许的,所以就将子Page的LazyColumn,使用modifier.heightIn(max = screenHeight.dp)进行高度限制,高度可以取屏幕高度,并且多个item之间都是取屏幕高度,之间不会存在间隙

视频详情
视频播放功能暂未实现完成,因为获取的API返回的URL进行播放一直为403,被告知权限不足,在网上进行多番查询未果,所以暂且搁置。视频库采用的Google的ExoPlayer


合集
每个视频返回的内容数据格式一致,但具体内容不一致,有的视频存在排行信息、合集等,就通过AnimatedVisibility进行显示和隐藏,将所有结果进行列出,然后在ViewModel通过解析数据,并改变相应的状态值,view即可进行重组


信息
Coroutines进行网络请求管理,避免回调地狱
在日常开发中网络请求必不可少,在传统View+java开发中使用Retrifit或者okhttp进行网络请求最为常见,但大多数场景中,后一个API需要前一个API数据内字段值,此时就需要callback进行操作,回调一次获取代码依旧看起来简洁,可读,但次数一旦增多,则会掉入回调地狱。Google后续推出的协程完美解决此类问题,协程的主要核心就是“通过非阻塞的代码实现阻塞功能”,具体代码如下
添加suspend
以下为示例代码,通过给接口添加suspend标志符,告知外界次方法需要挂起
@GET("xxxxx")
    suspend fun getVideoDetail(@Query("aid")aid:Int):BaseResponse<VideoDetail>
withContext
getVideoDetail挂起函数返回一个字段值,然后通过withContext包裹,使其进行阻塞,然后将返回值进行返回,后续的getVideoUrl挂起函数就可以使用前一个接口返回的数据;需要注意的是,函数都需为suspend修饰的方法,并且在统一协程域中,否则会出现异常
 viewModelScope.launch(Dispatchers.Main) {
            try {
                withContext(Dispatchers.Main){
                    val cid = withContext(Dispatchers.IO){
                        getVideoDetail(_videoState.value.aid)
                    }
                    val url = withContext(Dispatchers.IO){
                        getVideoUrl(avid = _videoState.value.aid, cid = cid)
                    }
                    if (url.isNotEmpty()){
                        play(url)
                    }
                    getRelatedVideos(_videoState.value.aid)
                }
            }catch (e:Exception){
                Log.d("VDetailViewModel",e.message.toString())
            }
        }
Git项目链接
末
此Demo并未完全完善,尤其是播放界面,由于采用Bilibili API获取的视频URL,在播放时一直返回403错误,被告知没有权限,在根据文档进行使用以及网上查询未果之后,只能暂且搁置此功能。


 3417
3417

 被折叠的 条评论
为什么被折叠?
被折叠的 条评论
为什么被折叠?
 到【灌水乐园】发言


