


该框架包含拦截器逻辑、策略处理器、统一异常处理逻辑,可供学习改造,适合netty入门,以及简单架构设计原理,本架构还可以做非常多的改进和优化,比如可以使用注解等方式替代实现接口等
代码优点:
- 可自定义拦截器,环绕业务处理的前后逻辑,可自定义拦截器顺序,比如请求反序列化、解密、验签、解析,请求后的结果加密、序列化等等
- 可扩展的业务处理逻辑,简单实现接口,即可实现自动加载处理器处理对应业务
代码包结构:
- compent:组件包,包括channel管理器、请求和返回类型
- enums:没举包,包括请求code,返回code
- exception:统一业务异常
- filter:拦截器包
- handler:业务处理器包
- util:工具包
- App:启动入口
- IMServer:netty 服务端

执行流程讲解:

启动流程讲解:
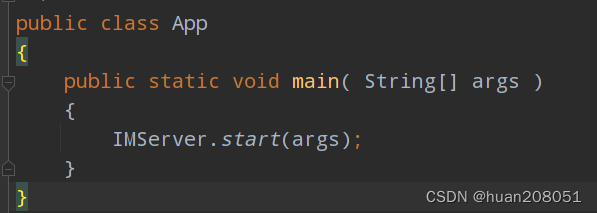
netty服务类入口:
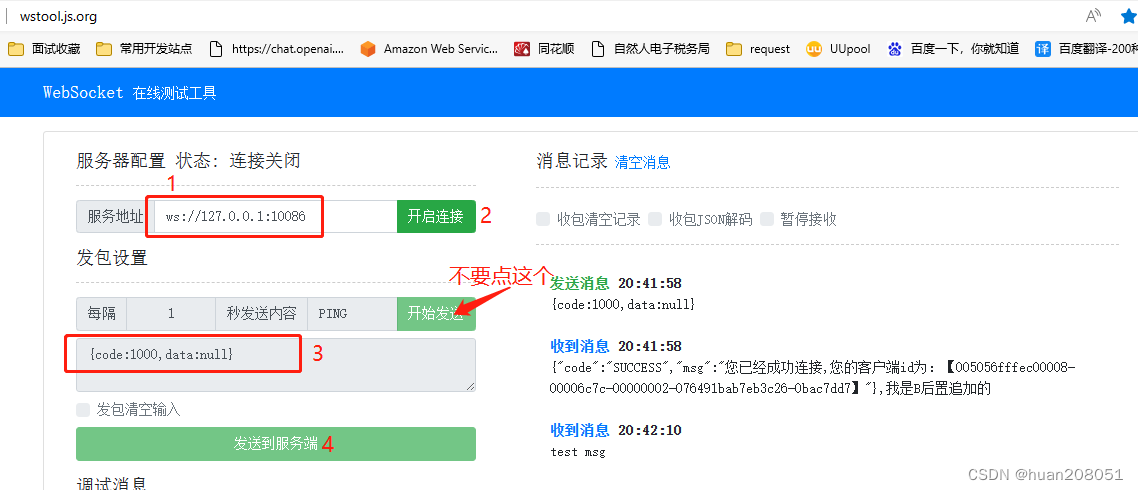
只需要调用IMServer.start()即可启动服务类,可以使用在线webSocket工具实现调试:
此类就是netty三段创建的模式代码,重点在我们自定义的处理器WebSocketDispatcher类
package org.example;

import io.netty.bootstrap.ServerBootstrap;
import io.netty.channel.ChannelInitializer;
import io.netty.channel.EventLoopGroup;
import io.netty.channel.nio.NioEventLoopGroup;
import io.netty.channel.socket.SocketChannel;
import io.netty.channel.socket.nio.NioServerSocketChannel;
import io.netty.handler.codec.http.HttpObjectAggregator;
import io.netty.handler.codec.http.HttpServerCodec;
import io.netty.handler.codec.http.websocketx.WebSocketServerProtocolHandler;
import io.netty.handler.codec.string.StringDecoder;
import io.netty.handler.codec.string.StringEncoder;
import io.netty.handler.stream.ChunkedWriteHandler;
import lombok.extern.slf4j.Slf4j;
import org.example.handler.Handler;
import org.example.handler.WebSocketDispatcher;
import org.example.util.RefrenceUtil;

import java.util.List;

@Slf4j
public class IMServer {
    public static void start(String[] args){
        int port = 10086;
        run(port);
    }

    private static void run(int port) {
        EventLoopGroup bossGroup = new NioEventLoopGroup();
        EventLoopGroup workerGroup  = new NioEventLoopGroup();

        ServerBootstrap bootstrap = new ServerBootstrap();
        bootstrap.group(bossGroup,workerGroup)
                .channel(NioServerSocketChannel.class)
                .childHandler(new ChannelInitializer<SocketChannel>() {
                    protected void initChannel(SocketChannel socketChannel) throws Exception {
                        socketChannel.pipeline()
                                .addLast(new HttpServerCodec())
                                .addLast(new ChunkedWriteHandler())
                                .addLast(new HttpObjectAggregator(1024*64))
                                .addLast(new WebSocketServerProtocolHandler("/"))
                                .addLast(new StringEncoder())
                                .addLast(new StringDecoder())
                                //本次逻辑重点
                                .addLast(new WebSocketDispatcher());
                    }
                });
        bootstrap.bind(port);
        log.info("服务在【{}】端口上启动成功",port);
    }
}
我们先看下WebSocketDispatcher类结构,其中红色部分是我们自定义的
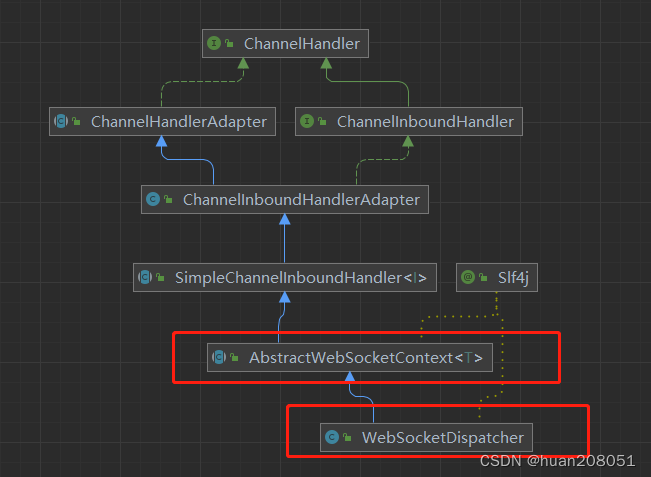
在有新链接连接时,会触发服务类的链式处理,最终会执行 new WebSocketDispatcher()方法,根据java执行逻辑,会先执行父类方法的构造器,此处会执行AbstractWebSocketContext.AbstractWebSocketContext()方法
AbstractWebSocketContext父类代码
下面是父类AbstractWebSocketContext代码,这块就是执行启动流程。
package org.example.handler;

import com.sun.org.apache.xpath.internal.operations.Or;
import io.netty.channel.SimpleChannelInboundHandler;
import lombok.extern.slf4j.Slf4j;
import org.example.enums.Code;
import org.example.filter.Filter;
import org.example.filter.FilterChain;
import org.example.filter.Order;
import org.example.util.RefrenceUtil;
import sun.security.util.ArrayUtil;

import java.util.*;
import java.util.concurrent.ConcurrentHashMap;
import java.util.concurrent.atomic.AtomicBoolean;

/**
 * 抽象的websocket,用来初始化加载拦截器、处理器
 * @param <T>
 */
@Slf4j
public abstract class AbstractWebSocketContext<T> extends SimpleChannelInboundHandler<T> {
    protected static Map<Code,Handler> registry = new ConcurrentHashMap<Code,Handler>();
    protected static FilterChain first;
    protected static FilterChain last;
    protected static final AtomicBoolean refresh = new AtomicBoolean(false);
    public AbstractWebSocketContext(){
        if(initWebSocket()){
            log.info("加载handler...");
            loadHandler();
            log.info("加载filter...");
            loadFilter();
        }else{
            log.warn("已经初始化过");
        }

    }


    private boolean initWebSocket() {
        if(refresh.get()){
            return false;
        }
        //只允许加载一次
        return refresh.compareAndSet(false,true);
    }

    private void loadFilter() {

        //加载所有拦截器

        final List<Class> allClassByInterface = RefrenceUtil.getAllClassByInterface(Filter.class);
        if(allClassByInterface!=null&&allClassByInterface.size()>0){
            List<Filter> filters = new ArrayList<Filter>();
            for(Class c:allClassByInterface){
                try {
                    final Filter filter = (Filter) c.newInstance();
                    filters.add(filter);
                } catch (InstantiationException e) {
                    e.printStackTrace();
                } catch (IllegalAccessException e) {
                    e.printStackTrace();
                }
            }

            if(filters.size()>0){

                //排序
                List<Filter> sorted = new ArrayList<>();
                final Iterator<Filter> iterator = filters.iterator();
                while (iterator.hasNext()){
                    Filter filter = iterator.next();
                    if(filter instanceof Order){
                        sorted.add(filter);
                        iterator.remove();
                    }
                }

                sorted.sort(new Comparator<Filter>() {
                    @Override
                    public int compare(Filter o1, Filter o2) {
                        Order order1 = (Order) o1;
                        Order order2 = (Order) o2;

                        return order1.getOrder() - order2.getOrder();
                    }
                });

                log.info("排序后:{}",Arrays.toString(sorted.toArray()));
                sorted.addAll(filters);
                log.info("添加未参与排序的后:{}",Arrays.toString(sorted.toArray()));

                FilterChain[] initCache = new FilterChain[sorted.size()];
                //快速初始化chain
                for(int i=0;i<sorted.size();i++){
                    FilterChain filterChain = new FilterChain();
                    filterChain.setCurrentFilter(sorted.get(i));
                    initCache[i] = filterChain;
                }
                //进行关联下一个
                for(int i=0;i<initCache.length-1;i++){
                    //current
                    FilterChain current = initCache[i];
                    FilterChain next = initCache[i+1];
                    current.setNextChain(next);
                }
                //关联上一个
                for(int i= initCache.length-1;i>0;i--){
                    //current
                    FilterChain current = initCache[i];
                    FilterChain pre = initCache[i-1];
                    current.setPreChain(pre);
                }
                log.info("注册的过滤器:{}",Arrays.toString(initCache));
                first = initCache[0];
                last = initCache[initCache.length-1];
            }
        }

    }

    private void loadHandler() {
        final List<Class> allClassByInterface = RefrenceUtil.getAllClassByInterface(Handler.class);
        //实例化,并且注册
        if(allClassByInterface!=null&&allClassByInterface.size()>0){
            for(Class c:allClassByInterface){
                try {
                    final Handler handler = (Handler) c.newInstance();
                    if(!registry.containsKey(handler.getCode())) {
                        registry.put(handler.getCode(), handler);
                        log.info("注册处理器,类型【{}】,描述【{}】",handler.getCode(),handler.getCode().getMsg());
                    }
                } catch (InstantiationException e) {
                    e.printStackTrace();
                } catch (IllegalAccessException e) {
                    e.printStackTrace();
                }
            }
        }

    }
}
- 构造器中,先使用CAS保证只加载一次初始化逻辑(每次有新链接,都会触发当前构造器,而当前逻辑只需要执行一次)
- 在首次加载时,加载系统中所有handler
- 加载所有实现了Handler接口的Class
- 实例化,并将实例放在父类的类成员 registry中
- 在首次加载时,加载系统中所有的Filter
- 加载所有实现了Filter接口的Class
- 实例化,并放入filters中
- 将所有同时实现了Order接口的实例存入sorted中,并从filters中移除
- 针对sorted进行排序
- 将其他未实现排序Order接口的实例(也就是filters),追加到sorted中
- 经过以上步骤,sorted中,已经包含所有排好序的Filter
- 先根据sorted创建FilterChain链式对象(该对象有两个指针,指向上一个和下一个FilterChain对象,以及当前需要执行的Filter)
- 经过第一次创建FilterChain对象,所有的FilterChain对象都已经创建好,但是两个指针还是空的,这个时候就类似于spring的二级缓存,有了对象,但属性为空。从第一个往后循环,将所有next指针填充好
- 跟上一步类似,只是从后往前,将pre指针填充好
- 获取第一个和最后一个FilterChain,然后赋值给父类属性的first和last,后续如果想要链式的调用Filter,即A->B->C,只需要调用A即可,所以就只保存A,由于我们的拦截器分为before逻辑(调用业务逻辑前执行的) 和 after逻辑(调用业务逻辑后执行的),所以,如果是调用before逻辑,则只需要调用A的before逻辑,会自动顺序往下执行。反之,调用C的after逻辑,则会C->B->A的反向调用所有after逻辑。具体调用逻辑,后面讲解。
- 至于子类WebSocketDispatcher并没有在构造器做什么,就先不展示。
执行流程讲解:
执行流程在WebSocketDispatcher中实现,该类继承AbstractWebSocketContext
package org.example.handler;

import com.alibaba.fastjson.JSON;
import io.netty.channel.ChannelHandlerContext;
import io.netty.channel.SimpleChannelInboundHandler;
import io.netty.handler.codec.http.websocketx.TextWebSocketFrame;
import lombok.extern.slf4j.Slf4j;
import org.example.compent.ChannelManager;
import org.example.compent.Command;
import org.example.compent.Result;
import org.example.enums.Code;
import org.example.exception.HandlerException;
import org.example.filter.FilterChain;

import java.util.Map;
import java.util.concurrent.ConcurrentHashMap;

@Slf4j
public class WebSocketDispatcher extends AbstractWebSocketContext<TextWebSocketFrame> {

    protected void channelRead0(ChannelHandlerContext channelHandlerContext, TextWebSocketFrame webSocketFrame) throws Exception {
        //转换为command对象
        try{
            final Command command = JSON.parseObject(webSocketFrame.text(), Command.class);
            if(command!=null){
                final Handler handler = registry.get(Code.match(command.getCode()));
                if(handler == null){
                    channelHandlerContext.channel().writeAndFlush(Result.fail("找不到指令对应的处理器"));
                }else{

                    TextWebSocketFrame res = doFilterBefore(channelHandlerContext,command);
                    if(res!=null){
                        channelHandlerContext.channel().writeAndFlush(res);
                        return;
                    }
                    res = handler.execut(channelHandlerContext, command);
                    res = doFilterAfter(channelHandlerContext,command,res);
                    if(res!=null){
                        channelHandlerContext.channel().writeAndFlush(res);
                    }
                }
            }else{
                channelHandlerContext.channel().writeAndFlush(Result.fail("指令格式异常"));
            }
        }catch (HandlerException e){
            e.printStackTrace();
            channelHandlerContext.channel().writeAndFlush(Result.fail(e.getMessage()));
        }catch (Exception e){
            e.printStackTrace();
            channelHandlerContext.channel().writeAndFlush(Result.fail("指令格式异常"));
        }
    }

    @Override
    public void channelInactive(ChannelHandlerContext ctx) throws Exception {
        super.channelInactive(ctx);
        String key = ctx.channel().id().asLongText();
        ChannelManager.remove(key);
    }

    //执行后置处理器
    private TextWebSocketFrame doFilterAfter(ChannelHandlerContext channelHandlerContext, Command command, TextWebSocketFrame res) throws HandlerException {
        return last.after(channelHandlerContext,command,res);
    }

    private TextWebSocketFrame doFilterBefore(ChannelHandlerContext channelHandlerContext, Command command) throws HandlerException {
        return first.before(channelHandlerContext,command);
    }
}
主要执行流程如下:
- 解析客户端发来的数据,序列化成Command对象(该对象只有code和data两个字段)
- 通过code,从父类注册的处理器中获取处理器
- 先执行Filter的before方法
- 执行first的before方法
- 链式执行到最后一个filter的before方法
- 如果任何一个filter返回了数据,则终止后续filter的执行(也包括业务逻辑处理),直接返回数据给客户端,这种设计,可以在filter中,直接决定后续逻辑,比如验签不通过,则不用让后面的filter继续执行了。

- 执行业务逻辑
- 执行Filter的after方法
- 执行last的after方法
- 从后往前链式执行到第一个filter的after方法
- 如果任何一个filter返回了数据,则将返回结果交给下一个filter继续处理结果,一直到最后一个filter,如果还是有数据返回,则返回给当前连接客户端。这种设计,可以让filter可以加工返回的数据,比如最后一个Filter对数据加密,倒数第二个,可以获取加密数据,继续签名。

核心逻辑讲解:
链式拦截器执行逻辑:
拦截器链式结构:
每一个Chain结构,包含三个属性,上一个Chain,当前Filter,下一个Chain
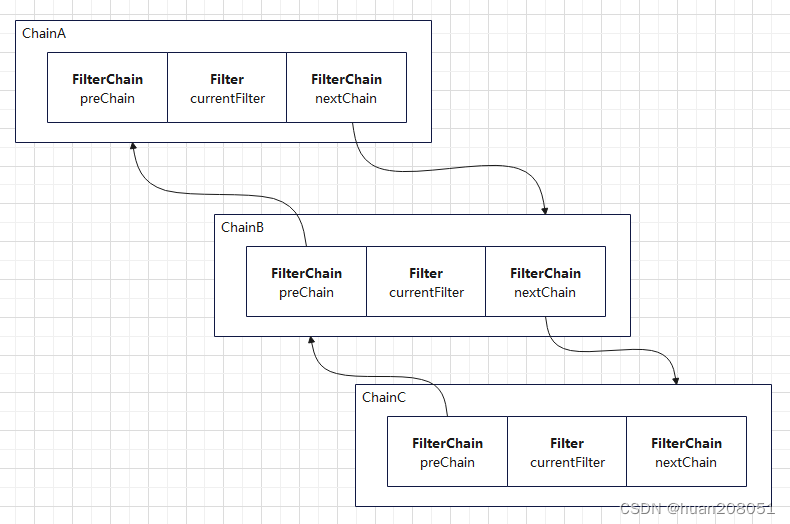
before的执行:
- 执行FilterChain的before,会先执行当前节点的Filter的before
- 如果返回值不为空,则直接返回
- 如果下一个FilterChain不为空,则执行下一个FilterChain的before,如果结果不为空,则直接返回
    public TextWebSocketFrame before(ChannelHandlerContext channelHandlerContext, Command command) throws HandlerException{
        TextWebSocketFrame b = currentFilter.before(channelHandlerContext, command);
        if(b!=null){
            return b;
        }
        if(nextChain!=null){
            b = nextChain.before(channelHandlerContext,command);
            if(b!=null){
                return b;
            }
        }
        return null;
    }
after的执行:
- 执行FilterChain的after,会先执行当前节点的Filter的after
- 如果上一个FilterChain不为空,则执行上一个FilterChain的after
    public TextWebSocketFrame after(ChannelHandlerContext channelHandlerContext, Command command, TextWebSocketFrame res) throws HandlerException{
        TextWebSocketFrame b = currentFilter.after(channelHandlerContext, command,res);
        if(preChain!=null){
            b = preChain.after(channelHandlerContext,command,b);
        }
        return b;
    }
效果演示:
1、启动时自动加载业务处理器和拦截器

2、执行业务逻辑时,会被拦截器按正序执行before-->业务逻辑-->倒叙执行after

如何扩展业务逻辑和拦截器
业务逻辑扩展
1、添加业务枚举,code对应客户端发送的指令code
package org.example.enums;

import lombok.AllArgsConstructor;
import lombok.Getter;

import java.util.HashMap;
import java.util.Map;

@AllArgsConstructor
@Getter
public enum Code {
   CONNECTION("1000","请求连接"),
    SEND_MSG("1001","发送消息"),
    UNKNOWN("-1","未知的命令");
   private String code;
   private String msg;

   private static final Map<String,Code> cache = new HashMap();

   public static Code match(String code){

       //from cache
       if(cache.containsKey(code)){
           return cache.get(code);
       }

       for(Code c:Code.values()){
           if(c.getCode().compareTo(code)==0){
               cache.put(code,c);
               return c;
           }
       }
       return UNKNOWN;
   }

}
2、实现Handler接口,在getCode中,返回对应枚举
package org.example.handler;

import io.netty.channel.ChannelHandlerContext;
import io.netty.handler.codec.http.websocketx.TextWebSocketFrame;
import lombok.extern.slf4j.Slf4j;
import org.example.compent.ChannelManager;
import org.example.compent.Command;
import org.example.compent.Result;
import org.example.enums.Code;
import org.example.exception.HandlerException;

@Slf4j
public class ConnectionHandler implements Handler {

    public Code getCode() {
        return Code.CONNECTION;
    }

    public TextWebSocketFrame execut(ChannelHandlerContext ctx, Command command) throws HandlerException {
        ChannelManager.add(ctx.channel().id().asLongText(),ctx.channel());
        return Result.success("您已经成功连接,您的客户端id为:【"+ctx.channel().id().asLongText()+"】");
    }
}
3、在execut中实现自定义业务逻辑
拦截器扩展
1、实现Filter接口,实现before方法(如果返回不为空,则会终止后续拦截器和业务逻辑执行,并且返回内容,会被发送至客户端),实现after方法。如果不指定Order排序,下图中可不实现Order接口(不指定排序的拦截器,在排序时,会放在所有有Order定义的拦截器后面)
package org.example.filter;

import io.netty.channel.ChannelHandlerContext;
import io.netty.handler.codec.http.websocketx.TextWebSocketFrame;
import lombok.extern.slf4j.Slf4j;
import org.example.compent.Command;
import org.example.exception.HandlerException;

@Slf4j
public class CFilter implements Filter,Order{
    @Override
    public TextWebSocketFrame before(ChannelHandlerContext channelHandlerContext, Command command) throws HandlerException {
        log.info("C before");
        return null;
    }

    @Override
    public TextWebSocketFrame after(ChannelHandlerContext channelHandlerContext, Command command, TextWebSocketFrame res) throws HandlerException {
        log.info("C after");
        return res;
    }

    @Override
    public int getOrder() {
        return 80;
    }
}
2、如果需要指定拦截器的顺序,则实现Order接口(上图),并实现getOrder方法,该方法返回数据越小,拦截器执行before的顺序越靠前,执行after的执行顺序越靠后。
附录
1、环境:
jdk1.8
2、pom文件:
<project xmlns="http://maven.apache.org/POM/4.0.0" xmlns:xsi="http://www.w3.org/2001/XMLSchema-instance"
  xsi:schemaLocation="http://maven.apache.org/POM/4.0.0 http://maven.apache.org/xsd/maven-4.0.0.xsd">
  <modelVersion>4.0.0</modelVersion>

  <groupId>org.example</groupId>
  <artifactId>netty3</artifactId>
  <version>1.0-SNAPSHOT</version>
    <build>
        <plugins>
            <plugin>
                <groupId>org.apache.maven.plugins</groupId>
                <artifactId>maven-compiler-plugin</artifactId>
                <configuration>
                    <source>8</source>
                    <target>8</target>
                </configuration>
            </plugin>
        </plugins>
    </build>
    <packaging>jar</packaging>

  <name>netty3</name>
  <url>http://maven.apache.org</url>

  <properties>
    <project.build.sourceEncoding>UTF-8</project.build.sourceEncoding>
  </properties>

  <dependencies>
    <dependency>
      <groupId>junit</groupId>
      <artifactId>junit</artifactId>
      <version>3.8.1</version>
      <scope>test</scope>
    </dependency>
    <dependency>
      <groupId>io.netty</groupId>
      <artifactId>netty-all</artifactId>
      <version>4.1.90.Final</version>
    </dependency>
    <dependency>
      <groupId>ch.qos.logback</groupId>
      <artifactId>logback-classic</artifactId>
      <version>1.3.0</version>
    </dependency>
    <dependency>
      <groupId>org.projectlombok</groupId>
      <artifactId>lombok</artifactId>
      <version>1.16.22</version>
    </dependency>
    <dependency>
      <groupId>com.alibaba</groupId>
      <artifactId>fastjson</artifactId>
      <version>2.0.25</version>
    </dependency>
  </dependencies>
</project>
3、demo源码路径:
gitee:netty3: 简单容易扩展自定义拦截器、处理器的框架demo (gitee.com)
拉下来执行执行App.main()即可,默认10086端口
如有问题,可以私信我。创作不易,还请关注、留言、点赞,谢谢!!!


 286
286


 被折叠的 条评论
为什么被折叠?
被折叠的 条评论
为什么被折叠?
 到【灌水乐园】发言


