


Android开发中的二维码扫描
现在Android开发中使用二维码扫描功能越来越多,本篇博客具体讲一下其使用方法:
- 添加依赖
- 在自己的Activity或者Fragment中使用添加关于扫描的链接
- 添加二维码扫描的相关Activity
- 对扫描数据进行解析
- 在返回Activity中做相应处理
添加依赖
首先在gradle中添加所要依赖的jar包,在github中有一个评价比较高的开源库,zxing。 [ 传送门 ]
     repositories {
        jcenter()
    }
dependencies {
     compile 'com.google.zxing:core:3.3.0'
     compile 'com.journeyapps:zxing-android-embedded:3.3.0'
     }
具体的版本则根据最新的版本使用。
添加扫描链接
一般情况下,我们在自己的Activity中通过一个点击事件来进入二维码扫描页面,在这里,我就用一个Button来表示:
      Button button = (Button) findViewById(R.id.erweima);
        button.setOnClickListener(new View.OnClickListener() {
            @Override
            public void onClick(View v) {
                customScan();
            }
        });
      public void customScan() {
        //Activity中的初始化方式
       new IntentIntegrator(this)
                .setOrientationLocked(false)
                .setCaptureActivity(CustomScanActivity.class) // 设置自定义的activity是CustomActivity
                .initiateScan(); // 初始化扫描
       //Fragment中的初始化方式
       IntentIntegrator.forSupportFragment(this)
                .setOrientationLocked(false)
                .setCaptureActivity(CustomScanActivity.class)
                .initiateScan();
可以看出,在Activity中与在Fragment中两者的初始化方式是有很大的区别的。
二维码界面
视图
<?xml version="1.0" encoding="utf-8"?>
<RelativeLayout xmlns:android="http://schemas.android.com/apk/res/android"
    xmlns:app="http://schemas.android.com/apk/res-auto"
    xmlns:tools="http://schemas.android.com/tools"
    android:layout_width="match_parent"
    android:layout_height="match_parent"
    tools:context="com.example.customscan.CustomScanActivity">


    <com.journeyapps.barcodescanner.DecoratedBarcodeView
        android:id="@+id/dbv_custom"
        android:layout_width="match_parent"
        android:layout_height="match_parent"
        app:zxing_framing_rect_height="250dp"
        app:zxing_framing_rect_width="250dp"
        app:zxing_preview_scaling_strategy="fitXY"
        app:zxing_use_texture_view="true">
    </com.journeyapps.barcodescanner.DecoratedBarcodeView>
    <Button
        android:id="@+id/btn_switch"
        android:layout_width="wrap_content"
        android:layout_height="wrap_content"
        android:layout_centerHorizontal="true"
        android:layout_alignParentBottom="true"
        android:textColor="#fff"
        android:text="打开闪光灯"
        android:layout_marginBottom="10dp"
        android:background="@drawable/button"/>
</RelativeLayout>
代码
public class CustomScanActivity extends AppCompatActivity implements DecoratedBarcodeView.TorchListener{
    private DecoratedBarcodeView mDBV;
    private CaptureManager captureManager;
    private boolean isLightOn = false;
    @Override
    protected void onCreate(Bundle savedInstanceState) {
        super.onCreate(savedInstanceState);
        setContentView(R.layout.activity_custom_scan);

        Button swichLight = (Button) findViewById(R.id.btn_switch);
        mDBV = (DecoratedBarcodeView) findViewById(R.id.dbv_custom);
        mDBV.setTorchListener(this);
        swichLight.setOnClickListener(new View.OnClickListener() {
            @Override
            public void onClick(View v) {
                if(isLightOn){
                    mDBV.setTorchOff();
                }else{
                    mDBV.setTorchOn();
                }
            }
        });

        if(!hasFlash()) {
            swichLight.setVisibility(View.GONE);
        }

        //重要代码,初始化捕获
        captureManager = new CaptureManager(this,mDBV);
        captureManager.initializeFromIntent(getIntent(),savedInstanceState);
        captureManager.decode();
    }

    @Override
    public void onTorchOn() {
        Toast.makeText(this,"torch on",Toast.LENGTH_LONG).show();
        isLightOn = true;
    }

    @Override
    public void onTorchOff() {
        Toast.makeText(this,"torch off",Toast.LENGTH_LONG).show();
        isLightOn = false;
    }

    @Override
    protected void onSaveInstanceState(Bundle outState) {
        super.onSaveInstanceState(outState);
        captureManager.onSaveInstanceState(outState);
    }

    @Override
    protected void onResume() {
        super.onResume();
        captureManager.onResume();
    }

    @Override
    protected void onPause() {
        super.onPause();
        captureManager.onPause();
    }

    @Override
    protected void onDestroy() {
        super.onDestroy();
        captureManager.onDestroy();
    }

    private boolean hasFlash() {
        return getApplicationContext().getPackageManager()
                .hasSystemFeature(PackageManager.FEATURE_CAMERA_FLASH);
    }

}
这里就是二维码Activity中的操作了, 在这里,我加了一个打开闪光灯的按钮,这个功能也在越来越多的项目中用到了。
回调方法
接下来就是在MainActivity中的回调了,我们在Activity中的onActivityResult方法中进行回调。
 @Override
    protected void onActivityResult(int requestCode, int resultCode, Intent data) {
        if (resultCode != RESULT_OK) {
            return;
        }
            IntentResult intentResult = IntentIntegrator.parseActivityResult(requestCode, resultCode, data);
            if (intentResult != null) {
                if (intentResult.getContents() == null) {
                    Toast.makeText(this, "内容为空", Toast.LENGTH_LONG).show();
                } else {
                    Toast.makeText(this, "扫描成功", Toast.LENGTH_LONG).show();
                    String ScanResult = intentResult.getContents();
                    Toast.makeText(this, ScanResult, Toast.LENGTH_LONG).show();
                }
            } else {
                super.onActivityResult(requestCode, resultCode, data);
            }
        }
好了,到这里扫描二维码的功能就可以实现了,但是在这个中我们可以看到,在扫描界面最下方有一行字提示将二维码放到扫描框中,但是这里字太小,也特别靠底部,所以我们来更改一下他的类型,但是在自己写的二维码扫描界面上没有这个设置,那么它应该在哪里更改呢,就在这里:
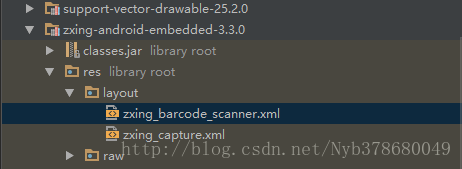
开打这个资源文件,更改它的TextView就可以改变下面那一行字的位置以及大小了。
<?xml version="1.0" encoding="utf-8"?>
<merge xmlns:android="http://schemas.android.com/apk/res/android"
    xmlns:tools="http://schemas.android.com/tools">

    <com.journeyapps.barcodescanner.BarcodeView
        android:id="@+id/zxing_barcode_surface"
        android:layout_width="match_parent"
        android:layout_height="match_parent" />

    <com.journeyapps.barcodescanner.ViewfinderView
        android:id="@+id/zxing_viewfinder_view"
        android:layout_width="match_parent"
        android:layout_height="match_parent" />

    <TextView
        android:id="@+id/zxing_status_view"
        android:layout_width="wrap_content"
        android:layout_height="wrap_content"
        android:layout_gravity="bottom|center_horizontal"
        android:background="@color/zxing_transparent"
        android:text="@string/zxing_msg_default_status"
        android:textColor="@color/zxing_status_text"
        android:textSize="18sp"
        android:layout_marginBottom="100dp"/>
</merge>
以上就是关于二维码扫描功能的全部介绍了,希望可以帮到大家。


 549
549


 被折叠的 条评论
为什么被折叠?
被折叠的 条评论
为什么被折叠?
 到【灌水乐园】发言


