


一、痛点:一条测试数据对应一个测试方法
前面的章节中我们已经写代码实现了登录接口的处理调用,但是一个接口往往是需要多条测试用例才能完整的覆盖到每一种情况,针对于单接口多条测试用例需要执行的情况,该如何处理呢,可能很多人最先想到的就是:一条测试数据对应一个测试方法?下面有一个注册接口,我们基于此思路来编码实现接口的完整测试。
1) 接口业务:会员注册
2) 接口地址:https://www.bilibili.com/video/BV1w3411q7BP/
3) 接口参数:mobilephone+pwd
4) 接口响应:json格式的报文
关于这个接口的更多详细的细节我们可以从公司提供的接口文档中获取,在公司里面做接口项目的测试,不管是自动化测试还是非自动化,都会有这样的一个文档描述接口项目中的每一个接口的细节,包括业务,接口地址,参数,响应报文中的字段以及格式,这是我们在测试前编写测试用例的重要参考文献,大部分接口文档的撰写都大同小异,关于接口的一些重要信息一般都会涵盖到,比如以下接口文档关于注册接口的描述:
现在我们整理得到一条正向用例和几条反向用例:
1.合格手机号,合格密码
2.重复以上的手机号,密码
3.传手机号,不传密码
4.不传手机号,传密码
5.不合格的手机号
6.合格的手机号,不合格密码
编写测试类,每条用例,准备一个测试方法:test1-test6对应上面每种测试情况: test1方法(mobilephone:18999700122;pwd:123456):
-
@Test -
public void test1(){ -
String restUrl = "http://119.23.241.154:8080/futureloan/mvc/api/member/register"; -
//1.创建post对象,以post方式提交接口请求 -
HttpPost httpPost = new HttpPost(restUrl); -
//2.准备提交参数 -
List<NameValuePair> params = new ArrayList<NameValuePair>(); -
BasicNameValuePair basicNameValuePair1 = new BasicNameValuePair("mobilephone", "18999700122"); -
BasicNameValuePair basicNameValuePair2 = new BasicNameValuePair("pwd", "123456"); -
params.add(basicNameValuePair1); -
params.add(basicNameValuePair2); -
//3.参数封装到请求体当中 -
try { -
httpPost.setEntity(new UrlEncodedFormEntity(params)); -
System.out.println("method:"+httpPost.getMethod()); -
//4.准备客户端 -
CloseableHttpClient httpClient = HttpClients.createDefault(); -
//5.提交请求 -
CloseableHttpResponse httpResponse = httpClient.execute(httpPost); -
//6.解析接口返回数据,返回字符串 -
String result = EntityUtils.toString(httpResponse.getEntity()); -
//7.输出结果到控制台验证数据 -
System.out.println("*********返回数据:"+result); -
} catch (Exception e) { -
// TODO Auto-generated catch block -
e.printStackTrace(); -
} -
}
![]()
test2方法(mobilephone:18999700122;pwd:123456)
-
@Test -
public void test1(){ -
String restUrl = "http://119.23.241.154:8080/futureloan/mvc/api/member/register"; -
//1.创建post对象,以post方式提交接口请求 -
HttpPost httpPost = new HttpPost(restUrl); -
//2.准备提交参数 -
List<NameValuePair> params = new ArrayList<NameValuePair>(); -
BasicNameValuePair basicNameValuePair1 = new BasicNameValuePair("mobilephone", "18999700122"); -
BasicNameValuePair basicNameValuePair2 = new BasicNameValuePair("pwd", "123456"); -
params.add(basicNameValuePair1); -
params.add(basicNameValuePair2); -
//3.参数封装到请求体当中 -
try { -
httpPost.setEntity(new UrlEncodedFormEntity(params)); -
System.out.println("method:"+httpPost.getMethod()); -
//4.准备客户端 -
CloseableHttpClient httpClient = HttpClients.createDefault(); -
//5.提交请求 -
CloseableHttpResponse httpResponse = httpClient.execute(httpPost); -
//6.解析接口返回数据,返回字符串 -
String result = EntityUtils.toString(httpResponse.getEntity()); -
//7.输出结果到控制台验证数据 -
System.out.println("*********返回数据:"+result); -
} catch (Exception e) { -
// TODO Auto-generated catch block -
e.printStackTrace(); -
} -
}
![]()
test3方法(mobilephone:18999700122;pwd:空)
-
@Test -
public void test3(){ -
String restUrl = "http://119.23.241.154:8080/futureloan/mvc/api/member/register"; -
//1.创建post对象,以post方式提交接口请求 -
HttpPost httpPost = new HttpPost(restUrl); -
//2.准备提交参数 -
List<NameValuePair> params = new ArrayList<NameValuePair>(); -
BasicNameValuePair basicNameValuePair1 = new BasicNameValuePair("mobilephone", "18999700122"); -
BasicNameValuePair basicNameValuePair2 = new BasicNameValuePair("pwd", ""); -
params.add(basicNameValuePair1); -
params.add(basicNameValuePair2); -
//3.参数封装到请求体当中 -
try { -
httpPost.setEntity(new UrlEncodedFormEntity(params)); -
System.out.println("method:"+httpPost.getMethod()); -
//4.准备客户端 -
CloseableHttpClient httpClient = HttpClients.createDefault(); -
//5.提交请求 -
CloseableHttpResponse httpResponse = httpClient.execute(httpPost); -
//6.解析接口返回数据,返回字符串 -
String result = EntityUtils.toString(httpResponse.getEntity()); -
//7.输出结果到控制台验证数据 -
System.out.println("*********返回数据:"+result); -
} catch (Exception e) { -
// TODO Auto-generated catch block -
e.printStackTrace(); -
} -
}
![]()
test4方法(mobilephone:空;password:123456)
-
@Test -
public void test3(){ -
String restUrl = "http://119.23.241.154:8080/futureloan/mvc/api/member/register"; -
//1.创建post对象,以post方式提交接口请求 -
HttpPost httpPost = new HttpPost(restUrl); -
//2.准备提交参数 -
List<NameValuePair> params = new ArrayList<NameValuePair>(); -
BasicNameValuePair basicNameValuePair1 = new BasicNameValuePair("mobilephone", ""); -
BasicNameValuePair basicNameValuePair2 = new BasicNameValuePair("pwd", "123456"); -
params.add(basicNameValuePair1); -
params.add(basicNameValuePair2); -
//3.参数封装到请求体当中 -
try { -
httpPost.setEntity(new UrlEncodedFormEntity(params)); -
System.out.println("method:"+httpPost.getMethod()); -
//4.准备客户端 -
CloseableHttpClient httpClient = HttpClients.createDefault(); -
//5.提交请求 -
CloseableHttpResponse httpResponse = httpClient.execute(httpPost); -
//6.解析接口返回数据,返回字符串 -
String result = EntityUtils.toString(httpResponse.getEntity()); -
//7.输出结果到控制台验证数据 -
System.out.println("*********返回数据:"+result); -
} catch (Exception e) { -
// TODO Auto-generated catch block -
e.printStackTrace(); -
} -
}
![]()
test5方法(mobilephone:189;password:123456)
-
@Test -
public void test3(){ -
String restUrl = "http://119.23.241.154:8080/futureloan/mvc/api/member/register"; -
//1.创建post对象,以post方式提交接口请求 -
HttpPost httpPost = new HttpPost(restUrl); -
//2.准备提交参数 -
List<NameValuePair> params = new ArrayList<NameValuePair>(); -
BasicNameValuePair basicNameValuePair1 = new BasicNameValuePair("mobilephone", "189"); -
BasicNameValuePair basicNameValuePair2 = new BasicNameValuePair("pwd", "123456"); -
params.add(basicNameValuePair1); -
params.add(basicNameValuePair2); -
//3.参数封装到请求体当中 -
try { -
httpPost.setEntity(new UrlEncodedFormEntity(params)); -
System.out.println("method:"+httpPost.getMethod()); -
//4.准备客户端 -
CloseableHttpClient httpClient = HttpClients.createDefault(); -
//5.提交请求 -
CloseableHttpResponse httpResponse = httpClient.execute(httpPost); -
//6.解析接口返回数据,返回字符串 -
String result = EntityUtils.toString(httpResponse.getEntity()); -
//7.输出结果到控制台验证数据 -
System.out.println("*********返回数据:"+result); -
} catch (Exception e) { -
// TODO Auto-generated catch block -
e.printStackTrace(); -
} -
}
![]()
test6(mobilephone:18999700122;password:123456789)
-
@Test -
public void test3(){ -
String restUrl = "http://119.23.241.154:8080/futureloan/mvc/api/member/register"; -
//1.创建post对象,以post方式提交接口请求 -
HttpPost httpPost = new HttpPost(restUrl); -
//2.准备提交参数 -
List<NameValuePair> params = new ArrayList<NameValuePair>(); -
BasicNameValuePair basicNameValuePair1 = new BasicNameValuePair("mobilephone", "18999700122"); -
BasicNameValuePair basicNameValuePair2 = new BasicNameValuePair("pwd", "123456789"); -
params.add(basicNameValuePair1); -
params.add(basicNameValuePair2); -
//3.参数封装到请求体当中 -
try { -
httpPost.setEntity(new UrlEncodedFormEntity(params)); -
System.out.println("method:"+httpPost.getMethod()); -
//4.准备客户端 -
CloseableHttpClient httpClient = HttpClients.createDefault(); -
//5.提交请求 -
CloseableHttpResponse httpResponse = httpClient.execute(httpPost); -
//6.解析接口返回数据,返回字符串 -
String result = EntityUtils.toString(httpResponse.getEntity()); -
//7.输出结果到控制台验证数据 -
System.out.println("*********返回数据:"+result); -
} catch (Exception e) { -
// TODO Auto-generated catch block -
e.printStackTrace(); -
} -
}
![]()
执行完毕,我们可以看到六个测试方法都有响应数据返回。
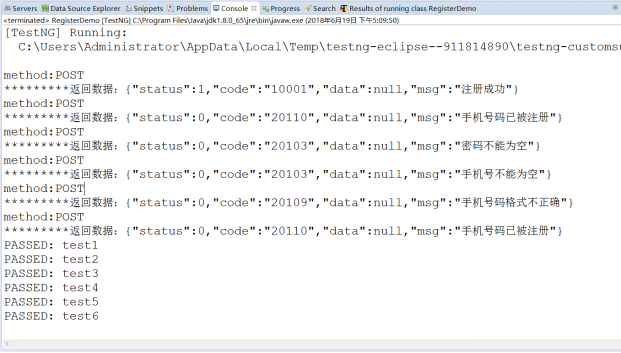
说明这种设计是可以达到我们的目的,但是问题是什么?
我们看到每个方法的代码几乎是一模一样,除了测试数据。目前我们只设计了六条用例,试想,如果有七组,八组,九组...更多组的测试数据,那么将会有更多的重复代码,这样的设计简直就是灾难性的。
二、痛点解决
上面已经将问题抛出,我们该如何去解决这个问题呢?
第一种办法是我们自己去编码实现一条解决方案,但是成本太高,而且可能写出来的框架有很多问题。
第二种办法就是去找一些第三方的框架来帮助我们来解决这个问题,而testng正式我们想要找的这样一个框架,testng的数据提供者技术就能帮我们优雅的解决这个痛点,我们准备一个测试方法就可以了。
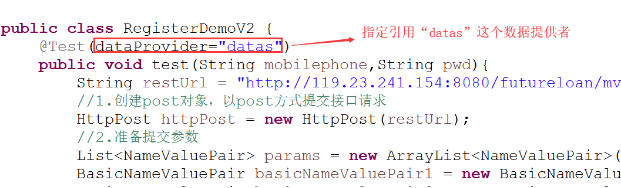
测试方法代码:
-
@Test(dataprrovider=”datas”) -
public void test(String mobilephone,String pwd){ -
String restUrl = "http://119.23.241.154:8080/futureloan/mvc/api/member/register"; -
//1.创建post对象,以post方式提交接口请求 -
HttpPost httpPost = new HttpPost(restUrl); -
//2.准备提交参数 -
List<NameValuePair> params = new ArrayList<NameValuePair>(); -
BasicNameValuePair basicNameValuePair1 = new BasicNameValuePair("mobilephone", mobilephone); -
BasicNameValuePair basicNameValuePair2 = new BasicNameValuePair("pwd", pwd); -
params.add(basicNameValuePair1); -
params.add(basicNameValuePair2); -
//3.参数封装到请求体当中 -
try { -
httpPost.setEntity(new UrlEncodedFormEntity(params)); -
System.out.println("method:"+httpPost.getMethod()); -
//4.准备客户端 -
CloseableHttpClient httpClient = HttpClients.createDefault(); -
//5.提交请求 -
CloseableHttpResponse httpResponse = httpClient.execute(httpPost); -
//6.解析接口返回数据,返回字符串 -
String result = EntityUtils.toString(httpResponse.getEntity()); -
//7.输出结果到控制台验证数据 -
System.out.println("*********返回数据:"+result); -
} catch (Exception e) { -
// TODO Auto-generated catch block -
e.printStackTrace(); -
} -
}
![]()
代码改动:
1) 测试方法上多了两个参数

2) 代码中直接绑定参数

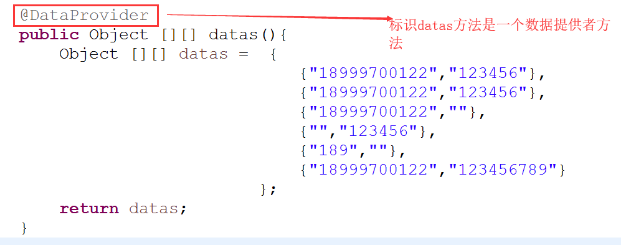
数据提供者代码:
① 数据提供者的作用就是提供几组测试数据给测试方法,方法的返回值必须是二维数组,并且此方法要用@DataProvider来标注:
② 测试方法如果要引用数据提供者则必须指定数据提供者的名字:
测试用例执行结果为:
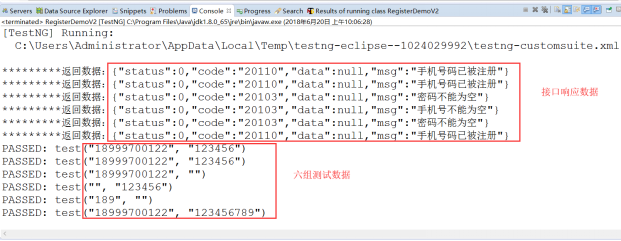
总结:
对于同一接口的批量测试,变动的数据可能就只有测试数据,因此,我们我们可以考虑通过@Dataprovider来提供几组测试数据,测试方法引用了dataprovider后就能拿到数据,依次注入完成批量测试,从而简化代码,简化测试。
三、 思路延伸
数据提供者能依次提供测试数据的功能固然很好,但是我们需要的这些测试数据来自于哪里呢。像上面那样直接定义在代码当中,其实属于硬编码的情况,耦合性很高,一旦我们要修改测试数据,那么我们就必须修改代码,而频繁的修改代码就可能导致各种不可预期的问题,要实现一个好的自动化测试框架应该尽可能保证代码的健壮性和兼容性。
那么问题来了,数据源的问题怎么解决?
感谢每一个认真阅读我文章的人,礼尚往来总是要有的,虽然不是什么很值钱的东西,如果你用得到的话可以直接拿走:
这些资料,对于【软件测试】的朋友来说应该是最全面最完整的备战仓库,这个仓库也陪伴上万个测试工程师们走过最艰难的路程,希望也能帮助到你!有需要的小伙伴可以点击下方小卡片领取


 574
574


 被折叠的 条评论
为什么被折叠?
被折叠的 条评论
为什么被折叠?
 到【灌水乐园】发言


