


环境:
主机名:k8s-master-122/ip:192.168.0.122/主节点
主机名:k8s-master-121/ip:192.168.0.121/主节点
主机名:k8s-node-120/ip:192.168.0.120/从节点
主机名:k8s-node-119/ip:192.168.0.119/从节点
优化
关闭防火墙和selinux
在/etc/hosts中添加主机解析
vim  /etc/hosts
192.168.0.121	k8s-master-121
192.168.0.120	k8s-node-120
192.168.0.119	k8s-node-119
192.168.0.122	k8s-master-122
ssh免密
## 生成密钥
ssh-keygen -t rsa

## 公钥复制到其他主机
ssh-copy-id k8s-master-121
ssh-copy-id k8s-master-122
ssh-copy-id k8s-node-120
ssh-copy-id k8s-node-119
升级内核
#导入公钥
rpm --import https://www.elrepo.org/RPM-GPG-KEY-elrepo.org

#安装yum源
yum install -y  https://www.elrepo.org/elrepo-release-7.el7.elrepo.noarch.rpm

#安装内核
yum --enablerepo elrepo-kernel -y install kernel-lt

#设置5.4内核为默认启动内核
grub2-set-default 0
grub2-reboot 0

#重启服务器
reboot

#查看内核版本
uname -a
其他优化
#开启路由转发
cat > /etc/sysctl.d/kubernetes.conf <<EOF
net.bridge.bridge-nf-call-ip6tables = 1
net.bridge.bridge-nf-call-iptables = 1
net.ipv4.ip_nonlocal_bind = 1
net.ipv4.ip_forward = 1
vm.swappiness = 0
vm.overcommit_memory = 1
EOF

sysctl -p /etc/sysctl.d/kubernetes.conf

#关闭swap
sed -i "s/.*swap.*//" /etc/fstab

#配置yum源
wget -O /etc/yum.repos.d/CentOS-Base.repo https://mirrors.aliyun.com/repo/Centos-7.repo
wget -O /etc/yum.repos.d/epel.repo http://mirrors.aliyun.com/repo/epel-7.repo
yum -y install yum-utils
yum-config-manager --add-repo https://mirrors.aliyun.com/docker-ce/linux/centos/docker-ce.repo
sed -i 's+download.docker.com+mirrors.aliyun.com/docker-ce+' /etc/yum.repos.d/docker-ce.repo

cat <<EOF > /etc/yum.repos.d/kubernetes.repo
[kubernetes]
name=Kubernetes
baseurl=https://mirrors.aliyun.com/kubernetes/yum/repos/kubernetes-el7-x86_64/
enabled=1
gpgcheck=1
repo_gpgcheck=1
gpgkey=https://mirrors.aliyun.com/kubernetes/yum/doc/yum-key.gpg https://mirrors.aliyun.com/kubernetes/yum/doc/rpm-package-key.gpg
EOF

yum clean all
yum  -y   makecache
yum install -y epel-release python36 python36-pip git
下载安装kubespray
wget https://github.com/kubernetes-sigs/kubespray/archive/v2.15.0.tar.gz

#解压缩后进入目录
#安装依赖
pip3.6 install --upgrade pip
pip3.6 install -r requirements.txt

#复制配置文件模板
cp -rpf inventory/sample inventory/mycluster

# 使用真实的hostname
export USE_REAL_HOSTNAME=true

# 指定配置文件位置
export CONFIG_FILE=inventory/mycluster/hosts.yaml

# 定义ip列表(你的服务器内网ip地址列表,3台及以上,前两台默认为master节点),192.168.0.119暂时预留,作为后面添加和删除节点时使用
declare -a IPS=(192.168.0.122 192.168.0.121 192.168.0.120)

# 生成配置文件
python3 contrib/inventory_builder/inventory.py ${IPS[@]}
其他个性化设置,比如helm,registry,metrics等功能,已经网络组件的选择,docker的设置,个人在这里开启了helm,优化了docker存储目录,网络组件推荐使用默认的calico
开启helm组件
vim  inventory/mycluster/group_vars/k8s-cluster/addons.yml

更改docker存储目录
vim  inventory/mycluster/group_vars/all/docker.yml
更换镜像源
find ./ -type f |xargs sed -i 's/k8s.gcr.io/registry.cn-hangzhou.aliyuncs.com\/kubernetes-kubespray/g'
find ./ -type f |xargs sed -i 's/gcr.io/registry.cn-hangzhou.aliyuncs.com\/kubernetes-kubespray/g'
find ./ -type f |xargs sed -i 's/google-containers/kubernetes-kubespray/g'
在安装时镜像源还会有问题,源地址和改后的阿里云地址有格式的区别,有些镜像需要把’/’改成’_’
#编辑镜像下载文件,当遇到镜像下载失败,提示镜像不存在时,可以尝试将'/'改成'_',下图为实际遇到报错后更改的地址

vim extra_playbooks/roles/download/defaults/main.yml

除了镜像的拉取,还会有在github上下载文件,有时也会下载失败,最好是搭梯子之后手动下载,再上传到/tmp/releases目录下
#个人遇到下载失败的文件包括
https://github.com/projectcalico/calicoctl/releases/download/v3.16.5/calicoctl-linux-amd64
https://get.helm.sh/helm-v3.3.4-linux-amd64.tar.gz

实际安装后 /tmp/releases 里包含的文件,此为主节点,从节点的文件会少一些
集群一键部署,一般来说会遇到一些报错,这时看情况处理即可,大部分就是资源下载不到的问题
ansible-playbook -i inventory/mycluster/hosts.yaml -b cluster.yml -vvvv
部署后查看是否成功
kubectl   get  no

kubectl   get  pod     --all-namespaces  -o  wide
其他功能
卸载集群
ansible-playbook -i inventory/mycluster/hosts.yaml reset.yml -b -vvv
添加节点
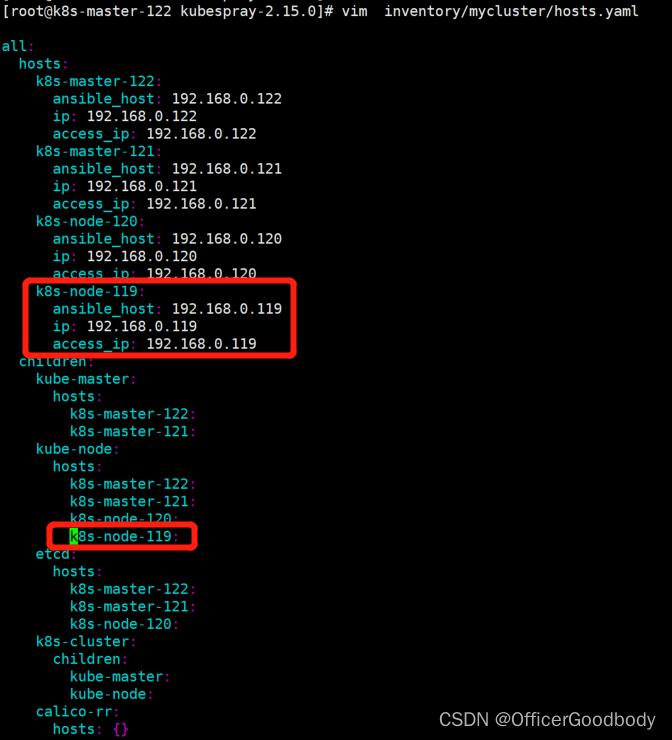
#编辑hosts.yaml文件,添加节点配置,如图,以192.168.0.119为例
vim  inventory/mycluster/hosts.yaml

#添加完后执行
ansible-playbook   -i  inventory/mycluster/hosts.yaml   scale.yml   -b  -v   --private-key=~/.ssh/id_rsa
删除节点
#hosts.yaml无需修改,运行命令--extra-vars指定node,但是删除节点后hosts.yaml内的节点配置还在,需要手动删除配置
ansible-playbook -i inventory/mycluster/hosts.yaml remove-node.yml -b -v --extra-vars "node=k8s-node-119"
升级集群
ansible-playbook upgrade-cluster.yml -b -i inventory/sample/hosts.ini -e kube_version=v1.20.0
参考文献:
https://www.cnblogs.com/v-fan/p/14676879.html


 1319
1319


 被折叠的 条评论
为什么被折叠?
被折叠的 条评论
为什么被折叠?
 到【灌水乐园】发言


