


SpringMVC+jQuery实现上传用户信息,并局部刷新显示
一.后台代码SpringMVC
1.Controller
用来接收前端post的数据,并返回上传成功后的数据模型user
@RequestMapping(value="/returnImagePath",method=RequestMethod.POST)
@ResponseBody
public Map<String, UserSrc> returnImagePath(User user,@RequestParam("picture") MultipartFile file){
	System.out.println(user);
	String realFileName = null;
	//UserSrc userSrc=null;
	if(!file.isEmpty()){
		//将用户头像上传到服务器指定磁盘下
		String filePath="D://upload//head";
		//获取上传图片名称
		String fileName=file.getOriginalFilename();
		System.out.println("文件名:"+fileName);
		//以上传时间给图片命名(在服务器磁盘上的名称)
		Date now=new Date();
		String time=now.getTime()+"_";
		realFileName=time+fileName;
		File fileFile=new File(filePath,realFileName);
		System.out.println("保存文件名:"+realFileName);
		System.out.println(user);
		try {
			//保存图片
			file.transferTo(fileFile);
		} catch (Exception e) {
			e.printStackTrace();
		}
		//将上传后的图片名称赋值给模型
		user.setSrc(realFileName);
	}
	System.out.println("返回数据:"+user);
	Map<String,UserSrc> map=new HashMap<String, UserSrc>();
	map.put("user", user);
	//返回上传后的数据,前端进行局部刷新
	return map;
}
2.model user
public class User {
   /*
    * id
    * 昵称
    * 姓名
    * 性别
    * 研发科室
    * 研发小组
    * 座机号码
    * 手机号码
    * 微信号
    * 电脑IP
    * 用户头像路径
    *
    */

	private int id;
	private String nickName;
	private String userName;
	private String sex;
	private String className;
	private String group;
	private String telePhone;
	private String mobilePhone;
	private String weChat;
	private String IP;
	private String src;
        get.......
        set.......
3.Controller
用来输出用户头像,通过上1中的Controller返回的数据user.src(服务器上图片名称),获取流的到图片。
代码一,Restful风格
/*
	 * 通过@PathVariable("imageId")获取图片,缺点没法获取图片后缀(SpringMVC配置文件设置问题) RestFul风格
	 */
	@RequestMapping(value = "/getDImage/{imageId}", method = RequestMethod.GET)
	public void getDImage(@PathVariable("imageId") String imageId,
			HttpServletResponse response) throws IOException {
		System.out.println(imageId);
		String filePath = "D://upload//head//" + imageId + ".jpg";
		File file = new File(filePath);
		System.out.println("获取用户头像" + file);
		// 输入流
		FileInputStream inputStream = new FileInputStream(file);
		// 输出流
		OutputStream stream = response.getOutputStream();
		response.setContentType("image/jpg");
		byte[] data=new byte[1024];
		while((inputStream.read(data))!=-1){
			stream.write(data);
		}
		inputStream.close();
		stream.flush();
		stream.close();
	}
代码二,一般get形式
/*
	 * 通过@RequestParam("imageId")获取图片,
	 * http://localhost:8080/IotManagerSystem/getImageByParam
	 * ?imageId=Jellyfish.jpg
	 */
	@RequestMapping(value = "/getImageByParam", method = RequestMethod.GET)
	public void getDImageByParam(@RequestParam("imageId") String imageId,
			HttpServletResponse response) throws IOException {
		System.out.println(imageId);
		String filePath = "D://upload//head//" + imageId;
		File file = new File(filePath);
		System.out.println("获取用户头像" + file);
		FileInputStream inputStream = new FileInputStream(file);
		OutputStream stream = response.getOutputStream();
		response.setContentType("image/jpg");
		byte[] data=new byte[1024];
		while((inputStream.read(data))!=-1){
			stream.write(data);
		}
		inputStream.close();
		stream.flush();
		stream.close();
	}
二.前端代码
为了调试方便,form表单中数据以填写,
<%@ page language="java" import="java.util.*" pageEncoding="UTF-8"%>
<%
String path = request.getContextPath();
String basePath = request.getScheme() + "://"
+ request.getServerName() + ":" + request.getServerPort()
+ path + "/";
%>
<!DOCTYPE HTML PUBLIC "-//W3C//DTD HTML 4.01 Transitional//EN">
<html>
<head>
<base href="<%=basePath%>">
<title>My JSP 'ajaxRegister.jsp' starting page</title>
<script type="text/javascript" src="js/jquery-3.2.1.min.js"></script>
<style type="text/css">
#img {
margin-top: 50px;
width: 100px;
height: 100px;
border-radius: 100px;
}
#user td {
border-width: 0px;
padding: 10px;
border-style: solid;
border-color: #666666;
background-color: #ffffff;
}
</style>
<script type="text/javascript">
function register() {
var form = new FormData($('#form')[0]);
$.ajax({
cache : false,
type : "POST",
url : "returnImagePath",
data : form,
//必须有
processData : false,
//dataType : "application/json;charset=utf-8" 增加后返回数据时会报错,
//必须有
contentType : false,
/*
返回的data数据
{"user":{"id":0,"nickName":"晒太阳","userName":"Orient","sex":"男","className":"研发五所","group":"后台开发","telePhone":"4565566","mobilePhone":"41564666454","weChat":"dfsf2re","src":"1523518468333_Desert.jpg","ip":"45655656656"}}
*/
success : function(data) {
var s = data.user.src;
//获取头像url(Restful风格)
var url = "getDImage\\" + s;
$('#img').attr('src', url);
var id = data.user.id;
var userName = data.user.userName;
var nickName = data.user.nickName;
var sex = data.user.sex;
var className = data.user.className;
var group = data.user.group;
var telePhone = data.user.telePhone;
var mobilePhone = data.user.mobilePhone;
var IP = data.user.ip;
var weChat = data.user.weChat;
var datahtml = '<tr><td>ID</td><td>' + id
+ '</td><td>昵称</td><td>' + nickName
+ '</td></tr><tr><td>姓名</td><td>' + userName
+ '</td><td>性别</td><td>' + sex
+ '</td></tr><tr><td>研发科室</td><td>' + className
+ '</td><td>研发小组</td><td>' + group
+ '</td></tr><tr><td>公司座机</td><td>' + telePhone
+ '</td><td>移动电话</td><td>' + mobilePhone
+ '</td></tr><tr><td>微信号</td><td>' + weChat
+ '</td><td>内网IP</td><td>' + IP + '</td></tr>';
//每次刷新是清除上次内容,以防重复显示
$('#user').empty();
$('#user').append(datahtml);
},
error : function() {
alert("error!");
}
});
}
</script>
</head>
<body>
<form id="form" enctype="multipart/form-data"
method="post">
昵称:<input type="text" name="nickName" value="晒太阳"><br /> 用户名:<input
type="text" name="userName" value="Orient"><br /> 性别:<input
type="text" name="sex" value="男"><br /> 所属研究所:<input
type="text" name="className" value="研发五所"><br /> 研究小组:<input
type="text" name="group" value="后台开发"><br /> 公司座机:<input
type="text" name="telePhone" value="4565566"><br /> 手机号:<input
type="text" name="mobilePhone" value="41564666454"><br />
微信号:<input type="text" name="weChat" value="dfsf2re"><br />
内网IP:<input type="text" name="IP" value="45655656656"><br />
头像:<input type="file" name="picture"><br />
</form>
<button id="btn" value="提交" οnclick="register()"></button>
<hr />
<h2>信息预览</h2>
<div id="u">
<img id="img" alt="头像">
<div id="user"></div>
</div>
</body>
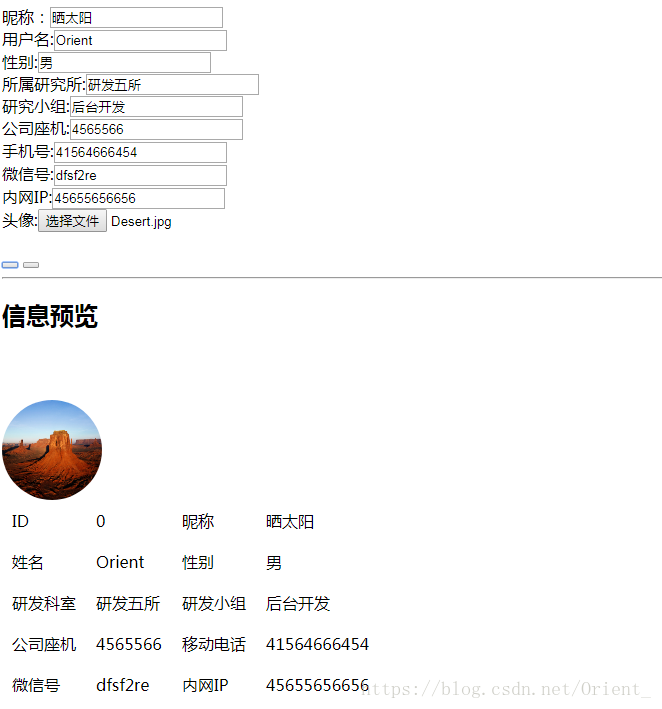
</html>三.效果图片
前端没做多少样式,只达到了效果。


 413
413

 被折叠的 条评论
为什么被折叠?
被折叠的 条评论
为什么被折叠?
 到【灌水乐园】发言


