


创建项目是的基本的环境可以参考链接对应的文章。JavaWeb之环境搭建_Ostkakah的博客-CSDN博客
Mybatis的环境搭建
mybatis.config.xml配置(在resources目录中),创建对应的jdbc.properties,和对应的mapper。
<?xml version="1.0" encoding="UTF-8" ?>
<!DOCTYPE configuration
        PUBLIC "-//mybatis.org//DTD Config 3.0//EN"
        "http://mybatis.org/dtd/mybatis-3-config.dtd">
<configuration>
<!--    对POJO中的类进行重命名-->
<!--    可以以包为整体,也可以以某个类为整体-->
    <properties resource="jdbc.properties"></properties>
    <typeAliases>
        <package name="com.huang.POJO"/>
    </typeAliases>
    <!--设置连接数据库的环境-->
    <environments default="development">
        <environment id="development">
            <transactionManager type="JDBC"/>
            <dataSource type="POOLED">
                <property name="driver" value="${driver}"/>
                <property name="url" value="${url}"/>
                <property name="username" value="${username}"/>
                <property name="password" value="${password}"/>
            </dataSource>
        </environment>
    </environments>
    <!--引入映射文件-->
    <mappers>
<!--        未来会存在多个映射文件,所以为了方便,我们可以直接引入整个包-->
<!--        且为了能够访问到相应的Mapper,我们需要保证mapper.xml和mapper接口要保证相同的路径,且mapper.xml要和mapper接口要同名-->
        <package name="com.huang.mappers"/>
    </mappers>
</configuration>
设置log4f.xml文件(固定的,且在resources目录中)
<?xml version="1.0" encoding="UTF-8" ?>
<!DOCTYPE log4j:configuration SYSTEM "log4j.dtd">
<log4j:configuration xmlns:log4j="http://jakarta.apache.org/log4j/">
    <appender name="STDOUT" class="org.apache.log4j.ConsoleAppender">
        <param name="Encoding" value="UTF-8" />
        <layout class="org.apache.log4j.PatternLayout">
            <param name="ConversionPattern" value="%-5p %d{MM-dd HH:mm:ss,SSS} %m (%F:%L) \n" />
        </layout>
    </appender>
    <logger name="java.sql">
        <level value="debug" />
    </logger>
    <logger name="org.apache.ibatis">
        <level value="info" />
    </logger>
    <root>
        <level value="debug" />
        <appender-ref ref="STDOUT" />
    </root>
</log4j:configuration>
mybatis启动工具类
import org.apache.ibatis.io.Resources;
import org.apache.ibatis.session.SqlSession;
import org.apache.ibatis.session.SqlSessionFactory;
import org.apache.ibatis.session.SqlSessionFactoryBuilder;

import java.io.IOException;
import java.io.InputStream;

/**
 * @author 86159
 * mybatis启动工具
 */
public class mybatisUtil {
    public static SqlSession getSqlSession(String configPath) {
        SqlSession sqlSession = null;
        try {
            InputStream resourceAsStream = Resources.getResourceAsStream(configPath);
            SqlSessionFactoryBuilder sqlSessionFactoryBuilder = new SqlSessionFactoryBuilder();
            SqlSessionFactory build = sqlSessionFactoryBuilder.build(resourceAsStream);
            sqlSession = build.openSession(true);
        } catch (IOException e) {
            e.printStackTrace();
        }
        return sqlSession;
    }
}
Mybatis必修知识
mybatis和Spring 配合使用所需要的基本依赖为下:
<dependencies>
<!--    测试依赖-->
    <dependency>
      <groupId>junit</groupId>
      <artifactId>junit</artifactId>
      <version>4.11</version>
      <scope>test</scope>
    </dependency>
    <!-- https://mvnrepository.com/artifact/org.springframework/spring-webmvc -->
<!--    Spring依赖-->
    <dependency>
      <groupId>org.springframework</groupId>
      <artifactId>spring-webmvc</artifactId>
      <version>5.3.9</version>
    </dependency>
<!--    注解依赖-->
    <dependency>
      <groupId>org.projectlombok</groupId>
      <artifactId>lombok</artifactId>
      <version>1.16.18</version>
      <scope>provided</scope>
    </dependency>
<!--    aop依赖-->
    <dependency>
      <groupId>org.aspectj</groupId>
      <artifactId>aspectjweaver</artifactId>
      <version>1.9.4</version>
    </dependency>
<!--    mysql依赖-->
    <dependency>
      <groupId>mysql</groupId>
      <artifactId>mysql-connector-java</artifactId>
      <version>5.1.47</version>
    </dependency>
<!--    mybatis依赖-->
    <dependency>
      <groupId>org.mybatis</groupId>
      <artifactId>mybatis</artifactId>
      <version>3.5.6</version>
    </dependency>
<!--    Spring连接数据库的依赖-->
<!--    Spring链接数据库需要Spring-JDBC-->
    <!-- https://mvnrepository.com/artifact/org.springframework/spring-jdbc -->
    <dependency>
      <groupId>org.springframework</groupId>
      <artifactId>spring-jdbc</artifactId>
      <version>5.3.10</version>
    </dependency>
<!--    mybatis和Spring整合的包-->
    <!-- https://mvnrepository.com/artifact/org.mybatis/mybatis-spring -->
    <dependency>
      <groupId>org.mybatis</groupId>
      <artifactId>mybatis-spring</artifactId>
      <version>2.0.6</version>
    </dependency>

  </dependencies>
mybatis-config.xml的Mapper绑定方法:
1.resources方式(XXX.xml文件可以直接放在resources目录下面)
 <mappers>
      <mapper resource="XXXX.xml"/>
    </mappers>
2.class方式(XXX.xml要和XXX.java接口的名字相同,且在同个包下,否则会报错)
 <mappers>
        <mapper class="对应的类"/>
    </mappers>
3.package方式
<mappers>
        <package name="包名"/>
    </mappers>
Mybatis-spring的使用
使用Spring的"驱动程序管理器数据源"替换Mybatis的配置, 我们这里使用Spring的jdbc。
下例作为dao层(只要数据源固定,那么我们都不需要对下列进行修改)
流程:
1.编写数据源配置。
2.sqlSessionFactory。
3.sqlSessionTemplate。
4.需要给接口加实现类。
5.将自己的实现类注入到spring中。
6.测试使用即可。
<?xml version="1.0" encoding="UTF-8"?>
<beans xmlns="http://www.springframework.org/schema/beans"
xmlns:xsi="http://www.w3.org/2001/XMLSchema-instance"
xsi:schemaLocation="http://www.springframework.org/schema/beans
https://www.springframework.org/schema/beans/spring-beans.xsd">
<!-- DataSource:使用Spring的"驱动程序管理器数据源"替换Mybatis的配置, 我们这里使用Spring的jdbc-->
<!-- dataSource为数据源-->
<!-- 设置jdbc-->
<bean id="dataSource" class="org.springframework.jdbc.datasource.DriverManagerDataSource">
<property name="driverClassName" value="com.mysql.jdbc.Driver"/>
<property name="url" value="jdbc:mysql://localhost:3306/mybatis?useSSL=false&useUnicode=true&characterEncoding=utf-8"/>
<property name="username" value="root"/>
<property name="password" value=""/>
</bean>
<!-- sqlSessionFactory:-->
<bean id="sqlSessionFactory" class="org.mybatis.spring.SqlSessionFactoryBean">
<!-- 这里jdbc和mybatis的其他配置要分开写-->
<!-- jdbc-->
<property name="dataSource" ref="dataSource"/>
<!-- 绑定Mybatis配置文件 mybatis-config.xml-->
<!-- configLocation:mybatis配置的地址-->
<property name="configLocation" value="classpath:mybatis-config.xml"/>
<!-- 绑定Mapper-->
<property name="mapperLocations" value="classpath:com/huang/Mapper/*.xml"/>
</bean>
<!-- org.mybatis.spring.SqlSessionTemplate就是我们要使用的sqlSession-->
<!-- 创建一个SqlSessionTemplate,其效果和SqlSession的效果相同,最终SqlSessionTemplate会被赋给实现类的属性-->
<bean id="sqlSession" class="org.mybatis.spring.SqlSessionTemplate">
<!-- 只能使用构造器注入,因为它没有set方法-->
<!-- index = 0应该是无参构造-->
<!-- 这里就类似 SqlSession session = build.openSession(true);-->
<!-- 相当于openSession的过程-->
<constructor-arg index="0" ref="sqlSessionFactory"/>
</bean>
<!-- 这里的bean类似session.getMapper(UserMapper.class);-->
<bean id="userMapper" class="com.huang.Mapper.UserMapperimpl">
<!-- 为UseMapper设置sqlSession属性-->
<property name="sqlSession" ref="sqlSession"/>
</bean>(重点)对应的UserMapperimpl的实现类一为下:
public class UserMapperimpl implements UserMapper{
//    我们的所有操作都使用sqlSession来执行在原来时候,现在使用SqlSessinTemplate;
    private SqlSessionTemplate sqlSession;

    public void setSqlSession(SqlSessionTemplate sqlSession) {
        this.sqlSession = sqlSession;
    }

    @Override
    public List<User> selectUser() {
        UserMapper mapper = sqlSession.getMapper(UserMapper.class);
        return mapper.selectUser();
    }
}
(理解即可)对应的UserMapperimpl的实现类二为下:
重点是继承SqlSessionDaoSupport,我们才能使用getSqlSession。
public class UserMapperimpl2 extends SqlSessionDaoSupport implements UserMapper{

    @Override
    public List<User> selectUser() {
        //SqlSessionDaoSupport类似工厂
        SqlSession sqlSession = getSqlSession();
        UserMapper mapper = sqlSession.getMapper(UserMapper.class);
        return mapper.selectUser();
//        == return getSqlSession().getMapper(UserMapper.class).selectUser();
    }
}
且在spring的配置文件中注册该类。对应的代码如下:
<!--    不需要注入属性-->
    <bean id="UserMapper2" class="com.huang.Mapper.UserMapperimpl2"></bean>
有了这个xml配置后,我们就可以就application-config.xml中的<environments>标签中的内容删除了,因为标签中的内容是Mybatis连接数据库,现在由Spring完成了。
强调:一定要导入Spring-jdbc的依赖
<dependency>
      <groupId>org.springframework</groupId>
      <artifactId>spring-jdbc</artifactId>
      <version>5.3.10</version>
    </dependency>
且要符合对应的版本条件。

至此mybatis-config.xml中的JDBC就要全部删除,在该xml文件中我们只在zmybatis的配置文件中放别名和设置(如:日志设置)。
XXXTemplate:是一种模板,会很经常遇到。
如果存在多人开发beans.xml,我们就可以使用<import>就所有beans.xml,导入到applicationContest.xml。
<?xml version="1.0" encoding="UTF-8"?>
<beans xmlns="http://www.springframework.org/schema/beans"
       xmlns:xsi="http://www.w3.org/2001/XMLSchema-instance"
       xsi:schemaLocation="http://www.springframework.org/schema/beans
        https://www.springframework.org/schema/beans/spring-beans.xsd">
    <settings>
        <setting name="logImpl" value="STDOUT_LOGGING"/>
          <!--这里设置了一个日志实例,该日志为STDOUT_LOGGING-->
    </settings>
    <import resource="XXXXX.xml"/>
    <import resource="XXXXX.xml"/>
    <import resource="XXXXX.xml"/>
</beans>
声明式事务
- 要么都成功,要么都失败。
- 事务在项目开发中,十分的重要,涉及到数据一致性的问题。
- 确保完整性和一致性。
事务的特性:ACID
- 原子性:要么都成功,要么都失败。
- 一致性:总量不会发生改变。
- 持久性:事务一但提交就会持久化到数据库,无论系统发生了什么问题。
- 隔离性:多个业务可以操作同一个资源,防止数据损坏。
spring中的事务分为:
- 声明式事务:AOP
- 编程式事务:需要在代码中进行事务的管理。(通过try/catch捕获异常,进行回滚, 不符合开闭原则,不推荐使用)
使用声明式事务的步骤:
- 配置声明式事务
<bean id="transactionManager" class="org.springframework.jdbc.datasource.DataSourceTransactionManager">
<!--       第一种写法 <constructor-arg ref="dataSource"/>-->
<!--        第二种写法-->
        <property name="dataSource" ref="dataSource"/>
    </bean>
2.结合AOP实现事务的织入
方法一:在spring-dao.xml中的sqlSessionFactory中添加一个参数:
<property name="transactionFactory">
            <bean class="org.apache.ibatis.transaction.managed.ManagedTransactionFactory"/>
        </property>
方法二:配置事务的通知
<!--    结合AOP实现事务的织入-->
<!--    配置事务的通知-->
    <tx:advice id="txAdvice" transaction-manager="transactionManager">
<!--        给那些方法配置事务-->
<!--        配置事务的传播特性 新东西-->
        <tx:attributes>
            <tx:method name="add" propagation="REQUIRED"/>
            <tx:method name="delete" propagation="REQUIRED"/>
            <tx:method name="update" propagation="REQUIRED"/>
<!--            查询的话就不需要提交事务,所以可以设为只读-->
            <tx:method name="query" read-only="true"/>
            <tx:method name="*" propagation="REQUIRED"/>
        </tx:attributes>
    </tx:advice>
<!--    配置事务的切入-->
<!--    设置切入点-->
    <aop:config>
<!--        第一*:表示com.huang下的所有包-->
<!--        第二个*:表示com.huang下的所有类-->
<!--        第三个*:表示com.haung.*下的所有方法-->
        <aop:pointcut id="txPointCut" expression="execution(* com.huang.Mapper.*.*(..))"/>
        <aop:advisor advice-ref="txAdvice" pointcut-ref="txPointCut"/>
    </aop:config>
propagation的七种配置
Mybatis-plus
对应的依赖:
<dependency>
    <groupId>com.baomidou</groupId>
    <artifactId>mybatis-plus-boot-starter</artifactId>
    <version>3.3.1.tmp</version>
</dependency>
对应的例子为下:
@Mapper
@Repository
public interface UserMapper extends BaseMapper<User> {
}
其基于BaseMapper类实现,其需要一个泛型,该泛型代表返回类型或参数类型。
配置mybatis-plus的日志
mybatis-plus:
  configuration:
    log-impl: org.apache.ibatis.logging.stdout.StdOutImpl
日志的实现类有很多种,例如:log4j,StdOut等等。
日志可以显示执行的sql。
继承ServiceImpl实现简单的Service层业务
例子:
service接口:
package com.huang.Service;

import com.baomidou.mybatisplus.extension.service.IService;
import com.huang.pojo.User;

public interface UserService extends IService<User> {
}
serviceImpl:
package com.huang.Service;

import com.baomidou.mybatisplus.extension.service.impl.ServiceImpl;
import com.huang.mapper.UserMapper;
import com.huang.pojo.User;
import org.springframework.stereotype.Service;

//继承ServiceImpl,其中的泛型表示对应的mapper和对应的实体类
@Service
public class UserServiceImpl extends ServiceImpl<UserMapper, User> implements UserService{
}
最终就可以调用其方法:
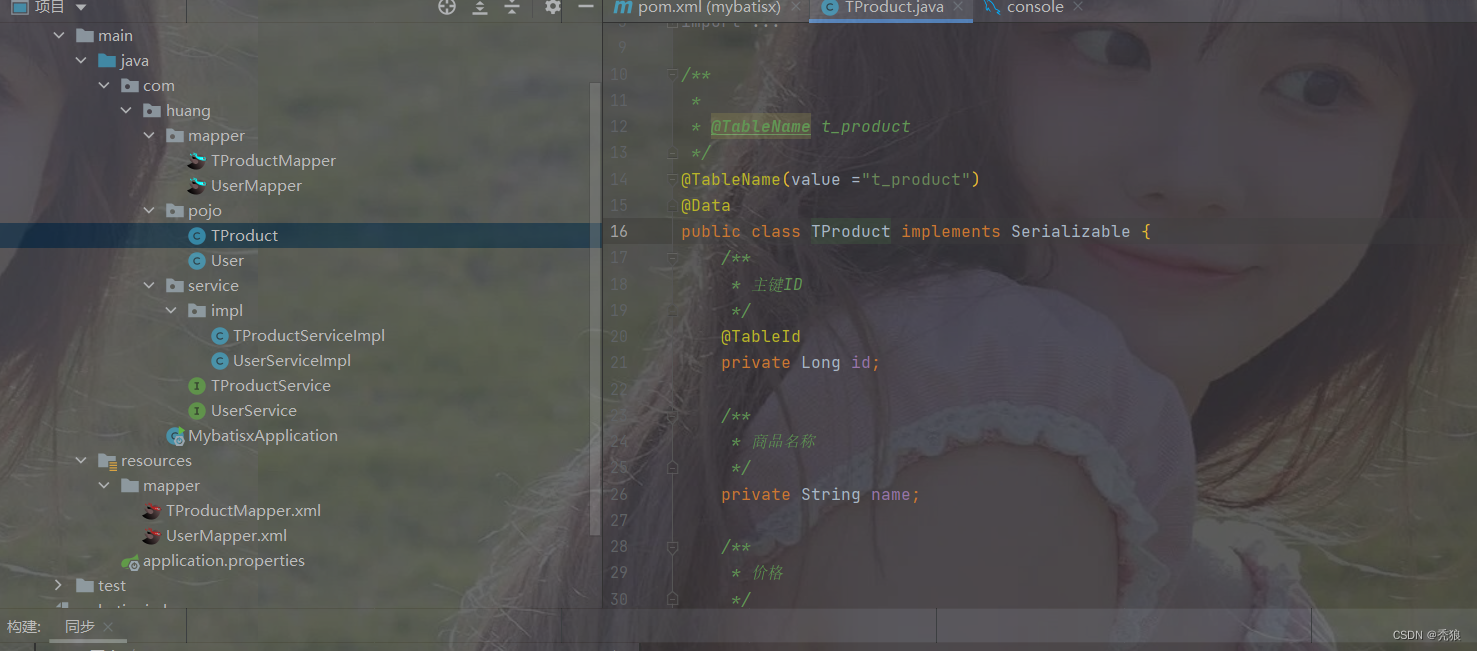
表明和实体类名不一致的情况
使用@TableName解决
import com.baomidou.mybatisplus.annotation.TableName;
import lombok.AllArgsConstructor;
import lombok.Data;
import lombok.NoArgsConstructor;

@Data
@AllArgsConstructor
@NoArgsConstructor
@TableName("user")
public class User {
    private Long id;
    private String name;
    private Integer age;
    private String email;
}id的设置: 在执行插入语句时,我们不需要set对应的id,BaseMapper回自动生成一个id,其id的生成使用雪花算法。
雪花算法,是 Twitter 开源的分布式 id 生成算法。其核心思想就是:使用一个 64 bit 的 long 型的数字作为全局唯一 id。在分布式系统中的应用十分广泛,且ID 引入了时间戳,基本上保持自增的。
设置id的属性:
@TableId(type = IdType.AUTO)//表示自增
@TableId(type = IdType.ID_WORKER)//表示全局唯一id
@TableId(type = IdType.UUID)//使用UUID
@TableId(type = IdType.NONE)//不设置
@TableId(type = IdType.INPUT)//手动设置
@TableId("value")//value属性可以设置主键属性在数据库表中对应主键的字段,可以防止主键属性和主键字段名冲突
mybatis-plus解决了动态拼接sql,大大提高了编码效率。
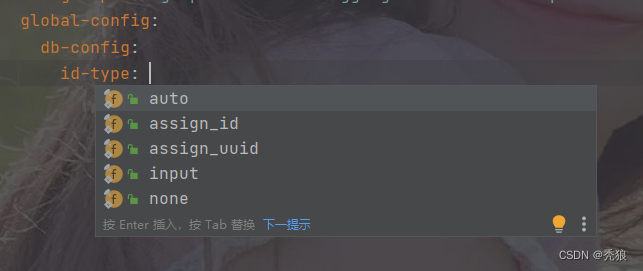
设置全局的主键生成策略
通过application.yml配置文件配置全局的主键生成策略。
mybatis-plus:
  global-config:
    db-config:
      id-type:
设置实体类属性在表中对应的字段名
使用@TableField。
@Data
@AllArgsConstructor
@NoArgsConstructor
@TableName("user")
public class User {
    @TableId
    private Long id;
//    设置此属性在表中对应的值
    @TableField("name")
    private String name;
    @TableField("age")
    private Integer age;
    @TableField("email")
    private String email;
    //设置为逻辑删除字段
    @TableLogic
    private Integer isDeleted;

    public User(Long id, String name, Integer age, String email) {
        this.id = id;
        this.name = name;
        this.age = age;
        this.email = email;
    }
}
使用枚举类
使用枚举类可以提高可读性,便于维护。
创建枚举类
import com.baomidou.mybatisplus.annotation.EnumValue;
import lombok.Getter;

@Getter
public enum sexEnum {
    MALE(1, "男"),
    FEMALE(0, "女");

    @EnumValue//保证传入的数据库的数据是sexId
    private Integer sexId;
    private String sexName;

    sexEnum(Integer sexId, String sexName) {
        this.sexId = sexId;
        this.sexName = sexName;
    }
}
进行测试
import com.huang.enums.sexEnum;
import com.huang.mapper.UserMapper;
import com.huang.pojo.User;
import org.junit.jupiter.api.Test;
import org.springframework.beans.factory.annotation.Autowired;
import org.springframework.boot.test.context.SpringBootTest;

@SpringBootTest
public class UserTest {

    @Autowired
    UserMapper userMapper;

    @Test
    public void test1() {
        User user = new User();
        user.setName("tolen");
        user.setAge(22);
        user.setEmail("1111");
        user.setSex(sexEnum.MALE);
        System.out.println(user);
        System.out.println(userMapper.insert(user));
    }
}
测试结果为下: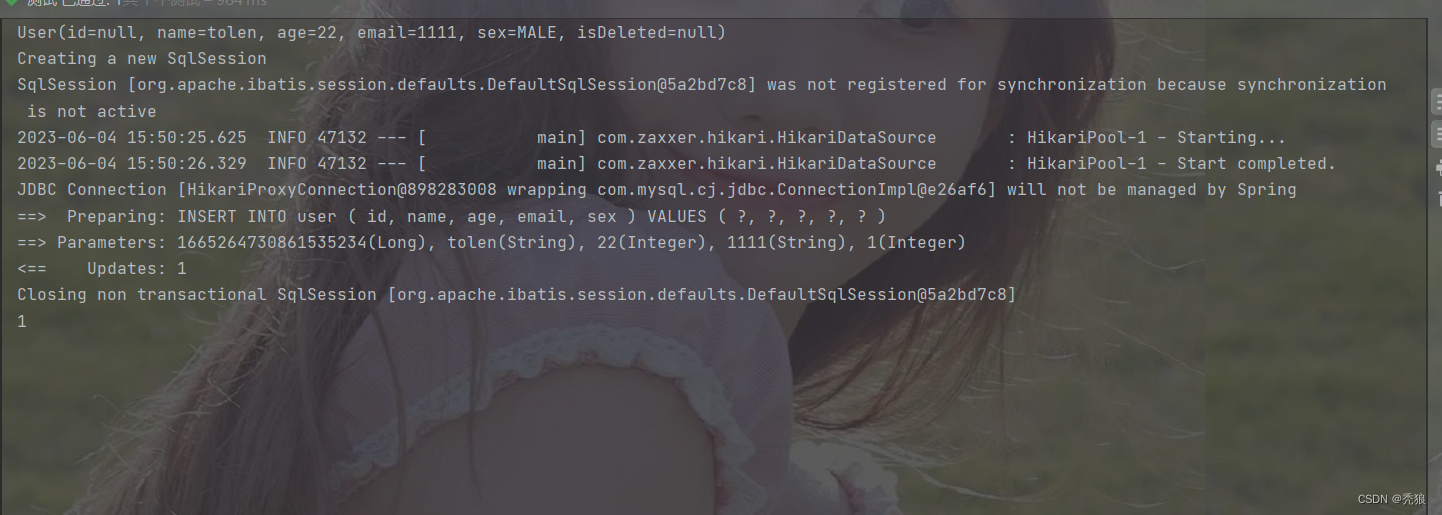
插入的sex为1。
乐观锁
乐观锁的实现方式:
1. 去出记录时,获取当前的version。
2.更新时,带上这个version。
3.执行更新时,set version = newVersion where version = oldVersion。
4.如果version不对,就更新失败。
在mybatisPlusConfig类中配置乐观锁的拦截器
import com.baomidou.mybatisplus.annotation.DbType;
import com.baomidou.mybatisplus.extension.plugins.MybatisPlusInterceptor;
import com.baomidou.mybatisplus.extension.plugins.inner.OptimisticLockerInnerInterceptor;
import com.baomidou.mybatisplus.extension.plugins.inner.PaginationInnerInterceptor;
import org.mybatis.spring.annotation.MapperScan;
import org.springframework.context.annotation.Bean;
import org.springframework.context.annotation.Configuration;

@Configuration
@MapperScan("com.huang.mapper")
public class mybatisPlusConfig {

    @Bean
    public MybatisPlusInterceptor mybatisPlusInterceptor() {
//        设置mybatisPlus的分页插件
        MybatisPlusInterceptor mybatisPlusInterceptor = new MybatisPlusInterceptor();
//        mybatisPlus可以对多种的数据库进行分页,所以我们要设置为mysql类型
        mybatisPlusInterceptor.addInnerInterceptor(new PaginationInnerInterceptor(DbType.MYSQL));
        //通过乐观锁拦截器
        mybatisPlusInterceptor.addInnerInterceptor(new OptimisticLockerInnerInterceptor());
        return mybatisPlusInterceptor;
    }
}
在对应的实体类中的对应属性上添加@Version
import com.baomidou.mybatisplus.annotation.TableName;
import com.baomidou.mybatisplus.annotation.Version;
import lombok.Data;

@Data
@TableName("t_product")
public class Product {
    private Long id;
    private String name;
    private Integer price;
    @Version//将此字段设置为版本号
    private Integer version;
}
模拟场景测试
import com.huang.mapper.ProductMapper;
import com.huang.pojo.Product;
import org.junit.jupiter.api.Test;
import org.springframework.beans.factory.annotation.Autowired;
import org.springframework.boot.test.context.SpringBootTest;

@SpringBootTest
public class ProductTest {

    @Autowired
    ProductMapper productMapper;

    @Test
    void test1() {
        //业务场景: A和b同时要修改t_product中的信息,为了保证两人都能修改成功,我们需要使用乐观锁
        //A将价格-50
        //b将价格-30

        //a,b同时查询了数据库中对应的信息
        Product productA = productMapper.selectById(1);
        System.out.println(productA);
        Product productB = productMapper.selectById(1);
        System.out.println(productB);
        //a先进行操作
        productA.setPrice(productA.getPrice() - 50);
        System.out.println(productMapper.updateById(productA));
        //b在进行操作,在此时b应该是操作失败的,因为version发生了改变
        productB.setPrice(productA.getPrice() - 30);
        int result = productMapper.updateById(productB);
        while(result == 0) {
            //重新执行业务
            //因为未来的业务中基本都是多线程的环境,
            //所以我们不能保证一次就能完成对应的业务,需要修改到成功为止
            productB = productMapper.selectById(1);
            productB.setPrice(productB.getPrice() - 30);
            //此时模拟一次就会成功,就会直接跳出循环
            result = productMapper.updateById(productB);
        }
    }
}
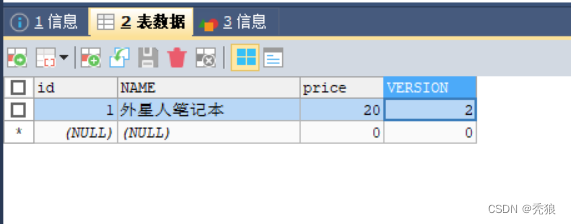
测试结果为下
 数据库结果
数据库结果
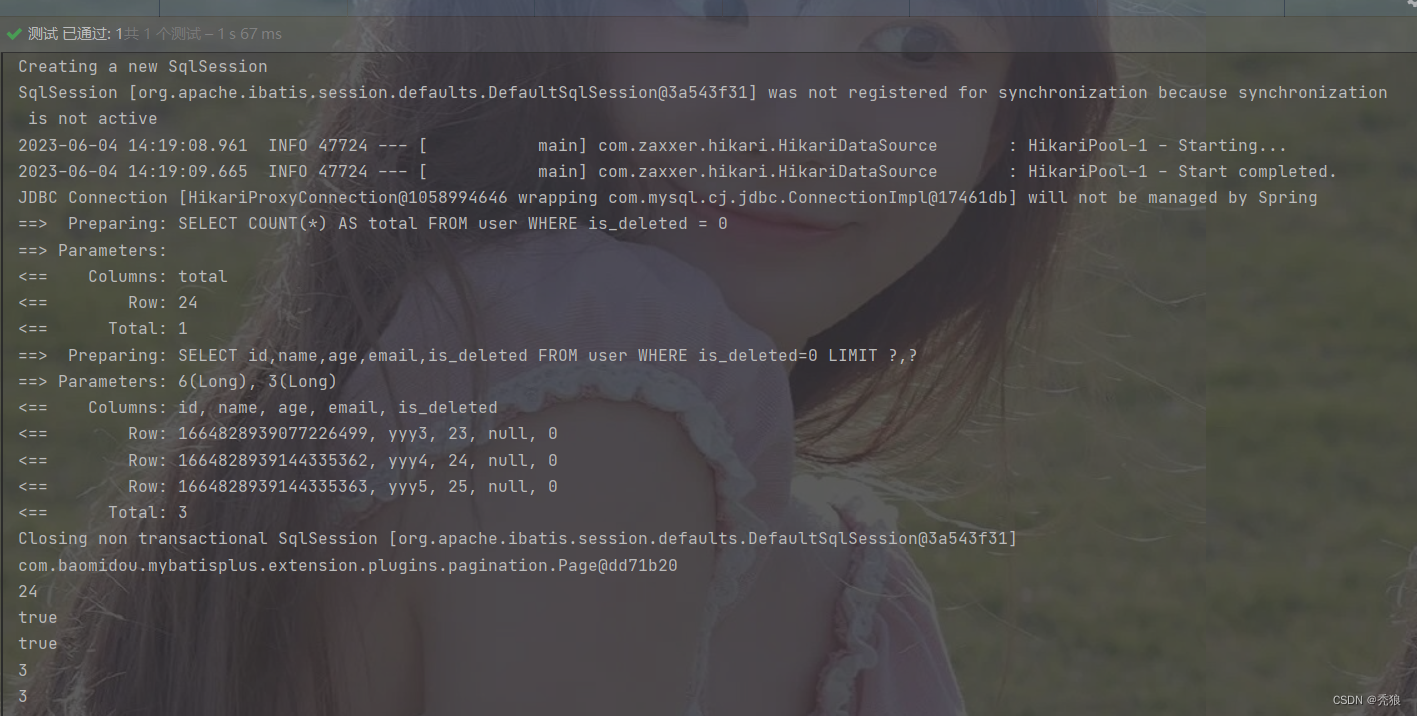
逻辑删除
例子:图片回收站,在表中创建一个isDeleted字段,当delete为1时就可以查看图片,当isDeleted为0时就不可以查看图片,在数据库中其实未对数据进行真正的删除。
1.在对应的实体类中添加对应的delete属性添加@TableLogic注解。
@Data
@AllArgsConstructor
@NoArgsConstructor
@TableName("user")
public class User {
    @TableId
    private Long id;
//    设置此属性在表中对应的值
    @TableField("name")
    private String name;
    @TableField("age")
    private Integer age;
    @TableField("email")
    private String email;
    //设置为逻辑删除字段
    @TableLogic
    private Integer isDeleted;

    public User(Long id, String name, Integer age, String email) {
        this.id = id;
        this.name = name;
        this.age = age;
        this.email = email;
    }
}
3.在application中配置逻辑删除
mybatis-plus:
  global-config:
    db-config:
#      删除时为1
      logic-delete-value: 1
#      未删除时为0
      logic-not-delete-value: 0
#且默认中未删除未0,删除为1
进行测试,测试结果为下:

最终执行update操作,将isDeleted的值赋为1,如果属性中存在@TableLogic的话,每次查询时都会在sql语句中的后面添加isDeleted不为1的条件,最终查询出数据。
性能分析插件
导入插件:
 @Bean
    @Profile({"dev","test"})//对应的环境
    public PerformanceInterceptor performanceInterceptor(){
        PerformanceInterceptor performanceInterceptor = new PerformanceInterceptor();
        performanceInterceptor.setMaxTime(1);//最大执行时间为1毫秒,如果超过了时间,其就会停止
        performanceInterceptor.setFormat(true);//开起格式化支持
        return performanceInterceptor;
    }
Wrapper(条件构造器)
public class WrapperTest {
@Autowired
UserMapper userMapper;
@Test
public void selectTest1(){
QueryWrapper queryWrapper = new QueryWrapper();
queryWrapper.isNotNull("name");
queryWrapper.isNotNull("email");
queryWrapper.ge("age",12);
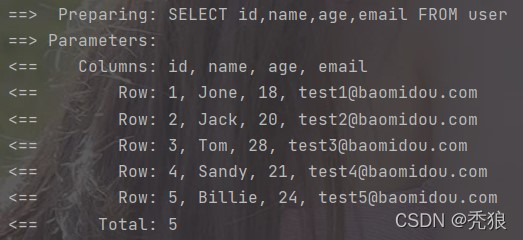
userMapper.selectList(queryWrapper);
}
@Test
public void selectOne(){
QueryWrapper<User> queryWrapper = new QueryWrapper<>();
queryWrapper.eq("name", "黄飞文");
userMapper.selectOne(queryWrapper);
}
@Test
public void selectBetween(){
//查询区间
QueryWrapper<User> queryWrapper = new QueryWrapper<>();
queryWrapper.between("age", 20, 30);
// Integer integer = userMapper.selectCount(queryWrapper);
List<Map<String, Object>> maps = userMapper.selectMaps(queryWrapper);
maps.forEach(System.out::println);
}
@Test
//模糊查询
public void SelectBetween2(){
QueryWrapper<User> queryWrapper = new QueryWrapper<>();
//左和右 %e,e%
queryWrapper.likeRight("email","test");//左查询
queryWrapper.likeLeft("name","黄");//右查询
// queryWrapper.inSql("id", "select id from user where id < 3"),insql(可用于多表查询)
List<Map<String, Object>> maps = userMapper.selectMaps(queryWrapper);
maps.forEach(System.out::println);
}
@Test
public void OrderBy(){
// 排序
QueryWrapper<User> qWrapper = new QueryWrapper<>();
// qWrapper.orderByAsc("id");
qWrapper.orderByDesc("id");
List<User> users = userMapper.selectList(qWrapper);
users.forEach(System.out::println);
}
}
配置多数据源
引入依赖
<dependency>
<groupId>com.baomidou</groupId>
<artifactId>dynamic-datasource-spring-boot-starter</artifactId>
<version>3.5.0</version>
</dependency>
设置application.yml配置文件
spring:
  datasource:
    dynamic:
      #默认的主数据库名字就叫master
      primary: master
      # 严格匹配数据源,默认false.true未匹配到指定数据源时抛异常,false使用默认数据源就是master
      strict: false
      datasource:
        #设置master数据库的相关信息
        master:
          url: jdbc:mysql://localhost:3306/mybatis_plus?characterEncoding=utf-8&useSSL=true
          driver-class-name: com.mysql.cj.jdbc.Driver
          username: root
          password:
        #设置从库的信息,从库的名字是自定义的(slave_1)
        slave_1:
          url: jdbc:mysql://localhost:3306/mybatis_plus_1?characterEncoding=utf-8&useSSL=true
          driver-class-name: com.mysql.cj.jdbc.Driver
          username: root
password:创建俩个数据库的service层,@Ds中的value值就是指定访问的数据库的名字,这里的数据库的名字必须为在application.yml中设置的数据库名相同,@Ds不仅可以作用在类上,也可以作用在方法上,便于我们在同一个类service类中实现相同表的读写分离操作。
//对应的service接口就是继承IService<Product>
package com.huang.Service.impl;

import com.baomidou.dynamic.datasource.annotation.DS;
import com.baomidou.mybatisplus.extension.service.impl.ServiceImpl;
import com.huang.Service.ProductService;
import com.huang.mapper.ProductMapper;
import com.huang.pojo.Product;
import org.springframework.stereotype.Service;

@Service
@DS("slave_1")
//@Ds中的value值就是指定访问的数据库的名字,这里的数据库的名字必须为在application.yml中设置的数据库名相同
//@Ds不仅可以作用在类上,也可以作用在方法上,便于我们在同一个类service类中实现相同表的读写分离操作
public class ProductServiceImpl extends ServiceImpl<ProductMapper, Product> implements ProductService {
}
对应的Serice接口就是继承ISerice<User>
package com.huang.Service.impl;

import com.baomidou.dynamic.datasource.annotation.DS;
import com.baomidou.mybatisplus.extension.service.impl.ServiceImpl;
import com.huang.Service.UserService;
import com.huang.mapper.UserMapper;
import com.huang.pojo.User;
import org.springframework.stereotype.Service;

@Service
@DS("master")
//@Ds中的value值就是指定访问的数据库的名字,这里的数据库的名字必须为在application.yml中设置的数据库名相同
//@Ds不仅可以作用在类上,也可以作用在方法上,便于我们在同一个类service类中实现相同表的读写分离操作
public class UserServiceImpl extends ServiceImpl<UserMapper, User> implements UserService {
}
进行测试
@SpringBootTest
class Mybatisplus1ApplicationTests {

    @Autowired
    ProductService productService;
    @Autowired
    UserService userService;

    @Test
    void test1() {
        //slave_1数据库中的信息
        System.out.println(productService.getById(1));
        //master数据库中的信息
        System.out.println(userService.getById(1));
    }

}
测试结果为下

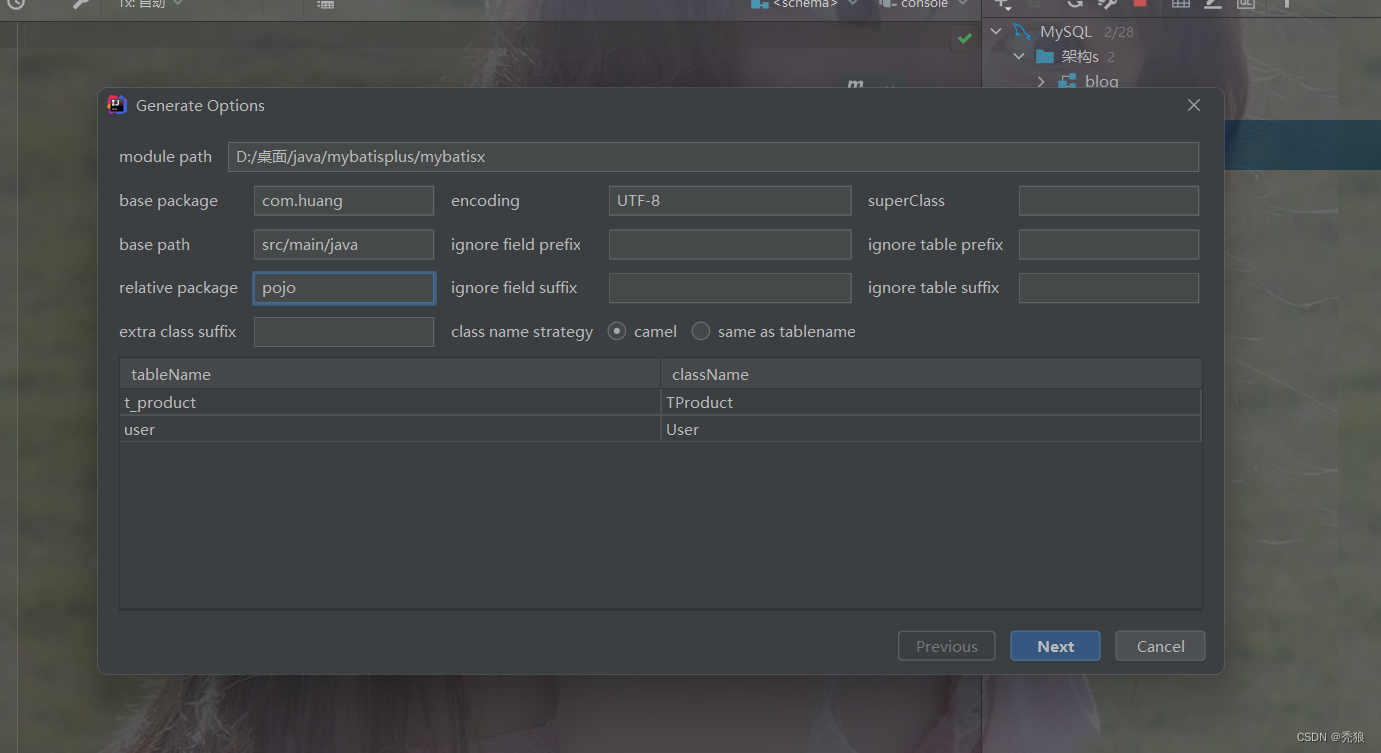
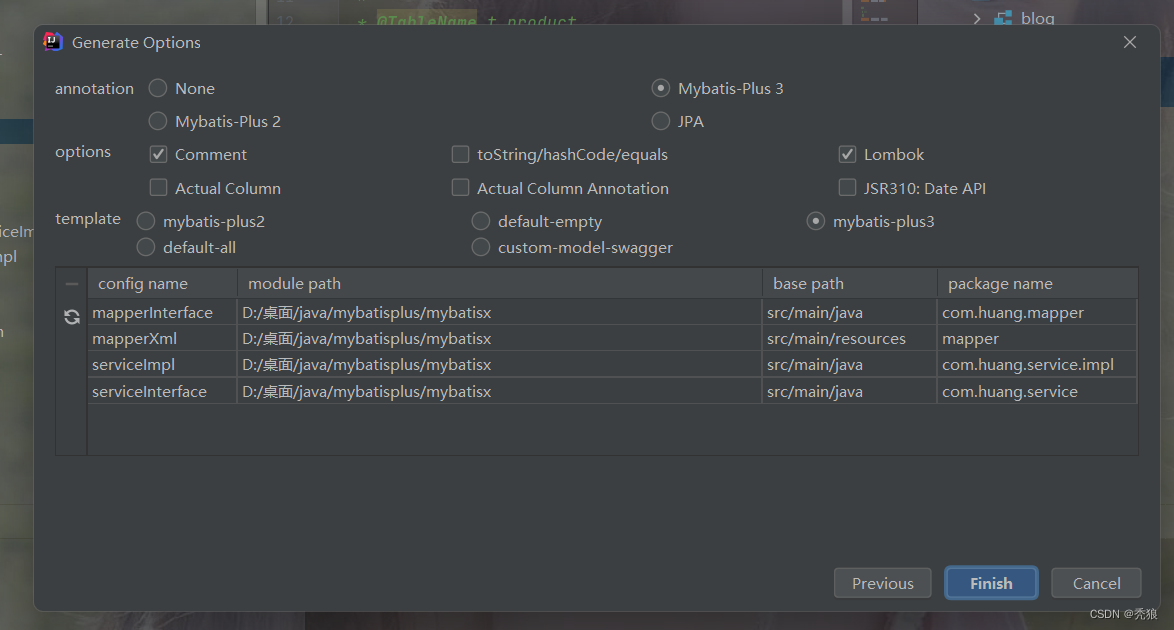
mybatis-X
代码生成器
通过连接数据库,右击对应的多个或一个表,执行mybatis-x的代码生成。
最终结果
条件的优先级
例子:使用lambda表达式表示优先级
@Test
void test7() {
// 设置条件的优先级
QueryWrapper<User> userQueryWrapper = new QueryWrapper<>();
//名字为yyy1并且age=21或email=null
QueryWrapper<User> and = userQueryWrapper.eq("name", "yyy1").and(i -> i.eq("age", 21).or().isNull("email"));
List<User> users = userMapper.selectList(and);
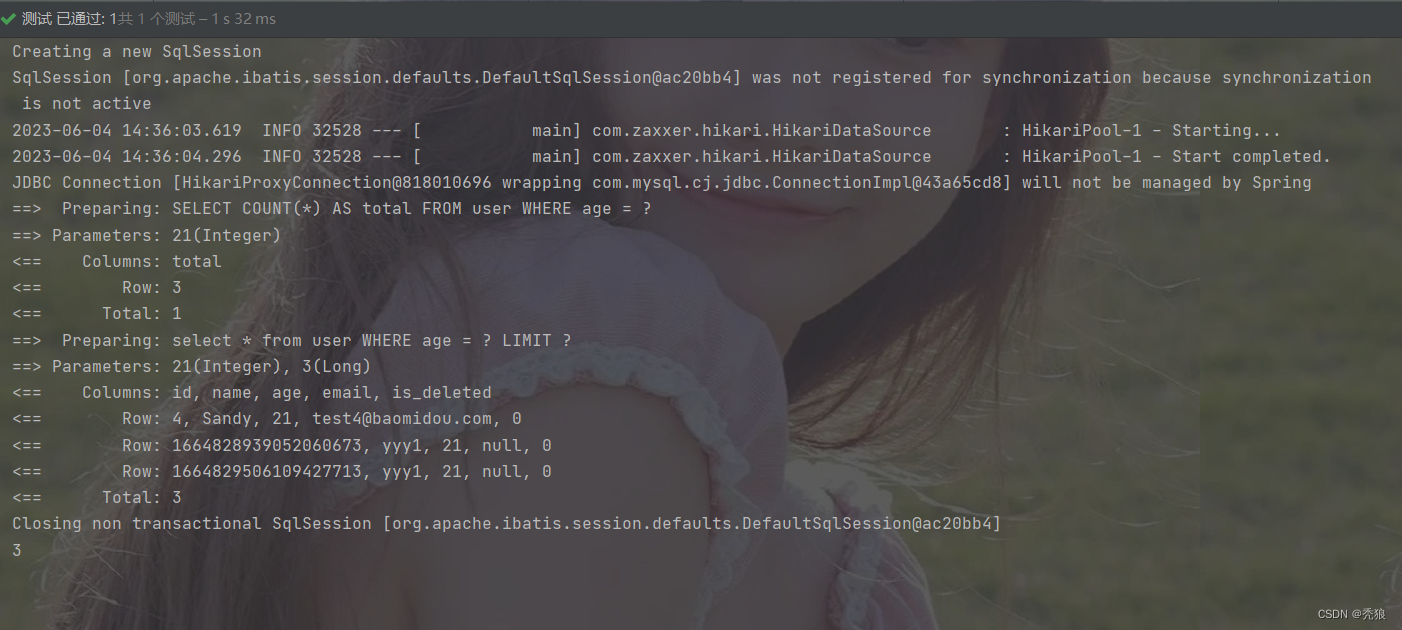
}在条件构造器中使用select方法
当我们需要的数据不是全部字段时,我们可以通过条件构造器设置需要查询的字段。
例子:
   @Test
    void test8() {
//        当我们需要的数据不是全部字段时,我们可以通过条件构造器设置需要查询的字段
//        在条件构造器中使用select方法进行操作,使用selectMaps进行查询
        QueryWrapper<User> wrapper = new QueryWrapper<>();
        wrapper.select("name", "age");
        List<Map<String, Object>> maps = userMapper.selectMaps(wrapper);
        maps.forEach(System.out::println);
    }
在条件构造器中使用inSql方法
使用子查询操作查询数据
例子:
 @Test
    void test9() {
        //使用子查询操作查询数据
        //这里的测试例子:将id<10的数据的使用信息打印出来
        QueryWrapper<User> wrapper = new QueryWrapper<>();
        wrapper.inSql("id", "select id from user where id < 10");
        List<User> users = userMapper.selectList(wrapper);
        users.forEach(user -> System.out.println(user));
    }
使用condition参数可以先进行判断数据的真实性
例子:
 @Test
    void test10() {
        //在用户传来条件时,可能某些字段是空的,所以我们需要进行判断
        //使用condition先对应数据进行判空,仔进行条件构造
        String name = "a";
        Integer ageStart = 18;
        Integer ageEnd = 25;
        String email = "";
        QueryWrapper<User> wrapper = new QueryWrapper<>();
        wrapper.like(StringUtils.isNotBlank(name), "name", name)
                .ge(ageStart != null, "age", ageStart)
                .le(ageEnd != null, "age", ageEnd)
                .eq(StringUtils.isNotBlank(email), "email", email);
        List<User> users = userMapper.selectList(wrapper);
        users.forEach(user -> System.out.println(user));
    }
LambdaQueryWrapper
为了避免我们在使用条件构造器时将数据库中的字段名写错,我们可以使用Lambda表达式获取数据库中对应的字段名。(通过get方法获取数据库中的字段名)
例子:
 @Test
    void test11() {
        //使用LambdaQueryWrapper
        //在用户传来条件时,可能某些字段是空的,所以我们需要进行判断
        //使用condition先对应数据进行判空,仔进行条件构造
        String name = "a";
        Integer ageStart = 18;
        Integer ageEnd = 25;
        String email = "";
        LambdaQueryWrapper<User> wrapper = new LambdaQueryWrapper<>();
        wrapper.like(StringUtils.isNotBlank("name"), User::getName, name)
                .ge(ageStart != null, User::getAge, ageStart)
                .le(ageEnd != null, User::getAge, ageEnd)
                .like(StringUtils.isNotBlank(email), User::getEmail, email);
        List<User> users = userMapper.selectList(wrapper);
        users.forEach(user -> System.out.println(user));
    }
myabtisPlus分页插件
在mybatisPlusConfig类中进行配置
import com.baomidou.mybatisplus.annotation.DbType;
import com.baomidou.mybatisplus.extension.plugins.MybatisPlusInterceptor;
import com.baomidou.mybatisplus.extension.plugins.inner.PaginationInnerInterceptor;
import org.mybatis.spring.annotation.MapperScan;
import org.springframework.context.annotation.Bean;
import org.springframework.context.annotation.Configuration;

@Configuration
@MapperScan("com.huang.mapper")
public class mybatisPlusConfig {

    @Bean
    public MybatisPlusInterceptor mybatisPlusInterceptor() {
//        设置mybatisPlus的分页插件
        MybatisPlusInterceptor mybatisPlusInterceptor = new MybatisPlusInterceptor();
//        mybatisPlus可以对多种的数据库进行分页,所以我们要设置为mysql类型
        mybatisPlusInterceptor.addInnerInterceptor(new PaginationInnerInterceptor(DbType.MYSQL));
        return mybatisPlusInterceptor;
    }
}
测试
import com.baomidou.mybatisplus.extension.plugins.pagination.Page;
import com.huang.mapper.UserMapper;
import com.huang.pojo.User;
import org.junit.jupiter.api.Test;
import org.springframework.beans.factory.annotation.Autowired;
import org.springframework.boot.test.context.SpringBootTest;

@SpringBootTest
public class MybatisPlusPluginTest {

    @Autowired
    UserMapper userMapper;

    @Test
    void test1() {
//        设置current当前页码,size表示每页对应的条数
        Page<User> page = new Page<>(3, 3);
//        打印使用的信息,并分页
        Page<User> data = userMapper.selectPage(page, null);
//        在使用selectPage方法后,最终的值会封装给page,所以继续使用page进行后续操作
        System.out.println(page);
        System.out.println(page.getTotal());
        System.out.println(page.hasNext());
        System.out.println(page.hasPrevious());
        System.out.println(page.getCurrent());
        System.out.println(page.getSize());
    }
}
测试结果为下:
xml自定义分页
在mapper接口中编写方法(要使用mybatisPlus的分页插件就要保证方法的第一个参数为Page,方法的额返回值为Page<T>)
import com.baomidou.mybatisplus.core.mapper.BaseMapper;
import com.baomidou.mybatisplus.extension.plugins.pagination.Page;
import com.huang.pojo.User;
import org.apache.ibatis.annotations.Mapper;
import org.apache.ibatis.annotations.Param;

@Mapper
public interface UserMapper extends BaseMapper<User> {

    Page<User> getListByAge(@Param("page") Page page, @Param("age") Integer age);
}
在mapper.xml中编写sql语句
<?xml version="1.0" encoding="UTF-8" ?>
<!DOCTYPE mapper
        PUBLIC "-//mybatis.org//DTD Mapper 3.0//EN"
        "http://mybatis.org/dtd/mybatis-3-mapper.dtd">
<mapper namespace="com.huang.mapper.UserMapper">
        <select id="getListByAge" resultType="com.huang.pojo.User">
            select * from user
            <where>
                <if test="age != null">
                    age = #{age}
                </if>
            </where>
        </select>
</mapper>
使用方法测试
  @Test
    void test2() {
        Page<User> page = new Page<>(1, 3);
        userMapper.getListByAge(page, 21);
        System.out.println(page.getTotal());
    }
测试结果为下:
代码自动生成器
添加依赖:
<dependency>
<groupId>com.baomidou</groupId>
<artifactId>mybatis-plus-generator</artifactId>
<version>3.5.1</version>
</dependency>
<dependency>
<groupId>org.freemarker</groupId>
<artifactId>freemarker</artifactId>
<version>2.3.31</version>
</dependency>
创建测试类
import com.baomidou.mybatisplus.generator.FastAutoGenerator;
import com.baomidou.mybatisplus.generator.config.OutputFile;
import com.baomidou.mybatisplus.generator.engine.FreemarkerTemplateEngine;
import org.junit.jupiter.api.Test;

import java.util.Collections;

public class FastAutoGeneratorTest {
    @Test
    void test1() {
        FastAutoGenerator.create("jdbc:mysql://localhost:3306/mybatis_plus?useUnicode=true&characterEncoding=UTF-8&useSSL=true", "root", "")
                        .globalConfig(builder -> {
                            builder.author("tolen") // 设置作者
//.enableSwagger() // 开启 swagger 模式
                                    .fileOverride() // 覆盖已生成文件
                                    .outputDir("D://mybatis_plus"); // 指定输出目录
                        })
                        .packageConfig(builder -> {
                            builder.parent("com.huang") // 设置父包名
                                    .moduleName("mybatisplus") // 设置父包模块名
                                    .pathInfo(Collections.singletonMap(OutputFile.mapperXml, "D://mybatis_plus"));
// 设置mapperXml生成路径
                        })
                        .strategyConfig(builder -> {
                            builder.addInclude("user","t_product") // 设置需要生成的表名
                                    .addTablePrefix("t_"); // 设置过滤表前缀
                        })
                        .templateEngine(new FreemarkerTemplateEngine())
    // 使用Freemarker引擎模板,默认的是Velocity引擎模板
                        .execute();
    }
}
结果为下:


@MapKey(“id”)
在对应的mapper的接口上添加此直接,就是将原本返回List的数据 ,以对应的id为键,以每一条数据为值,返回一个Map<String, object>。
Mybatis获取添加属性中自增的主键
-
在mapper.xml中设置两个属性
-
useGeneratedKeys:设置使用自增的主键
-
keyProperty:因为增删改有统一的返回值是受影响的行数,因此只能将获取的自增的主键放在传输的参数user对象的某个属性中
-
对应的代码例子
<?xml version="1.0" encoding="UTF-8" ?>
<!DOCTYPE mapper
        PUBLIC "-//mybatis.org//DTD Mapper 3.0//EN"
        "http://mybatis.org/dtd/mybatis-3-mapper.dtd">
<mapper namespace="com.huang.mappers.UserMapper">
<!--    useGeneratedKeys="true" 设置使用自增的主键-->
<!--    keyProperty="id"将主键放入传入类中的对应属性上-->
    <insert id="saveAndReturnKey" useGeneratedKeys="true" keyProperty="id">
        insert into user values (#{id}, #{name}, #{password})
    </insert>
</mapper>
结果为下:
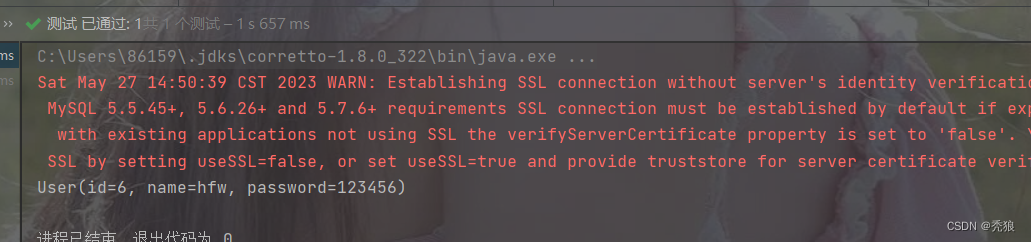
自动生成的主键被赋给了传入的实体类。
mysql和java名命冲突问题
方法一:在mybatis-config.xml中的setting中设置mapUnderscoreToCamelCase为true。

代码为下:
<?xml version="1.0" encoding="UTF-8" ?>
<!DOCTYPE configuration
        PUBLIC "-//mybatis.org//DTD Config 3.0//EN"
        "http://mybatis.org/dtd/mybatis-3-config.dtd">
<configuration>

    <settings>
<!--        开启数据库命名规则和java命名规则的转换-->
        <setting name="mapUnderscoreToCamelCase" value="true"/>
    </settings>

</configuration>
方法二:设置结果映射(resultMap)
将每个字段进行自定义的映射(每个字段必须都设置,即使名字一样)
代码为下:
<?xml version="1.0" encoding="UTF-8" ?>
<!DOCTYPE mapper
        PUBLIC "-//mybatis.org//DTD Mapper 3.0//EN"
        "http://mybatis.org/dtd/mybatis-3-mapper.dtd">
<mapper namespace="com.huang.mappers.employeeMapper">

    <!--    type表示返回的类型-->
    <resultMap id="employeeResultMap" type="com.huang.pojo.Employee">
        <!--        设置主键的映射关系-->
        <id property="id" column="id"></id>
        <result property="empName" column="emp_name"></result>
        <result property="empSex" column="emp_sex"></result>
        <result property="empEmail" column="emp_email"></result>
        <result property="comId" column="com_id"></result>
    </resultMap>

    <select id="getAllEmployee" resultMap="employeeResultMap">
        select * from t_emp;
    </select>

</mapper>
一对多的属性赋值方案
方案一:使用级联的方式赋值。
<?xml version="1.0" encoding="UTF-8" ?>
<!DOCTYPE mapper
        PUBLIC "-//mybatis.org//DTD Mapper 3.0//EN"
        "http://mybatis.org/dtd/mybatis-3-mapper.dtd">
<mapper namespace="com.huang.mappers.employeeMapper">

    <resultMap id="Employee" type="com.huang.pojo.Employee">
        <id property="id" column="id"></id>
        <result property="empName" column="emp_name"></result>
        <result property="empSex" column="emp_sex"></result>
        <result property="empEmail" column="emp_email"></result>
        <result property="comId" column="com_id"></result>
        <result property="company.comId" column="com_id"></result>
        <result property="company.comName" column="com_name"></result>
    </resultMap>
    <select id="getOneByIdEmployee" resultMap="Employee">
    select * from t_emp left join company on t_emp.id = company.com_id where id = #{id}
    </select>

</mapper>
方案二:使用association处理映射关系
<?xml version="1.0" encoding="UTF-8" ?>
<!DOCTYPE mapper
        PUBLIC "-//mybatis.org//DTD Mapper 3.0//EN"
        "http://mybatis.org/dtd/mybatis-3-mapper.dtd">
<mapper namespace="com.huang.mappers.employeeMapper">

<!--    2.使用association处理映射关系-->
    <resultMap id="Employee" type="com.huang.pojo.Employee">
        <id property="id" column="id"></id>
        <result property="empName" column="emp_name"></result>
        <result property="empSex" column="emp_sex"></result>
        <result property="empEmail" column="emp_email"></result>
        <result property="comId" column="com_id"></result>
        <association property="company" javaType="com.huang.pojo.Company">
<!--            调用association标签,通过javaType指定要反射的对象,将数据库的信息赋值给该对象的各个属性,
                最终将此对象赋给association标签中property对应的属性-->
            <result property="comId" column="com_id"></result>
            <result property="comName" column="com_name"></result>
        </association>
    </resultMap>

    <select id="getOneByIdEmployee" resultMap="Employee">
    select * from t_emp left join company on t_emp.id = company.com_id where id = #{id}
    </select>

</mapper>
方案三:使用分步查询
<?xml version="1.0" encoding="UTF-8" ?>
<!DOCTYPE mapper
        PUBLIC "-//mybatis.org//DTD Mapper 3.0//EN"
        "http://mybatis.org/dtd/mybatis-3-mapper.dtd">
<mapper namespace="com.huang.mappers.employeeMapper">

<!--    3.使用分步查询, 最为常用的方法,到后期分布式的时候由于数据量巨大,我们要减少使用连表查询的操作,使用单表操作,加快速度-->
<!--    此方法可以提高代码的利用率和提高可读性-->
    <resultMap id="Employee" type="com.huang.pojo.Employee">
            <id property="id" column="id"></id>
            <result property="empName" column="emp_name"></result>
            <result property="empSex" column="emp_sex"></result>
            <result property="empEmail" column="emp_email"></result>
            <result property="comId" column="com_id"></result>
<!--        select属性要使用唯一标识,这里就可以使用对应方法的全路径-->
            <association property="company"
                         column="com_id"
                         select="com.huang.mappers.companyMapper.getCompanyById">
            </association>
<!--        column属性就是作为后续select的条件-->
<!--        最后将查询得到的数据赋值给 association标签中的property中对应的属性-->
        </resultMap>


    <select id="getOneByIdEmployee" resultMap="Employee">
    select * from t_emp where id = #{id}
    </select>

</mapper>
companymapper中的select方法
<?xml version="1.0" encoding="UTF-8" ?>
<!DOCTYPE mapper
        PUBLIC "-//mybatis.org//DTD Mapper 3.0//EN"
        "http://mybatis.org/dtd/mybatis-3-mapper.dtd">
<mapper namespace="com.huang.mappers.companyMapper">

    <resultMap id="Company" type="com.huang.pojo.Company">
        <id property="comId" column="com_id"></id>
        <result property="comName" column="com_name"></result>
    </resultMap>
        <select id="getCompanyById" resultMap="Company">
            SELECT * FROM company WHERE com_id = #{comId}
        </select>
</mapper>
在后续的一对多处理中尽量使用第三种方法,可以提高运行效率和提高可读性。
多对一的属性赋值方案
方案一:使用collection标签
<?xml version="1.0" encoding="UTF-8" ?>
<!DOCTYPE mapper
        PUBLIC "-//mybatis.org//DTD Mapper 3.0//EN"
        "http://mybatis.org/dtd/mybatis-3-mapper.dtd">
<mapper namespace="com.huang.mappers.companyMapper">

    <resultMap id="CompanyAndEmployeeList" type="com.huang.pojo.Company">
        <id property="comId" column="com_id"></id>
        <result property="comName" column="com_name"></result>
        <collection property="employeeList" ofType="com.huang.pojo.Employee">
            <!--            ofType表示此集合的类型,与javaType不同-->
            <id property="id" column="id"></id>
            <result property="empName" column="emp_name"></result>
            <result property="empSex" column="emp_sex"></result>
            <result property="empEmail" column="emp_email"></result>
            <result property="comId" column="com_id"></result>
        </collection>
    </resultMap>

    <select id="getCompanyAndEmployeeListById" resultMap="CompanyAndEmployeeList">
        select * from company left join t_emp te on company.com_id = te.com_id where company.com_id = #{comId}
    </select>
</mapper>
方案二:使用分步查询
EmployeeByComId的mapper配置。
<?xml version="1.0" encoding="UTF-8" ?>
<!DOCTYPE mapper
        PUBLIC "-//mybatis.org//DTD Mapper 3.0//EN"
        "http://mybatis.org/dtd/mybatis-3-mapper.dtd">
<mapper namespace="com.huang.mappers.employeeMapper">

    <resultMap id="EmployeeByComId" type="com.huang.pojo.Employee">
        <id property="id" column="id"></id>
        <result property="empName" column="emp_name"></result>
        <result property="empEmail" column="emp_email"></result>
        <result property="empSex" column="emp_sex"></result>
        <result property="comId" column="com_id"></result>
    </resultMap>

    <select id="getEmployeeByComId" resultMap="EmployeeByComId">
        select * from t_emp where com_id = #{comId}
    </select>

</mapper>
分布查询mapper配置。
<?xml version="1.0" encoding="UTF-8" ?>
<!DOCTYPE mapper
        PUBLIC "-//mybatis.org//DTD Mapper 3.0//EN"
        "http://mybatis.org/dtd/mybatis-3-mapper.dtd">
<mapper namespace="com.huang.mappers.companyMapper">

    <resultMap id="CompanyAndEmployeeList" type="com.huang.pojo.Company">
        <id property="comId" column="com_id"></id>
        <result property="comName" column="com_name"></result>
        <collection property="employeeList"
                    ofType="com.huang.pojo.Employee"
                    column="com_id"
                    select="com.huang.mappers.employeeMapper.getEmployeeByComId">
        </collection>
    </resultMap>

    <select id="getCompanyAndEmployeeListById" resultMap="CompanyAndEmployeeList">
        select * from company where com_id = #{comId}
    </select>
</mapper>
延迟加载
-
分步查询的优点:可以实现延迟加载,但是必须在核心配置文件中设置全局配置信息:
-
lazyLoadingEnabled:延迟加载的全局开关。当开启时,所有关联对象都会延迟加载
-
aggressiveLazyLoading:当开启时,任何方法的调用都会加载该对象的所有属性。 否则,每个属性会按需加载(默认是false,所以无需设置)
-
-
此时就可以实现按需加载,获取的数据是什么,就只会执行相应的sql。此时可通过association和collection中的fetchType属性设置当前的分步查询是否使用延迟加载,fetchType="lazy(延迟加载)|eager(立即加载)"
开启延迟加载
<?xml version="1.0" encoding="UTF-8" ?>
<!DOCTYPE configuration
        PUBLIC "-//mybatis.org//DTD Config 3.0//EN"
        "http://mybatis.org/dtd/mybatis-3-config.dtd">
<configuration>

<!--        开启延迟加载-->
        <setting name="lazyLoadingEnabled" value="true"/>
    </settings>

</configuration>
此时是开启所有的分布查询都进行延迟加载。(就是懒汉式)
有时可能会存在一些分步查询不需要延迟加载此时就可以设置fetchType属性,此属性有eager/lazy两个值,eager就是全部加载(饿汉式),lazy就是延迟加载(懒汉式)。
<?xml version="1.0" encoding="UTF-8" ?>
<!DOCTYPE mapper
        PUBLIC "-//mybatis.org//DTD Mapper 3.0//EN"
        "http://mybatis.org/dtd/mybatis-3-mapper.dtd">
<mapper namespace="com.huang.mappers.employeeMapper">

<!--    3.使用分步查询, 最为常用的方法,到后期分布式的时候由于数据量巨大,我们要减少使用连表查询的操作,使用单表操作,加快速度-->
<!--    此方法可以提高代码的利用率和提高可读性-->
    <resultMap id="Employee" type="com.huang.pojo.Employee">
            <id property="id" column="id"></id>
            <result property="empName" column="emp_name"></result>
            <result property="empSex" column="emp_sex"></result>
            <result property="empEmail" column="emp_email"></result>
            <result property="comId" column="com_id"></result>
<!--        select属性要使用唯一标识,这里就可以使用对应方法的全路径-->
            <association property="company"
                         column="com_id"
                         select="com.huang.mappers.companyMapper.getCompanyById"
                         fetchType="eager">
            </association>
<!--        column属性就是作为后续select的条件-->
<!--        最后将查询得到的数据赋值给 association标签中的property中对应的属性-->
        </resultMap>


    <select id="getOneByIdEmployee" resultMap="Employee">
    select * from t_emp where id = #{id}
    </select>

</mapper>
SQL动态查询
where标签
where标签:使用此标签可以动态的生成where,并且会将去除前面重复的and/or去除。(但是不能去除后面的and/or)
例子:
<?xml version="1.0" encoding="UTF-8" ?>
<!DOCTYPE mapper
        PUBLIC "-//mybatis.org//DTD Mapper 3.0//EN"
        "http://mybatis.org/dtd/mybatis-3-mapper.dtd">
<mapper namespace="com.huang.mappers.DynamicEmployeeMapper">

    <resultMap id="EmployeeMap" type="com.huang.pojo.Employee">
        <id property="id" column="id"></id>
        <result property="empName" column="emp_name"></result>
        <result property="empSex" column="emp_sex"></result>
        <result property="empEmail" column="emp_email"></result>
        <result property="comId" column="com_id"></result>
    </resultMap>
    <select id="DynameicSQLForGetEmployeeByProperties" resultMap="EmployeeMap">
            select * from t_emp
            <where>
                <if test="empName != null and empName != ''">
                    and emp_name = #{empName}
                </if>
                <if test="empSex != null and empSex != ''">
                    and emp_sex = #{empSex}
                </if>
                <if test="empEmail != null and empEmail != ''">
                    and emp_email = #{empEmail}
                </if>
            </where>
    </select>
</mapper>tirm标签:
-
trim用于去掉或添加标签中的内容
-
常用属性
-
prefix:在trim标签中的内容的前面添加某些内容
-
suffix:在trim标签中的内容的后面添加某些内容
-
prefixOverrides:在trim标签中的内容的前面去掉某些内容
-
suffixOverrides:在trim标签中的内容的后面去掉某些内容
-
可以解决if语句中出现的多余的and/or。
例子:
<?xml version="1.0" encoding="UTF-8" ?>
<!DOCTYPE mapper
        PUBLIC "-//mybatis.org//DTD Mapper 3.0//EN"
        "http://mybatis.org/dtd/mybatis-3-mapper.dtd">
<mapper namespace="com.huang.mappers.DynamicEmployeeMapper">

    <resultMap id="EmployeeMap" type="com.huang.pojo.Employee">
        <id property="id" column="id"></id>
        <result property="empName" column="emp_name"></result>
        <result property="empSex" column="emp_sex"></result>
        <result property="empEmail" column="emp_email"></result>
        <result property="comId" column="com_id"></result>
    </resultMap>

<!--tirm标签-->
    <select id="DynameicSQLForGetEmployeeByProperties" resultMap="EmployeeMap">
                select * from t_emp
                <trim prefix="where" suffix="" prefixOverrides="" suffixOverrides="and|or">
#                     如果下面的所有条件都不成立的话,tirm中设置的属性全部不生效
                    <if test="empName != null and empName != ''">
                        emp_name = #{empName} and
                    </if>
                    <if test="empSex != null and empSex != ''">
                        emp_sex = #{empSex} and
                    </if>
                    <if test="empEmail != null and empEmail != ''">
                        emp_email = #{empEmail} and
                    </if>
                </trim>
        </select>
</mapper>
chooce,where,otherwise标签
可以将他们理解为if....else,when至少要有一个,otherwise至多只有一个。
例子:
<?xml version="1.0" encoding="UTF-8" ?>
<!DOCTYPE mapper
        PUBLIC "-//mybatis.org//DTD Mapper 3.0//EN"
        "http://mybatis.org/dtd/mybatis-3-mapper.dtd">
<mapper namespace="com.huang.mappers.DynamicEmployeeMapper">

    <resultMap id="EmployeeMap" type="com.huang.pojo.Employee">
        <id property="id" column="id"></id>
        <result property="empName" column="emp_name"></result>
        <result property="empSex" column="emp_sex"></result>
        <result property="empEmail" column="emp_email"></result>
        <result property="comId" column="com_id"></result>
    </resultMap>

    <select id="DynameicSQLForGetEmployeeByProperties" resultMap="EmployeeMap">
        select * from t_emp
        <where>
#         最多执行一个when,如果when都没有执行就会执行otherwise中的语句
            <choose>
                <when test="empName != null and empName != ''">
                    emp_name = #{empName}
                </when>
                <when test="empSex != null and empSex != ''">
                    emp_sex = #{empSex}
                </when>
                <when test="empEmail != null and empEmail != ''">
                    emp_email = #{empEmail}
                </when>
                <otherwise>
                    1=1
                </otherwise>
            </choose>
        </where>
    </select>
</mapper>
foreach标签
用于 多次的插入和删除。
插入例子:
<?xml version="1.0" encoding="UTF-8" ?>
<!DOCTYPE mapper
        PUBLIC "-//mybatis.org//DTD Mapper 3.0//EN"
        "http://mybatis.org/dtd/mybatis-3-mapper.dtd">
<mapper namespace="com.huang.mappers.DynamicEmployeeMapper">

    <insert id="DynameicSQLForInsertEmployeeList">
        insert into t_emp values
        <foreach collection="Employees" item="item" separator=",">
            (null, #{item.empName}, #{item.empSex}, #{item.empEmail}, null)
        </foreach>
    </insert>
</mapper>
删除例子:
<?xml version="1.0" encoding="UTF-8" ?>
<!DOCTYPE mapper
        PUBLIC "-//mybatis.org//DTD Mapper 3.0//EN"
        "http://mybatis.org/dtd/mybatis-3-mapper.dtd">
<mapper namespace="com.huang.mappers.DynamicEmployeeMapper">

<!--    in的写法-->
<!--    <delete id="DynameicSQLFordeleteEmployeeByIds">-->
<!--        delete from t_emp where id in-->
<!--        <foreach collection="ids" item="id" open="(" close=")" separator=",">-->
<!--            #{id}-->
<!--        </foreach>-->
<!--    </delete>-->
<!--    or的写法-->
    <delete id="DynameicSQLFordeleteEmployeeByIds">
        delete from t_emp where
        <foreach collection="ids" item="id" separator="or">
            id = #{id}
        </foreach>
    </delete>
</mapper>
sql片段
-
sql片段,可以记录一段公共sql片段,在使用的地方通过include标签进行引入
-
声明sql片段:
<sql>标签
<sql id="empColumns">eid,emp_name,age,sex,email</sql>-
引用sql片段:
<include>标签
<!--List<Emp> getEmpByCondition(Emp emp);-->
<select id="getEmpByCondition" resultType="Emp">
	select <include refid="empColumns"></include> from t_emp
</select>
mybatis缓存
MyBatis的一级缓存
-
一级缓存是SqlSession级别的,通过同一个SqlSession查询的数据会被缓存,下次查询相同的数据,就会从缓存中直接获取,不会从数据库重新访问
-
使一级缓存失效的四种情况:
1. 不同的SqlSession对应不同的一级缓存
2. 同一个SqlSession但是查询条件不同
3. 同一个SqlSession两次查询期间执行了任何一次增删改操作
4. 同一个SqlSession两次查询期间手动清空了缓存
MyBatis的二级缓存
-
二级缓存是SqlSessionFactory级别,通过同一个SqlSessionFactory创建的SqlSession查询的结果会被缓存;此后若再次执行相同的查询语句,结果就会从缓存中获取
-
二级缓存开启的条件
1. 在核心配置文件中,设置全局配置属性cacheEnabled="true",默认为true,不需要设置
2. 在映射文件中设置标签<cache />
3. 二级缓存必须在SqlSession关闭或提交之后有效
4. 查询的数据所转换的实体类类型必须实现序列化的接口-
使二级缓存失效的情况:两次查询之间执行了任意的增删改,会使一级和二级缓存同时失效
-
二级缓存的相关配置:
-
在mapper配置文件中添加的cache标签可以设置一些属性
-
eviction属性:缓存回收策略
-
LRU(Least Recently Used) – 最近最少使用的:移除最长时间不被使用的对象。
-
FIFO(First in First out) – 先进先出:按对象进入缓存的顺序来移除它们。
-
SOFT – 软引用:移除基于垃圾回收器状态和软引用规则的对象。
-
WEAK – 弱引用:更积极地移除基于垃圾收集器状态和弱引用规则的对象。
-
默认的是 LRU
-
-
flushInterval属性:刷新间隔,单位毫秒
-
默认情况是不设置,也就是没有刷新间隔,缓存仅仅调用语句(增删改)时刷新
-
size属性:引用数目,正整数
-
代表缓存最多可以存储多少个对象,太大容易导致内存溢出
-
readOnly属性:只读,true/false
-
true:只读缓存;会给所有调用者返回缓存对象的相同实例。因此这些对象不能被修改。这提供了很重要的性能优势。
-
false:读写缓存;会返回缓存对象的拷贝(通过序列化)。这会慢一些,但是安全,因此默认是false
-
MyBatis缓存查询的顺序
-
先查询二级缓存,因为二级缓存中可能会有其他程序已经查出来的数据,可以拿来直接使用
-
如果二级缓存没有命中,再查询一级缓存
-
如果一级缓存也没有命中,则查询数据库
-
SqlSession关闭之后,一级缓存中的数据会写入二级缓存
分页插件
分页插件使用步骤
添加依赖
<!-- https://mvnrepository.com/artifact/com.github.pagehelper/pagehelper -->
<dependency>
    <groupId>com.github.pagehelper</groupId>
    <artifactId>pagehelper</artifactId>
    <version>5.2.0</version>
</dependency>
配置分页插件
-
在MyBatis的核心配置文件(mybatis-config.xml)中配置插件
<plugins>
    <!--设置分页插件-->
    <plugin interceptor="com.github.pagehelper.PageInterceptor"></plugin>
</plugins>
分页插件的使用
开启分页功能
-
在查询功能之前使用
PageHelper.startPage(int pageNum, int pageSize)开启分页功能 -
pageNum:当前页的页码
-
pageSize:每页显示的条数
-
@Test
public void testPageHelper() throws IOException {
    InputStream is = Resources.getResourceAsStream("mybatis-config.xml");
    SqlSessionFactoryBuilder sqlSessionFactoryBuilder = new SqlSessionFactoryBuilder();
    SqlSessionFactory sqlSessionFactory = sqlSessionFactoryBuilder.build(is);
    SqlSession sqlSession = sqlSessionFactory.openSession(true);
    EmpMapper mapper = sqlSession.getMapper(EmpMapper.class);
    //访问第一页,每页四条数据
    PageHelper.startPage(1,4);
    List<Emp> emps = mapper.selectByExample(null);
    emps.forEach(System.out::println);
}
分页相关数据
方法一:直接输出
@Test
public void testPageHelper() throws IOException {
    InputStream is = Resources.getResourceAsStream("mybatis-config.xml");
    SqlSessionFactoryBuilder sqlSessionFactoryBuilder = new SqlSessionFactoryBuilder();
    SqlSessionFactory sqlSessionFactory = sqlSessionFactoryBuilder.build(is);
    SqlSession sqlSession = sqlSessionFactory.openSession(true);
    EmpMapper mapper = sqlSession.getMapper(EmpMapper.class);
    //访问第一页,每页四条数据
    Page<Object> page = PageHelper.startPage(1, 4);
    List<Emp> emps = mapper.selectByExample(null);
    //在查询到List集合后,打印分页数据
    System.out.println(page);
}
-
分页相关数据:
```
Page{count=true, pageNum=1, pageSize=4, startRow=0, endRow=4, total=8, pages=2, reasonable=false, pageSizeZero=false}[Emp{eid=1, empName='admin', age=22, sex='男', email='456@qq.com', did=3}, Emp{eid=2, empName='admin2', age=22, sex='男', email='456@qq.com', did=3}, Emp{eid=3, empName='王五', age=12, sex='女', email='123@qq.com', did=3}, Emp{eid=4, empName='赵六', age=32, sex='男', email='123@qq.com', did=1}]
```
方法二使用PageInfo
-
在查询获取list集合之后,使用
PageInfo<T> pageInfo = new PageInfo<>(List<T> list, intnavigatePages)获取分页相关数据 -
list:分页之后的数据
-
navigatePages:导航分页的页码数
-
@Test
public void testPageHelper() throws IOException {
    InputStream is = Resources.getResourceAsStream("mybatis-config.xml");
    SqlSessionFactoryBuilder sqlSessionFactoryBuilder = new SqlSessionFactoryBuilder();
    SqlSessionFactory sqlSessionFactory = sqlSessionFactoryBuilder.build(is);
    SqlSession sqlSession = sqlSessionFactory.openSession(true);
    EmpMapper mapper = sqlSession.getMapper(EmpMapper.class);
    PageHelper.startPage(1, 4);
    List<Emp> emps = mapper.selectByExample(null);
    //5就是导航的目录个数
    PageInfo<Emp> page = new PageInfo<>(emps,5);
    System.out.println(page);
}
-
分页相关数据:
```
PageInfo{
pageNum=1, pageSize=4, size=4, startRow=1, endRow=4, total=8, pages=2,
list=Page{count=true, pageNum=1, pageSize=4, startRow=0, endRow=4, total=8, pages=2, reasonable=false, pageSizeZero=false}[Emp{eid=1, empName='admin', age=22, sex='男', email='456@qq.com', did=3}, Emp{eid=2, empName='admin2', age=22, sex='男', email='456@qq.com', did=3}, Emp{eid=3, empName='王五', age=12, sex='女', email='123@qq.com', did=3}, Emp{eid=4, empName='赵六', age=32, sex='男', email='123@qq.com', did=1}],
prePage=0, nextPage=2, isFirstPage=true, isLastPage=false, hasPreviousPage=false, hasNextPage=true, navigatePages=5, navigateFirstPage=1, navigateLastPage=2, navigatepageNums=[1, 2]}
```
-
其中list中的数据等同于方法一中直接输出的page数据
常用数据:
-
pageNum:当前页的页码
-
pageSize:每页显示的条数
-
size:当前页显示的真实条数
-
total:总记录数
-
pages:总页数
-
prePage:上一页的页码
-
nextPage:下一页的页码
-
isFirstPage/isLastPage:是否为第一页/最后一页
-
hasPreviousPage/hasNextPage:是否存在上一页/下一页
-
navigatePages:导航分页的页码数
-
navigatepageNums:导航分页的页码,[1,2,3,4,5]


 181
181

 被折叠的 条评论
为什么被折叠?
被折叠的 条评论
为什么被折叠?
 到【灌水乐园】发言


