zigbee printf 输出打印信息到控制台

在学习zigbee协议栈的时候,想实现单步走,并且为了让程序运转到某一步时希望能够输出一些打印信息到IAR工作台。这里给出具体的步骤:

添加需要输出的信息,比如我想在Zmain.c文件的main函数中打印“ok”;则在main函数中加入语句:printf("ok")并且包含头文件: # include "stdio.h";。为了更加清晰的看到打印信息,我们在printf语句前面加上断点。

点击debug按钮,将zigbee协议栈内容下载到节点;

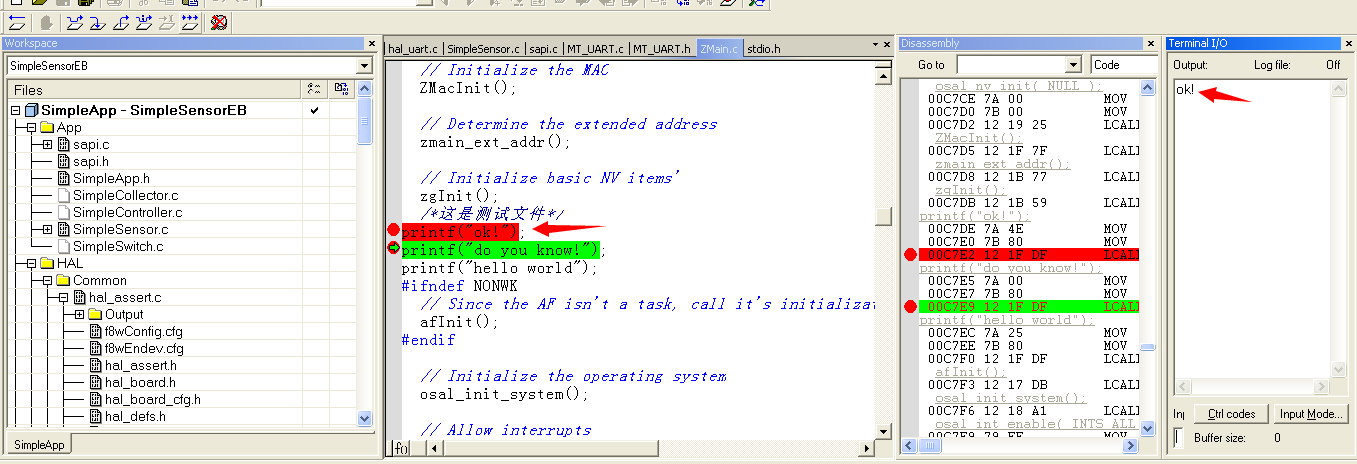
然后点击菜单栏的view按钮,选择terminal I/O,然后把光标定位到断点处(即printf语句处),点击run to cursor按钮,就会出现打印信息:ok,下图是我的做出来的效果!

1. 准备工作 在开始之前,您需要准备以下设备和软件: - 树莓派 - Zigbee接收器 - Zigbee协调器(可选,用于管理网络) - Zigbee模块 - Raspbian操作系统(或其他基于Debian的Linux系统) - Zigbee驱动程序和库文件(例如,libusb和libzbee) 2. 安装驱动程序和库文件 在树莓派上安装驱动程序和库文件,以便可以与Zigbee接收器进行通信。您可以使用以下命令来安装libusb和libzbee: ``` sudo apt-get update sudo apt-get install libusb-dev sudo apt-get install libzbee-dev ``` 3. 编写驱动程序 在树莓派上编写驱动程序,以便可以识别Zigbee接收器并与其通信。您可以使用以下代码作为驱动程序的模板: ```c #include <stdio.h> #include <stdlib.h> #include <string.h> #include <unistd.h> #include <fcntl.h> #include <errno.h> #include <termios.h> int open_serial_port(const char *device) { int fd = open(device, O_RDWR | O_NOCTTY | O_NDELAY); if (fd == -1) { perror("open_port: Unable to open serial port"); } else { fcntl(fd, F_SETFL, 0); } return fd; } int main(int argc, char *argv[]) { const char *device = "/dev/ttyUSB0"; int fd = open_serial_port(device); if (fd == -1) { exit(EXIT_FAILURE); } // TODO: Add Zigbee communication code here close(fd); return 0; } ``` 在这个示例中,我们使用open_serial_port函数打开串口设备。您需要将设备名称(例如,/dev/ttyUSB0)替换为Zigbee接收器的设备名称。接下来,您可以使用fd变量与Zigbee接收器进行通信。 4. 编写接收程序 在树莓派上编写接收程序,以便可以从Zigbee模块接收数据。您可以使用以下代码作为接收程序的模板: ```c #include <stdio.h> #include <stdlib.h> #include <string.h> #include <unistd.h> #include <fcntl.h> #include <errno.h> #include <termios.h> int open_serial_port(const char *device) { int fd = open(device, O_RDWR | O_NOCTTY | O_NDELAY); if (fd == -1) { perror("open_port: Unable to open serial port"); } else { fcntl(fd, F_SETFL, 0); } return fd; } int main(int argc, char *argv[]) { const char *device = "/dev/ttyUSB0"; int fd = open_serial_port(device); if (fd == -1) { exit(EXIT_FAILURE); } struct termios options; tcgetattr(fd, &options); cfsetispeed(&options, B9600); cfsetospeed(&options, B9600); options.c_cflag &= ~PARENB; options.c_cflag &= ~CSTOPB; options.c_cflag &= ~CSIZE; options.c_cflag |= CS8; options.c_cflag &= ~CRTSCTS; options.c_cflag |= CLOCAL | CREAD; options.c_lflag &= ~(ICANON | ECHO | ECHOE | ISIG); options.c_iflag &= ~(IXON | IXOFF | IXANY); options.c_oflag &= ~OPOST; options.c_cc[VMIN] = 1; options.c_cc[VTIME] = 0; tcsetattr(fd, TCSANOW, &options); char buffer[255]; while (1) { int n = read(fd, buffer, sizeof(buffer)); if (n > 0) { buffer[n] = '\0'; printf("Received: %s", buffer); } } close(fd); return 0; } ``` 在这个示例中,我们使用tcsetattr函数设置串口选项。这些选项包括波特率(B9600)、数据位(CS8)、停止位(1)和校验位(无)。接下来,我们使用read函数从Zigbee模块读取数据。如果读取成功,我们将在控制台输出接收到的数据。 5. 测试驱动程序和接收程序 编译和运行驱动程序和接收程序,以确保它们可以与Zigbee接收器和模块进行通信。您可以使用以下命令来编译和运行程序: ``` gcc -o zigbee_driver zigbee_driver.c -lusb -lzbee gcc -o zigbee_receiver zigbee_receiver.c sudo ./zigbee_driver sudo ./zigbee_receiver ``` 如果一切正常,您将能够在控制台上看到接收到的数据。
评论
添加红包

请填写红包祝福语或标题

红包个数最小为10个

红包金额最低5元

当前余额3.43前往充值 >
需支付:10.00
成就一亿技术人!
领取后你会自动成为博主和红包主的粉丝 规则
hope_wisdom
发出的红包
实付
使用余额支付
点击重新获取
扫码支付
钱包余额 0

抵扣说明:

1.余额是钱包充值的虚拟货币,按照1:1的比例进行支付金额的抵扣。
2.余额无法直接购买下载,可以购买VIP、付费专栏及课程。

余额充值