


Activiti6.x 基础流程demo
接下来是一个demo了,首先,先把数据库清理一下,虽然不清理也没啥事。为了待会更直观吧。
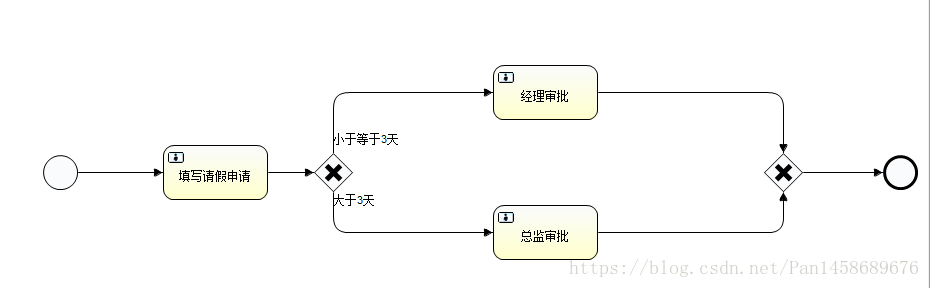
流程图介绍:
流程图总览
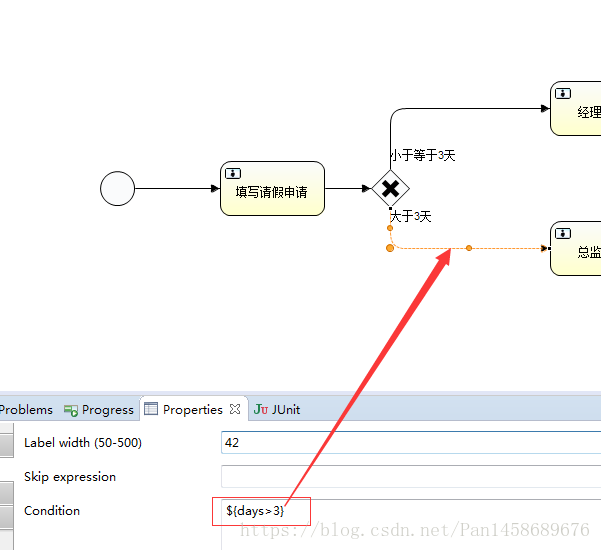
网关condition设置
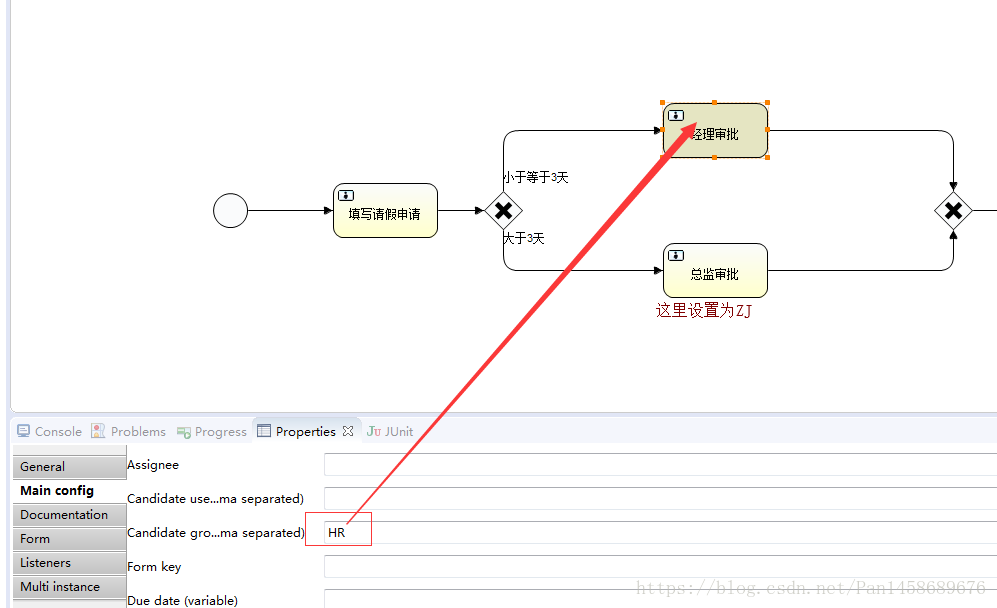
组设置
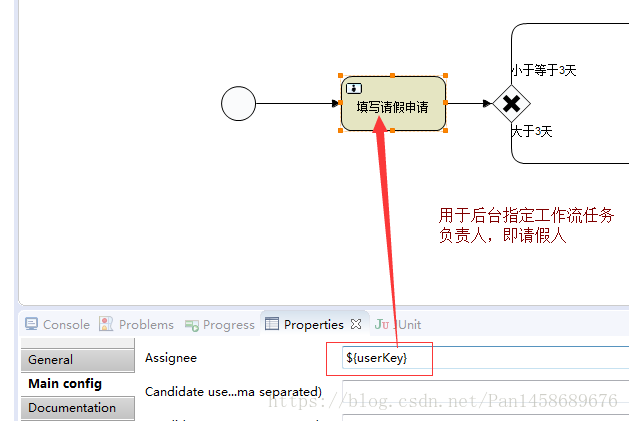
用户设置
【一般以流程变量形式设置办理人(把请假理解成一种任务,办理人即请假人)】
流程图代码
<?xml version="1.0" encoding="UTF-8"?>
<definitions xmlns="http://www.omg.org/spec/BPMN/20100524/MODEL" xmlns:xsi="http://www.w3.org/2001/XMLSchema-instance" xmlns:xsd="http://www.w3.org/2001/XMLSchema" xmlns:activiti="http://activiti.org/bpmn" xmlns:bpmndi="http://www.omg.org/spec/BPMN/20100524/DI" xmlns:omgdc="http://www.omg.org/spec/DD/20100524/DC" xmlns:omgdi="http://www.omg.org/spec/DD/20100524/DI" typeLanguage="http://www.w3.org/2001/XMLSchema" expressionLanguage="http://www.w3.org/1999/XPath" targetNamespace="EmployeeAskForLeave">
  <process id="myProcess" name="员工请假流程" isExecutable="true">
    <startEvent id="startevent1" name="Start"></startEvent>
    <endEvent id="endevent1" name="End"></endEvent>
    <sequenceFlow id="flow1" sourceRef="startevent1" targetRef="usertask1"></sequenceFlow>
    <userTask id="usertask1" name="填写请假申请" activiti:assignee="${userKey}"></userTask>
    <exclusiveGateway id="exclusivegateway1" name="请假时间判断(排他网关)"></exclusiveGateway>
    <sequenceFlow id="flow2" sourceRef="usertask1" targetRef="exclusivegateway1"></sequenceFlow>
    <userTask id="usertask2" name="经理审批" activiti:candidateGroups="HR"></userTask>
    <userTask id="usertask3" name="总监审批" activiti:candidateGroups="ZJ"></userTask>
    <sequenceFlow id="flow3" name="小于等于3天" sourceRef="exclusivegateway1" targetRef="usertask2">
      <conditionExpression xsi:type="tFormalExpression"><![CDATA[${days<=3}]]></conditionExpression>
    </sequenceFlow>
    <sequenceFlow id="flow4" name="大于3天" sourceRef="exclusivegateway1" targetRef="usertask3">
      <conditionExpression xsi:type="tFormalExpression"><![CDATA[${days>3}]]></conditionExpression>
    </sequenceFlow>
    <exclusiveGateway id="exclusivegateway2" name="请假时间判断(排他网关)"></exclusiveGateway>
    <sequenceFlow id="flow5" sourceRef="usertask2" targetRef="exclusivegateway2"></sequenceFlow>
    <sequenceFlow id="flow6" sourceRef="usertask3" targetRef="exclusivegateway2"></sequenceFlow>
    <sequenceFlow id="flow7" sourceRef="exclusivegateway2" targetRef="endevent1"></sequenceFlow>
  </process>
  <bpmndi:BPMNDiagram id="BPMNDiagram_myProcess">
    <bpmndi:BPMNPlane bpmnElement="myProcess" id="BPMNPlane_myProcess">
      <bpmndi:BPMNShape bpmnElement="startevent1" id="BPMNShape_startevent1">
        <omgdc:Bounds height="35.0" width="35.0" x="200.0" y="220.0"></omgdc:Bounds>
      </bpmndi:BPMNShape>
      <bpmndi:BPMNShape bpmnElement="endevent1" id="BPMNShape_endevent1">
        <omgdc:Bounds height="35.0" width="35.0" x="1040.0" y="220.0"></omgdc:Bounds>
      </bpmndi:BPMNShape>
      <bpmndi:BPMNShape bpmnElement="usertask1" id="BPMNShape_usertask1">
        <omgdc:Bounds height="55.0" width="105.0" x="320.0" y="210.0"></omgdc:Bounds>
      </bpmndi:BPMNShape>
      <bpmndi:BPMNShape bpmnElement="exclusivegateway1" id="BPMNShape_exclusivegateway1">
        <omgdc:Bounds height="40.0" width="40.0" x="470.0" y="217.0"></omgdc:Bounds>
      </bpmndi:BPMNShape>
      <bpmndi:BPMNShape bpmnElement="usertask2" id="BPMNShape_usertask2">
        <omgdc:Bounds height="55.0" width="105.0" x="650.0" y="130.0"></omgdc:Bounds>
      </bpmndi:BPMNShape>
      <bpmndi:BPMNShape bpmnElement="usertask3" id="BPMNShape_usertask3">
        <omgdc:Bounds height="55.0" width="105.0" x="650.0" y="270.0"></omgdc:Bounds>
      </bpmndi:BPMNShape>
      <bpmndi:BPMNShape bpmnElement="exclusivegateway2" id="BPMNShape_exclusivegateway2">
        <omgdc:Bounds height="40.0" width="40.0" x="920.0" y="217.0"></omgdc:Bounds>
      </bpmndi:BPMNShape>
      <bpmndi:BPMNEdge bpmnElement="flow1" id="BPMNEdge_flow1">
        <omgdi:waypoint x="235.0" y="237.0"></omgdi:waypoint>
        <omgdi:waypoint x="320.0" y="237.0"></omgdi:waypoint>
      </bpmndi:BPMNEdge>
      <bpmndi:BPMNEdge bpmnElement="flow2" id="BPMNEdge_flow2">
        <omgdi:waypoint x="425.0" y="237.0"></omgdi:waypoint>
        <omgdi:waypoint x="470.0" y="237.0"></omgdi:waypoint>
      </bpmndi:BPMNEdge>
      <bpmndi:BPMNEdge bpmnElement="flow3" id="BPMNEdge_flow3">
        <omgdi:waypoint x="490.0" y="217.0"></omgdi:waypoint>
        <omgdi:waypoint x="490.0" y="157.0"></omgdi:waypoint>
        <omgdi:waypoint x="650.0" y="157.0"></omgdi:waypoint>
        <bpmndi:BPMNLabel>
          <omgdc:Bounds height="14.0" width="66.0" x="490.0" y="198.0"></omgdc:Bounds>
        </bpmndi:BPMNLabel>
      </bpmndi:BPMNEdge>
      <bpmndi:BPMNEdge bpmnElement="flow4" id="BPMNEdge_flow4">
        <omgdi:waypoint x="490.0" y="257.0"></omgdi:waypoint>
        <omgdi:waypoint x="490.0" y="297.0"></omgdi:waypoint>
        <omgdi:waypoint x="650.0" y="297.0"></omgdi:waypoint>
        <bpmndi:BPMNLabel>
          <omgdc:Bounds height="14.0" width="42.0" x="490.0" y="257.0"></omgdc:Bounds>
        </bpmndi:BPMNLabel>
      </bpmndi:BPMNEdge>
      <bpmndi:BPMNEdge bpmnElement="flow5" id="BPMNEdge_flow5">
        <omgdi:waypoint x="755.0" y="157.0"></omgdi:waypoint>
        <omgdi:waypoint x="940.0" y="157.0"></omgdi:waypoint>
        <omgdi:waypoint x="940.0" y="217.0"></omgdi:waypoint>
      </bpmndi:BPMNEdge>
      <bpmndi:BPMNEdge bpmnElement="flow6" id="BPMNEdge_flow6">
        <omgdi:waypoint x="755.0" y="297.0"></omgdi:waypoint>
        <omgdi:waypoint x="940.0" y="297.0"></omgdi:waypoint>
        <omgdi:waypoint x="940.0" y="257.0"></omgdi:waypoint>
      </bpmndi:BPMNEdge>
      <bpmndi:BPMNEdge bpmnElement="flow7" id="BPMNEdge_flow7">
        <omgdi:waypoint x="960.0" y="237.0"></omgdi:waypoint>
        <omgdi:waypoint x="1040.0" y="237.0"></omgdi:waypoint>
      </bpmndi:BPMNEdge>
    </bpmndi:BPMNPlane>
  </bpmndi:BPMNDiagram>
</definitions>
数据准备
//部署流程定义,新建数据
@Test
public void prepare() {
    Deployment deployment = repositoryService.createDeployment()//创建一个部署对象
            .name("请假流程")
            .addClasspathResource("bpmn/MyProcess.bpmn")
            .addClasspathResource("bpmn/MyProcess.png")
            .deploy();
    System.out.println("部署ID:"+deployment.getId());
    System.out.println("部署名称:"+deployment.getName());

    Group group1 = identityService.newGroup("HR");
    group1.setName("HR");
    group1.setType("HRassignment");
    identityService.saveGroup(group1);//建立HR组

    Group group2 = identityService.newGroup("ZJ");
    group2.setName("ZJ");
    group2.setType("ZJassignment");
    identityService.saveGroup(group2);//建立ZJ组

    Group group3 = identityService.newGroup("EP");
    group3.setName("EP");
    group3.setType("EPassignment");
    identityService.saveGroup(group3);//建立员工组

    //newUser传的是key【不是名字】
    identityService.saveUser(identityService.newUser("HR1"));//高管
    identityService.saveUser(identityService.newUser("HR2"));//高管
    identityService.saveUser(identityService.newUser("ZJ"));//总监
    identityService.saveUser(identityService.newUser("ZJ2"));//总监
    identityService.saveUser(identityService.newUser("PTM"));//员工

    identityService.createMembership("HR1", "HR");
    identityService.createMembership("HR2", "HR");
    identityService.createMembership("ZJ", "ZJ");
    identityService.createMembership("ZJ2", "ZJ");
    identityService.createMembership("PTM", "EP");
}
启动流程设置流程变量【流程变量必须指定不然报错】
/**启动流程实例分配任务给个人*/
@Test
public void start() {

    String userKey="PTM";//脑补一下这个是从前台传过来的数据
    String processDefinitionKey ="myProcess";//每一个流程有对应的一个key这个是某一个流程内固定的写在bpmn内的
    HashMap<String, Object> variables=new HashMap<>();
    variables.put("userKey", userKey);//userKey在上文的流程变量中指定了

    ProcessInstance instance=runtimeService
        .startProcessInstanceByKey(processDefinitionKey,variables);

    System.out.println("流程实例ID:"+instance.getId());
    System.out.println("流程定义ID:"+instance.getProcessDefinitionId());
}
运行结果:

【通过流程变量指定User的结果】

TaskService
查询当前人的个人任务
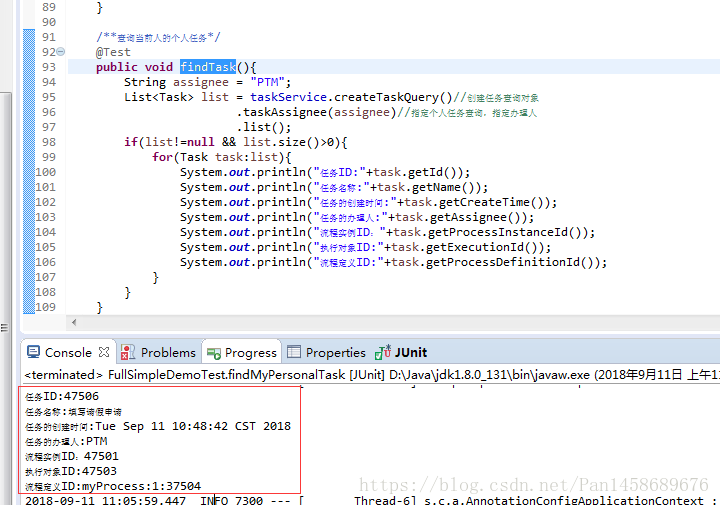
/**查询当前人的个人任务*/
@Test
public void findTask(){
    String assignee = "PTM";
    List<Task> list = taskService.createTaskQuery()//创建任务查询对象
                    .taskAssignee(assignee)//指定个人任务查询
                    .list();
    if(list!=null && list.size()>0){
        for(Task task:list){
            System.out.println("任务ID:"+task.getId());
            System.out.println("任务名称:"+task.getName());
            System.out.println("任务的创建时间:"+task.getCreateTime());
            System.out.println("任务的办理人:"+task.getAssignee());
            System.out.println("流程实例ID:"+task.getProcessInstanceId());
            System.out.println("执行对象ID:"+task.getExecutionId());
            System.out.println("流程定义ID:"+task.getProcessDefinitionId());
        }
    }
}
Query里面可以写多个查询条件类是EF的那种
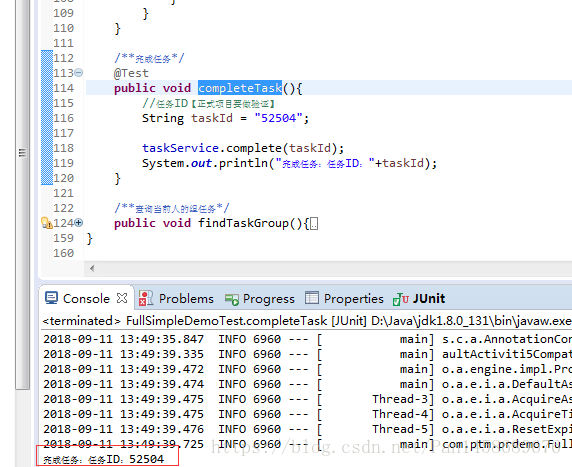
完成任务
/**完成任务*/
@Test
public void completeTask(){
    //任务ID
    String taskId = "47506";

    HashMap<String, Object> variables=new HashMap<>();
    variables.put("days", 4);//userKey在上文的流程变量中指定了

    taskService.complete(taskId,variables);
    System.out.println("完成任务:任务ID:"+taskId);
}组任务查询【因为days=4所以由总监组负责】
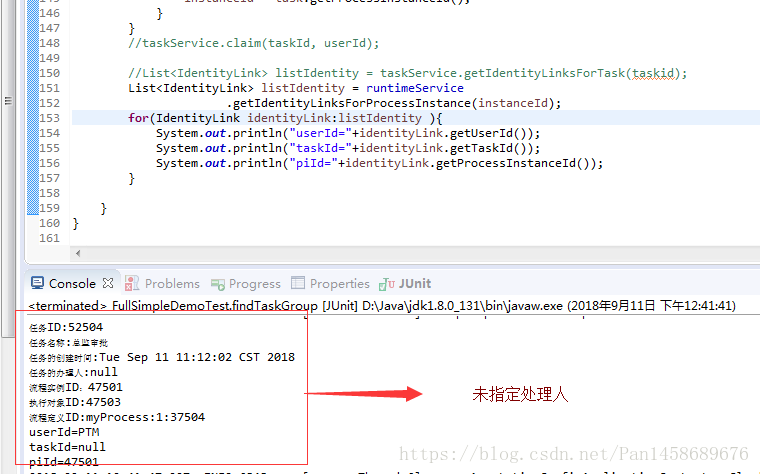
/**查询当前人的组任务*/
@Test
public void findTaskGroup(){

    //String assignee = "PTM";
    List<Task> list = taskService.createTaskQuery()//创建任务查询对象
                    .taskCandidateUser("ZJ")//指定组任务查询
                    .list();
    String taskid ="";
    String instanceId ="";
    if(list!=null && list.size()>0){
        for(Task task:list){
            System.out.println("任务ID:"+task.getId());
            System.out.println("任务名称:"+task.getName());
            System.out.println("任务的创建时间:"+task.getCreateTime());
            System.out.println("任务的办理人:"+task.getAssignee());
            System.out.println("流程实例ID:"+task.getProcessInstanceId());
            System.out.println("执行对象ID:"+task.getExecutionId());
            System.out.println("流程定义ID:"+task.getProcessDefinitionId());
            taskid=task.getId();
            instanceId = task.getProcessInstanceId();
        }
    }
    //查询组任务成员[两种方式]
    //List<IdentityLink> listIdentity = taskService.getIdentityLinksForTask(taskid);
    List<IdentityLink> listIdentity = runtimeService.getIdentityLinksForProcessInstance(instanceId);
    for(IdentityLink identityLink:listIdentity ){
        System.out.println("userId="+identityLink.getUserId());
        System.out.println("taskId="+identityLink.getTaskId());
        System.out.println("piId="+identityLink.getProcessInstanceId());
    }
}
//taskService.claim(taskid,"ZJ2");//指定办理人
//taskService.setAssignee(taskid, null);//回退为组任务状态
指定办理人后会变为用户任务。
/**查询当前人的组任务*/
@Test
public void findTaskGroup(){

    String assignee = "ZJ2";
    List<Task> list = taskService.createTaskQuery()//创建任务查询对象
                    //.taskCandidateUser("ZJ")//指定组任务查询
                    .taskAssignee(assignee)//指定个人任务查询
                    .list();
    String taskid ="";
    String instanceId ="";
    if(list!=null && list.size()>0){
        for(Task task:list){
            System.out.println("任务ID:"+task.getId());
            System.out.println("任务名称:"+task.getName());
            System.out.println("任务的创建时间:"+task.getCreateTime());
            System.out.println("任务的办理人:"+task.getAssignee());
            System.out.println("流程实例ID:"+task.getProcessInstanceId());
            System.out.println("执行对象ID:"+task.getExecutionId());
            System.out.println("流程定义ID:"+task.getProcessDefinitionId());
            taskid=task.getId();
            instanceId = task.getProcessInstanceId();
        }
    }
    //taskService.claim(taskid,"ZJ2");//指定办理人
    taskService.setAssignee(taskid, null);//回退为组任务状态

    List<IdentityLink> listIdentity = taskService.getIdentityLinksForTask(taskid);
    //List<IdentityLink> listIdentity = runtimeService.getIdentityLinksForProcessInstance(instanceId);
    //runtime查询没有taskId,task查询没有InstanceId

    for(IdentityLink identityLink:listIdentity ){
        System.out.println("userId="+identityLink.getUserId());
        System.out.println("taskId="+identityLink.getTaskId());
        System.out.println("piId="+identityLink.getProcessInstanceId());
    }
}
代码里退回为组任务【即无办理人】
【流程就结束了。记录会被移到history表里面去。】


 986
986


 被折叠的 条评论
为什么被折叠?
被折叠的 条评论
为什么被折叠?
 到【灌水乐园】发言


