


这是思维图,画的有点拉,看官老爷凑合看,接下来就按照这个逻辑来实现。
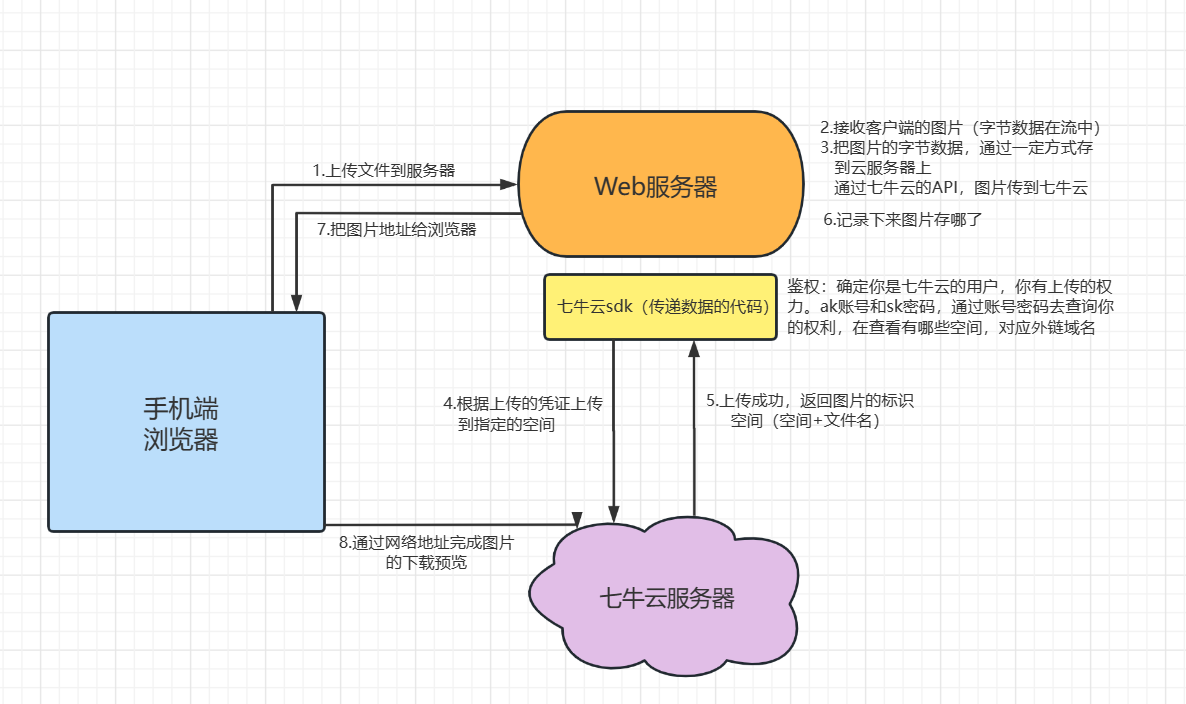
七牛云本身是提供的Java SDK的,可以完成图片上传和删除,我们可以参考官方提供的例子。
官方文档:https://developer.qiniu.com/kodo/sdk/1239/java
上传
Configuration cfg = new Configuration(Region.region0());
//...其他参数参考类注释
UploadManager uploadManager = new UploadManager(cfg);
//...生成上传凭证,然后准备上传
String accessKey = "your access key";
String secretKey = "your secret key";
String bucket = "your bucket name";
//默认不指定key的情况下,以文件内容的hash值作为文件名
String key = null;
try {
    byte[] uploadBytes = "hello qiniu cloud".getBytes("utf-8");
    ByteArrayInputStream byteInputStream=new ByteArrayInputStream(uploadBytes);
    Auth auth = Auth.create(accessKey, secretKey);
    String upToken = auth.uploadToken(bucket);
    try {
        Response response = uploadManager.put(byteInputStream,key,upToken,null, null);
        //解析上传成功的结果
        DefaultPutRet putRet = new Gson().fromJson(response.bodyString(), DefaultPutRet.class);
        System.out.println(putRet.key);
        System.out.println(putRet.hash);
    } catch (QiniuException ex) {
        Response r = ex.response;
        System.err.println(r.toString());
        try {
            System.err.println(r.bodyString());
        } catch (QiniuException ex2) {
            //ignore
        }
    }
} catch (UnsupportedEncodingException ex) {
    //ignore
}
删除
//构造一个带指定Zone对象的配置类
Configuration cfg = new Configuration(Zone.zone0());
//...其他参数参考类注释

String accessKey = "your access key";
String secretKey = "your secret key";

String bucket = "your bucket name";
String key = "your file key";

Auth auth = Auth.create(accessKey, secretKey);
BucketManager bucketManager = new BucketManager(auth, cfg);
try {
    bucketManager.delete(bucket, key);
} catch (QiniuException ex) {
    //如果遇到异常,说明删除失败
    System.err.println(ex.code());
    System.err.println(ex.response.toString());
}
现在开始在自己的项目里,导入maven依赖..这就开始结合官方SDK自己敲代码
<!--        七牛云-->
<dependency>
    <groupId>com.qiniu</groupId>
    <artifactId>qiniu-java-sdk</artifactId>
    <version>7.2.25</version>
</dependency>
编写QiniuUtils.java七牛云工具类
/**
 * @author spt
 * @description 七牛云工具类
 * @date 2022/06/05
 **/
@Slf4j
@Setter
@Getter
public class QiniuUtils {
    private String accessKey;
    private String secretKey;
    private String urlPrefix;
    private String bucket;

    /**
     * 上传到七牛云
     *
     * @param is             上传内容的输入流
     * @param uploadFileName
     */
    public void upload2Qiniu(InputStream is, String uploadFileName) {
        //构造一个带指定Zone对象的配置类
        Configuration cfg = new Configuration(Region.autoRegion());
        //...其他参数参考类注释
        UploadManager uploadManager = new UploadManager(cfg);

        Auth auth = Auth.create(accessKey, secretKey);
        String upToken = auth.uploadToken(bucket);
        try {
            Response response = uploadManager.put(is, uploadFileName, upToken, null, null);
            //解析上传成功的结果
            log.info(response.bodyString());
            // 访问路径
            log.info("{}/{}", urlPrefix, uploadFileName);
        } catch (QiniuException ex) {
            Response r = ex.response;
            log.error(r.toString());
            try {
                log.error(r.bodyString());
            } catch (QiniuException ex2) {
                //ignore
                log.error("", ex2);
            }
            throw new RuntimeException(ex);
        }
    }

    /**
     * 删除指定文件
     * @param fileName
     */
    public void deleteFileFromQiniu(String fileName) {
        //构造一个带指定Zone对象的配置类
        Configuration cfg = new Configuration(Region.autoRegion());
        String key = fileName;
        Auth auth = Auth.create(accessKey, secretKey);
        BucketManager bucketManager = new BucketManager(auth, cfg);
        try {
            bucketManager.delete(bucket, key);
        } catch (QiniuException ex) {
            if(612 == ex.code()){
                // 文件不存在,则无需任何操作,直接返回
                log.info("[七牛云工具类-删除]重复删除,跳过:{}",fileName );
            }else {
                //如果遇到异常,说明删除失败
                log.error("code:{}", ex.code());
                log.error(ex.response.toString());
                throw new RuntimeException(ex);
            }
        }
    }
}
在需要使用QiniuUtils 中加入配置属性application.yml
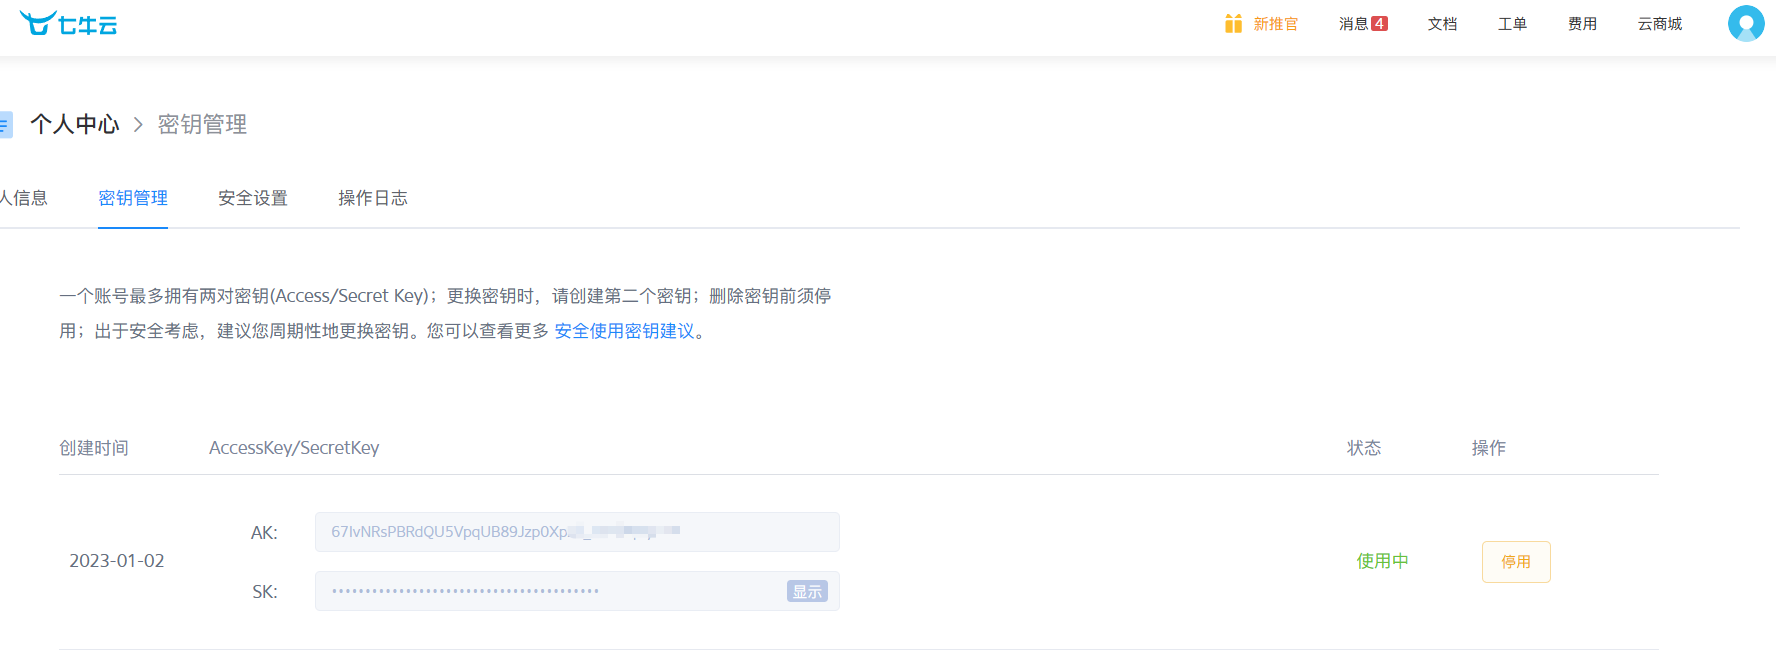
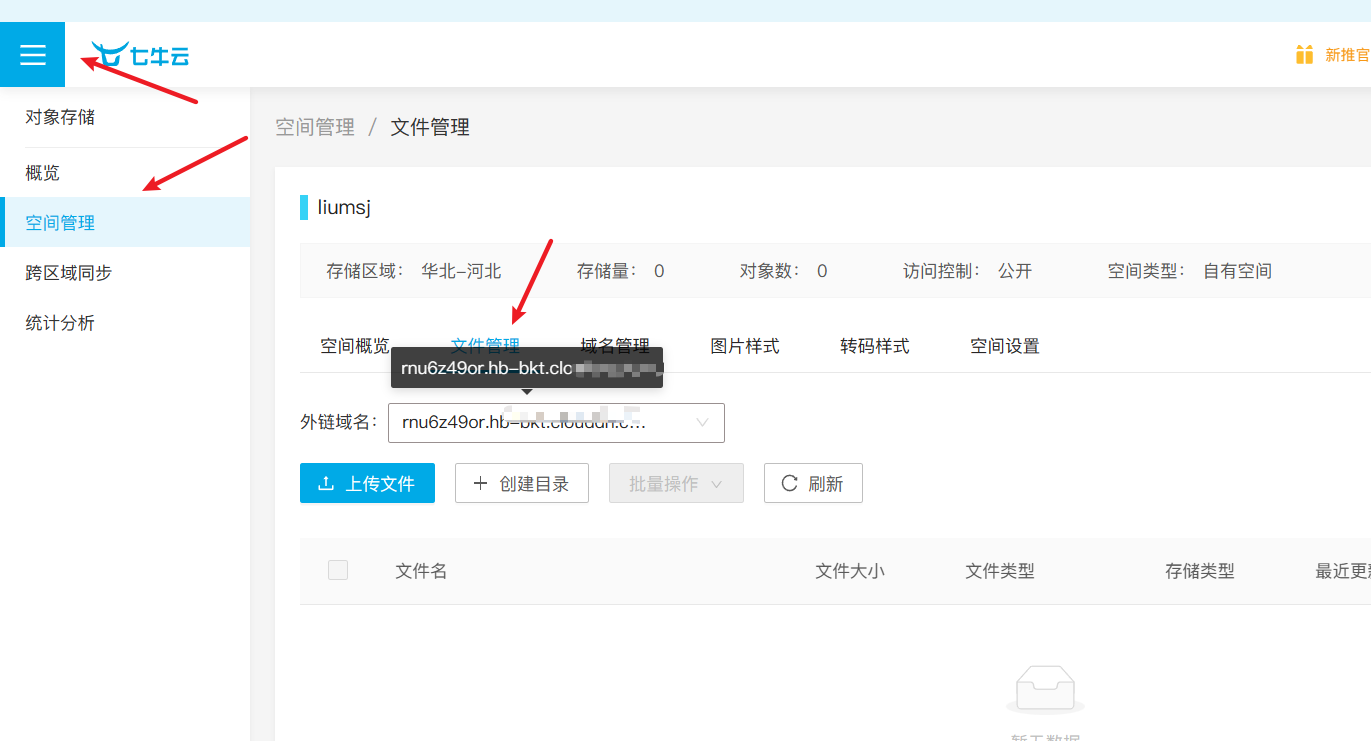
以下信息来自自己的服务空间内容

自己在自己的七牛云里找。
配置类还可以交给spirng管理 在config包下自定义一个 七牛云配置类,里面放入工具对象.
@Configuration
public class QiniuConfiguration {

    @ConfigurationProperties("qiniu")
    @Bean
    public QiniuUtils qiniuUtils() {
        return new QiniuUtils();
    }

}
前端用的是 ElementUI提供的上传组件el-upload,提供了多种不同的上传效果,上传成功后可以进行预览。逻辑图为下。


 3937
3937


 被折叠的 条评论
为什么被折叠?
被折叠的 条评论
为什么被折叠?
 到【灌水乐园】发言


