


Spring AOP&jdbcTemplate
1 sping的aop
		1:aop的底层--动态代理(理解)
	    2: 使用spring提供好的aop做业务增强(  xml  半xml半注解  )
2 spring提供的dao操作数据库的手段--JDBCTemplate
一 转账案例
业务代码和事务代码进行拆分,通过动态代理的方式,对业务方法进行事务的增强。这样就不会对业务层产生影响,解决了耦合性的问题啦!(在不修该原方法的基础上,对原方法进行增强)
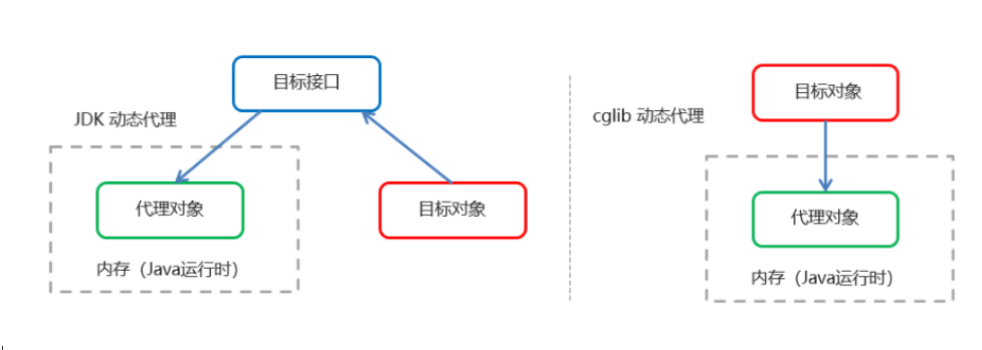
常用的动态代理技术
JDK 代理 : 基于接口的动态代理技术
条件:必须要有接口
生成的动态代理对象和被代理对象是兄弟关系
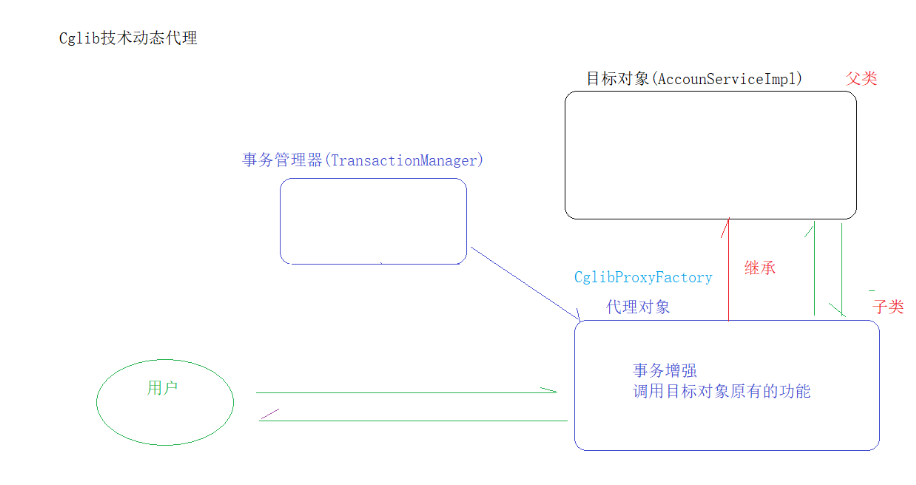
CGLIB代理:基于父类的动态代理技术
条件:被代理对象不能使用final修饰
导入cglib的坐标(spring坐标整合好了)
生成的动态代理对象是被代理对象的子类
1)JDK动态代理
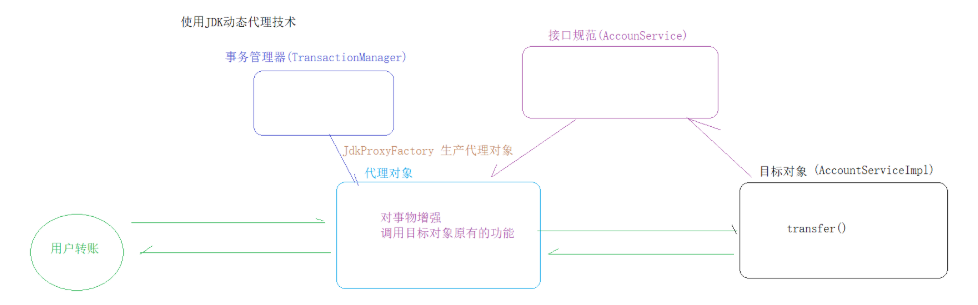
JdkProxy
/**
 * jdk动态代理技术工厂
 */
@Component
public class JdkProxy {

    @Autowired
    @Qualifier("accountServiceImpl")
    private AccountService accountService;

    @Autowired
    private TransactionManager transactionManager;

    @Bean("AccountServiceProxy")
    public Object getProxy(){

        Object objProxy = Proxy.newProxyInstance(accountService.getClass().getClassLoader(),
                accountService.getClass().getInterfaces(),
                new InvocationHandler() {
                    @Override
                    public Object invoke(Object proxy, Method method, Object[] args) throws Throwable {
                        Object value=null;
                        try {

                            transactionManager.begin();
                            value = method.invoke(accountService, args);
                            transactionManager.commit();

                        }catch (Exception e){
                            e.printStackTrace();
                            transactionManager.rollback();
                        }finally {
                            transactionManager.close();
                        }
                        return value;
                    }
                });

        return objProxy;

    }
}
SpringJunitTest
@RunWith(SpringJUnit4ClassRunner.class)
@ContextConfiguration(locations = "classpath:application.xml")
public class SpringJunitTest2 {

    @Autowired
    @Qualifier("AccountServiceProxy") //代理对象--jdk
    private AccountService accountService;

    @Test
    public void test1() throws SQLException {
        accountService.tranfer();
    }

}
2)Cglib动态代理
spring的jar包,是包含cglib依赖
CglibProxy
@Component
public class CglibProxy {

    @Autowired
    @Qualifier("accountServiceImpl")
    private AccountServiceImpl accountService;

    @Autowired
    private TransactionManager transactionManager;

    @Bean("accountProxy")
    public Object getCglibProxy(){

        Object object =Enhancer.create(accountService.getClass(), new MethodInterceptor() {
            @Override
            public Object intercept(Object o, Method method, Object[] objects, MethodProxy methodProxy) throws Throwable {

                Object value = null;
                try {

                    transactionManager.begin();
                    value = methodProxy.invoke(accountService, objects);
                    transactionManager.commit();

                } catch (Exception e) {
                    e.printStackTrace();
                    transactionManager.rollback();
                } finally {
                    transactionManager.close();
                }

                return value;
            }
        });

        return object;
    }

}
SpringJunitTest
@RunWith(SpringJUnit4ClassRunner.class)
@ContextConfiguration(locations = "classpath:application.xml")
public class SpringJunitTest2 {

    @Autowired
    @Qualifier("accountProxy") //代理对象--cglib
    private AccountServiceImpl accountService;

    @Test
    public void test1() throws SQLException {
        accountService.tranfer();
    }

}
二 Spring的AOP简介
AOP:面向切面编程是软件开发的一种思想
目的:代码之间的解耦,在不破坏源代码的情况下,对源代码实现业务增强。
springAOP的底层:动态代理
springAOP的相关术语
Target(目标对象):  要被增强的对象

Proxy(代理对象) :  对增强对象的封装对象

Joinpoint(连接点):  目标对象的一个一个方法

Pointcut(切入点):   目标对象要被增强的那个方法

Advice(通知/增强): 增强方法
前置通知
后置通知
异常通知
最终通知

环绕通知


Aspect(切面): 切入点+通知=切面 (目标方法和增强方法合成在一起 叫做切面)

Weaving(织入):将切入点集成到切面的这一个过程 我们称为织入过程
将目标方法和增强方法合成在一起的过程 叫织入过程 (底层实现技术就是动态代理)
三 基于XML的AOP开发【重点】
导入坐标
<dependency>
            <groupId>org.aspectj</groupId>
            <artifactId>aspectjweaver</artifactId>
            <version>1.8.13</version>
 </dependency>
<!--通知类-->
        <bean id="adviceConfig" class="cn.itcast.advice.AdviceConfig"></bean>
        <!--spring的aop:
                       关注点1:通知(增强方法)
                       关注点2:织入(将通知和切入点合并成切面的过程) 使用aop标签
                                // 将增强方法和目标方法合同在一起的过程

        -->


        <!--aop的置入-->
         <aop:config>
                 <!--指向通知-->
                 <aop:aspect ref="adviceConfig">
                         <!--
                                before:之前
                                method:通知类中的某个方法
                                pointcut:指向的是切入点(要增强的方法)

                                表达式:
                                    execution(public void cn.itcast.serviceimpl.AccountServiceImpl.save(..))
                                修饰符:可以省略不写
                                返回值:可以使用通配符
                                包名:cn.itcast.serviceimpl
                                         可以使用通配符代替 但是只能代替一个

                                类名:AccountServiceImpl
                                         可以使用通配符代替 但是只能代替一个

                                方法名:save(..)
                                          可以使用通配符代替 但是只能代替一个

                                       通配符:* 可以代替所有
                                        ..:用于方法参数  用于包名
                                        方法参数:代表参数可有可无
                                        包名:cn.. 带表cn下的所有子包 cn.itcast.. 带表是cn.itcast下的所有子包
                         -->
                        <!--抽取切入点-->
                        <aop:pointcut id="pt" expression="execution(* cn.itcast.*.AccountServiceImpl.*(..))"></aop:pointcut>

                        <!--前置 后置  异常 最终 顺序无序 建议单独使用-->
                        <aop:before method="before" pointcut-ref="pt"></aop:before>
                        <aop:after-returning method="afterReturning" pointcut-ref="pt"></aop:after-returning>
                        <aop:after-throwing method="afterThrowing" pointcut-ref="pt"></aop:after-throwing>
                        <aop:after method="after" pointcut-ref="pt"></aop:after>

                        <!--环绕通知-->
                       <!-- <aop:around method="around" pointcut="execution(public void cn.itcast.serviceimpl.AccountServiceImpl.save(..))"></aop:around>-->
                 </aop:aspect>
         </aop:config>
四 基于注解的AOP开发
1 开启aop的注解
<aop:aspectj-autoproxy></aop:aspectj-autoproxy>
2 在通知类添加注解
@Aspect
public class AdviceConfig {
  ....
}
3 在每个通知方法上添加切入点表达式
public class AdviceConfig {


    /*抽取切入点表达式:
    *       定义无参无返回值无内容的方法
    *               在方法头上加统一注解:@Pointcut("execution(* cn.itcast.*.AccountServiceImpl.save(..))")
    *                谁用谁调方法名
    *
    * */
    @Pointcut("execution(* cn.itcast.*.AccountServiceImpl.save(..))")
    public void pt(){}

    //通知
    //@Before("pt()")
    public void before(){
        System.out.println("之前。。。");
    }

    //通知

  	//@AfterReturning("pt()")
    public void afterReturning(){
        System.out.println("之后。。。");
    }

    //通知
    //@AfterThrowing("pt()")
    public void afterThrowing(){
        System.out.println("异常。。。");
    }

    //通知
    //@After("pt()")
    public void after(){
        System.out.println("最终。。。");
    }


    // 通知--给环绕用
    @Around("pt()")
    public void around(ProceedingJoinPoint pj){

        try {
            // 之前
            System.out.println("之前。。。");
            // 原方法
            pj.proceed(); //invoke
            // 之后
            System.out.println("之后。。。");

        }catch (Throwable e){
            e.printStackTrace();
            System.out.println("异常。。。");
        }finally {
            System.out.println("最终。。。");
        }
    }
}
4 抽取切入点表达式
  /*抽取切入点表达式:
    *       定义无参无返回值无内容的方法
    *               在方法头上加统一注解:@Pointcut("execution(* cn.itcast.*.AccountServiceImpl.save(..))")
    *                谁用谁调方法名
    *
    * */
    @Pointcut("execution(* cn.itcast.*.AccountServiceImpl.save(..))")
    public void pt(){}


     // 通知--给环绕用
    @Around("pt()")
    public void around(ProceedingJoinPoint pj){

        try {
            // 之前
            System.out.println("之前。。。");
            // 原方法
            pj.proceed(); //invoke
            // 之后
            System.out.println("之后。。。");

        }catch (Throwable e){
            e.printStackTrace();
            System.out.println("异常。。。");
        }finally {
            System.out.println("最终。。。");
        }
    }
全注解开发:
@EnableAspectJAutoProxy 配置类上填写该注解 会扫描带有Aspect注解的内容
@Configuration
@ComponentScan(basePackages = "cn.itcast")
@EnableAspectJAutoProxy
public class SpringConfig {
}
五 spring的aop优化转账
1 aop的全xml方式
application.xml
 <!--aop的xml方式:
            关注点:通知
            关注点:织入
    -->
    <bean id="transactionManager" class="cn.itcast.utils.TransactionManager"></bean>

    <aop:config>
        <aop:aspect ref="transactionManager">
            <aop:pointcut id="pt" expression="execution(* cn.itcast.serviceimpl.AccountServiceImpl.tranfer(..))"></aop:pointcut>
              <aop:around method="around" pointcut-ref="pt"></aop:around>
        </aop:aspect>
    </aop:config>
TransactionManager
 public void around(ProceedingJoinPoint pjp){
        try {
            begin();
            pjp.proceed();
            commit();
        } catch (Throwable throwable) {
            throwable.printStackTrace();
            rollback();
        }finally {
            close();
        }
    }
2 aop的半xml半注解方式
application.xml
<aop:aspectj-autoproxy></aop:aspectj-autoproxy>
TransactionManager
@Component
@Aspect
public class TransactionManager {

    @Autowired
    private ThreadLocalUtils tl;

    // 开启事务
    public void begin(){
        try {
            tl.getConnection().setAutoCommit(false);
        } catch (SQLException e) {
            e.printStackTrace();
        }
    }
    // 提交事务
    public void commit(){
        try {
            tl.getConnection().commit();
        } catch (SQLException e) {
            e.printStackTrace();
        }
    }
    // 回滚事务
    public void rollback(){
        try {
            tl.getConnection().rollback();
        } catch (SQLException e) {
            e.printStackTrace();
        }
    }
    // 释放资源
    public void close(){
        try {
            tl.getConnection().close();
        } catch (SQLException e) {
            e.printStackTrace();
        }
    }


    @Pointcut("execution(* cn.itcast.serviceimpl.AccountServiceImpl.tranfer(..))")
    public void pt(){}

    @Around("pt()")
    public void around(ProceedingJoinPoint pjp){

        try {
            begin();
            pjp.proceed();
            commit();
        } catch (Throwable throwable) {
            throwable.printStackTrace();
            rollback();
        }finally {
            close();
        }
    }
}
六 spring整合JdbcTemplate
jdbcTemplate:spring提供的用来操作数据库的工具
构造:new JdbcTemplate(连接池)
api:
	update() 增删改
	queryForObject() 单查
	query()多查
整合步骤
1 导入jdbcTemplate的坐标
<!--jdbcTemplate-->
    <dependency>
      <groupId>org.springframework</groupId>
      <artifactId>spring-jdbc</artifactId>
      <version>5.1.5.RELEASE</version>
    </dependency>
    <dependency>
      <groupId>org.springframework</groupId>
      <artifactId>spring-tx</artifactId>
      <version>5.1.5.RELEASE</version>
    </dependency>
2 整合jdbcTemplate(application.xml)
<?xml version="1.0" encoding="UTF-8"?>
<beans xmlns="http://www.springframework.org/schema/beans"
       xmlns:context="http://www.springframework.org/schema/context"
       xmlns:xsi="http://www.w3.org/2001/XMLSchema-instance"
       xsi:schemaLocation="http://www.springframework.org/schema/beans http://www.springframework.org/schema/beans/spring-beans.xsd
http://www.springframework.org/schema/context
http://www.springframework.org/schema/context/spring-context.xsd">

        <!--开启注解扫描-->
        <context:component-scan base-package="cn.itcast"></context:component-scan>

        <!--第三方的资源-->
        <bean id="jdbcTemplate" class="org.springframework.jdbc.core.JdbcTemplate">
                <property name="dataSource" ref="druid"></property>
        </bean>
        <!--druid-->
        <context:property-placeholder location="classpath:jdbc.properties"></context:property-placeholder>
        <bean id="druid" class="com.alibaba.druid.pool.DruidDataSource">
                <property name="driverClassName" value="${jdbc.driver}"></property>
                <property name="url" value="${jdbc.url}"></property>
                <property name="username" value="${jdbc.username}"></property>
                <property name="password" value="${jdbc.password}"></property>
        </bean>
</beans>
AccountDaoImpl
@Repository
public class AccountDaoImpl implements AccountDao {

    @Autowired
    private JdbcTemplate jdbcTemplate;

    @Override
    public void save() {
        /*增加
        String sql="insert into account(name,money) values(?,?)";
        jdbcTemplate.update(sql,"老王2",100);*/


        //单查询--返回对象
        /*String sql="select * from account where id=?";
        Account account = jdbcTemplate.queryForObject(sql, new BeanPropertyRowMapper<Account>(Account.class), 1);
        System.out.println(account);*/


        //多查--返回list
        String sql="select * from account";
        List<Account> list = jdbcTemplate.query(sql, new BeanPropertyRowMapper<Account>(Account.class));
        for (Account account : list) {
            System.out.println(account);
        }

    }
}
SpringJunitTest1测试
@RunWith(SpringJUnit4ClassRunner.class)
@ContextConfiguration(locations = "classpath:application.xml")
public class SpringJunitTest1 {

    @Autowired
    private AccountService accountService;

    @Test
    public void test(){
        accountService.save();
    }
}


 100
100


 被折叠的 条评论
为什么被折叠?
被折叠的 条评论
为什么被折叠?
 到【灌水乐园】发言


