


目录
引出
1.springboot配置Tomcat两个端口,https和http的方式;
2.在https协议下,发送axios请求没反应,暂时用form表单解决;
3.运行jar包template might not exist报错及解决;
代码位置:
https://gitcode.net/Pireley/springboot-tomcat-http-https
springboot配置Tomcat两个端口,https和http的方式
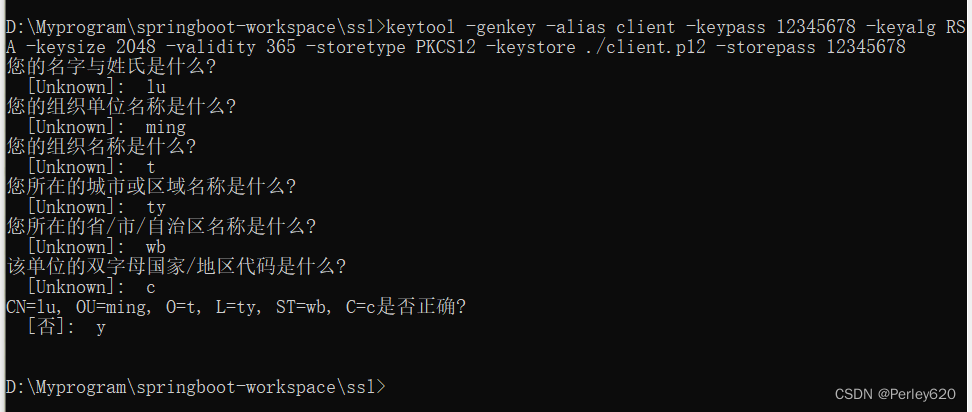
1.生成SSL证书
严格来说https不是一个独立协议,只是在http协议基础上增加了SSL/TLS加密层。所以我们需要先生成SSL证书,这里使用keytool生成jks。
keytool -genkey -alias client -keypass 12345678 -keyalg RSA -keysize 2048 -validity 365 -storetype PKCS12 -keystore ./client.p12 -storepass 12345678
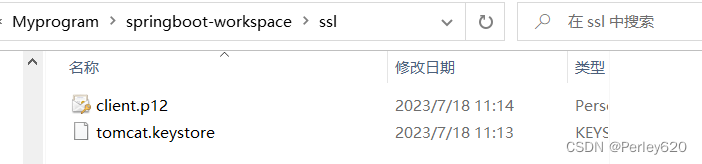
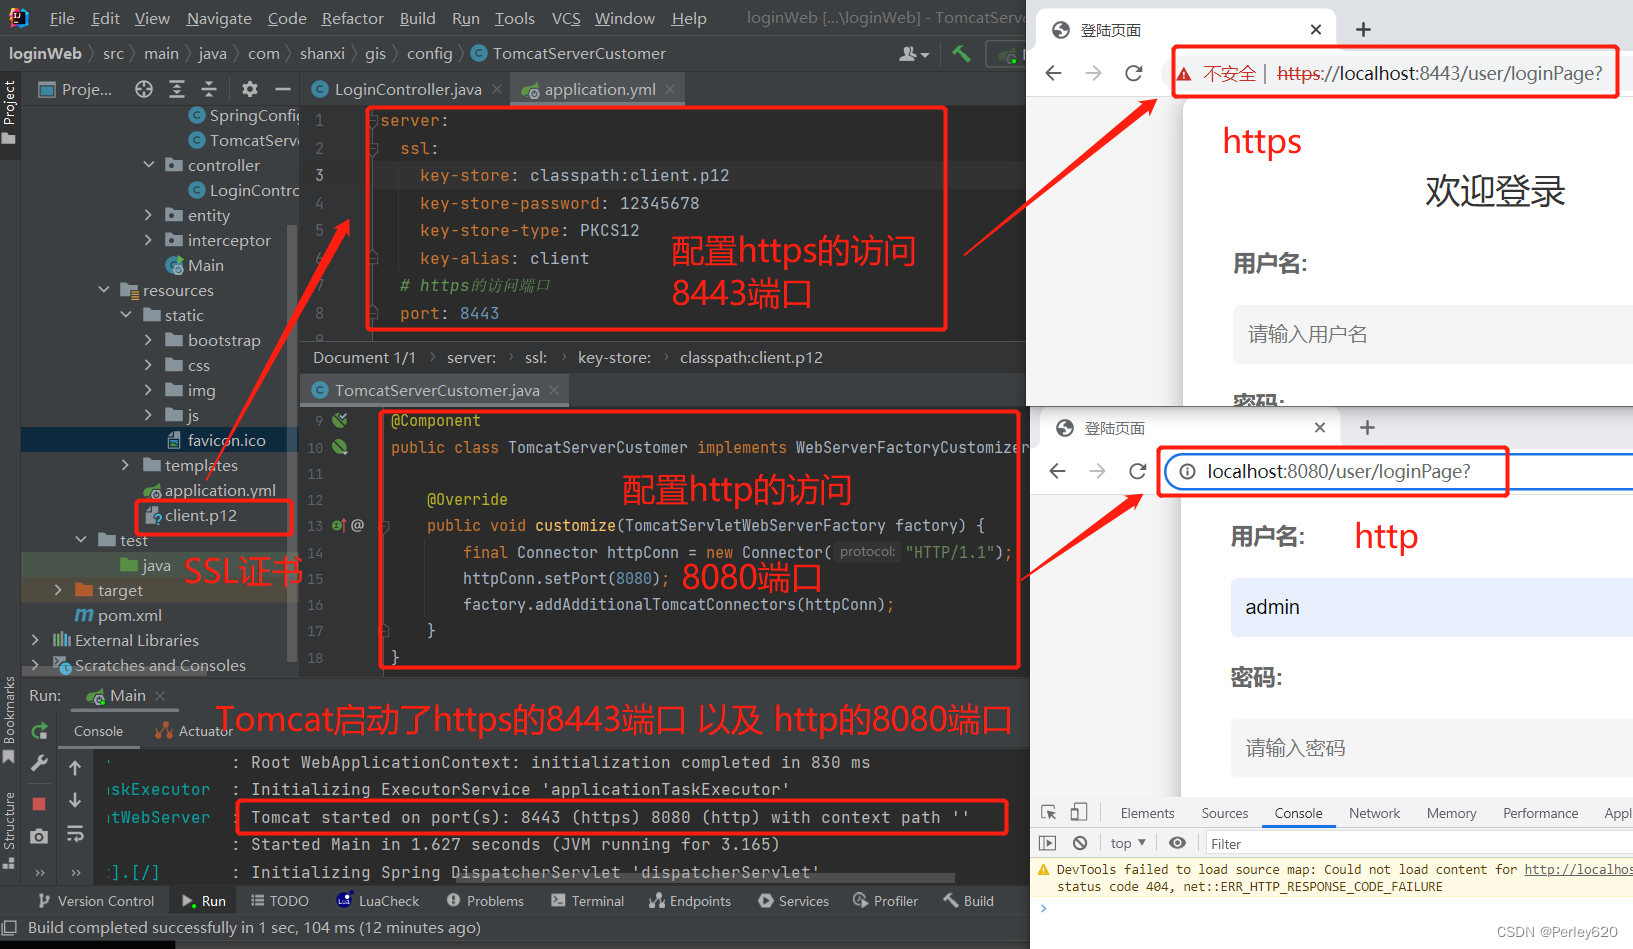
2.配置client.p12和https端口
server:
  ssl:
    key-store: classpath:client.p12
    key-store-password: 12345678
    key-store-type: PKCS12
    key-alias: client
  # https的访问端口
  port: 8443
3.配置http的8080端口WebServerFactoryCustomizer接口
WebServerFactory接口的几个重要实现:
-
TomcatServletWebServerFactory:对应于tomcat
-
JettyServletWebServerFactory:对应jetty
-
UndertowServletWebServerFactory:对应undertow
-
NettyReactiveWebServerFactory:对应netty
Spring Boot默认使用http/1.1协议。所以我们增加额外的自定义https连接器。
package com.shanxi.gis.config;

import org.apache.catalina.connector.Connector;
import org.springframework.boot.web.embedded.tomcat.TomcatServletWebServerFactory;
import org.springframework.boot.web.server.WebServerFactory;
import org.springframework.boot.web.server.WebServerFactoryCustomizer;
import org.springframework.stereotype.Component;

@Component
public class TomcatServerCustomer implements WebServerFactoryCustomizer<TomcatServletWebServerFactory> {

    @Override
    public void customize(TomcatServletWebServerFactory factory) {
        final Connector httpConn = new Connector("HTTP/1.1");
        httpConn.setPort(8080);
        factory.addAdditionalTomcatConnectors(httpConn);
    }
}
4.启动项目
运行项目后可以看到启动了https的8843和http的8080两个端口
项目应用:在某项目中有一个功能需要https协议
Tomcat启动https和http两个端口
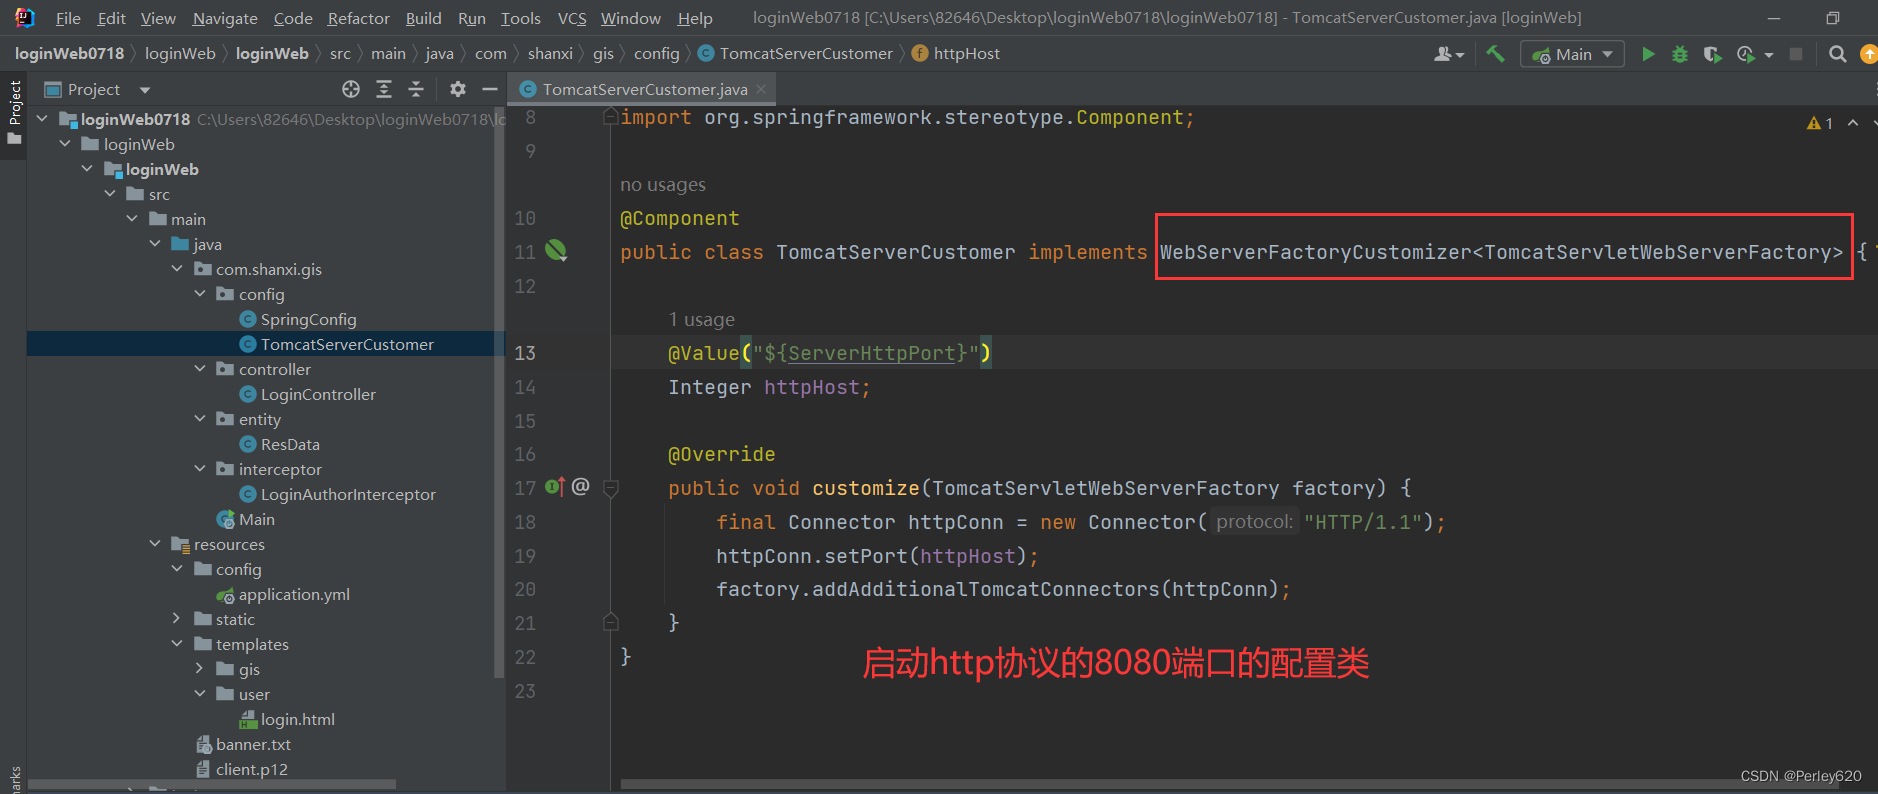
TomcatServerCustomer.java文件
package com.shanxi.gis.config;

import org.apache.catalina.connector.Connector;
import org.springframework.beans.factory.annotation.Value;
import org.springframework.boot.web.embedded.tomcat.TomcatServletWebServerFactory;
import org.springframework.boot.web.server.WebServerFactory;
import org.springframework.boot.web.server.WebServerFactoryCustomizer;
import org.springframework.stereotype.Component;

@Component
public class TomcatServerCustomer implements WebServerFactoryCustomizer<TomcatServletWebServerFactory> {

    @Value("${ServerHttpPort}")
    Integer httpHost;

    @Override
    public void customize(TomcatServletWebServerFactory factory) {
        final Connector httpConn = new Connector("HTTP/1.1");
        httpConn.setPort(httpHost);
        factory.addAdditionalTomcatConnectors(httpConn);
    }
}
application.yml配置文件
server:
  ssl:
    key-store: classpath:client.p12
    key-store-password: 12345678
    key-store-type: PKCS12
    key-alias: client
  # https的访问端口
  port: 8443

# 部署服务器的配置
ServerHttpsUrl: https://localhost:8443 # https的url
ServerHttpUrl: http://localhost:8080 # http的url
ServerHttpPort: 8080 # http的端口号
LoginPassword: Admin@1a2 # 登陆的密码


spring:
  mvc:
    static-path-pattern: /**
  resources:
    static-locations: classpath:/static/
  thymeleaf:
    prefix: classpath:/templates/
    check-template-location: true
    cache: false
    suffix: .html #模板后缀
    encoding: UTF-8 #编码
    mode: HTML #模板
    servlet:
      content-type: text/html
根据http或者https确定拦截后到哪个页面
LoginAuthorInterceptor.java文件
request.getScheme(); // for example, http, https, or ftp.
package com.shanxi.gis.interceptor;

import org.springframework.beans.factory.annotation.Value;
import org.springframework.stereotype.Component;
import org.springframework.web.servlet.HandlerInterceptor;

import javax.servlet.http.HttpServletRequest;
import javax.servlet.http.HttpServletResponse;
import javax.servlet.http.HttpSession;

/**
 * spring的拦截器,
 * 1.在容器中,@Component
 * 2.是spring的拦截器 implements HandlerInterceptor
 */
@Component
public class LoginAuthorInterceptor implements HandlerInterceptor {

    @Value("${ServerHttpsUrl}")
    String httpsUrl;

    @Value("${ServerHttpUrl}")
    String httpUrl;
    @Override
    public boolean preHandle(HttpServletRequest request, HttpServletResponse response, Object handler) throws Exception {
        // 如果没有登陆,就去登陆页面,如果登陆了就放行
        HttpSession session = request.getSession();
        Object user = session.getAttribute("user");
        System.out.println(user);
        if ("admin".equals(user)){
            return true;
        }else {
            // 没有登陆,就去登陆页面
            String scheme = request.getScheme(); // for example, http, https, or ftp.
            // 如果是http就去,http的端口
            if ("http".equals(scheme)){
                response.sendRedirect(httpUrl+"/user/loginPage");
            }
            // 否则就去https的端口
            response.sendRedirect(httpsUrl+"/user/loginPage");
            return false;
        }
    }
}
后端共享值,前端form表单获取
login.html页面
<!DOCTYPE html>
<html lang="en" xmlns:th="http://www.thymeleaf.org">
<head>
    <meta charset="UTF-8">
    <title>登陆页面</title>
    <link rel="stylesheet" href="/bootstrap/css/bootstrap.min.css">
    <script src="/js/jquery-3.5.1.js"></script>
    <script src="/bootstrap/js/bootstrap.js"></script>
    <script src="/js/axios.min.js"></script>
    <script src="/js/vue.min-v2.5.16.js"></script>
    <link rel="stylesheet" href="/css/login.css">
</head>

<body>
    <div class="login-container" id="app">
        <h2>欢迎登录</h2>
<!--        "https://localhost:8443/user/login"-->
        <form :action=url method="post">
            <label for="username">用户名:</label>
            <input type="text" id="username" v-model="username" placeholder="请输入用户名" required name="username">
            <label for="password">密码:</label>
            <input type="password" id="password" v-model="password" placeholder="请输入密码" required name="password">
            <input type="submit" value="登录" @click="loginBtn" class="btn btn-primary btn-block">
        </form>
    </div>

<script>
    let app = new Vue({
        el:"#app",
        data:{
            username:"",
            password:"",
            url:"[[${httpsUrl}]]",
        },
        methods:{
        },
        created(){},
    })
</script>
</body>
</html>
后端共享值+跳转loginController.java
    @Value("${ServerHttpsUrl}")
    String httpsUrl;

    // 1.先到登陆页面
    @RequestMapping("/loginPage") // /user/loginPage
    public ModelAndView loginPage(){
        ModelAndView mv = new ModelAndView("user/login");
        mv.addObject("httpsUrl", httpsUrl + "/user/login");
        return mv;
    }
配置文件设置url
server:
  ssl:
    key-store: classpath:client.p12
    key-store-password: 12345678
    key-store-type: PKCS12
    key-alias: client
  # https的访问端口
  port: 8443

# 部署服务器的配置
ServerHttpsUrl: https://localhost:8443 # https的url
ServerHttpUrl: http://localhost:8080 # http的url
ServerHttpPort: 8080 # http的端口号
LoginPassword: Admin@1a2 # 登陆的密码


spring:
  mvc:
    static-path-pattern: /**
  resources:
    static-locations: classpath:/static/
  thymeleaf:
    prefix: classpath:/templates/
    check-template-location: true
    cache: false
    suffix: .html #模板后缀
    encoding: UTF-8 #编码
    mode: HTML #模板
    servlet:
      content-type: text/html
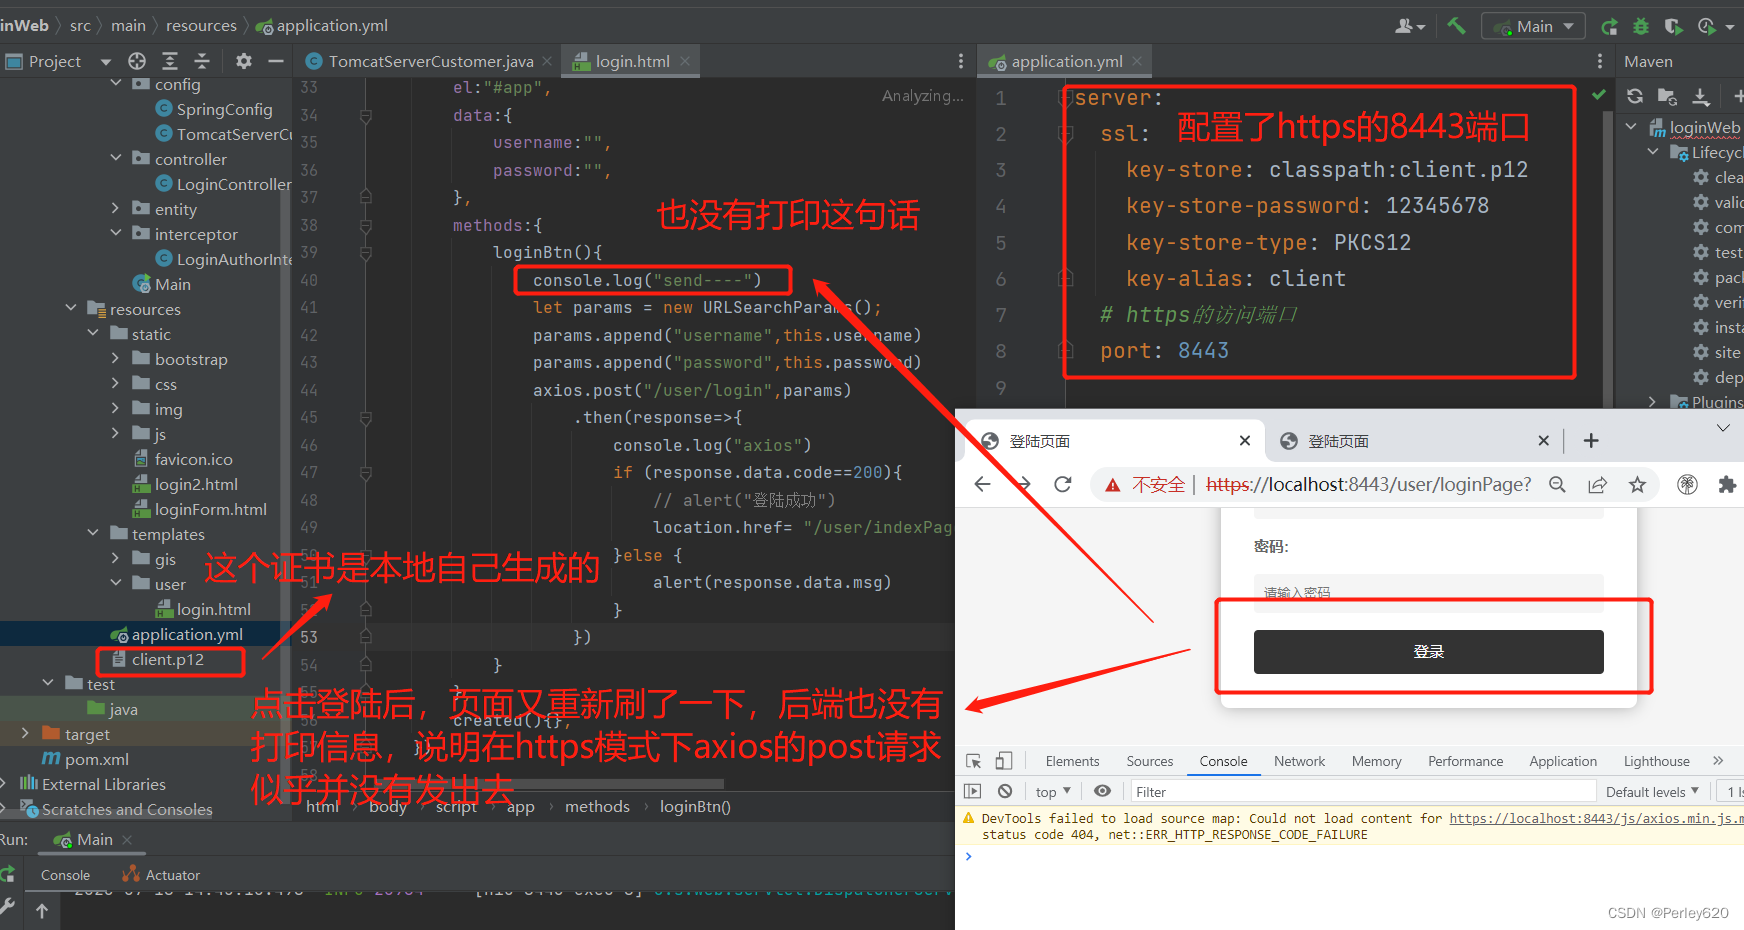
问题:在https协议下,发送axios请求没反应
问题如下:
解决方案一:用form表单
后端,用户名和密码正确后,重定向到index.html页面
// form表单下重定向到indexPage页面
response.sendRedirect(httpsUrl+“/user/indexPage”);
package com.shanxi.gis.controller;

import com.shanxi.gis.entity.ResData;
import org.springframework.beans.factory.annotation.Autowired;
import org.springframework.beans.factory.annotation.Value;
import org.springframework.stereotype.Controller;
import org.springframework.web.bind.annotation.CrossOrigin;
import org.springframework.web.bind.annotation.RequestMapping;
import org.springframework.web.bind.annotation.ResponseBody;
import org.springframework.web.servlet.ModelAndView;

import javax.servlet.http.HttpServletResponse;
import javax.servlet.http.HttpSession;
import java.io.IOException;
import java.util.Objects;

@Controller
@RequestMapping("/user")
@CrossOrigin // 允许跨域
public class LoginController {
    @Value("${ServerHttpsUrl}")
    String httpsUrl;

    @Value("${LoginPassword}")
    String loginPassword;

    // 1.先到登陆页面
    @RequestMapping("/loginPage") // /user/loginPage
    public ModelAndView loginPage(){
        ModelAndView mv = new ModelAndView("user/login");
        mv.addObject("httpsUrl", httpsUrl + "/user/login");
        return mv;
    }

    // 2.处理前端的axios请求
    @Autowired
    HttpSession session; // TODO:保存用户名到session

    @RequestMapping("/login")
    @ResponseBody
    public ResData login(
            String username,
            String password, HttpServletResponse response
            ) throws IOException {
        System.out.println(username +"//"+ password);
        if (Objects.equals(username, "") || username==null ||
                Objects.equals(password, "") || password==null
        ){
            return new ResData(1001, "必填项为空", null);
        }

        if (!"admin".equals(username) || !loginPassword.equals(password)){
            return new ResData(1002, "用户名|密码错误", null);
        }
        session.setAttribute("user",username); // TODO:set进session
        // form表单下重定向到indexPage页面
        response.sendRedirect(httpsUrl+"/user/indexPage");

        return new ResData(200, "ok", null);
    }

    // 3.登陆成功到index页面
    @RequestMapping("/indexPage")
    public String loginIndex(){
        return "gis/index";
    }
}
前端发送form表单
<form :action=url method=“post”>
<!DOCTYPE html>
<html lang="en" xmlns:th="http://www.thymeleaf.org">
<head>
    <meta charset="UTF-8">
    <title>登陆页面</title>
    <link rel="stylesheet" href="/bootstrap/css/bootstrap.min.css">
    <script src="/js/jquery-3.5.1.js"></script>
    <script src="/bootstrap/js/bootstrap.js"></script>
    <script src="/js/axios.min.js"></script>
    <script src="/js/vue.min-v2.5.16.js"></script>
    <link rel="stylesheet" href="/css/login.css">
</head>

<body>
    <div class="login-container" id="app">
        <h2>欢迎登录</h2>
<!--        "https://localhost:8443/user/login"-->
        <form :action=url method="post">
            <label for="username">用户名:</label>
            <input type="text" id="username" v-model="username" placeholder="请输入用户名" required name="username">
            <label for="password">密码:</label>
            <input type="password" id="password" v-model="password" placeholder="请输入密码" required name="password">
            <input type="submit" value="登录" @click="loginBtn" class="btn btn-primary btn-block">
        </form>
    </div>

<script>
    let app = new Vue({
        el:"#app",
        data:{
            username:"",
            password:"",
            url:"[[${httpsUrl}]]",
        },
        methods:{
            loginBtn(){
                console.log("send----")
                let params = new URLSearchParams();
                params.append("username",this.username)
                params.append("password",this.password)
                // axios.post("/user/login",params)
                axios.post("/user/login",params)
                    .then(response=>{
                        console.log("axios")
                        if (response.data.code==200){
                            // alert("登陆成功")
                            location.href= "/user/indexPage"
                        }else {
                            alert(response.data.msg)
                        }
                    })
            }
        },
        created(){},
    })

</script>

</body>
</html>
项目的打包部署
1.template might not exist or might not be accessible by any of the configured Template Resolvers
错误描述:
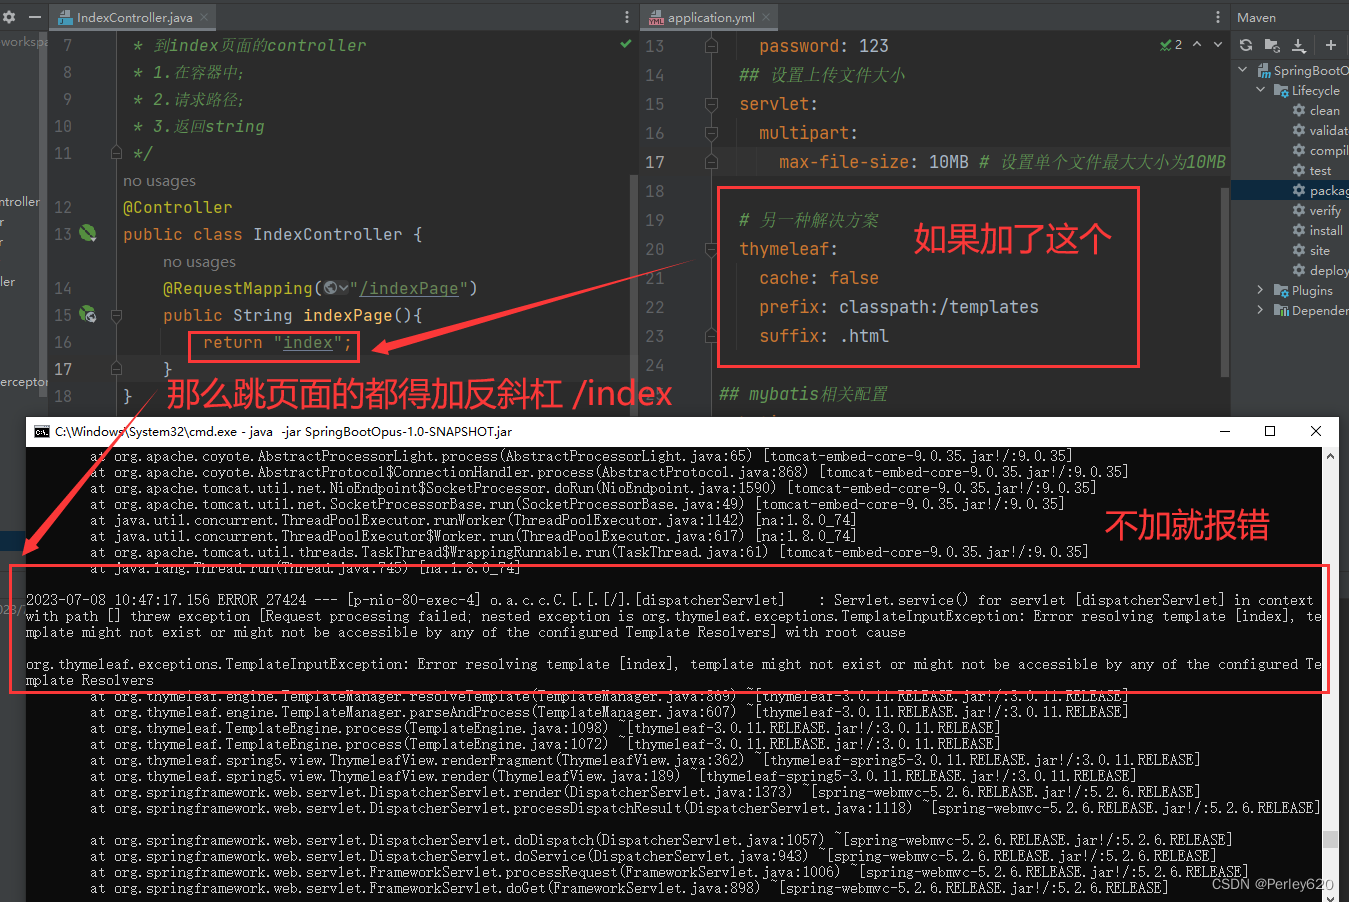
在idea中进行测试,所有功能都可以实现,尝试打包成jar包后运行,进入首页后没有显示用户信息页面,报500异常,后台显示Error resolving template [/user/info], template might not exist or might not be accessible by any of the configured Template Resolvers
报错信息:

2023-07-08 10:16:11.298 ERROR 28396 — [p-nio-80-exec-1] o.a.c.c.C.[.[.[/].[dispatcherServlet] : Servlet.service() for servlet [dispatcherServlet] in context with path [] threw exception [Request processing failed; nested exception is org.thymeleaf.exceptions.TemplateInputException: Error resolving template [/user/info], template might not exist or might not be accessible by any of the configured Template Resolvers] with root cause
org.thymeleaf.exceptions.TemplateInputException: Error resolving template [/user/info], template might not exist or might not be accessible by any of the configured Template Resolvers
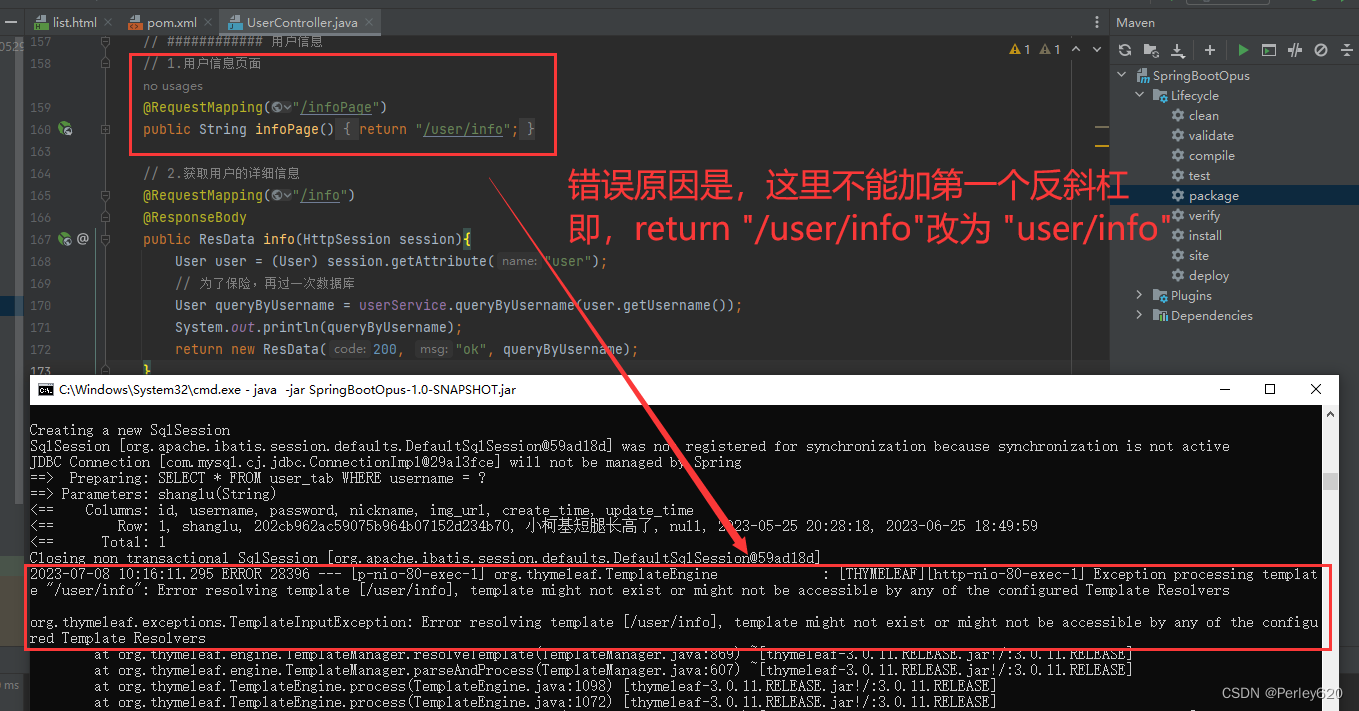
解决方案一:
@RequestMapping("/infoPage")
public String infoPage(){
    return "/user/info";
}
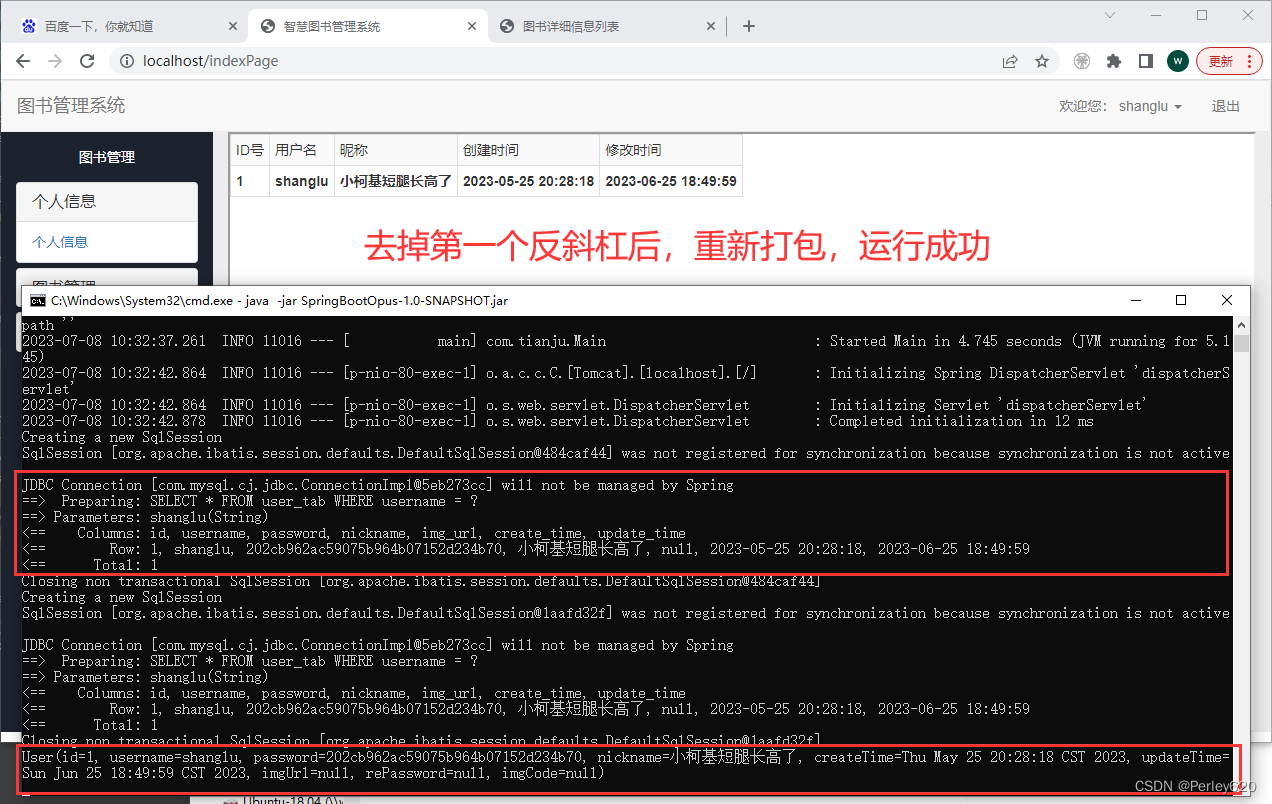
跳转页面去掉第一个反斜杠,改为如下
    @RequestMapping("/infoPage")
    public String infoPage(){
        return "user/info";
    }
thymeleaf + Spring Boot 在开发环境正常,但用jar运行时报错 Error resolving template template might not exist or might not be accessible;
就可以了
解决方案二:
spring.thymeleaf.cache=false
spring.thymeleaf.prefix=classpath:/templates/
spring.thymeleaf.suffix=.html
改成
spring.thymeleaf.cache=false
spring.thymeleaf.prefix=classpath:/templates
spring.thymeleaf.suffix=.html
## spring相关的配置
spring:
  # 连接数据库
  datasource:
    type: com.alibaba.druid.pool.DruidDataSource
    driver-class-name: com.mysql.cj.jdbc.Driver
    url: jdbc:mysql://127.0.0.1:3306/javaweb?useSSL=false&serverTimezone=Asia/Shanghai&allowPublicKeyRetrieval=true
    username: root
    password: 123
  ## 设置上传文件大小
  servlet:
    multipart:
      max-file-size: 10MB # 设置单个文件最大大小为10MB

  # 另一种解决方案
  thymeleaf:
    cache: false
    prefix: classpath:/templates
    suffix: .html
此时所有跳页面的都要加反斜杠


 1990
1990


 被折叠的 条评论
为什么被折叠?
被折叠的 条评论
为什么被折叠?
 到【灌水乐园】发言


