


1、引言
最近在学习如何在安卓手机上对蓝牙进行操控,作为初学者发现大多数博客对安卓开发的初学者极为不友好,特别是安卓和java都不熟悉的童鞋,因此现对我近期所学习内容做一个总结,希望对大家有帮助。
2、布局文件
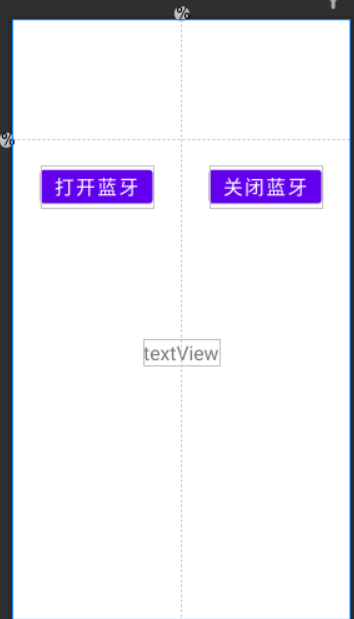
控件的种类,数量及用途如下表所示,AS中控件的使用方法可参考B站up主(longway777)讲得很到位。
| 控件种类 | 控件数量 | 作用 |
|---|---|---|
| Button | 2 | 蓝牙的打开与关闭 |
| Guideline | 2 | 固定控件 |
| textView | 1 | 显示蓝牙的状态 |
具体布局如下图所示,
<?xml version="1.0" encoding="utf-8"?>
<androidx.constraintlayout.widget.ConstraintLayout xmlns:android="http://schemas.android.com/apk/res/android"
    xmlns:app="http://schemas.android.com/apk/res-auto"
    xmlns:tools="http://schemas.android.com/tools"
    android:layout_width="match_parent"
    android:layout_height="match_parent"
    tools:context=".MainActivity">

    <Button
        android:id="@+id/button"
        android:layout_width="wrap_content"
        android:layout_height="wrap_content"
        android:layout_marginTop="32dp"
        android:text="@string/button1"
        android:textSize="24sp"
        app:layout_constraintEnd_toStartOf="@+id/guideline2"
        app:layout_constraintStart_toStartOf="parent"
        app:layout_constraintTop_toTopOf="@+id/guideline" />

    <Button
        android:id="@+id/button2"
        android:layout_width="wrap_content"
        android:layout_height="wrap_content"
        android:layout_marginTop="32dp"
        android:text="@string/button2"
        android:textSize="24sp"
        app:layout_constraintEnd_toEndOf="parent"
        app:layout_constraintStart_toStartOf="@+id/guideline2"
        app:layout_constraintTop_toTopOf="@+id/guideline" />

    <TextView
        android:id="@+id/textView"
        android:layout_width="wrap_content"
        android:layout_height="wrap_content"
        android:layout_marginTop="244dp"
        android:textSize="24sp"
        app:layout_constraintEnd_toStartOf="@+id/guideline2"
        app:layout_constraintHorizontal_bias="0.965"
        app:layout_constraintStart_toStartOf="@+id/guideline2"
        app:layout_constraintTop_toTopOf="@+id/guideline" />

    <androidx.constraintlayout.widget.Guideline
        android:id="@+id/guideline"
        android:layout_width="wrap_content"
        android:layout_height="wrap_content"
        android:orientation="horizontal"
        app:layout_constraintGuide_percent="0.2" />

    <androidx.constraintlayout.widget.Guideline
        android:id="@+id/guideline2"
        android:layout_width="wrap_content"
        android:layout_height="wrap_content"
        android:orientation="vertical"
        app:layout_constraintGuide_percent="0.5" />

</androidx.constraintlayout.widget.ConstraintLayout>
3、蓝牙打开与关闭
这里主要讲两种方法实现按钮对蓝牙的打开与关闭功能,若要对安卓手机蓝牙进行操控时,首先在AndroidManifest.xml文件中添加蓝牙权限,如下所示。
<uses-permission android:name="android.permission.BLUETOOTH" />
<uses-permission android:name="android.permission.BLUETOOTH_ADMIN"/>
在AndroidManifest.xml具体位置如下图所示,

无论采用那种方法处理按钮背后的逻辑,都需要采用用到 BluetoothAdapter这个类来实现对蓝牙的关闭与打开,下面对本次实验用到 BluetoothAdapter类的方法进行解释。BluetoothAdapter为蓝牙适配器,在对本机蓝牙进行操作时一般都要用到这个类里的方法。
| 方法 | 作用 | 返回值 |
|---|---|---|
| BluetoothAdapter.getDefaultAdapter() | 判断本机是否支持蓝牙 | 返回值为boolean类型, 若返回null则表示不支持蓝牙 |
| BluetoothAdapter.isEnabled() | 判断本机蓝牙当前状态 | 返回值为boolean类型, 若返回truel则表示本机蓝牙已打开 |
| BluetoothAdapter.enable() | 打开蓝牙 | 返回值为boolean类型 |
| BluetoothAdapter.disenable() | 关闭蓝牙 | 返回值为boolean类型 |
3.1 通过对按钮监听方法
通过调用按钮的监听方法对按钮进行监听,MainActivity.java具体代码所示。
package com.example.ble_csdn;

import androidx.appcompat.app.AppCompatActivity;

import android.bluetooth.BluetoothAdapter;
import android.os.Bundle;
import android.view.View;
import android.widget.Button;
import android.widget.TextView;
import android.widget.Toast;

public class MainActivity extends AppCompatActivity {

    Button button1, button2;   // 申明蓝牙打开与关闭按钮
    TextView textView;         // 申明蓝牙状态显示文本框
    private BluetoothAdapter mAdapter = BluetoothAdapter.getDefaultAdapter();
    @Override
    protected void onCreate(Bundle savedInstanceState) {
        super.onCreate(savedInstanceState);
        setContentView(R.layout.activity_main);

        button1 = findViewById(R.id.button);      // 与layout布局文件中的按钮绑定
        button2 = findViewById(R.id.button2);
        textView = findViewById(R.id.textView);   // 与layout布局文件中的文本框绑定

        // 在程序运行的时候就要监测本机当前蓝牙的状态,并显示在文本框中
        if (mAdapter.isEnabled()){
            textView.setText(R.string.bleStatusOn);
            Toast.makeText(MainActivity.this, R.string.bleStatusOn, Toast.LENGTH_SHORT).show();
            //Toast.makeText(MainActivity.this, "蓝牙已打开!", Toast.LENGTH_SHORT).show();
        }

        // 调用按钮监听方法,对button1进行监听
        button1.setOnClickListener(new View.OnClickListener() {
            @Override
            public void onClick(View v) {

                if(mAdapter == null){
                    Toast.makeText(MainActivity.this, "本机不支持蓝牙!", Toast.LENGTH_SHORT).show();
                }else{
                    if(!mAdapter.isEnabled()){
                        mAdapter.enable();  // 打开蓝牙
                        textView.setText(R.string.bleStatusOn);     // 显示蓝牙当前状态
                        //textView.setText("蓝牙已打开!");
                    }
                    textView.setText(R.string.bleStatusOn);
                    Toast.makeText(MainActivity.this, R.string.bleStatusOn, Toast.LENGTH_SHORT).show();
                    //Toast.makeText(MainActivity.this, "蓝牙已打开!", Toast.LENGTH_SHORT).show();
                }
            }
        });

        // 调用按钮监听方法,对button2进行监听
        button2.setOnClickListener(new View.OnClickListener() {
            @Override
            public void onClick(View v) {
                mAdapter.disable();  //关闭蓝牙
                textView.setText(R.string.bleStatusOff);
                //textView.setText("蓝牙已打开!");
            }
        });
    }
}
备注:只需将对应的部分拷贝到自己新建的工程即可,无需将整个代码复制过去。
3.2 通过设置点击事件
不需要利用findViewById();方法实现声明的按钮控件与layout文件中的按钮相关联,MainActivity.java具体代码如下所示。
package com.example.ble_csdn;

import androidx.appcompat.app.AppCompatActivity;

import android.bluetooth.BluetoothAdapter;
import android.os.Bundle;
import android.view.View;
import android.widget.Button;
import android.widget.TextView;
import android.widget.Toast;

public class MainActivity extends AppCompatActivity {

    Button button1, button2;   // 申明蓝牙打开与关闭按钮
    TextView textView;         // 申明蓝牙状态显示文本框
    private BluetoothAdapter mAdapter = BluetoothAdapter.getDefaultAdapter();
    @Override
    protected void onCreate(Bundle savedInstanceState) {
        super.onCreate(savedInstanceState);
        setContentView(R.layout.activity_main);
        textView = findViewById(R.id.textView);   // 与layout布局文件中的文本框绑定

        // 在程序运行的时候就要监测本机当前蓝牙的状态,并显示在文本框中
        if (mAdapter.isEnabled()){
            textView.setText(R.string.bleStatusOn);
            Toast.makeText(MainActivity.this, R.string.bleStatusOn, Toast.LENGTH_SHORT).show();
            //Toast.makeText(MainActivity.this, "蓝牙已打开!", Toast.LENGTH_SHORT).show();
        }

    }

	// 打开蓝牙
    public void turnOnBlueTooth(View view){
        if(mAdapter == null){
            Toast.makeText(MainActivity.this, "本机不支持蓝牙!", Toast.LENGTH_SHORT).show();
            textView.setText("本机不支持蓝牙!");
        }else{
            if(!mAdapter.isEnabled()){
                mAdapter.enable();
                Toast.makeText(MainActivity.this, "蓝牙已打开!", Toast.LENGTH_SHORT).show();
                textView.setText("蓝牙已打开!");
            }else {
                Toast.makeText(MainActivity.this, "蓝牙已打开!", Toast.LENGTH_SHORT).show();
                textView.setText("蓝牙已打开!");
            }
        }
    }

	// 关闭蓝牙
    public void turnOffBlueTooth(View view){
        mAdapter.disable();
        Toast.makeText(MainActivity.this, "蓝牙已关闭!", Toast.LENGTH_SHORT).show();
        textView.setText("蓝牙已关闭!");
    }
}
接下来要为按钮设置点击函数,具体步骤如下所示,

4、结果展示及总结
结果展示如下所示,若觉得本文对您有请动一动小手指帮忙点个赞额,若需要源码请在评论区留下您的邮箱。

5、参考链接
1、常用控件的使用
2、BluetoothAdapter、BluetoothDevice类方法介绍
3、初探安卓开发
4、安卓蓝牙开发


 被折叠的 条评论
为什么被折叠?
被折叠的 条评论
为什么被折叠?
 到【灌水乐园】发言


