


页面布局是直播带货app源码非常重要的一部分,那么直播带货app源码可以怎样实现呢?
1.fullscreen Activity
布局:
<FrameLayout xmlns:android="http://schemas.android.com/apk/res/android"
    xmlns:tools="http://schemas.android.com/tools"
    android:layout_width="match_parent"
    android:layout_height="match_parent"
    android:background="#0099cc"
    tools:context="com.example.administrator.jreduch05.FullscreenActivity">

    <!-- The primary full-screen view. This can be replaced with whatever view
         is needed to present your content, e.g. VideoView, SurfaceView,
         TextureView, etc. -->
    <TextView
        android:id="@+id/fullscreen_content"
        android:layout_width="match_parent"
        android:layout_height="match_parent"
        android:gravity="center"
        android:keepScreenOn="true"
        android:text="@string/dummy_content"
        android:textColor="#33b5e5"
        android:textSize="50sp"
        android:textStyle="bold" />

    <!-- This FrameLayout insets its children based on system windows using
         android:fitsSystemWindows. -->
    <FrameLayout
        android:layout_width="match_parent"
        android:layout_height="match_parent"
        android:fitsSystemWindows="true">

        <LinearLayout
            android:id="@+id/fullscreen_content_controls"
            style="?metaButtonBarStyle"
            android:layout_width="match_parent"
            android:layout_height="wrap_content"
            android:layout_gravity="bottom|center_horizontal"
            android:background="@color/black_overlay"
            android:orientation="horizontal"
            tools:ignore="UselessParent">

            <Button
                android:id="@+id/dummy_button"
                style="?metaButtonBarButtonStyle"
                android:layout_width="0dp"
                android:layout_height="wrap_content"
                android:layout_weight="1"
                android:text="@string/dummy_button" />
        </LinearLayout>
    </FrameLayout>
</FrameLayout>
显示效果:

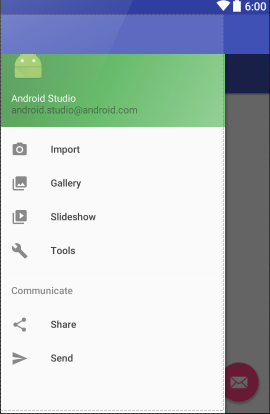
2.SlidingMenu Activity
布局:
<?xml version="1.0" encoding="utf-8"?>
<android.support.v4.widget.DrawerLayout xmlns:android="http://schemas.android.com/apk/res/android"
    xmlns:app="http://schemas.android.com/apk/res-auto"
    xmlns:tools="http://schemas.android.com/tools"
    android:id="@+id/drawer_layout"
    android:layout_width="match_parent"
    android:layout_height="match_parent"
    android:fitsSystemWindows="true"
    tools:openDrawer="start">

    <include
        layout="@layout/app_bar_drawer"
        android:layout_width="match_parent"
        android:layout_height="match_parent" />

    <android.support.design.widget.NavigationView
        android:id="@+id/nav_view"
        android:layout_width="wrap_content"
        android:layout_height="match_parent"
        android:layout_gravity="start"
        android:fitsSystemWindows="true"
        app:headerLayout="@layout/nav_header_drawer"
        app:menu="@menu/activity_drawer_drawer" />

</android.support.v4.widget.DrawerLayout>
效果:
代码:
package com.example.administrator.jreduch05.adapter;

import android.os.Bundle;
import android.support.design.widget.FloatingActionButton;
import android.support.design.widget.NavigationView;
import android.support.design.widget.Snackbar;
import android.support.v4.view.GravityCompat;
import android.support.v4.widget.DrawerLayout;
import android.support.v7.app.ActionBarDrawerToggle;
import android.support.v7.app.AppCompatActivity;
import android.support.v7.widget.Toolbar;
import android.view.Menu;
import android.view.MenuItem;
import android.view.View;

import com.example.administrator.jreduch05.R;

public class DrawerActivity extends AppCompatActivity
        implements NavigationView.OnNavigationItemSelectedListener {

    @Override
    protected void onCreate(Bundle savedInstanceState) {
        super.onCreate(savedInstanceState);
        setContentView(R.layout.activity_drawer);
        Toolbar toolbar = (Toolbar) findViewById(R.id.toolbar);
        setSupportActionBar(toolbar);

        FloatingActionButton fab = (FloatingActionButton) findViewById(R.id.fab);
        fab.setOnClickListener(new View.OnClickListener() {
            @Override
            public void onClick(View view) {
                Snackbar.make(view, "Replace with your own action", Snackbar.LENGTH_LONG)
                        .setAction("Action", null).show();
            }
        });

        DrawerLayout drawer = (DrawerLayout) findViewById(R.id.drawer_layout);
        ActionBarDrawerToggle toggle = new ActionBarDrawerToggle(
                this, drawer, toolbar, R.string.navigation_drawer_open, R.string.navigation_drawer_close);
        drawer.setDrawerListener(toggle);
        toggle.syncState();

        NavigationView navigationView = (NavigationView) findViewById(R.id.nav_view);
        navigationView.setNavigationItemSelectedListener(this);
    }

    @Override
    public void onBackPressed() {
        DrawerLayout drawer = (DrawerLayout) findViewById(R.id.drawer_layout);
        if (drawer.isDrawerOpen(GravityCompat.START)) {
            drawer.closeDrawer(GravityCompat.START);
        } else {
            super.onBackPressed();
        }
    }

    @Override
    public boolean onCreateOptionsMenu(Menu menu) {
        // Inflate the menu; this adds items to the action bar if it is present.
        getMenuInflater().inflate(R.menu.drawer, menu);
        return true;
    }

    @Override
    public boolean onOptionsItemSelected(MenuItem item) {
        // Handle action bar item clicks here. The action bar will
        // automatically handle clicks on the Home/Up button, so long
        // as you specify a parent activity in AndroidManifest.xml.
        int id = item.getItemId();

        //noinspection SimplifiableIfStatement
        if (id == R.id.action_settings) {
            return true;
        }

        return super.onOptionsItemSelected(item);
    }

    @SuppressWarnings("StatementWithEmptyBody")
    @Override
    public boolean onNavigationItemSelected(MenuItem item) {
        // Handle navigation view item clicks here.
        int id = item.getItemId();

        if (id == R.id.nav_camera) {
            // Handle the camera action
        } else if (id == R.id.nav_gallery) {

        } else if (id == R.id.nav_slideshow) {

        } else if (id == R.id.nav_manage) {

        } else if (id == R.id.nav_share) {

        } else if (id == R.id.nav_send) {

        }

        DrawerLayout drawer = (DrawerLayout) findViewById(R.id.drawer_layout);
        drawer.closeDrawer(GravityCompat.START);
        return true;
    }
}
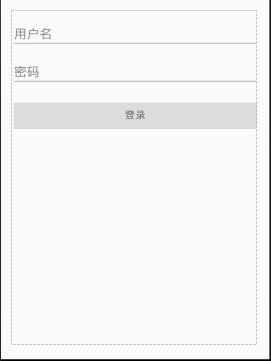
3.Login Activity
布局:(将英文改成汉字)
<LinearLayout xmlns:android="http://schemas.android.com/apk/res/android"
    xmlns:tools="http://schemas.android.com/tools"
    android:layout_width="match_parent"
    android:layout_height="match_parent"
    android:gravity="center_horizontal"
    android:orientation="vertical"
    android:paddingBottom="@dimen/activity_vertical_margin"
    android:paddingLeft="@dimen/activity_horizontal_margin"
    android:paddingRight="@dimen/activity_horizontal_margin"
    android:paddingTop="@dimen/activity_vertical_margin"
    tools:context="com.example.administrator.jreduch05.LoginActivity">

    <!-- Login progress -->
    <ProgressBar
        android:id="@+id/login_progress"
        style="?android:attr/progressBarStyleLarge"
        android:layout_width="wrap_content"
        android:layout_height="wrap_content"
        android:layout_marginBottom="8dp"
        android:visibility="gone" />

    <ScrollView
        android:id="@+id/login_form"
        android:layout_width="match_parent"
        android:layout_height="match_parent">

        <LinearLayout
            android:id="@+id/email_login_form"
            android:layout_width="match_parent"
            android:layout_height="wrap_content"
            android:orientation="vertical">

            <android.support.design.widget.TextInputLayout
                android:layout_width="match_parent"
                android:layout_height="wrap_content">

                <AutoCompleteTextView
                    android:id="@+id/user"
                    android:layout_width="match_parent"
                    android:layout_height="wrap_content"
                    android:hint="用户名"
                    android:inputType="textEmailAddress"
                    android:maxLines="1"
                    android:singleLine="true" />

            </android.support.design.widget.TextInputLayout>

            <android.support.design.widget.TextInputLayout
                android:layout_width="match_parent"
                android:layout_height="wrap_content">

                <EditText
                    android:id="@+id/pwd"
                    android:layout_width="match_parent"
                    android:layout_height="wrap_content"
                    android:hint="密码"
                    android:imeActionId="@+id/login"
                    android:imeActionLabel="@string/action_sign_in_short"
                    android:imeOptions="actionUnspecified"
                    android:inputType="textPassword"
                    android:maxLines="1"
                    android:singleLine="true" />

            </android.support.design.widget.TextInputLayout>

            <Button
                android:id="@+id/bt1"
                style="?android:textAppearanceSmall"
                android:layout_width="match_parent"
                android:layout_height="wrap_content"
                android:layout_marginTop="16dp"
                android:text="登录"
                android:textStyle="bold" />

        </LinearLayout>
    </ScrollView>
</LinearLayout>
效果:
代码:(如果密码和用户名为空,则提示)
package com.example.administrator.jreduch05;

import android.support.v7.app.AppCompatActivity;
import android.os.Bundle;
import android.text.TextUtils;
import android.view.View;
import android.widget.Button;
import android.widget.EditText;

public class MyLoginActivity extends AppCompatActivity {
    private Button bt1;
    private EditText user;
    private EditText pwd;
    @Override
    protected void onCreate(Bundle savedInstanceState) {
        super.onCreate(savedInstanceState);
        setContentView(R.layout.activity_my_login);
        bt1=(Button) findViewById(R.id.bt1);
        user=(EditText) findViewById(R.id.user);
        pwd=(EditText) findViewById(R.id.pwd);
        bt1.setOnClickListener(new View.OnClickListener() {
            @Override
            public void onClick(View v) {
                if(TextUtils.isEmpty(user.getText().toString())){
                    user.setError("请输入正确用户名");
                }else if(TextUtils.isEmpty(pwd.getText().toString())){
                    pwd.setError("请输入正确密码");
                }
            }
        });
    }
}
这样我们就实现了一个简单的直播带货app源码页面布局。
声明:本文由云豹科技转发自funder博客,如有侵权请联系作者删除


 1549
1549


 被折叠的 条评论
为什么被折叠?
被折叠的 条评论
为什么被折叠?
 到【灌水乐园】发言


