


ServiceManager的addService()和getService
从上文[转]Android系统服务(SystemService)简介【上】的分析我们可以看到,所有的系统服务最终都是由ServiceManager来管理的,那么ServiceManager是怎么管理这些系统服务的呢?还是先看上面的VibratorService的实现:
// App
Vibrator mVibrator = (Vibrator) getSystemService(Context.VIBRATOR_SERVICE);
mVibrator.vibrate(500);
// frameworks/base/services/java/com/android/server/SystemServer.java
public void initAndLoop() {
    vibrator = new VibratorService(context);
    ServiceManager.addService("vibrator", vibrator);
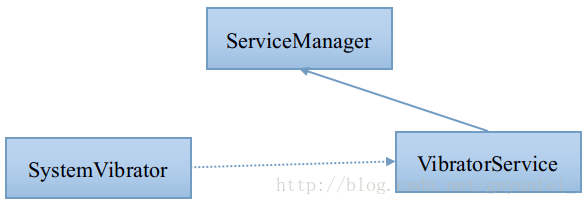
proxy端
VibratorService通过addService()将自己注册到ServiceManager里,SystemVibrator通过getService()获得一个服务代理,并与服务进行通信交互,那么ServiceManager又是什么?它是怎么管理服务的注册与代理的呢?我们先从addService()与getService()开始,分析一下ServiceManager:
frameworks/base/core/java/android/os/ServiceManager.java
public final class ServiceManager {
    public static void addService(String name, IBinder service) {
        try {
            getIServiceManager().addService(name, service, false);
        } catch (RemoteException e) {
            Log.e(TAG, "error in addService", e);
        }
    }

    public static IBinder getService(String name) {
        try {
            IBinder service = sCache.get(name);
            if (service != null) {
                return service;
            } else {
                return getIServiceManager().getService(name);
            }
        } catch (RemoteException e) {
            Log.e(TAG, "error in getService", e);
        }
        return null;
    }
}
addService()和getService()都是直接调用了getIServiceManager()的方法,getIServiceManager()返回的又是什么呢?
private static IServiceManager getIServiceManager() {
    if (sServiceManager != null) {
        return sServiceManager;
    }
    // Find the service manager
    sServiceManager = ServiceManagerNative.asInterface(BinderInternal.getContextObject());
    return sServiceManager;
}
这里是创建了一个IServiceManager类型的单实例,具体的实例又是通过ServiceManagerNative创建的:
ServiceManagerNative.asInterface(BinderInternal.getContextObject());
先来看BinderInternal.getContextObject()
frameworks/base/core/java/com/android/internal/os/BinderInternal.java
public static final native IBinder getContextObject();
getContextObject()是在native层实现的
frameworks/base/core/jni/android_util_Binder.cpp
static jobject android_os_BinderInternal_getContextObject(JNIEnv* env,
        jobject clazz)
{
    sp<IBinder> b = ProcessState::self()->getContextObject(NULL);
    return javaObjectForIBinder(env, b);
}
后面的实现过程逻辑比较复杂,这里就不详细分析了,只是说明一下大致流程,感兴趣的可以自己详细研究一下binder的实现机制。
ProcessState从名字可以看出这应该是一个保存进程状态的类,最好应该用单实例的对象保存,所以ProcessState::self()得到的也就是ProcessState的一个单实例对象,它的getContextObject()会继续调用getStrongProxyForHandle(int32_t handle)返回一个IBinder
frameworks/native/libs/binder/ProcessState.cpp
sp<IBinder> ProcessState::getContextObject(const sp<IBinder>& caller)
{
    return getStrongProxyForHandle(0);
}
在getStrongProxyForHandle()中会根据传入的参数handle创建一个BpBinder,这个BpBinder会保存在一个数组mHandleToObject中,下次再用同样的handle请求时不会再重新创建。由于我们传入的handle=0,这里创建的BpBinder也就相当于第0号BpBinder。
之后的javaObjectForIBinder()会将C++的BpBinder对象封装成Java的BinderProxy对象并返回。所以BinderInternal.getContextObject()得到的是一个BinderProxy对象,并将native层的第0号BpBinder保存在BinderProxy的mObject变量中。
jobject javaObjectForIBinder(JNIEnv* env, const sp<IBinder>& val){
    ...
    object = env->NewObject(gBinderProxyOffsets.mClass, gBinderProxyOffsets.mConstructor);
    if (object != NULL) {
        // The proxy holds a reference to the native object.
        env->SetIntField(object, gBinderProxyOffsets.mObject, (int)val.get());
    ...
而gBinderProxyOffsets的赋值是在framework/base/core/jni/android_util_Binder.cpp中
const char* const kBinderProxyPathName = "android/os/BinderProxy";

static int int_register_android_os_BinderProxy(JNIEnv* env){
    ...
    clazz = env->FindClass(kBinderProxyPathName);
    LOG_FATAL_IF(clazz == NULL, "Unable to find class android.os.BinderProxy");

    gBinderProxyOffsets.mClass = (jclass) env->NewGlobalRef(clazz);
    gBinderProxyOffsets.mConstructor
        = env->GetMethodID(clazz, "<init>", "()V");
    ...
所以
ServiceManagerNative.asInterface(BinderInternal.getContextObject());
相当于
ServiceManagerNative.asInterface(new BinderProxy());
ServiceManagerNative.asInterface()又做了些什么呢?
frameworks/base/core/java/android/os/ServiceManagerNative.java
static public IServiceManager asInterface(IBinder obj)
{
    ...
    return new ServiceManagerProxy(obj);
}
这里会将BinderProxy再封装成一个ServiceManagerProxy(),所以getIServiceManager()得到的其实是一个ServiceManagerProxy。这个ServiceManagerProxy中的mRemote为BinderProxy,在其BinderProxy中包含一个mObject,mObject指向BpBinder(0)。
class ServiceManagerProxy{
    private IBinder mRemote;

    public ServiceManagerProxy(IBinder remote) {
        mRemote = remote;
    }
ServiceManagerProxy、BinderProxy以及BpBinder都是代理模式中的proxy端,真正的实现应该在对应的native端。我们接着看。
native端
addService()和getService()在代理端的实现应该是在frameworks/base/core/java/android/os/ServiceManagerNative.java中里:
class ServiceManagerProxy{
    public IBinder getService(String name) throws RemoteException {
        Parcel data = Parcel.obtain();
        Parcel reply = Parcel.obtain();
        data.writeInterfaceToken(IServiceManager.descriptor);
        data.writeString(name);
        mRemote.transact(GET_SERVICE_TRANSACTION, data, reply, 0);
        IBinder binder = reply.readStrongBinder();
        reply.recycle();
        data.recycle();
        return binder;
    }

    public void addService(String name, IBinder service, boolean allowIsolated)
        throws RemoteException {
            Parcel data = Parcel.obtain();
            Parcel reply = Parcel.obtain();
            data.writeInterfaceToken(IServiceManager.descriptor);
            data.writeString(name);
            data.writeStrongBinder(service);
            data.writeInt(allowIsolated ? 1 : 0);
            mRemote.transact(ADD_SERVICE_TRANSACTION, data, reply, 0);
            reply.recycle();
            data.recycle();
        }}
从上面两个方法的实现可以看到,首先是创建了两个可序列化的Parcel data、reply,传入的参数被放到了data里,data、reply又一起传给了mRemote.transact(),之后又从reply里读取结果。addService()的实现里还通过data.writeStrongBinder(service)写入了一个IBinder的实例。同时注意到getService()和addService()里面调用mRemote.transact()传递的第一个参数分别为GET_SERVICE_TRANSACTION 和 ADD_SERVICE_TRANSACTION ,我们可以在IServiceManager里看到这是两个int值,分别为1和3
frameworks/base/core/java/android/os/IServiceManager.java
int GET_SERVICE_TRANSACTION = IBinder.FIRST_CALL_TRANSACTION;  //值为1
int CHECK_SERVICE_TRANSACTION = IBinder.FIRST_CALL_TRANSACTION+1;
int ADD_SERVICE_TRANSACTION = IBinder.FIRST_CALL_TRANSACTION+2;
mRemote就是BinderProxy,BinderProxy的transact是一个native的方法
public native boolean transact(int code, Parcel data, Parcel reply,
        int flags) throws RemoteException;
调用时会通过JNI映射到cpp中的android_os_BinderProxy_transact方法里
frameworks/base/core/jni/android_util_Binder.cpp
static jboolean android_os_BinderProxy_transact(JNIEnv* env, jobject obj,
        jint code, jobject dataObj, jobject replyObj, jint flags) // throws RemoteException
{
    ...
    IBinder* target = (IBinder*)
        env->GetIntField(obj, gBinderProxyOffsets.mObject);
    ...
    status_t err = target->transact(code, *data, reply, flags);
所以调用BinderProxy的transact就相当于调用了BpBinder的transact方法
frameworks/native/libs/binder/BpBinder.cpp
status_t BpBinder::transact(
        uint32_t code, const Parcel& data, Parcel* reply, uint32_t flags)
{
    // Once a binder has died, it will never come back to life.
    if (mAlive) {
        status_t status = IPCThreadState::self()->transact(
            mHandle, code, data, reply, flags);
        if (status == DEAD_OBJECT) mAlive = 0;
        return status;
    }

    return DEAD_OBJECT;
}
IPCThreadState里的transact会将proxy端的请求通过binder机制写入到一块共享内存里,然后会有一个native端从共享内存里读出请求,并执行相应的操作。那么这个native端在哪里呢?是不是ServiceManagerNative呢?但是ServiceManagerNative只是一个抽象类,我们并没有找到继承自它的子类。实际上ServiceManagerNative只是架构方面的一个抽象定义,并没有真正的一个实现,真正实现ServiceManager的native端功能的是在native层的service_manager.c中。
servicemanager是底层的一个独立进程,主要的实现代码就在service_manager.c中。
frameworks/native/cmds/servicemanager/binder.h
enum {
    /* Must match definitions in IBinder.h and IServiceManager.h */
    /* 如注释,这个值和IServiceManager.h中的值应一一对应 */
    PING_TRANSACTION  = B_PACK_CHARS('_','P','N','G'),
    SVC_MGR_GET_SERVICE = 1,
    SVC_MGR_CHECK_SERVICE,
    SVC_MGR_ADD_SERVICE,
    SVC_MGR_LIST_SERVICES,
};
frameworks/native/cmds/servicemanager/service_manager.c
#include "binder.h"
...
int svcmgr_handler(struct binder_state *bs,
                   struct binder_transaction_data *txn,
                   struct binder_io *msg,
                   struct binder_io *reply)
{
    ...
    switch(txn->code) {
    case SVC_MGR_GET_SERVICE:
    case SVC_MGR_CHECK_SERVICE:
        s = bio_get_string16(msg, &len);
        if (s == NULL) {
            return -1;
        }
        handle = do_find_service(s, len, txn->sender_euid, txn->sender_pid);
        if (!handle)
            break;
        bio_put_ref(reply, handle);
        return 0;

    case SVC_MGR_ADD_SERVICE:
        s = bio_get_string16(msg, &len);
        if (s == NULL) {
            return -1;
        }
        handle = bio_get_ref(msg);
        allow_isolated = bio_get_uint32(msg) ? 1 : 0;
        if (do_add_service(bs, s, len, handle, txn->sender_euid,
            allow_isolated, txn->sender_pid))
            return -1;
        break;
        ...
    }
}
service_manager.c的svcmgr_handler函数就是监听代理端请求命令的txn->code就是mRemote.transact()里传过来的第一个参数。SVC_MGR_GET_SERVICE和SVC_MGR_ADD_SERVICE是在头文件binder.h里定义的,它们的值与IServiceManager.java里定义的一致,也是1和3。
1.我们先看SVC_MGR_ADD_SERVICE的响应:
- 首先通过s = bio_get_string16(msg, &len)获得了service的名称,
- 然后通过handle = bio_get_ref(msg)获得了一个handle,这个handle就是我们之前通过 writeStrongBinder写入的IBinder,
- 最后通过do_add_service()添加注册service
do_add_service()的实现如下:
int do_add_service(struct binder_state *bs,
                   const uint16_t *s, size_t len,
                   uint32_t handle, uid_t uid, int allow_isolated,
                   pid_t spid)
{
    struct svcinfo *si;
    si = find_svc(s, len);
    if (si) {
        if (si->handle) {
            ALOGE("add_service('%s',%x) uid=%d - ALREADY REGISTERED, OVERRIDE\n",
                 str8(s, len), handle, uid);
            svcinfo_death(bs, si);
        }
        si->handle = handle;
    } else {
        si = malloc(sizeof(*si) + (len + 1) * sizeof(uint16_t));
        si->handle = handle;
        si->len = len;
        memcpy(si->name, s, (len + 1) * sizeof(uint16_t));
        si->name[len] = '\0';
        si->death.func = (void*) svcinfo_death;
        si->death.ptr = si;
        si->allow_isolated = allow_isolated;
        si->next = svclist;
        svclist = si;
    }
    ...
}

struct svcinfo *find_svc(const uint16_t *s16, size_t len)
{
    struct svcinfo *si;

    for (si = svclist; si; si = si->next) {
        if ((len == si->len) &&
            !memcmp(s16, si->name, len * sizeof(uint16_t))) {
            return si;
        }
    }
    return NULL;
}
- 首先声明了一个
struct svcinfo *si - 通过
find_svc(s, len)查找一下同样名称的service之前是不是注册过,防止重复注册。find_svc()的实现里可以看到是通过遍历一个svclist链表来查重的,svclist链表就是用来保存所有注册过的service的 - 如果确认没有重复注册
service,就重新构造一个svcinfo添加到svclist链表的头部。
2.我们再看SVC_MGR_GET_SERVICE的响应
主要是通过do_find_service()查找到对应的service,并通过bio_put_ref(reply, handle)将查找到的handle返回。do_find_service()的实现主要也是通过find_svc()去svclist链表中查找
uint32_t do_find_service(const uint16_t *s, size_t len, uid_t uid, pid_t spid)
{
    struct svcinfo *si = find_svc(s, len);
    ...
    return si->handle;
}
通过上面的流程梳理我们最终了解到:
- 每个System Service通过调用ServiceManager.addService()将自己的名字以及IBinder引用保存到servicemanager进程的一个链表里
- 每个使用该System Service的进程通过调用ServiceManager.getService()从servicemanager进程获得该System Service对应的IBinder,就可以与该System Service进行通信了。
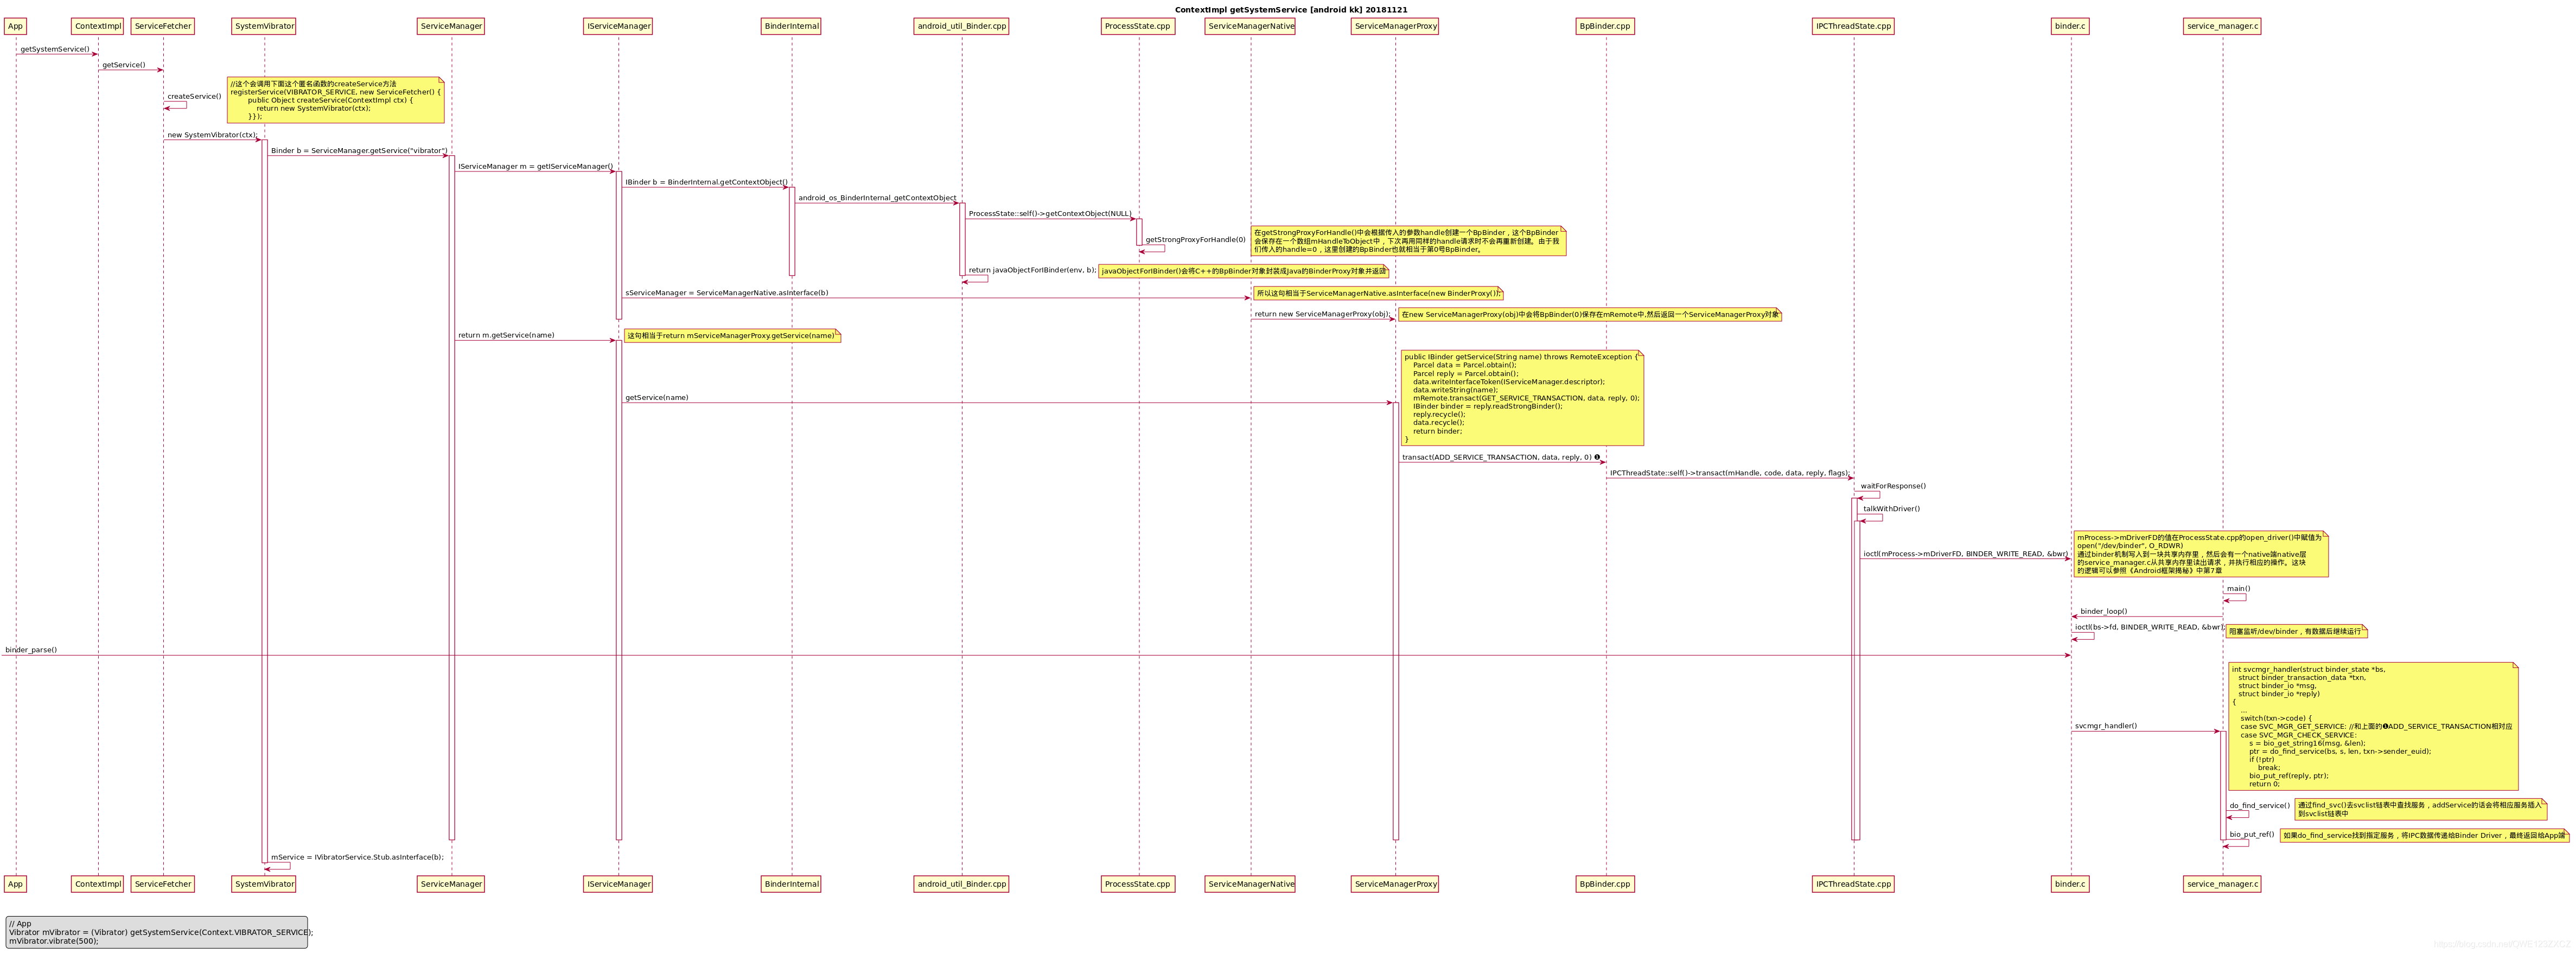
附一张流程图:
参考博客:
https://blog.csdn.net/geyunfei_/article/details/78851024


 706
706


 被折叠的 条评论
为什么被折叠?
被折叠的 条评论
为什么被折叠?
 到【灌水乐园】发言


