


spark-submit.s
首先由spark-submit.sh脚本提交任务:
if [ -z "${SPARK_HOME}" ]; then
  source "$(dirname "$0")"/find-spark-home
fi

# disable randomized hash for string in Python 3.3+
export PYTHONHASHSEED=0

exec "${SPARK_HOME}"/bin/spark-class org.apache.spark.deploy.SparkSubmit "$@"
1、通过find-spark-home.sh 设置SPARK_HOME环境变量,方便整个shell脚本生命周期内能直接使用${SPARK_HOME}
2、执行spark-class.sh脚本,传入的参数$@ 是父脚本传入的参数
RUNNER="${JAVA_HOME}/bin/java"
......
build_command() {
  "$RUNNER" -Xmx128m -cp "$LAUNCH_CLASSPATH" org.apache.spark.launcher.Main "$@"
  printf "%d\0" $?
}
....
CMD=()
while IFS= read -d '' -r ARG; do
  CMD+=("$ARG")
done < <(build_command "$@")
....
CMD=("${CMD[@]:0:$LAST}")
exec "${CMD[@]}"
3、< <(build_command "$@") 这一段是执行 java -cp org.apache.spark.launcher.Main 解析验证命令行参数,被SparkSubmitCommandBuilder验证成功后,返回执行命令赋值给CMD,最后执行CMD,启动SparkSubmit。
org.apache.spark.deploy.SparkSubmit
private def runMain(args: SparkSubmitArguments, uninitLog: Boolean): Unit = {
    val (childArgs, childClasspath, sparkConf, childMainClass) = prepareSubmitEnvironment(args)
...

    val loader =
      if (sparkConf.get(DRIVER_USER_CLASS_PATH_FIRST)) {
        new ChildFirstURLClassLoader(new Array[URL](0),
          Thread.currentThread.getContextClassLoader)
      } else {
        new MutableURLClassLoader(new Array[URL](0),
          Thread.currentThread.getContextClassLoader)
      }
    Thread.currentThread.setContextClassLoader(loader)

    for (jar <- childClasspath) {
      addJarToClasspath(jar, loader)
    }

    var mainClass: Class[_] = null

    try {
      mainClass = Utils.classForName(childMainClass)
    } catch {
   ...
    }

    val app: SparkApplication = if (classOf[SparkApplication].isAssignableFrom(mainClass)) {
      mainClass.newInstance().asInstanceOf[SparkApplication]
    } else {
      // SPARK-4170
      if (classOf[scala.App].isAssignableFrom(mainClass)) {
        logWarning("Subclasses of scala.App may not work correctly. Use a main() method instead.")
      }
      new JavaMainApplication(mainClass)
    }

...

    try {
      app.start(childArgs.toArray, sparkConf)
    } catch {
      case t: Throwable =>
        throw findCause(t)
    }
  }
此过程分为三个步骤。
1、prepareSubmitEnvironment解析参数
(childArgs, childClasspath, sparkConf, childMainClass)
- childArgs:步骤三要运行的子主类所需 命令行参数
- childClasspath:步骤二运行时classpath,将该classpath下的文件加入运行时环境
- sparkConf:步骤三要运行的子主类所需 传入的 运行配置
- childMainClass:步骤三要运行的子主类。
2、通过设置适当的类路径,系统属性和应用程序参数来准备启动环境,以基于集群管理器和部署模式运行子主类。
3、我们使用此启动环境来调用子主类的main方法。
org.apache.spark.deploy.yarn.YarnClusterApplication
spark cluster模式下SparkApplication对应YarnClusterApplication来启动任务。
 def run(): Unit = {
    this.appId = submitApplication()
    if (!launcherBackend.isConnected() && fireAndForget) {
      val report = getApplicationReport(appId)
      val state = report.getYarnApplicationState
      logInfo(s"Application report for $appId (state: $state)")
      logInfo(formatReportDetails(report))
      if (state == YarnApplicationState.FAILED || state == YarnApplicationState.KILLED) {
        throw new SparkException(s"Application $appId finished with status: $state")
      }
    } else {
      val YarnAppReport(appState, finalState, diags) = monitorApplication(appId)
      if (appState == YarnApplicationState.FAILED || finalState == FinalApplicationStatus.FAILED) {
        diags.foreach { err =>
          logError(s"Application diagnostics message: $err")
        }
        throw new SparkException(s"Application $appId finished with failed status")
      }
      if (appState == YarnApplicationState.KILLED || finalState == FinalApplicationStatus.KILLED) {
        throw new SparkException(s"Application $appId is killed")
      }
      if (finalState == FinalApplicationStatus.UNDEFINED) {
        throw new SparkException(s"The final status of application $appId is undefined")
      }
    }
  }
1、提交应用
def submitApplication(): ApplicationId = {
    var appId: ApplicationId = null
    try {
      launcherBackend.connect()
      yarnClient.init(hadoopConf)
      yarnClient.start()

      logInfo("Requesting a new application from cluster with %d NodeManagers"
        .format(yarnClient.getYarnClusterMetrics.getNumNodeManagers))

      // Get a new application from our RM
      val newApp = yarnClient.createApplication()
      val newAppResponse = newApp.getNewApplicationResponse()
      appId = newAppResponse.getApplicationId()

      new CallerContext("CLIENT", sparkConf.get(APP_CALLER_CONTEXT),
        Option(appId.toString)).setCurrentContext()

      // Verify whether the cluster has enough resources for our AM
      verifyClusterResources(newAppResponse)

      // Set up the appropriate contexts to launch our AM
      val containerContext = createContainerLaunchContext(newAppResponse)
      val appContext = createApplicationSubmissionContext(newApp, containerContext)

      // Finally, submit and monitor the application
      logInfo(s"Submitting application $appId to ResourceManager")
      yarnClient.submitApplication(appContext)
      launcherBackend.setAppId(appId.toString)
      reportLauncherState(SparkAppHandle.State.SUBMITTED)

      appId
    } catch {
      case e: Throwable =>
        if (appId != null) {
          cleanupStagingDir(appId)
        }
        throw e
    }
  }
初始化、开始建立rpc连接、提交应用三部曲
yarnClient实际上是使用rmclient向yarn提交任务的。
yarnClient在start方法里调用了YarnClientImpl的serviceStart来创建rmclient, createRMProxy方法里创建YarnRPC 客户端 。
 @Override
  protected void serviceStart() throws Exception {
    try {
      rmClient = ClientRMProxy.createRMProxy(getConfig(),
          ApplicationClientProtocol.class);
      if (historyServiceEnabled) {
        historyClient.start();
      }
      if (timelineServiceEnabled) {
        timelineClient.start();
      }
    } catch (IOException e) {
      throw new YarnRuntimeException(e);
    }
    super.serviceStart();
  }
在yarnClient 的submitApplication里使用rmClient.submitApplication,通过RPC向yarn发送SubmitApplicationRequest。
org.apache.hadoop.yarn.server.resourcemanager.ClientRMService
ClientRMService接受来自客户端的Rpc消息:
  @Override
  public SubmitApplicationResponse submitApplication(
      SubmitApplicationRequest request) throws YarnException {
    ApplicationSubmissionContext submissionContext = request
        .getApplicationSubmissionContext();
    ApplicationId applicationId = submissionContext.getApplicationId();

    // ApplicationSubmissionContext needs to be validated for safety - only
    // those fields that are independent of the RM's configuration will be
    // checked here, those that are dependent on RM configuration are validated
    // in RMAppManager.

    String user = null;
    try {
      // Safety
      user = UserGroupInformation.getCurrentUser().getShortUserName();
    } catch (IOException ie) {
      LOG.warn("Unable to get the current user.", ie);
      RMAuditLogger.logFailure(user, AuditConstants.SUBMIT_APP_REQUEST,
          ie.getMessage(), "ClientRMService",
          "Exception in submitting application", applicationId);
      throw RPCUtil.getRemoteException(ie);
    }

    // Check whether app has already been put into rmContext,
    // If it is, simply return the response
    if (rmContext.getRMApps().get(applicationId) != null) {
      LOG.info("This is an earlier submitted application: " + applicationId);
      return SubmitApplicationResponse.newInstance();
    }

    if (submissionContext.getQueue() == null) {
      submissionContext.setQueue(YarnConfiguration.DEFAULT_QUEUE_NAME);
    }
    if (submissionContext.getApplicationName() == null) {
      submissionContext.setApplicationName(
          YarnConfiguration.DEFAULT_APPLICATION_NAME);
    }
    if (submissionContext.getApplicationType() == null) {
      submissionContext
        .setApplicationType(YarnConfiguration.DEFAULT_APPLICATION_TYPE);
    } else {
      if (submissionContext.getApplicationType().length() > YarnConfiguration.APPLICATION_TYPE_LENGTH) {
        submissionContext.setApplicationType(submissionContext
          .getApplicationType().substring(0,
            YarnConfiguration.APPLICATION_TYPE_LENGTH));
      }
    }

    try {
      // call RMAppManager to submit application directly
      rmAppManager.submitApplication(submissionContext,
          System.currentTimeMillis(), user);

      LOG.info("Application with id " + applicationId.getId() +
          " submitted by user " + user);
      RMAuditLogger.logSuccess(user, AuditConstants.SUBMIT_APP_REQUEST,
          "ClientRMService", applicationId);
    } catch (YarnException e) {
      LOG.info("Exception in submitting application with id " +
          applicationId.getId(), e);
      RMAuditLogger.logFailure(user, AuditConstants.SUBMIT_APP_REQUEST,
          e.getMessage(), "ClientRMService",
          "Exception in submitting application", applicationId);
      throw e;
    }

    SubmitApplicationResponse response = recordFactory
        .newRecordInstance(SubmitApplicationResponse.class);
    return response;
  }
rmAppManager 继续提交application。 rmAppManager.submitApplication(submissionContext,System.currentTimeMillis(), user);
  @SuppressWarnings("unchecked")
  protected void submitApplication(
      ApplicationSubmissionContext submissionContext, long submitTime,
      String user) throws YarnException {
    ApplicationId applicationId = submissionContext.getApplicationId();

    RMAppImpl application =
        createAndPopulateNewRMApp(submissionContext, submitTime, user, false);
    ApplicationId appId = submissionContext.getApplicationId();

    if (UserGroupInformation.isSecurityEnabled()) {
      try {
        this.rmContext.getDelegationTokenRenewer().addApplicationAsync(appId,
            parseCredentials(submissionContext),
            submissionContext.getCancelTokensWhenComplete(),
            application.getUser());
      } catch (Exception e) {
        LOG.warn("Unable to parse credentials.", e);
        // Sending APP_REJECTED is fine, since we assume that the
        // RMApp is in NEW state and thus we haven't yet informed the
        // scheduler about the existence of the application
        assert application.getState() == RMAppState.NEW;
        this.rmContext.getDispatcher().getEventHandler()
          .handle(new RMAppEvent(applicationId,
              RMAppEventType.APP_REJECTED, e.getMessage()));
        throw RPCUtil.getRemoteException(e);
      }
    } else {
      // Dispatcher is not yet started at this time, so these START events
      // enqueued should be guaranteed to be first processed when dispatcher
      // gets started.
      this.rmContext.getDispatcher().getEventHandler()
        .handle(new RMAppEvent(applicationId, RMAppEventType.START));
    }
  }
从rmContext拿到Dispatcher之后就开始状态机的状态扭转处理了,状态很长
RMAppEventType.START.-> RMStateStoreEventType.STORE_APP -> RMAppEventType.APP_NEW_SAVED -> SchedulerEventType.APP_ADDED
org.apache.hadoop.yarn.server.resourcemanager.scheduler.capacity.CapacityScheduler
这里就会进入调度排队了org.apache.hadoop.yarn.server.resourcemanager.scheduler.capacity.CapacityScheduler#handle
  @Override
  public void handle(SchedulerEvent event) {
    switch(event.getType()) {
   ...
    case APP_ADDED:
    {
      AppAddedSchedulerEvent appAddedEvent = (AppAddedSchedulerEvent) event;
      String queueName =
          resolveReservationQueueName(appAddedEvent.getQueue(),
              appAddedEvent.getApplicationId(),
              appAddedEvent.getReservationID());
      if (queueName != null) {
        if (!appAddedEvent.getIsAppRecovering()) {
          addApplication(appAddedEvent.getApplicationId(), queueName,
              appAddedEvent.getUser());
        } else {
          addApplicationOnRecovery(appAddedEvent.getApplicationId(), queueName,
              appAddedEvent.getUser());
        }
      }
    }
    break;
   ....
    case APP_ATTEMPT_ADDED:
    {
      AppAttemptAddedSchedulerEvent appAttemptAddedEvent =
          (AppAttemptAddedSchedulerEvent) event;
      addApplicationAttempt(appAttemptAddedEvent.getApplicationAttemptId(),
        appAttemptAddedEvent.getTransferStateFromPreviousAttempt(),
        appAttemptAddedEvent.getIsAttemptRecovering());
    }
    break;
    ....
    case CONTAINER_RESCHEDULED:
    {
      ContainerRescheduledEvent containerRescheduledEvent =
          (ContainerRescheduledEvent) event;
      RMContainer container = containerRescheduledEvent.getContainer();
      recoverResourceRequestForContainer(container);
    }
    break;
    default:
      LOG.error("Invalid eventtype " + event.getType() + ". Ignoring!");
    }
  }
会进入case APP_ADDED,在addApplication里将Application放入CSQueue队列
  private synchronized void addApplication(ApplicationId applicationId,
      String queueName, String user) {
    queueName = getQueueMappings(applicationId, queueName, user);
    if (queueName == null) {
      // Exception encountered while getting queue mappings.
      return;
    }
    // sanity checks.
    CSQueue queue = getQueue(queueName);
    if (queue == null) {
      String message = "Application " + applicationId +
      " submitted by user " + user + " to unknown queue: " + queueName;
      this.rmContext.getDispatcher().getEventHandler()
          .handle(new RMAppEvent(applicationId,
              RMAppEventType.APP_REJECTED, message));
      return;
    }
    if (!(queue instanceof LeafQueue)) {
      String message = "Application " + applicationId +
          " submitted by user " + user + " to non-leaf queue: " + queueName;
      this.rmContext.getDispatcher().getEventHandler()
          .handle(new RMAppEvent(applicationId,
              RMAppEventType.APP_REJECTED, message));
      return;
    }
    // Submit to the queue
    try {
      queue.submitApplication(applicationId, user, queueName);
    } catch (AccessControlException ace) {
      LOG.info("Failed to submit application " + applicationId + " to queue "
          + queueName + " from user " + user, ace);
      this.rmContext.getDispatcher().getEventHandler()
          .handle(new RMAppEvent(applicationId,
              RMAppEventType.APP_REJECTED, ace.toString()));
      return;
    }
    // update the metrics
    queue.getMetrics().submitApp(user);
    SchedulerApplication<FiCaSchedulerApp> application =
        new SchedulerApplication<FiCaSchedulerApp>(queue, user);
    applications.put(applicationId, application);
    LOG.info("Accepted application " + applicationId + " from user: " + user
        + ", in queue: " + queueName);
    rmContext.getDispatcher().getEventHandler()
        .handle(new RMAppEvent(applicationId, RMAppEventType.APP_ACCEPTED));
  }
又开始下个状态处理了 rmContext.getDispatcher().getEventHandler()
.handle(new RMAppEvent(applicationId, RMAppEventType.APP_ACCEPTED));
->RMAppEventType.APP_ACCEPTED 到这个状态 yarn ui上看到任务状态是ACCEPTED
RMAppAttemptEventType.START ->. SchedulerEventType.APP_ATTEMPT_ADDED -> RMAppAttemptEventType.ATTEMPT_ADDED
org.apache.hadoop.yarn.server.resourcemanager.rmapp.attempt.RMAppAttemptImpl.ScheduleTransition#transition
Allocation amContainerAllocation =
            appAttempt.scheduler.allocate(appAttempt.applicationAttemptId,
                Collections.singletonList(appAttempt.amReq),
                EMPTY_CONTAINER_RELEASE_LIST, null, null);
到这个状态申请容器资源
RMAppAttemptState.SCHEDULED ->.RMAppAttemptState.ALLOCATED_SAVING. -> AMLauncherEventType.LAUNCH
到这个状态就来时启动AM,实际上是通过调用main.c去生成launch_container.sh脚本文件,并执行脚本
main.c

#include "config.h"
#include "configuration.h"
#include "container-executor.h"
...
case LAUNCH_CONTAINER:
    if (argc != 13) {
      fprintf(ERRORFILE, "Wrong number of arguments (%d vs 13) for launch container\n",
	      argc);
      fflush(ERRORFILE);
      return INVALID_ARGUMENT_NUMBER;
    }
    app_id = argv[optind++];
    container_id = argv[optind++];
    current_dir = argv[optind++];
    script_file = argv[optind++];
    cred_file = argv[optind++];
    pid_file = argv[optind++];
    local_dirs = argv[optind++];// good local dirs as a comma separated list
    log_dirs = argv[optind++];// good log dirs as a comma separated list
    resources = argv[optind++];// key,value pair describing resources
    char *resources_key = malloc(strlen(resources));
    char *resources_value = malloc(strlen(resources));
    if (get_kv_key(resources, resources_key, strlen(resources)) < 0 ||
        get_kv_value(resources, resources_value, strlen(resources)) < 0) {
        fprintf(ERRORFILE, "Invalid arguments for cgroups resources: %s",
                           resources);
        fflush(ERRORFILE);
        free(resources_key);
        free(resources_value);
        return INVALID_ARGUMENT_NUMBER;
    }
    char** resources_values = extract_values(resources_value);
    exit_code = launch_container_as_user(yarn_user_name, app_id,
                    container_id, current_dir, script_file, cred_file,
                    pid_file, extract_values(local_dirs),
                    extract_values(log_dirs), resources_key,
                    resources_values);
    free(resources_key);
    free(resources_value);
    break;
这里#include "container-executor.h" ,是引入container-executor.c的头文件,里面包含launch_container_as_user方法
container-executor.h
#define CONTAINER_SCRIPT "launch_container.sh"

container-executor.c

char *get_container_launcher_file(const char* work_dir) {
  return concatenate("%s/%s", "container launcher", 2, work_dir, CONTAINER_SCRIPT);
}
....
int launch_container_as_user(const char *user, const char *app_id,
                   const char *container_id, const char *work_dir,
                   const char *script_name, const char *cred_file,
                   const char* pid_file, char* const* local_dirs,
                   char* const* log_dirs, const char *resources_key,
                   char* const* resources_values) {
  int exit_code = -1;
  char *script_file_dest = NULL;
  char *cred_file_dest = NULL;
  char *exit_code_file = NULL;

  script_file_dest = get_container_launcher_file(work_dir);
  if (script_file_dest == NULL) {
    exit_code = OUT_OF_MEMORY;
    goto cleanup;
  }
  cred_file_dest = get_container_credentials_file(work_dir);
  ...

  // 700
  if (copy_file(container_file_source, script_name, script_file_dest,S_IRWXU) != 0) {
    goto cleanup;
  }
copyfile将生成的脚本代码放入脚本。
if (execlp(script_file_dest, script_file_dest, NULL) != 0) {
    fprintf(LOGFILE, "Couldn't execute the container launch file %s - %s",
            script_file_dest, strerror(errno));
    exit_code = UNABLE_TO_EXECUTE_CONTAINER_SCRIPT;
    goto cleanup;
  }
execlp执行脚本:
{{JAVA_HOME}}/bin/java -Xmx10m org.apache.hadoop.yarn.applications.distributedshell.ApplicationMaster —class xxxx container_memory 10 --container_vcores 1 --num_containers 1 --priority 0 1>/AppMaster.stdout 2>/AppMaster.stderr
ApplicationMaster
org.apache.spark.deploy.yarn.ApplicationMaster#main
 def main(args: Array[String]): Unit = {
    SignalUtils.registerLogger(log)
    val amArgs = new ApplicationMasterArguments(args)
    master = new ApplicationMaster(amArgs)
    System.exit(master.run())
  }
driver 和 ExecutorLauncher的区别:
1、如果是集群模式 driver运行在am里
2、如果是客户端模式 driver在本读client里,am会走ExecutorLauncher方法,完成向rm注册自己,申请container用来运行executor。
  private val isClusterMode = args.userClass != null
  ...
  private def parseArgs(inputArgs: List[String]): Unit = {
     ...

    while (!args.isEmpty) {
      // --num-workers, --worker-memory, and --worker-cores are deprecated since 1.0,
      // the properties with executor in their names are preferred.
      args match {
      ...

        case ("--class") :: value :: tail =>
          userClass = value
          args = tail

      ...
       }
  }
  ...
  private def runImpl(): Unit = {
   ...

      if (isClusterMode) {
        runDriver()
      } else {
        runExecutorLauncher()
      }
   ...
  }
isClusterMode :如果 命令行参数里有 --class 那么就是true,否则false。
如果是yarn cluster模式命令行参数里有 --class,
如果是yarn client模式命令行参数里没有--class
isClusterMode 决定了当前am里是启动 driver 还是 走runExecutorLauncher方法
所以yarn cluster模式 走的runDriver(),yarn client模式走runExecutorLauncher()。
  private def runDriver(): Unit = {
    addAmIpFilter(None)
    userClassThread = startUserApplication()

    // This a bit hacky, but we need to wait until the spark.driver.port property has
    // been set by the Thread executing the user class.
    logInfo("Waiting for spark context initialization...")
    val totalWaitTime = sparkConf.get(AM_MAX_WAIT_TIME)
    try {
      val sc = ThreadUtils.awaitResult(sparkContextPromise.future,
        Duration(totalWaitTime, TimeUnit.MILLISECONDS))
      if (sc != null) {
        rpcEnv = sc.env.rpcEnv

        val userConf = sc.getConf
        val host = userConf.get("spark.driver.host")
        val port = userConf.get("spark.driver.port").toInt
        registerAM(host, port, userConf, sc.ui.map(_.webUrl))

        val driverRef = rpcEnv.setupEndpointRef(
          RpcAddress(host, port),
          YarnSchedulerBackend.ENDPOINT_NAME)
        createAllocator(driverRef, userConf)
      } else {
        // Sanity check; should never happen in normal operation, since sc should only be null
        // if the user app did not create a SparkContext.
        throw new IllegalStateException("User did not initialize spark context!")
      }
      resumeDriver()
      userClassThread.join()
    } catch {
      case e: SparkException if e.getCause().isInstanceOf[TimeoutException] =>
        logError(
          s"SparkContext did not initialize after waiting for $totalWaitTime ms. " +
           "Please check earlier log output for errors. Failing the application.")
        finish(FinalApplicationStatus.FAILED,
          ApplicationMaster.EXIT_SC_NOT_INITED,
          "Timed out waiting for SparkContext.")
    } finally {
      resumeDriver()
    }
  }
Driver
开启driver线程 userClassThread = startUserApplication()
rivate def startUserApplication(): Thread = {
    logInfo("Starting the user application in a separate Thread")

    var userArgs = args.userArgs
    if (args.primaryPyFile != null && args.primaryPyFile.endsWith(".py")) {
      // When running pyspark, the app is run using PythonRunner. The second argument is the list
      // of files to add to PYTHONPATH, which Client.scala already handles, so it's empty.
      userArgs = Seq(args.primaryPyFile, "") ++ userArgs
    }
    if (args.primaryRFile != null && args.primaryRFile.endsWith(".R")) {
      // TODO(davies): add R dependencies here
    }

    val mainMethod = userClassLoader.loadClass(args.userClass)
      .getMethod("main", classOf[Array[String]])

    val userThread = new Thread {
      override def run() {
        try {
          if (!Modifier.isStatic(mainMethod.getModifiers)) {
            logError(s"Could not find static main method in object ${args.userClass}")
            finish(FinalApplicationStatus.FAILED, ApplicationMaster.EXIT_EXCEPTION_USER_CLASS)
          } else {
            mainMethod.invoke(null, userArgs.toArray)
            finish(FinalApplicationStatus.SUCCEEDED, ApplicationMaster.EXIT_SUCCESS)
            logDebug("Done running user class")
          }
        } catch {
          case e: InvocationTargetException =>
            e.getCause match {
              case _: InterruptedException =>
                // Reporter thread can interrupt to stop user class
              case SparkUserAppException(exitCode) =>
                val msg = s"User application exited with status $exitCode"
                logError(msg)
                finish(FinalApplicationStatus.FAILED, exitCode, msg)
              case cause: Throwable =>
                logError("User class threw exception: " + cause, cause)
                finish(FinalApplicationStatus.FAILED,
                  ApplicationMaster.EXIT_EXCEPTION_USER_CLASS,
                  "User class threw exception: " + StringUtils.stringifyException(cause))
            }
            sparkContextPromise.tryFailure(e.getCause())
        } finally {
          // Notify the thread waiting for the SparkContext, in case the application did not
          // instantiate one. This will do nothing when the user code instantiates a SparkContext
          // (with the correct master), or when the user code throws an exception (due to the
          // tryFailure above).
          sparkContextPromise.trySuccess(null)
        }
      }
    }
    userThread.setContextClassLoader(userClassLoader)
    userThread.setName("Driver")
    userThread.start()
    userThread
  }
加载 userclass字节码文件
在新开线程里反射invoke调用 main方法 传入 userargs 参数
启动线程。
这里有个地方需要注意 sparkContextPromise.trySuccess(null),通知线程等待SparkContext,以防应用程序未实例化该线程。当用户代码实例化SparkContext(具有正确的主对象)时,或者当用户代码引发异常(由于上述tryFailure)时,此操作将无效。
继续回到刚才rundriver的方法里
am默认100s后,继续执行,此刻sparkContext基本上初始化好了,如果没有初始化完成抛出异常
throw new IllegalStateException("User did not initialize spark context!")
driver 因为 初始化sparkContext 运行到_taskScheduler.postStartHook() ,
调用sparkContextPromise.wait() 导致driver线程阻塞。
am向rm注册自己:
  private def registerAM(
      host: String,
      port: Int,
      _sparkConf: SparkConf,
      uiAddress: Option[String]): Unit = {
    val appId = client.getAttemptId().getApplicationId().toString()
    val attemptId = client.getAttemptId().getAttemptId().toString()
    val historyAddress = ApplicationMaster
      .getHistoryServerAddress(_sparkConf, yarnConf, appId, attemptId)

    client.register(host, port, yarnConf, _sparkConf, uiAddress, historyAddress)
    registered = true
  }
给exeutor分配资源 :
  private def createAllocator(driverRef: RpcEndpointRef, _sparkConf: SparkConf): Unit = {
    val appId = client.getAttemptId().getApplicationId().toString()
    val driverUrl = RpcEndpointAddress(driverRef.address.host, driverRef.address.port,
      CoarseGrainedSchedulerBackend.ENDPOINT_NAME).toString

    // Before we initialize the allocator, let's log the information about how executors will
    // be run up front, to avoid printing this out for every single executor being launched.
    // Use placeholders for information that changes such as executor IDs.
    logInfo {
      val executorMemory = _sparkConf.get(EXECUTOR_MEMORY).toInt
      val executorCores = _sparkConf.get(EXECUTOR_CORES)
      val dummyRunner = new ExecutorRunnable(None, yarnConf, _sparkConf, driverUrl, "<executorId>",
        "<hostname>", executorMemory, executorCores, appId, securityMgr, localResources)
      dummyRunner.launchContextDebugInfo()
    }

    allocator = client.createAllocator(
      yarnConf,
      _sparkConf,
      driverUrl,
      driverRef,
      securityMgr,
      localResources)

    credentialRenewer.foreach(_.setDriverRef(driverRef))

    // Initialize the AM endpoint *after* the allocator has been initialized. This ensures
    // that when the driver sends an initial executor request (e.g. after an AM restart),
    // the allocator is ready to service requests.
    rpcEnv.setupEndpoint("YarnAM", new AMEndpoint(rpcEnv, driverRef))

    allocator.allocateResources()
    val ms = MetricsSystem.createMetricsSystem("applicationMaster", sparkConf, securityMgr)
    val prefix = _sparkConf.get(YARN_METRICS_NAMESPACE).getOrElse(appId)
    ms.registerSource(new ApplicationMasterSource(prefix, allocator))
    ms.start()
    metricsSystem = Some(ms)
    reporterThread = launchReporterThread()
  }
YarnAllocator负责从YARN ResourceManager请求容器,并确定当YARN满足这些请求时如何处理容器。
此类使用YARN的AMRMClient API。
我们通过三种方式与AMRMClient进行交互:
*告知我们的资源需求,从而更新有关所请求容器的本地簿记。
*调用“分配”,它将我们的本地容器请求与RM同步,并返回YARN授予我们的所有容器。 这也起到了心跳的作用。
*处理授予我们的容器,以在其中启动执行程序。 此类的公共方法是线程安全的。 更改状态的所有方法均已同步
  @Override
  public AllocateResponse allocate(float progressIndicator)
      throws YarnException, IOException {
       ....
      try {
        allocateResponse = rmClient.allocate(allocateRequest);
      } catch (ApplicationMasterNotRegisteredException e) {
       ...
      }
    return allocateResponse;
  }
初始化一个 25个核心的缓存线程池,用于运行executorRunner。
executorRunner 初始化 nmclient,向nodemanager请求启动executor。
nodemanager启动 executor shell命令:
  /**
   * Launches executors in the allocated containers.
   */
  private def runAllocatedContainers(containersToUse: ArrayBuffer[Container]): Unit = {
    for (container <- containersToUse) {
     ...
        if (launchContainers) {
          launcherPool.execute(new Runnable {
            override def run(): Unit = {
              try {
                new ExecutorRunnable(
                  Some(container),
                  conf,
                  sparkConf,
                  driverUrl,
                  executorId,
                  executorHostname,
                  executorMemory,
                  executorCores,
                  appAttemptId.getApplicationId.toString,
                  securityMgr,
                  localResources
                ).run()
       ...
    }
  }
线程执行:
 def run(): Unit = {
    logDebug("Starting Executor Container")
    nmClient = NMClient.createNMClient()
    nmClient.init(conf)
    nmClient.start()
    startContainer()
  }
  def startContainer(): java.util.Map[String, ByteBuffer] = {


    val commands = prepareCommand()

    ctx.setCommands(commands.asJava)
    ctx.setApplicationACLs(
      YarnSparkHadoopUtil.getApplicationAclsForYarn(securityMgr).asJava)


      ctx.setServiceData(Collections.singletonMap("spark_shuffle", secretBytes))

      nmClient.startContainer(container.get, ctx)

  }


  private def prepareCommand(): List[String] = {
    ...
    val commands = prefixEnv ++
      Seq(Environment.JAVA_HOME.$$() + "/bin/java", "-server") ++
      javaOpts ++
      Seq("org.apache.spark.executor.CoarseGrainedExecutorBackend",
        "--driver-url", masterAddress,
        "--executor-id", executorId,
        "--hostname", hostname,
        "--cores", executorCores.toString,
        "--app-id", appId) ++
      userClassPath ++
      Seq(
        s"1>${ApplicationConstants.LOG_DIR_EXPANSION_VAR}/stdout",
        s"2>${ApplicationConstants.LOG_DIR_EXPANSION_VAR}/stderr")
     ...
  }
走到resumeDriver(),driver才继续运行。
 private def resumeDriver(): Unit = {
    // When initialization in runDriver happened the user class thread has to be resumed.
    sparkContextPromise.synchronized {
      sparkContextPromise.notify()
    }
  }
userClassThread.join() 等待driver线程执行完毕。然后am正常执行完毕退出。
CoarseGrainedExecutorBackend
  def main(args: Array[String]) {
    ...
    run(driverUrl, executorId, hostname, cores, appId, workerUrl, userClassPath)
    System.exit(0)
  }
  private def run(
      driverUrl: String,
      executorId: String,
      hostname: String,
      cores: Int,
      appId: String,
      workerUrl: Option[String],
      userClassPath: Seq[URL]) {

    Utils.initDaemon(log)

    SparkHadoopUtil.get.runAsSparkUser { () =>
      // Debug code
      Utils.checkHost(hostname)

      // Bootstrap to fetch the driver's Spark properties.
      val executorConf = new SparkConf
      val fetcher = RpcEnv.create(
        "driverPropsFetcher",
        hostname,
        -1,
        executorConf,
        new SecurityManager(executorConf),
        clientMode = true)
      val driver = fetcher.setupEndpointRefByURI(driverUrl)
      val cfg = driver.askSync[SparkAppConfig](RetrieveSparkAppConfig)
      val props = cfg.sparkProperties ++ Seq[(String, String)](("spark.app.id", appId))
      fetcher.shutdown()

      // Create SparkEnv using properties we fetched from the driver.
      val driverConf = new SparkConf()
      for ((key, value) <- props) {
        // this is required for SSL in standalone mode
        if (SparkConf.isExecutorStartupConf(key)) {
          driverConf.setIfMissing(key, value)
        } else {
          driverConf.set(key, value)
        }
      }

      cfg.hadoopDelegationCreds.foreach { tokens =>
        SparkHadoopUtil.get.addDelegationTokens(tokens, driverConf)
      }

      val env = SparkEnv.createExecutorEnv(
        driverConf, executorId, hostname, cores, cfg.ioEncryptionKey, isLocal = false)

      env.rpcEnv.setupEndpoint("Executor", new CoarseGrainedExecutorBackend(
        env.rpcEnv, driverUrl, executorId, hostname, cores, userClassPath, env))
      workerUrl.foreach { url =>
        env.rpcEnv.setupEndpoint("WorkerWatcher", new WorkerWatcher(env.rpcEnv, url))
      }
      env.rpcEnv.awaitTermination()
    }
  }
1、通过RpcEnv.create创建一个RpcEnv其本质是启动一个netty客户端,RpcEnv里面设计比较巧妙,本人曾参考设计了一套基于netty的通信框架,暂时不说这个。
  private void init(String hostToBind, int portToBind) {

    IOMode ioMode = IOMode.valueOf(conf.ioMode());
    EventLoopGroup bossGroup =
      NettyUtils.createEventLoop(ioMode, conf.serverThreads(), conf.getModuleName() + "-server");
    EventLoopGroup workerGroup = bossGroup;

    PooledByteBufAllocator allocator = NettyUtils.createPooledByteBufAllocator(
      conf.preferDirectBufs(), true /* allowCache */, conf.serverThreads());

    bootstrap = new ServerBootstrap()
      .group(bossGroup, workerGroup)
      .channel(NettyUtils.getServerChannelClass(ioMode))
      .option(ChannelOption.ALLOCATOR, allocator)
      .option(ChannelOption.SO_REUSEADDR, !SystemUtils.IS_OS_WINDOWS)
      .childOption(ChannelOption.ALLOCATOR, allocator);

    bootstrap.childHandler(new ChannelInitializer<SocketChannel>() {
      @Override
      protected void initChannel(SocketChannel ch) {
        RpcHandler rpcHandler = appRpcHandler;
        for (TransportServerBootstrap bootstrap : bootstraps) {
          rpcHandler = bootstrap.doBootstrap(ch, rpcHandler);
        }
        context.initializePipeline(ch, rpcHandler);
      }
    });

    InetSocketAddress address = hostToBind == null ?
        new InetSocketAddress(portToBind): new InetSocketAddress(hostToBind, portToBind);
    channelFuture = bootstrap.bind(address);
    channelFuture.syncUninterruptibly();
...
  }
向客户端和driver建立连接。
发送RetrieveSparkAppConfig来获取sparkConf配置信息。
2、SparkEnv.createExecutorEnv创建了executor的运行环境,里面包含很多东西,比如 mapOutputTracker、shuffleManager、memoryManager、blockTransferService、blockManager、outputCommitCoordinator、broadcastManager、serializerManager、rpcEnv等等
这些组件涉及到内存管理、网络通信、写数据、传输数据、shuffle等等需要一个个专题文章来分析,暂时不做介绍。
3、executor创建了一个CoarseGrainedExecutorBackend通过env.rpcEnv.setupEndpoint在rpcEnv里注册自己。
 def registerRpcEndpoint(name: String, endpoint: RpcEndpoint): NettyRpcEndpointRef = {
    val addr = RpcEndpointAddress(nettyEnv.address, name)
    val endpointRef = new NettyRpcEndpointRef(nettyEnv.conf, addr, nettyEnv)
    synchronized {
      if (stopped) {
        throw new IllegalStateException("RpcEnv has been stopped")
      }
      if (endpoints.putIfAbsent(name, new EndpointData(name, endpoint, endpointRef)) != null) {
        throw new IllegalArgumentException(s"There is already an RpcEndpoint called $name")
      }
      val data = endpoints.get(name)
      endpointRefs.put(data.endpoint, data.ref)
      receivers.offer(data)  // for the OnStart message
    }
    endpointRef
  }
endpointData里 endpoint, endpointRef 都是 executor自己,通过receivers.offer(data),自己给自己发一条消息。
receivers 是一个线程安全的阻塞队列LinkedBlockingQueue.
dispatcher 里启动了一个MessageLoop 消息循环读取线程 ,如果receivers里一旦有数据就取出来,就用inbox来驱动endpoint处理对应消息
  private class MessageLoop extends Runnable {
    override def run(): Unit = {
      try {
        while (true) {
          try {
            val data = receivers.take()
            if (data == PoisonPill) {
              // Put PoisonPill back so that other MessageLoops can see it.
              receivers.offer(PoisonPill)
              return
            }
            data.inbox.process(Dispatcher.this)
          } catch {
            case NonFatal(e) => logError(e.getMessage, e)
          }
        }
      } catch {
        case _: InterruptedException => // exit
        case t: Throwable =>
          try {
            // Re-submit a MessageLoop so that Dispatcher will still work if
            // UncaughtExceptionHandler decides to not kill JVM.
            threadpool.execute(new MessageLoop)
          } finally {
            throw t
          }
      }
    }
  }
inbox是一个收件箱,一个endpointData对应一个inbox,用于存储RpcEndpoint的消息并以线程安全的方式向其发布消息,实例化时自动添加一条 onstart消息,这是为什么executor能自己给自己发的原因。
  // OnStart should be the first message to process
  inbox.synchronized {
    messages.add(OnStart)
  }

  /**
   * Process stored messages.
   */
  def process(dispatcher: Dispatcher): Unit = {
    var message: InboxMessage = null
    inbox.synchronized {
      if (!enableConcurrent && numActiveThreads != 0) {
        return
      }
      message = messages.poll()
      if (message != null) {
        numActiveThreads += 1
      } else {
        return
      }
    }
    while (true) {
      safelyCall(endpoint) {
        message match {
          case RpcMessage(_sender, content, context) =>
            try {
              endpoint.receiveAndReply(context).applyOrElse[Any, Unit](content, { msg =>
                throw new SparkException(s"Unsupported message $message from ${_sender}")
              })
            } catch {
              case e: Throwable =>
                context.sendFailure(e)
                // Throw the exception -- this exception will be caught by the safelyCall function.
                // The endpoint's onError function will be called.
                throw e
            }

          case OneWayMessage(_sender, content) =>
            endpoint.receive.applyOrElse[Any, Unit](content, { msg =>
              throw new SparkException(s"Unsupported message $message from ${_sender}")
            })

          case OnStart =>
            endpoint.onStart()
            if (!endpoint.isInstanceOf[ThreadSafeRpcEndpoint]) {
              inbox.synchronized {
                if (!stopped) {
                  enableConcurrent = true
                }
              }
            }

          case OnStop =>
            val activeThreads = inbox.synchronized { inbox.numActiveThreads }
            assert(activeThreads == 1,
              s"There should be only a single active thread but found $activeThreads threads.")
            dispatcher.removeRpcEndpointRef(endpoint)
            endpoint.onStop()
            assert(isEmpty, "OnStop should be the last message")

          case RemoteProcessConnected(remoteAddress) =>
            endpoint.onConnected(remoteAddress)

          case RemoteProcessDisconnected(remoteAddress) =>
            endpoint.onDisconnected(remoteAddress)

          case RemoteProcessConnectionError(cause, remoteAddress) =>
            endpoint.onNetworkError(cause, remoteAddress)
        }
      }

      inbox.synchronized {
        // "enableConcurrent" will be set to false after `onStop` is called, so we should check it
        // every time.
        if (!enableConcurrent && numActiveThreads != 1) {
          // If we are not the only one worker, exit
          numActiveThreads -= 1
          return
        }
        message = messages.poll()
        if (message == null) {
          numActiveThreads -= 1
          return
        }
      }
    }
  }
inbox取出onstart消息,endpoint 调用onstart方法,即调用CoarseGrainedExecutorBackend的onStart方法,向driver通知 自己 已启动。
  override def onStart() {
    logInfo("Connecting to driver: " + driverUrl)
    rpcEnv.asyncSetupEndpointRefByURI(driverUrl).flatMap { ref =>
      // This is a very fast action so we can use "ThreadUtils.sameThread"
      driver = Some(ref)
      ref.ask[Boolean](RegisterExecutor(executorId, self, hostname, cores, extractLogUrls))
    }(ThreadUtils.sameThread).onComplete {
      // This is a very fast action so we can use "ThreadUtils.sameThread"
      case Success(msg) =>
        // Always receive `true`. Just ignore it
      case Failure(e) =>
        exitExecutor(1, s"Cannot register with driver: $driverUrl", e, notifyDriver = false)
    }(ThreadUtils.sameThread)
  }
至此 executor已初始化完成,和driver建立了连接,等待driver发送命令。
spark rpc的全貌:
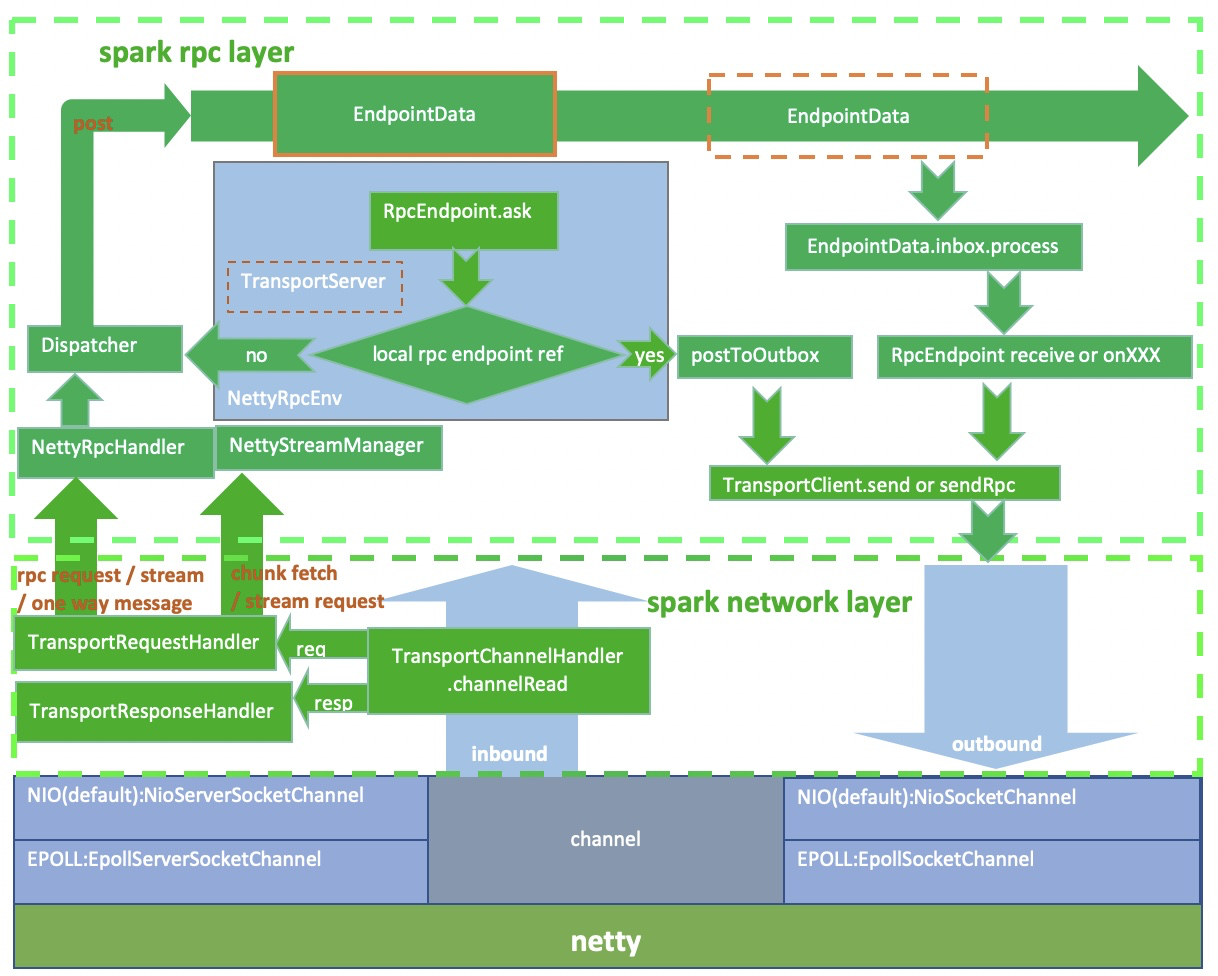
executor等待driver发送消息,即netty客户端接受消息由NettyRpcHandler进行消息处理
private[netty] class NettyRpcHandler(
    dispatcher: Dispatcher,
    nettyEnv: NettyRpcEnv,
    streamManager: StreamManager) extends RpcHandler with Logging {

  // A variable to track the remote RpcEnv addresses of all clients
  private val remoteAddresses = new ConcurrentHashMap[RpcAddress, RpcAddress]()

  override def receive(
      client: TransportClient,
      message: ByteBuffer,
      callback: RpcResponseCallback): Unit = {
    val messageToDispatch = internalReceive(client, message)
    dispatcher.postRemoteMessage(messageToDispatch, callback)
  }

  override def receive(
      client: TransportClient,
      message: ByteBuffer): Unit = {
    val messageToDispatch = internalReceive(client, message)
    dispatcher.postOneWayMessage(messageToDispatch)
  }
通过dispatcher 将消息交给inbox放入messages,同时将EndpointData放入receivers
  private def postMessage(
      endpointName: String,
      message: InboxMessage,
      callbackIfStopped: (Exception) => Unit): Unit = {
    val error = synchronized {
      val data = endpoints.get(endpointName)
      if (stopped) {
        Some(new RpcEnvStoppedException())
      } else if (data == null) {
        Some(new SparkException(s"Could not find $endpointName."))
      } else {
        data.inbox.post(message)
        receivers.offer(data)
        None
      }
    }
    // We don't need to call `onStop` in the `synchronized` block
    error.foreach(callbackIfStopped)
  }
在上面说的MessageLoop 消息循环读取线程 ,如果receivers里一旦有数据就取出来,就用inbox来驱动endpoint处理对应消息
这一步又回到上面调用CoarseGrainedExecutorBackend的方法的步骤了,只不过不再是onStart方法。而是receive方法。
receive方法里会判断driver发送过来的消息是执行以下那些操作:
  override def receive: PartialFunction[Any, Unit] = {
    case RegisteredExecutor =>
      logInfo("Successfully registered with driver")
      try {
        executor = new Executor(executorId, hostname, env, userClassPath, isLocal = false)
      } catch {
        case NonFatal(e) =>
          exitExecutor(1, "Unable to create executor due to " + e.getMessage, e)
      }

    case RegisterExecutorFailed(message) =>
      exitExecutor(1, "Slave registration failed: " + message)

    case LaunchTask(data) =>
      if (executor == null) {
        exitExecutor(1, "Received LaunchTask command but executor was null")
      } else {
        val taskDesc = TaskDescription.decode(data.value)
        logInfo("Got assigned task " + taskDesc.taskId)
        executor.launchTask(this, taskDesc)
      }

    case KillTask(taskId, _, interruptThread, reason) =>
      if (executor == null) {
        exitExecutor(1, "Received KillTask command but executor was null")
      } else {
        executor.killTask(taskId, interruptThread, reason)
      }

    case StopExecutor =>
      stopping.set(true)
      logInfo("Driver commanded a shutdown")
      // Cannot shutdown here because an ack may need to be sent back to the caller. So send
      // a message to self to actually do the shutdown.
      self.send(Shutdown)

    case Shutdown =>
      stopping.set(true)
      new Thread("CoarseGrainedExecutorBackend-stop-executor") {
        override def run(): Unit = {
          // executor.stop() will call `SparkEnv.stop()` which waits until RpcEnv stops totally.
          // However, if `executor.stop()` runs in some thread of RpcEnv, RpcEnv won't be able to
          // stop until `executor.stop()` returns, which becomes a dead-lock (See SPARK-14180).
          // Therefore, we put this line in a new thread.
          executor.stop()
        }
      }.start()

    case UpdateDelegationTokens(tokenBytes) =>
      logInfo(s"Received tokens of ${tokenBytes.length} bytes")
      SparkHadoopUtil.get.addDelegationTokens(tokenBytes, env.conf)
  }
比如启动任务,走 case LaunchTask(data) 。
接受来自driver 的 taskset,先反序列化 ,再通过放入线程池运行;
线程池:缓存线程池 ,都是默认参数。
 private val threadPool = {
    val threadFactory = new ThreadFactoryBuilder()
      .setDaemon(true)
      .setNameFormat("Executor task launch worker-%d")
      .setThreadFactory(new ThreadFactory {
        override def newThread(r: Runnable): Thread =
          // Use UninterruptibleThread to run tasks so that we can allow running codes without being
          // interrupted by `Thread.interrupt()`. Some issues, such as KAFKA-1894, HADOOP-10622,
          // will hang forever if some methods are interrupted.
          new UninterruptibleThread(r, "unused") // thread name will be set by ThreadFactoryBuilder
      })
      .build()
    Executors.newCachedThreadPool(threadFactory).asInstanceOf[ThreadPoolExecutor]
  }
threadFactory 使用UninterruptibleThread运行任务,这样我们就可以允许正在运行的代码而不会被Thread.interrupt打断
  def launchTask(context: ExecutorBackend, taskDescription: TaskDescription): Unit = {
    val tr = new TaskRunner(context, taskDescription)
    runningTasks.put(taskDescription.taskId, tr)
    threadPool.execute(tr)
  }
写到这里这个编辑器没法继续打字了。。


 1448
1448


 被折叠的 条评论
为什么被折叠?
被折叠的 条评论
为什么被折叠?
 到【灌水乐园】发言


