


一、Spring 与 Spring IOC
推荐相关文章 Spring 与 Spring AOP
1.1 简介
Spring前生Interface21,是Rod Johnson创始的,是一个轻量级的IOC+AOP编程框架。
官网 https://spring.io/projects/spring-framework
文档 https://docs.spring.io/spring-framework/docs/current/javadoc-api/
下载 http://repo.spring.io/release/org/springframework/spring
github https://github.com/spring-projects/spring-framework
问答社区 https://stackoverflow.com/questions/tagged/spring+or+spring-mvc+or+spring-webflux
了解Spring和Spring Mvc是了解SpringBoot的基础
maven依赖
<!-- https://mvnrepository.com/artifact/org.springframework/spring-webmvc -->
<dependency>
    <groupId>org.springframework</groupId>
    <artifactId>spring-webmvc</artifactId>
    <version>5.3.7</version>
</dependency>

<!-- https://mvnrepository.com/artifact/org.springframework/spring-jdbc -->
<dependency>
    <groupId>org.springframework</groupId>
    <artifactId>spring-jdbc</artifactId>
    <version>5.3.7</version>
</dependency>
1.2 Spring 框架结构
1.2.1 Spring 框架模块
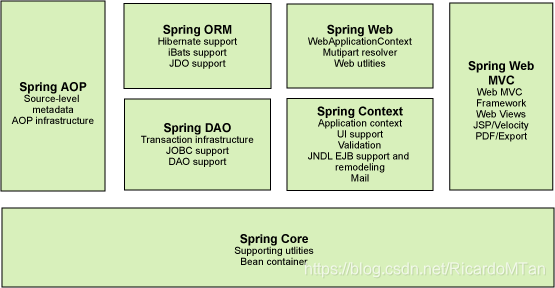
1、核心容器:核心容器提供 Spring 框架的基本功能。核心容器的主要组件是 BeanFactory,它是工厂模式的实现。BeanFactory 使用控制反转 (IOC) 模式将应用程序的配置和依赖性规范与实际的应用程序代码分开。
2、Spring 上下文:Spring 上下文是一个配置文件,向 Spring 框架提供上下文信息。Spring 上下文包括企业服务,例如 JNDI、EJB、电子邮件、国际化、校验和调度功能。
3、Spring AOP:通过配置管理特性,Spring AOP 模块直接将面向方面的编程功能集成到了 Spring 框架中。所以,可以很容易地使 Spring 框架管理的任何对象支持 AOP。Spring AOP 模块为基于 Spring 的应用程序中的对象提供了事务管理服务。通过使用 Spring AOP,不用依赖 EJB 组件,就可以将声明性事务管理集成到应用程序中。
4、Spring DAO:JDBC DAO 抽象层提供了有意义的异常层次结构,可用该结构来管理异常处理和不同数据库供应商抛出的错误消息。异常层次结构简化了错误处理,并且极大地降低了需要编写的异常代码数量(例如打开和关闭连接)。Spring DAO 的面向 JDBC 的异常遵从通用的 DAO 异常层次结构。
5、Spring ORM:Spring 框架插入了若干个 ORM 框架,从而提供了 ORM 的对象关系工具,其中包括 JDO、Hibernate 和 iBatis SQL Map。所有这些都遵从 Spring 的通用事务和 DAO 异常层次结构。
6、Spring Web 模块:Web 上下文模块建立在应用程序上下文模块之上,为基于 Web 的应用程序提供了上下文。所以,Spring 框架支持与 Jakarta Struts 的集成。Web 模块还简化了处理多部分请求以及将请求参数绑定到域对象的工作。
7、Spring MVC 框架:MVC 框架是一个全功能的构建 Web 应用程序的 MVC 实现。通过策略接口,MVC 框架变成为高度可配置的,MVC 容纳了大量视图技术,其中包括 JSP、Velocity、Tiles、iText 和 POI。Spring 框架的功能可以用在任何 J2EE 服务器中,大多数功能也适用于不受管理的环境。Spring 的核心要点是:支持不绑定到特定 J2EE 服务的可重用业务和数据访问对象。毫无疑问,这样的对象可以在不同J2EE 环境(Web 或EJB)、独立应用程序、测试环境之间重用。
1.2.1 Spring 架构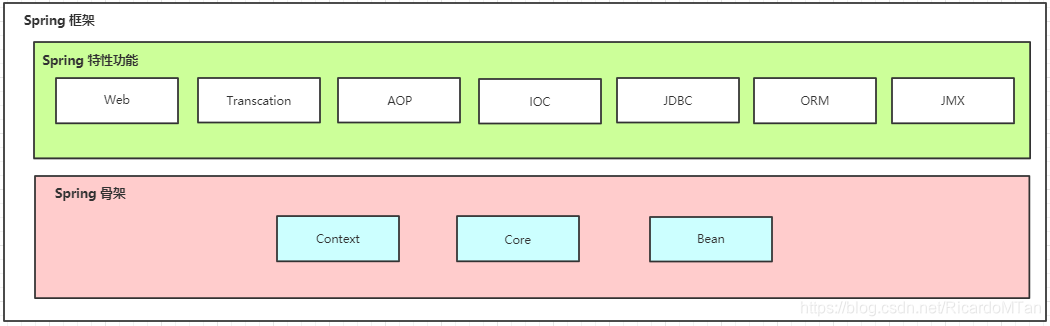
1、Spring 框架中的核心组件只有三个:Core、Context 和 Beans。它们构建起了整个 Spring 的骨骼架构。
2、Spring就是面向Bean的编程(BOP,Bean Oriented Programming),Bean 在 Spring 中才是真正的主角。Bean 在 Spring 中作用就像 Object 对 OOP 的意义一样,没有对象的概念就像没有面向对象编程,Spring 中没有 Bean 也就没有 Spring 存在的意义。就像一次演出舞台都准备好了但是却没有演员一样。为什么要 Bean 这种角色 Bean 或者为何在 Spring 如此重要,这由 Spring 框架的设计目标决定,Spring 为何如此流行,我们用 Spring 的原因是什么,想想你会发现原来 Spring 解决了一个非常关键的问题他可以让你把对象之间的依赖关系转而用配置文件来管理,也就是他的依赖注入机制。而这个注入关系在一个叫 Ioc 容器中管理,那 Ioc 容器中有又是什么就是被 Bean 包裹的对象。Spring 正是通过把对象包装在 Bean 中而达到对这些对象管理以及一些列额外操作的目的。
3、如果Bean比作一场演出中的演员的话,那 Context 就是这场演出的舞台背景,而 Core 应该就是演出的道具了。只有他们在一起才能具备能演出一场好戏的最基本的条件。当然有最基本的条件还不能使这场演出脱颖而出,还要他表演的节目足够的精彩,这些节目就是 Spring 能提供的特色功能了。
4、Bean 包装的是 Object,而 Object 必然有数据,如何给这些数据提供生存环境就是 Context 要解决的问题,对 Context 来说他就是要发现每个 Bean 之间的关系,为它们建立这种关系并且要维护好这种关系。所以 Context 就是一个 Bean 关系的集合,这个关系集合又叫 Ioc 容器,一旦建立起这个 Ioc 容器后 Spring 就可以为你工作了。那 Core 组件又有什么用武之地呢?其实Core 就是发现、建立和维护每个 Bean 之间的关系所需要的一些列的工具,从这个角度看来,Core 这个组件叫 Util 更能让你理解。
1.2 IOC原理
参考 浅谈IOC–说清楚IOC是什么 与 IOC是什么意思
个人理解,就是把程序对象的创建由由程序控制转变为由第三方控制。IOC是一种思想,实现的方式有很多。
1.2.1 Spring的IOC
首先,配置Spring的bean之后,可以通过以下方式测试(或者类似的方式):
// 获取Spring上下文对象
ApplicationContext context = new ClassPathXmlApplicationContext("applicationContext.xml");
User user = context.getBean(User.class);
System.out.println(user);
现在主要看看Spring IOC 通过构造器创建对象的两种方式:
方式一:调用无参构造函数
关键是对象里需要包括无参构造函数以及属性字段的set方法
applicationContext.xml
<?xml version="1.0" encoding="UTF-8"?>
<beans xmlns="http://www.springframework.org/schema/beans"
       xmlns:xsi="http://www.w3.org/2001/XMLSchema-instance"
       xsi:schemaLocation="http://www.springframework.org/schema/beans
        https://www.springframework.org/schema/beans/spring-beans.xsd">

    <bean id="user" class="com.st.pojo.User">
        <property name="id" value="1" />
        <property name="name" value="Spring" />
        <property name="age" value="12" />
    </bean>
</beans>
方式二:调用有参构造函数
通过有参构造函数创建对象,其配置方式有三种 name type index
<bean id="users" class="com.st.pojo.User">
    <constructor-arg type="int" value="1"/>
    <!--此处需注意,引用类型要使用完全限定名,如String要使用java.lang.String-->
    <constructor-arg type="java.lang.String" value="st"/>
    <constructor-arg type="int" value="12"/>
</bean>
<bean id="users" class="com.st.pojo.User">
    <constructor-arg index="0" value="1"/>
    <constructor-arg index="1" value="st"/>
    <constructor-arg index="2" value="12"/>
</bean>
<bean id="users" class="com.st.pojo.User">
    <constructor-arg name="id" value="1"/>
    <constructor-arg name="name" value="st"/>
    <constructor-arg name="age" value="12"/>
</bean>
以上两种涵盖了对象创建的方式,通过无参与有参构造函数。另外,关于应用类型使用全限定名或者使用name时可以配合ref来使用,原理就是Spring会根据所给的限定名或者ref属性来形成对象实例化的链,直到该对象的创建不再需要查找其他引用类型,然后根据链返回实例对象。
另外IOC配置文件可以分割为多个bean文件,然后可以通过import合并为一个。
<import resource="applicationContext1.xml"/>
<import resource="applicationContext2.xml"/>
<import resource="applicationContext3.xml"/>
1.3 依赖注入
1.3.1 构造器注入
1.3.2 set 方式注入
实体 bean
ublic class Student {
    private String name;
    private Address address;
    private String[] books;
    private List<String> favorites;
    private Map<String, String> lessons;
    private Set<String> games;
    private Properties info;
    private String job;

    public void setName(String name) {
        this.name = name;
    }

    public void setAddress(Address address) {
        this.address = address;
    }

    public void setBooks(String[] books) {
        this.books = books;
    }

    public void setFavorites(List<String> favorites) {
        this.favorites = favorites;
    }

    public void setLessons(Map<String, String> lessons) {
        this.lessons = lessons;
    }

    public void setGames(Set<String> games) {
        this.games = games;
    }

    public void setInfo(Properties info) {
        this.info = info;
    }

    public void setJob(String job) {
        this.job = job;
    }

    @Override
    public String toString() {
        return "Student{" +
                "name='" + name + '\'' +
                ", address=" + address +
                ", books=" + Arrays.toString(books) +
                ", favorites=" + favorites +
                ", lessons=" + lessons +
                ", games=" + games +
                ", info=" + info +
                ", job='" + job + '\'' +
                '}';
    }
}

public class Address {
    private String address;

    public void setAddress(String address) {
        this.address = address;
    }

    @Override
    public String toString() {
        return "Address{" +
                "address='" + address + '\'' +
                '}';
    }
}
复杂属性注入
<?xml version="1.0" encoding="UTF-8"?>
<beans xmlns="http://www.springframework.org/schema/beans"
       xmlns:xsi="http://www.w3.org/2001/XMLSchema-instance"
       xsi:schemaLocation="http://www.springframework.org/schema/beans
        https://www.springframework.org/schema/beans/spring-beans.xsd">
    <bean id="address" class="com.st.pojo.Address">
        <property name="address" value="guizhou.guiyang.guanShanHu"/>
    </bean>
    <bean id="student" class="com.st.pojo.Student">
        <property name="name" value="st"/>
        <property name="address" ref="address"/>
        <property name="books">
            <array>
                <value>红楼梦</value>
                <value>水浒传</value>
                <value>三国演义</value>
                <value>西游记</value>
            </array>
        </property>
        <property name="favorites">
            <list>
                <value>Music</value>
                <value>Basketball</value>
            </list>
        </property>
        <property name="lessons">
            <map>
                <entry key="语文" value="王老师"/>
                <entry key="物理" value="姜老师"/>
                <entry key="数学" value="吴老师"/>
            </map>
        </property>
        <property name="games">
            <set>
                <value>LOL</value>
                <value>DNF</value>
                <value>CSGO</value>
            </set>
        </property>
        <property name="job">
            <null/>
        </property>
        <property name="info">
            <props>
                <prop key="username">st</prop>
                <prop key="password">123456</prop>
                <prop key="enabled">true</prop>
            </props>
        </property>
    </bean>
</beans>
1.3.2 拓展方式注入
<?xml version="1.0" encoding="UTF-8"?>
<?xml version="1.0" encoding="UTF-8"?>
<beans xmlns="http://www.springframework.org/schema/beans"
       xmlns:xsi="http://www.w3.org/2001/XMLSchema-instance"
       xmlns:p="http://www.springframework.org/schema/p"
       xmlns:c="http://www.springframework.org/schema/c"
       xsi:schemaLocation="http://www.springframework.org/schema/beans
        https://www.springframework.org/schema/beans/spring-beans.xsd">
    <!--导入约束xmlns:p-->
    <bean id="customer" class="com.st.pojo.Customer" p:age="10" p:name="st"></bean>
    <!--导入约束xmlns:c-->
    <bean id="user" class="com.st.pojo.Student" c:id="1" c:name="st" c:age="18"></bean>
</beans>
以上方式需要导入p和c命名空间,即properties和construct
1.4 Bean 的作用域
1.4.1 单例模式
对象只被创建一个,即只被注入一次 scope=“singleton”。
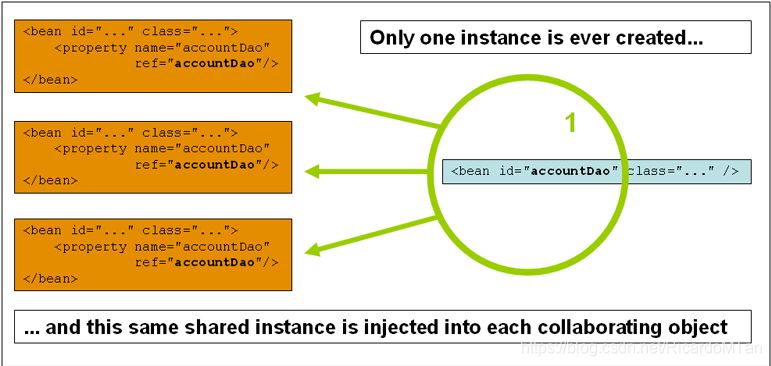
<bean id="customer" class="com.st.pojo.Customer" p:age="10" p:name="st" scope="singleton"></bean>
1.4.2 原型模式
为每次引用创建一个对象,即注入多次scope=“prototype”:
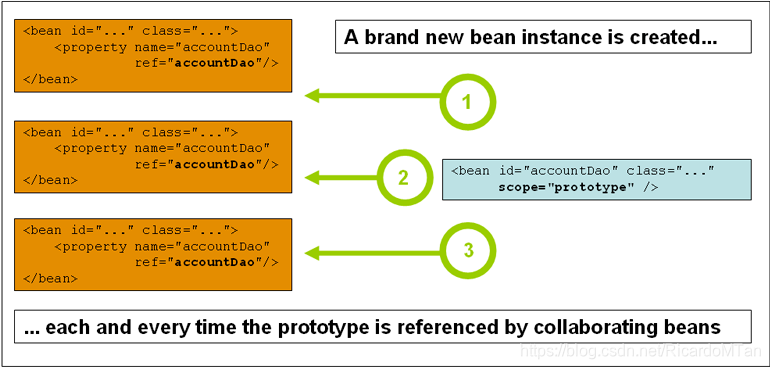
<bean id="customer" class="com.st.pojo.Customer" p:age="10" p:name="st" scope="prototype"></bean>
1.4.3 其它
request session application web开发使用
1.5 Bean的自动装配
自动装配时Spring满足Bean依的一直方式。Spring火灾上下文中自动寻找,并自动给bean装配。在Spring中有三种装配的方式:
- 在xml显示配置
- 在java中显示配置
- 隐式的自动装配
1.5.1 自动装配 autowire
autowire=“byName”,自动在上下文查找与属性名完全匹配的bean,并自动装配
<?xml version="1.0" encoding="UTF-8"?>
<beans xmlns="http://www.springframework.org/schema/beans"
       xmlns:xsi="http://www.w3.org/2001/XMLSchema-instance"
       xsi:schemaLocation="http://www.springframework.org/schema/beans
        https://www.springframework.org/schema/beans/spring-beans.xsd">
    <bean id="cat" class="com.st.pojo.Cat"/>
    <bean id="dog" class="com.st.pojo.Dog"/>
    <bean id="people" class="com.st.pojo.People" autowire="byName">
        <property name="name" value="st"/>
    </bean>
</beans>
autowire=“byType”,自动在上下文查找与属性类型匹配的bean,并自动装配
<bean id="people" class="com.st.pojo.People" autowire="byType">
1.5.2 使用注解
@Autowired 注解,使用此方法可以不需要set方法。但是需要满足IOC中要存在完全匹配的属性名。
命名空间导入
xmlns:context="http://www.springframework.org/schema/context"
xsi:schemaLocation="http://www.springframework.org/schema/context https://www.springframework.org/schema/context/spring-context.xsd">
设置此处开启注解支持
<context:annotation-config></context:annotation-config>
另外 如果定义@Autowired(false),则这个属性可以为null,类似的被 @Nullable 标记的也可以为 null。在IOC环境复杂的时候,也可以配合**@Qualifier(value=“xxx”)**使用,来指定一个唯一的对象。
另外还有@Resource(这个注解不是Spring中的,而是java.annotation下的),也可以用于自动装配,@Resource首先通过name去匹配,name匹配不到的情况下,再通过type匹配,不能匹配则报错。
@Autowired与@Resource不同在于前者默认使用byType,通过type不能匹配的情况下再使用name匹配,后者默认使用byName,再使用byType。
1.6 Spring 注解开发
在使用前需要导入context约束,增加注解支持。
1.6.1 @Component 与 @Value
@Component 等价于 <bean id=“user” class=“com.st.pojo.User”/>
@Value 等价于 <property name=“name” value=“Spring” />
1.6.2 衍生注解
@Component 的衍生注解:
- @Repository 对应dao层
- @Service 对应service层
- @Controller 对应controller层
@Scope(“singleton”)
@Scope(“singleton”) 等价于 <bean id=“user” class=“com.st.pojo.User” p:age=“10” p:name=“st” scope=“singleton”/>
1.6.3 小结
xml 与 注解
- xml更加万能,适合任何场合,维护简单方便
- 注解不是自己类使用不了,维护相对复杂
xml 与 注解最佳实践
- xml用来管理 Bean
- 注解只负责完成属性注入
1.7 使用 java 的方式配置Spring
1.7.1 JavaConfig
JavaConfig 是Spring的子项目,Spring4后成为核心功能。
@Component
public class User {

    @Value("st")
    private String name;

    @Override
    public String toString() {
        return "User{" +
                "name='" + name + '\'' +
                '}';
    }
}

@Configuration
@ComponentScan("com.st.pojo")
@Import(AppConfig2.class)
public class AppConfig {

    @Bean
    public User getUser() {
        return new User();
    }
}

public class MyTest {

    @Test
    public void getUser() {
        ApplicationContext context = new AnnotationConfigApplicationContext(AppConfig.class);//上下文的类型变了
        User user = (User) context.getBean("getUser");
        System.out.println(user);
    }
}
@Configuration 也是一个@Component,会被Spring容器托管,相当于 ioc的配置文件(applicationContext.xml)
@Bean相当于bean标签,getUser对应id属性,返回值User对应class属性。
@ComponentScan相当于 <context:component-scan base-package=“com.st.pojo”/>
@Import相当于 <import resource=“applicationContext2.xml”/>


 4747
4747


 被折叠的 条评论
为什么被折叠?
被折叠的 条评论
为什么被折叠?
 到【灌水乐园】发言


