


前言
本文代码虽是手动code了一遍并小小做了改动,但是终究是在他人demo的基础上编排出的,即便是个比较简单的例子,但是这个..那个..为了尊重别人劳动成果,还是分类到了转载,这里特别感谢一下@非典型技术宅老兄的原文,想必大家都听腻了太多的多线程的概念理论,本文不大书理论,用实例讲述 Operation Queues 的用法,就是这么任性!
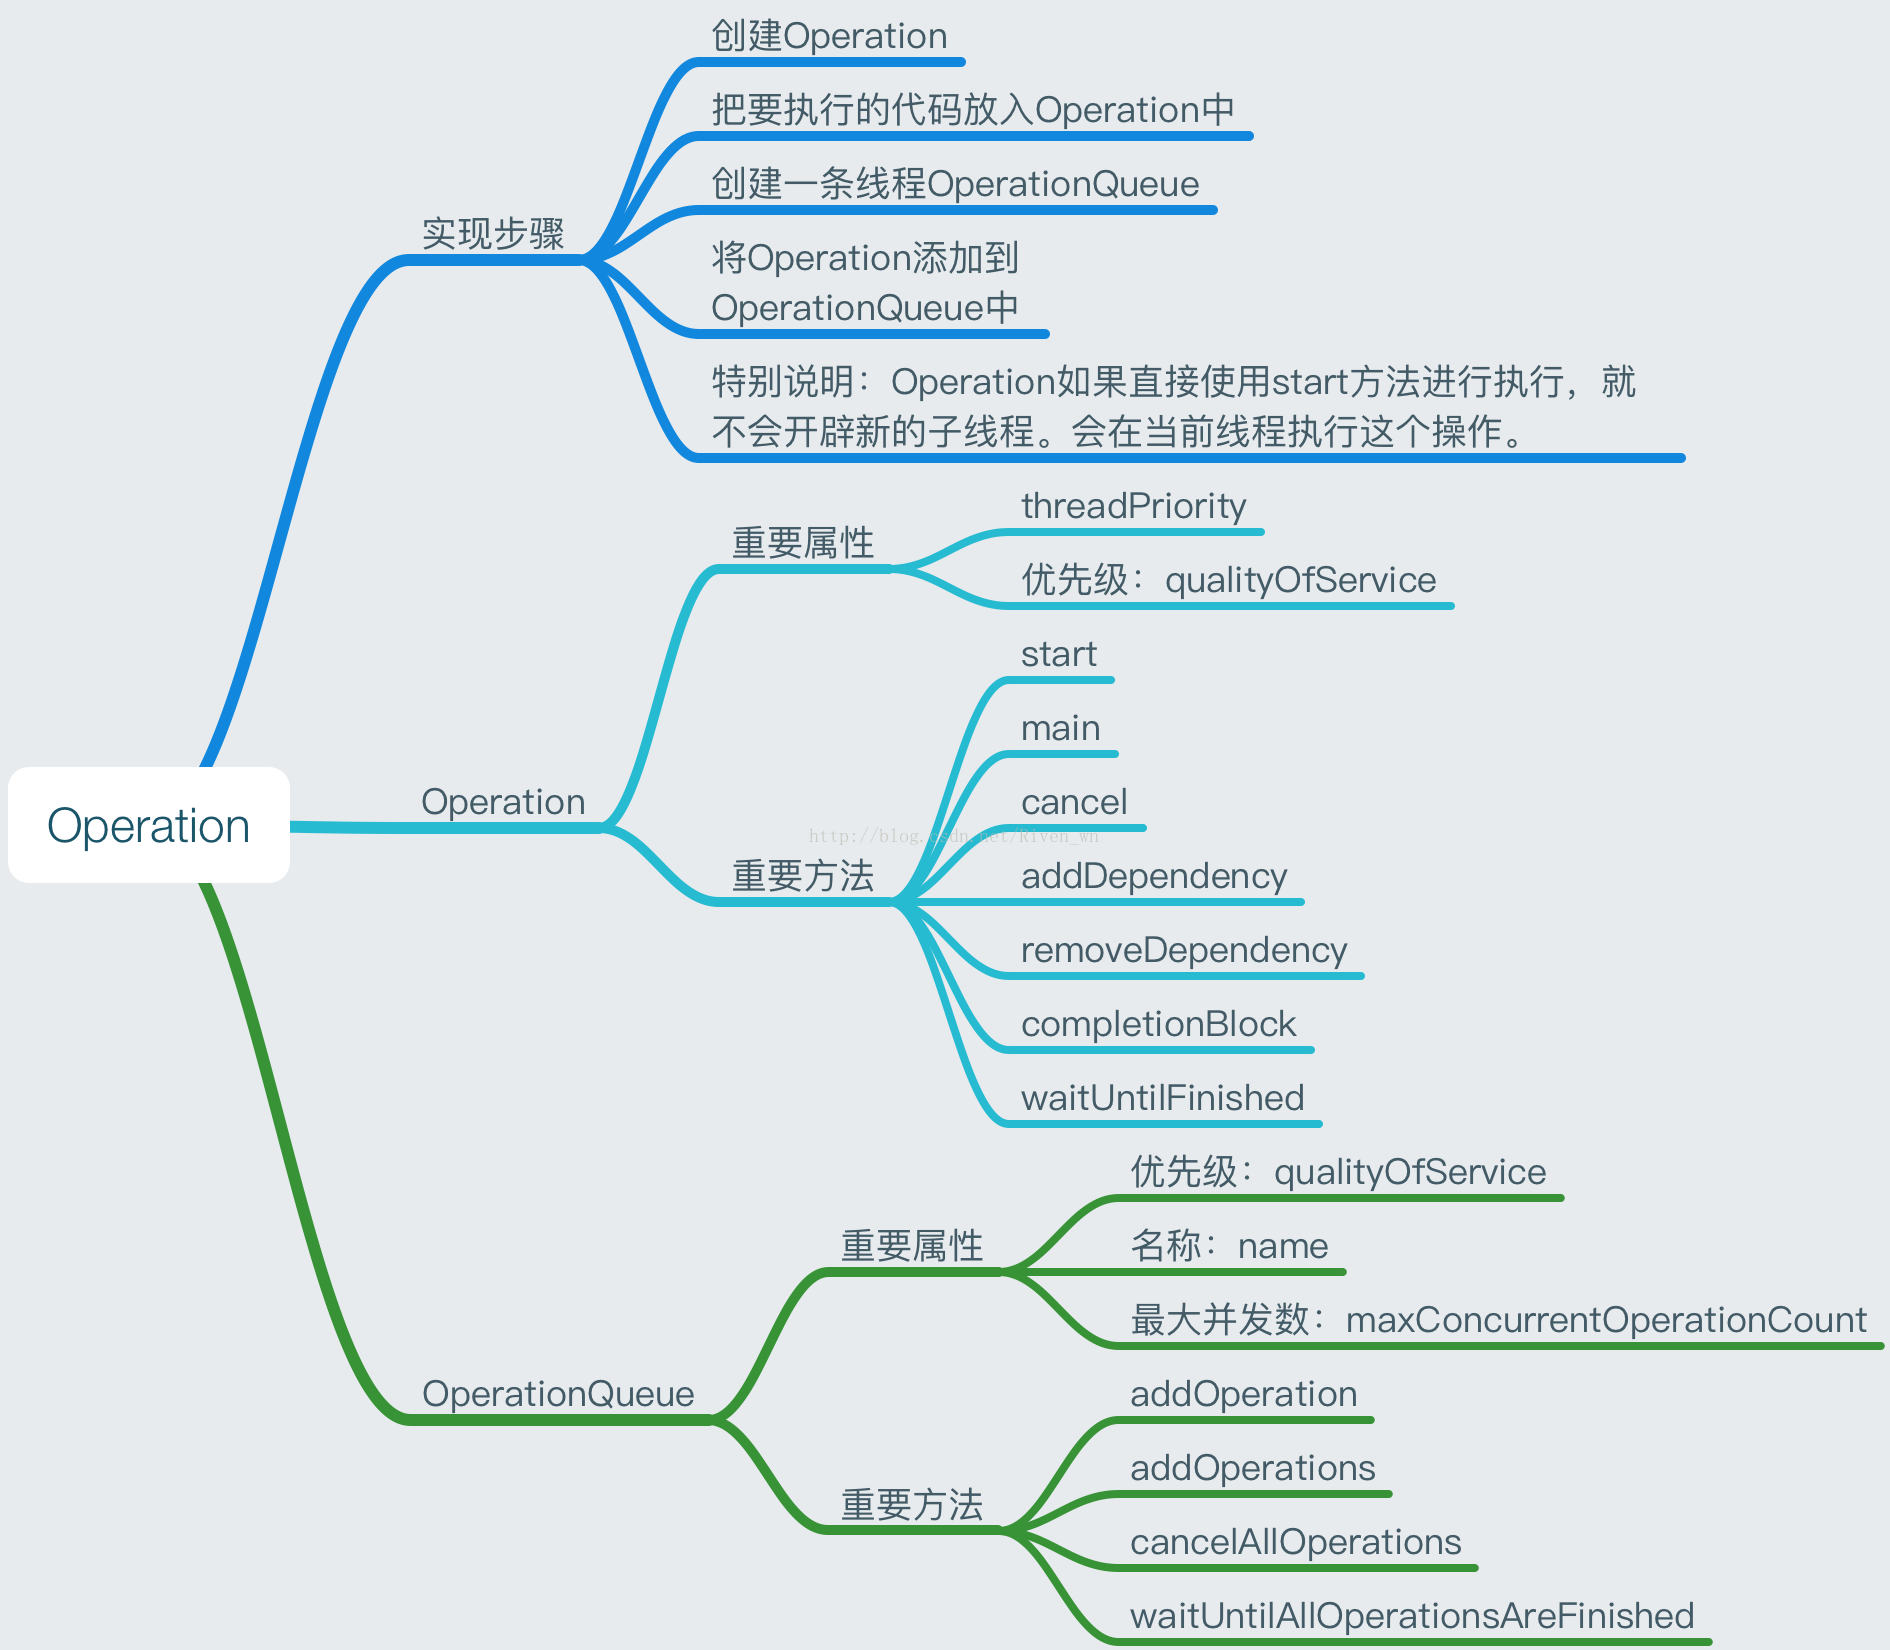
先看一下operation的属性、方法
并行执行任务,全部完成后刷新UI
需求:
1.分线程下载图片并显示
2.下载过程中显示loading
3.全部下载完成后停止loading
代码:
let imgW = Int(UIScreen.main.bounds.width - 20)

    let imgH = Int((UIScreen.main.bounds.height - 80)/4)

    @IBOutlet weak var indicator: UIActivityIndicatorView!

    @IBOutlet weak var img1: UIImageView!

    @IBOutlet weak var img2: UIImageView!

    @IBOutlet weak var img3: UIImageView!

    @IBOutlet weak var img4: UIImageView!

    let operationQueue = OperationQueue()

    var imageViews: [UIImageView]?

    var operationType: OperationType?

    override func viewDidLoad() {
        super.viewDidLoad()
        imageViews = [img1, img2, img3, img4]
    }

    // actions
    @IBAction func rightItemAction(_ sender: Any) {
        indicator.startAnimating()
        startBasicDemo()
    }

    func startBasicDemo() {
        // 最大并行数 3
        operationQueue.maxConcurrentOperationCount = 3
        // 添加任务下载图片  在主线程刷新UI
        for imageView in imageViews! {
            operationQueue.addOperation {
                if let url = URL(string: "https://placebeard.it/\(self.imgW)/\(self.imgH)") {
                    do {
                        let image = UIImage(data:try Data(contentsOf: url))
                        DispatchQueue.main.async {
                            imageView.image = image
                        }
                    } catch {
                        print(error)
                    }
                }
            }
        }
        // 等待所有操作完成,回到主线程停止刷新器
        DispatchQueue.global().async {
            [weak self] in
            self?.operationQueue.waitUntilAllOperationsAreFinished()
            DispatchQueue.main.async {
                self?.indicator.stopAnimating()
            }
        }
    }
解析:
operationQueue:操作队列
operationQueue.addOperation:向队列中添加任务(例子中放在for循环中,添加了多个任务)
do{} catch{}:执行任务,捕获异常
DispatchQueue.global().async:全局队列异步执行
DispatchQueue.main.async:主队列异步执行
设置队列中的优先级并执行异步任务
需求:
1.分线程下载图片并显示
2.下载过程中显示loading
3.全部下载完成后停止loading
4.设置每个任务的优先级
代码:
class ConvenienceOperation: Operation {
    let url: URL
    let imageView: UIImageView

    init(setImageView: UIImageView, withURL: URL) {
        imageView = setImageView
        url = withURL
        super.init()
    }

    override func main() {
        do {
            // 当任务被取消的时候,立刻返回
            if isCancelled {
                return
            }
            let imageData = try Data(contentsOf: url)
            let image = UIImage(data: imageData)

            DispatchQueue.main.async {
                [weak self] in
                self?.imageView.image = image
            }
        } catch  {
            print(error)
        }
    }
}
func startDependencyDemo() {
operationQueue.maxConcurrentOperationCount = 4
if let url = URL(string: "https://placebeard.it/\(self.imgW)/\(self.imgH)") {
let operation1 = ConvenienceOperation(setImageView: img1, withURL: url)
let operation2 = ConvenienceOperation(setImageView: img2, withURL: url)
let operation3 = ConvenienceOperation(setImageView: img3, withURL: url)
let operation4 = ConvenienceOperation(setImageView: img4, withURL: url)
// 设置依赖关系 执行顺序为 4,3,2,1
operation1.addDependency(operation2)
operation2.addDependency(operation3)
operation3.addDependency(operation4)
// 等待所有操作完成,回到主线程停止刷新器。
DispatchQueue.global().async {
[weak self] in
self?.operationQueue.addOperations([operation1, operation2, operation3, operation4], waitUntilFinished: true)
DispatchQueue.main.async {
self?.indicator.stopAnimating()
}
}
}
}
解析:
queuePriority:任务的优先级(有高到低依次为:veryHigh、high、normal、low、veryLow),这里的优先级值得是对某一任务分配资源的优先级,由于这里设置的
maxConcurrentOperationCount(最大并行数)为2,并且任务放在异步队列里,所以看上去任务并没有按从高到低的顺序执行,如果想实现按顺序执行任务,只需将并行数设置为1,或者对任务设置依赖关系,下文会讲解到。
为队列中的任务设置依赖并异步执行任务
需求:
1.分线程下载图片并显示
2.下载过程中显示loading
3.全部下载完成后停止loading
4.任务间添加依赖关系
代码:
func startDependencyDemo() {
        operationQueue.maxConcurrentOperationCount = 4
        if let url = URL(string: "https://placebeard.it/\(self.imgW)/\(self.imgH)") {
            let operation1 = ConvenienceOperation(setImageView: img1, withURL: url)
            let operation2 = ConvenienceOperation(setImageView: img2, withURL: url)
            let operation3 = ConvenienceOperation(setImageView: img3, withURL: url)
            let operation4 = ConvenienceOperation(setImageView: img4, withURL: url)
            // 设置依赖关系 执行顺序为 4,3,2,1
            operation1.addDependency(operation2)
            operation2.addDependency(operation3)
            operation3.addDependency(operation4)

            // 等待所有操作完成,回到主线程停止刷新器。
            DispatchQueue.global().async {
                [weak self] in
                self?.operationQueue.addOperations([operation1, operation2, operation3, operation4], waitUntilFinished: true)
                DispatchQueue.main.async {
                    self?.indicator.stopAnimating()
                }
            }
        }
    }
解析:
operation1.addDependency(operation2):operation1依赖operation2,既任务2完成后再执行任务1。


 2762
2762

 被折叠的 条评论
为什么被折叠?
被折叠的 条评论
为什么被折叠?
 到【灌水乐园】发言


