


1、图形Drawable
android把所有能够显示的图形都抽象为Drawable类(可绘制的)。这里的图形不止是图片,还包括色块、画板、背景等。
包含图片在内的图形文件放在res目录的各个darwable目录下,其中drawable目录一般保存描述性的xml文件,而图片文件一般放在具体分辨率的drawable目录下。例如:
- drawable-ldpi 存放低分辨率图片(如240*320)现在基本没有这样的智能机了
- drawable-mdpi 存放中等辨率图片(如320*480) 这样的手机已经很少了
- drawable-hdpi 存放高辨率图片(如480*800)一般对应4英寸~4.5英寸的手机(但不绝对,同尺寸的手机有可能分辨率不同,手机分辨率就高不就低,分辨率低了屏幕就会模糊)
- drawable-xhdpi 存放高分辨率的图片(如720*1280) 一般对应5英寸~5.5英寸的手机
- drawable-xxhdpi 存放超高分辨率的图片(如1080*1920),对应6英寸~6.5英寸的手机
- drawable-xxxhdpi 存放超超高分辨率的图片(如1440*2560)对应7英寸以上的平板电脑
2、形状图形
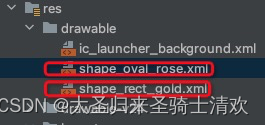
<?xml version="1.0" encoding="utf-8"?>
<shape xmlns:android="http://schemas.android.com/apk/res/android">
    <!-- 指定了形状内部的填充颜色 -->
    <solid android:color="#ffdd66"></solid>
    <!--    指定了形状轮廓的粗细与颜色-->
    <stroke
        android:width="1dp"
        android:color="#aaaaaa"></stroke>
    <!--    指定了形状四个圆角的半径-->
    <corners android:radius="10dp"></corners>
</shape>
<?xml version="1.0" encoding="utf-8"?>
<shape xmlns:android="http://schemas.android.com/apk/res/android"
android:shape = "oval"
>
<!-- 指定了形状内部的填充颜色 -->
<solid android:color="#ff66aa"></solid>
<!-- 指定了形状轮廓的粗细与颜色-->
<stroke
android:width="1dp"
android:color="#aaaaaa"></stroke>
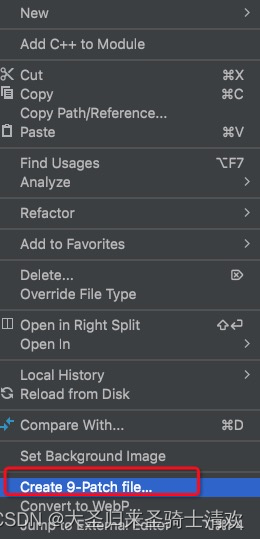
</shape>3.九宫格图片(点9图片)
将某张图片设置成背景图时,如果图片尺寸太小,则系统会自动拉伸图片使之填满背景。
可是一旦图片拉得多大,其画面容易变得模糊
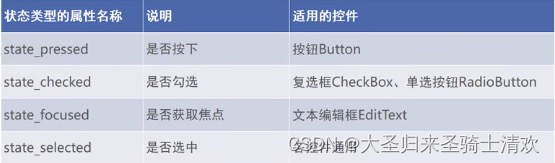
4.状态列表图形
下面是继承关系图:
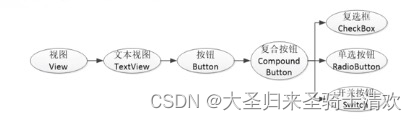
4.1、选择按钮状态列表图形不仅应用于按钮,还应用于拥有多种状态的控件。
<?xml version="1.0" encoding="utf-8"?>
<selector xmlns:android="http://schemas.android.com/apk/res/android">
    <item android:drawable="@drawable/button_circle_select" android:state_pressed="true"></item>
    <item android:drawable="@drawable/button_circle_normal"></item>

</selector>
<Button
android:layout_width="wrap_content"
android:layout_height="wrap_content"
android:background="@drawable/btn_nine_selector"
android:text="定制样式样式按钮"
android:layout_marginTop="5dp"
android:padding="5dp">
</Button>4.2、复选框Checkbox
下面是自定义复选框
<?xml version="1.0" encoding="utf-8"?>
<selector xmlns:android="http://schemas.android.com/apk/res/android">
    <item android:drawable="@drawable/button_circle_select" android:state_checked="true"></item>
    <item android:drawable="@drawable/button_circle_normal"></item>
</selector>
<CheckBox
android:id="@+id/ck_custom"
android:layout_width="match_parent"
android:layout_height="wrap_content"
android:button="@drawable/checkbox_selector"
android:checked="true"
android:padding="5dp"
android:layout_marginTop="10dp"
android:text="自定义checkbox">
</CheckBox>4.3、开关按钮Switch
Switch 是开关按钮,它在选中与取消选中时可展现的界面元素比复选框丰富(高级版checkbox)
Switch控件新添加的xml属性说明如下:
- textOn 右侧开启时的文本
- textOff 右侧关闭时的文本
- track 设置开关轨道的背景
- thumb 设置开关标识的图
4.4、单选按钮RadioButton
<?xml version="1.0" encoding="utf-8"?>
<LinearLayout xmlns:android="http://schemas.android.com/apk/res/android"
    xmlns:app="http://schemas.android.com/apk/res-auto"
    xmlns:tools="http://schemas.android.com/tools"
    android:layout_width="match_parent"
    android:layout_height="match_parent"
    android:orientation="vertical"
    tools:context=".RadioHorizonActivity">

    <TextView
        android:layout_width="match_parent"
        android:layout_height="wrap_content"
        android:text="请选择您的性别"></TextView>

    <RadioGroup
        android:id="@+id/rb_gender"
        android:layout_width="match_parent"
        android:layout_height="wrap_content"
        android:orientation="horizontal">

        <RadioButton
            android:id="@+id/rb_male"
            android:layout_width="0dp"
            android:layout_height="wrap_content"
            android:layout_marginTop="10dp"
            android:layout_weight="1"
            android:text="男"></RadioButton>

        <RadioButton
            android:id="@+id/rb_female"
            android:layout_width="0dp"
            android:layout_height="wrap_content"
            android:layout_marginTop="10dp"
            android:layout_weight="1"
            android:text="女"></RadioButton>
    </RadioGroup>

    <TextView
        android:id="@+id/tv_result"
        android:layout_width="match_parent"
        android:layout_height="wrap_content"
        android:gravity="start"></TextView>
</LinearLayout>
public class RadioHorizonActivity extends AppCompatActivity implements RadioGroup.OnCheckedChangeListener {
private TextView tv_result;
@Override
protected void onCreate(Bundle savedInstanceState) {
super.onCreate(savedInstanceState);
setContentView(R.layout.activity_radio_horizon);
tv_result = findViewById(R.id.tv_result);
RadioGroup rb_group = findViewById(R.id.rb_gender);
rb_group.setOnCheckedChangeListener(this);
}
@Override
public void onCheckedChanged(RadioGroup group, int checkedId) {
String desc = String.format("您选择的是:%s", checkedId == R.id.rb_male ? "帅哥" : "美女");
tv_result.setText(desc);
}
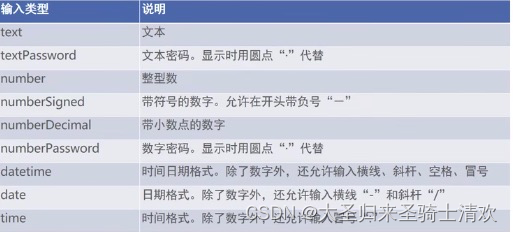
}4.5、文本输入编辑框EditText

shape_edit_normal.xml
<?xml version="1.0" encoding="utf-8"?>
<shape xmlns:android="http://schemas.android.com/apk/res/android">
    <!-- 指定了形状内部的填充颜色 -->
    <solid android:color="#ffffff"></solid>
    <!--    指定了形状轮廓的粗细与颜色-->
    <stroke
        android:width="1dp"
        android:color="#aaaaaa"></stroke>
    <!--    指定了形状四个圆角的半径-->
    <corners android:radius="10dp"></corners>
    <!--    指定了形状四个方向的间距-->
    <padding
        android:bottom="2dp"
        android:left="2dp"
        android:right="2dp"
        android:top="2dp"></padding>
</shape>
shape_edit_focus.xml
<?xml version="1.0" encoding="utf-8"?>
<shape xmlns:android="http://schemas.android.com/apk/res/android">
    <!-- 指定了形状内部的填充颜色 -->
    <solid android:color="#ffffff"></solid>
    <!--    指定了形状轮廓的粗细与颜色-->
    <stroke
        android:width="1dp"
        android:color="#0000ff"></stroke>
    <!--    指定了形状四个圆角的半径-->
    <corners android:radius="10dp"></corners>
    <!--    指定了形状四个方向的间距-->
    <padding android:bottom="2dp" android:left="2dp" android:top="2dp" android:right="2dp"></padding>
</shape>
shape_edit_selector.xml
<?xml version="1.0" encoding="utf-8"?>
<selector xmlns:android="http://schemas.android.com/apk/res/android">
    <item android:drawable="@drawable/shape_edit_focus" android:state_focused="true"></item>
    <item android:drawable="@drawable/shape_edit_normal"></item>
</selector>
shape_edit_border.xml
<?xml version="1.0" encoding="utf-8"?>
<LinearLayout xmlns:android="http://schemas.android.com/apk/res/android"
    xmlns:app="http://schemas.android.com/apk/res-auto"
    xmlns:tools="http://schemas.android.com/tools"
    android:layout_width="match_parent"
    android:layout_height="match_parent"
    tools:context=".EditBorderActivity"
    android:orientation="vertical">
    <EditText
        android:layout_width="match_parent"
        android:layout_height="wrap_content"
        android:background="@null"
        android:hint="我的边框不见了"
        android:inputType="text"></EditText>
    <EditText
        android:layout_marginTop="10dp"
        android:layout_width="match_parent"
        android:layout_height="wrap_content"
        android:background="@drawable/shape_edit_selector"
        android:hint="我的边框是圆角"
        android:inputType="text"></EditText>

</LinearLayout>
4.6、焦点变更监听器
activity_edit_focus.xml
<?xml version="1.0" encoding="utf-8"?>
<LinearLayout xmlns:android="http://schemas.android.com/apk/res/android"
    xmlns:app="http://schemas.android.com/apk/res-auto"
    xmlns:tools="http://schemas.android.com/tools"
    android:layout_width="match_parent"
    android:layout_height="match_parent"
    tools:context=".EditFocusActivity"
    android:orientation="vertical">
    <TextView
        android:layout_width="match_parent"
        android:layout_height="wrap_content"
        android:text="下面是登录信息"></TextView>
    <EditText
        android:id="@+id/et_phone"
        android:layout_width="match_parent"
        android:layout_height="wrap_content"
        android:hint="请输入11位手机号码"
        android:maxLength="11"
        android:inputType="phone"
        android:background="@drawable/shape_edit_selector"
        ></EditText>
    <EditText
        android:id="@+id/et_password"
        android:layout_marginTop="5dp"
        android:layout_width="match_parent"
        android:layout_height="wrap_content"
        android:hint="请输入6位密码"
        android:inputType="numberPassword"
        android:background="@drawable/shape_edit_selector"
        android:maxLength="6"
        ></EditText>
    <Button
        android:id="@+id/btn_login"
        android:layout_width="match_parent"
        android:layout_height="wrap_content"
        android:text="登录"></Button>

</LinearLayout>
package com.qidian.chapter05;
import android.os.Bundle;
import android.text.TextUtils;
import android.view.View;
import android.widget.Button;
import android.widget.EditText;
import android.widget.Toast;
import androidx.appcompat.app.AppCompatActivity;
public class EditFocusActivity extends AppCompatActivity implements View.OnFocusChangeListener{
private EditText et_phone;
private EditText et_password;
@Override
protected void onCreate(Bundle savedInstanceState) {
super.onCreate(savedInstanceState);
setContentView(R.layout.activity_edit_focus);
et_phone = findViewById(R.id.et_phone);
et_password = findViewById(R.id.et_password);
Button btn_login = findViewById(R.id.btn_login);
et_phone.setOnFocusChangeListener(this);
et_password.setOnFocusChangeListener(this);
}
@Override
public void onFocusChange(View v, boolean hasFocus) {
if (hasFocus) {
String phone = et_phone.getText().toString();
// String password = et_password.getText().toString();
// 手机号码不足11位
if (TextUtils.isEmpty(phone) || phone.length() < 11) {
// 手机号码编辑框请求焦点,也就是把光标移回手机号码编辑框
et_phone.requestFocus();
Toast.makeText(this,"请输入11位手机号码",Toast.LENGTH_SHORT).show();
}
}
}
}4.7、文本变化监听器
<?xml version="1.0" encoding="utf-8"?>
<LinearLayout xmlns:android="http://schemas.android.com/apk/res/android"
    xmlns:app="http://schemas.android.com/apk/res-auto"
    xmlns:tools="http://schemas.android.com/tools"
    android:layout_width="match_parent"
    android:layout_height="match_parent"
    tools:context=".EditHideActivity"
    android:orientation="vertical">
    <EditText
        android:id="@+id/et_phone"
        android:layout_width="match_parent"
        android:layout_height="wrap_content"
        android:background="@drawable/shape_edit_selector"
        android:hint="输入11位时自动隐藏输入法"
        android:inputType="text"
        android:maxLength="11"></EditText>
    <EditText
        android:id="@+id/et_password"
        android:layout_marginTop="10dp"
        android:layout_width="match_parent"
        android:layout_height="wrap_content"
        android:background="@drawable/shape_edit_selector"
        android:hint="输入6位时自动隐藏输入法"
        android:inputType="textPassword"></EditText>
</LinearLayout>
public class EditHideActivity extends AppCompatActivity {
private EditText et_phone;
private EditText et_password;
@Override
protected void onCreate(Bundle savedInstanceState) {
super.onCreate(savedInstanceState);
setContentView(R.layout.activity_edit_hide);
et_phone = findViewById(R.id.et_phone);
et_password = findViewById(R.id.et_password);
et_phone.addTextChangedListener(new HideTextWatcher(et_phone, 11));
et_password.addTextChangedListener(new HideTextWatcher(et_password, 6));
}
// 定义一个编辑框监听器,在输入文本达到指定长度时自动隐藏输入法
private class HideTextWatcher implements TextWatcher {
private EditText mView;
private int mMaxLength;
public HideTextWatcher(EditText v, int maxLength) {
this.mView = v;
this.mMaxLength = maxLength;
}
@Override
public void beforeTextChanged(CharSequence s, int start, int count, int after) {
}
@Override
public void onTextChanged(CharSequence s, int start, int before, int count) {
}
// 在编辑框输入文本变化后触发
@Override
public void afterTextChanged(Editable s) {
// 获得已输入的文本字符串
String str = s.toString();
// 输入文本达到11位(如手机号),或者达到6位(如密码)关闭输入框
if (str.length() == mMaxLength) {
// 隐藏输入法软键盘
ViewUtil.hideOneInputMethod(EditHideActivity.this, mView);
}
}
}
}public class ViewUtil {
public static void hideOneInputMethod(Activity act, View v) {
// 从系统服务中获取输入法管理器
InputMethodManager imm = (InputMethodManager)act.getSystemService(Context.INPUT_METHOD_SERVICE);
// 关闭屏幕上的输入法的软键盘
imm.hideSoftInputFromWindow(v.getWindowToken(),0);
}
}
4.8、提醒对话框

 @Override
    public void onClick(View v) {
        // 创建提醒对话框的构造器
        AlertDialog.Builder builder = new AlertDialog.Builder(this);
        // 设置对话框标题文本
        builder.setTitle("尊敬的用户");
        // 设置对话框内容文本
        builder.setMessage("你真的要卸载吗?");
        builder.setPositiveButton("残忍卸载", new DialogInterface.OnClickListener() {
            @Override
            public void onClick(DialogInterface dialog, int which) {
                tv_alert.setText("虽然依依不舍但还是离开了");
            }
        });
        builder.setNegativeButton("再想想", new DialogInterface.OnClickListener() {
            @Override
            public void onClick(DialogInterface dialog, int which) {
                tv_alert.setText("想好了继续使用");
            }
        });
        // 根据建造器构建提醒对话框对象
        AlertDialog alertDialog = builder.create();
        alertDialog.show();
    }
4.9日期对话框DatePickerDialog
package com.qidian.chapter05;

import android.app.DatePickerDialog;
import android.os.Bundle;
import android.view.View;
import android.widget.DatePicker;
import android.widget.TextView;

import androidx.appcompat.app.AppCompatActivity;

public class DaterPickerActivity extends AppCompatActivity implements View.OnClickListener,DatePickerDialog.OnDateSetListener{
    private DatePicker dp_date;
    private TextView tv_result;
    @Override
    protected void onCreate(Bundle savedInstanceState) {
        super.onCreate(savedInstanceState);
        setContentView(R.layout.activity_dater_picker);
        findViewById(R.id.btn_ok).setOnClickListener(this);
        findViewById(R.id.btn_date).setOnClickListener(this);
        dp_date = findViewById(R.id.dp_date);
        tv_result = findViewById(R.id.tv_date);

    }

    @Override
    public void onClick(View v) {
        switch (v.getId()) {
            case R.id.btn_ok:
                String desc = String.format("你选择的日期是:%s年%s月%s日",dp_date.getYear(),dp_date.getMonth() + 1,dp_date.getDayOfMonth());
                tv_result.setText(desc);
                break;
            case  R.id.btn_date:
                // 获取日历的一个实例,里面包含了当前的年月日
                /*Calendar calendar = Calendar.getInstance();
                calendar.get(Calendar.YEAR);
                calendar.get(Calendar.MONTH);
                calendar.get(Calendar.DATE);*/
                DatePickerDialog dialog = new DatePickerDialog(this, this,2090,8,23);
                // 显示日期对话框
                dialog.show();
                break;
        }
    }


    @Override
    public void onDateSet(DatePicker view, int year, int month, int dayOfMonth) {
        String desc = String.format("你选择的日期是:%s年%s月%s日",year,month + 1,dayOfMonth);
        tv_result.setText(desc);
    }
}
4.10时间对话框TimePickerDialog
package com.qidian.chapter05;

import android.annotation.SuppressLint;
import android.app.TimePickerDialog;
import android.os.Build;
import android.os.Bundle;
import android.view.View;
import android.widget.TextView;
import android.widget.TimePicker;

import androidx.annotation.RequiresApi;
import androidx.appcompat.app.AppCompatActivity;

import java.util.Calendar;

public class TimePickerActivity extends AppCompatActivity implements View.OnClickListener ,TimePickerDialog.OnTimeSetListener{
    private TimePicker tp_time;
    private TextView tv_time;
    @SuppressLint("WrongViewCast")
    @Override
    protected void onCreate(Bundle savedInstanceState) {
        super.onCreate(savedInstanceState);
        setContentView(R.layout.activity_time_picker);
        tp_time = findViewById(R.id.tp_time);
        tp_time.setIs24HourView(true);
        tv_time = findViewById(R.id.tv_time);
        findViewById(R.id.btn_ok).setOnClickListener(this);
        findViewById(R.id.btn_time).setOnClickListener(this);
    }

    @RequiresApi(api = Build.VERSION_CODES.M)
    @Override
    public void onClick(View v) {
        switch (v.getId()) {
            case R.id.btn_ok:
                String desc = String.format("你选择的时间是:%d时%d分",tp_time.getHour(), tp_time.getMinute());
                tv_time.setText(desc);
                break;
            case R.id.btn_time:
                Calendar calendar = Calendar.getInstance();
                TimePickerDialog dialog = new TimePickerDialog(this, android.R.style.Theme_Holo_Dialog,this,calendar.get(Calendar.HOUR_OF_DAY),calendar.get(Calendar.MINUTE),true);
                dialog.show();
        }
    }

    @RequiresApi(api = Build.VERSION_CODES.M)
    @Override
    public void onTimeSet(TimePicker view, int hourOfDay, int minute) {
        String desc = String.format("你选择的时间是:%d时%d分",view.getHour(), view.getMinute());
        tv_time.setText(desc);
    }
}


 94
94


 被折叠的 条评论
为什么被折叠?
被折叠的 条评论
为什么被折叠?
 到【灌水乐园】发言


