一、硬件配置及服务拓扑
1. controller节点:一块网卡
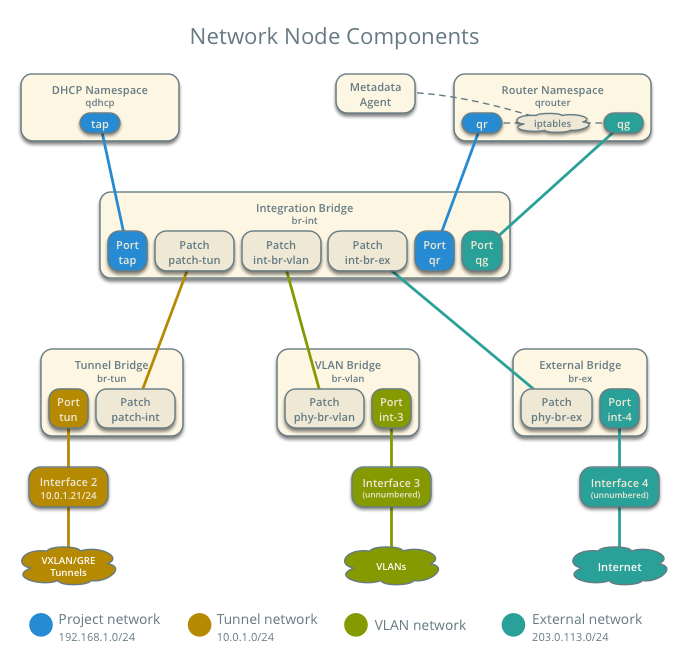
2. 网络节点:四块网卡。
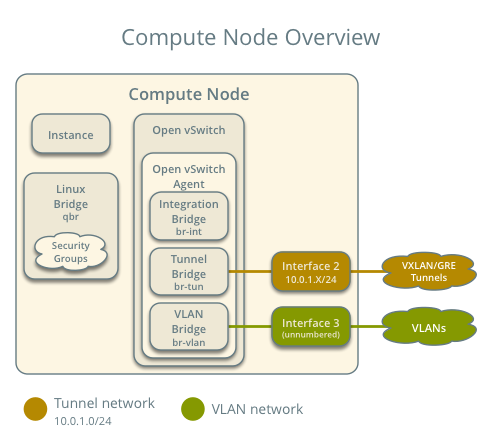
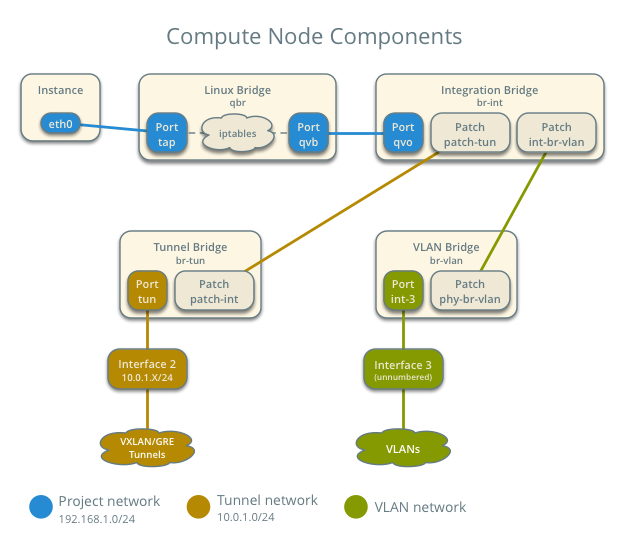
3. 计算节点:三块网卡
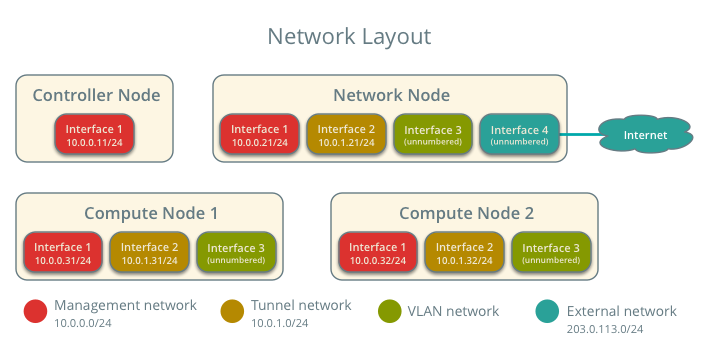
controller节点
1. 运行 neutron数据库
2. 运行消息队列服务
3. 运行认证。
4. 运行OpenStack计算nova相关网络,需配置nova.conf文件。
5. 运行插件ML2 。
网络节点
1. Neutron认证相关信息需配置neutron.conf文件。
2. Open vSwitch服务,Open vSwitch代理,L3代理,DHCP代理,元数据代理,一些依赖项。
计算节点
1. 运行OpenStack身份与合适的配置服务 需配置neutron.conf文件。
2. 运行OpenStack计算nova相关网络,需配置nova.conf文件。
3. Open vSwitch服务,Open vSwitch代理,一些依赖项。
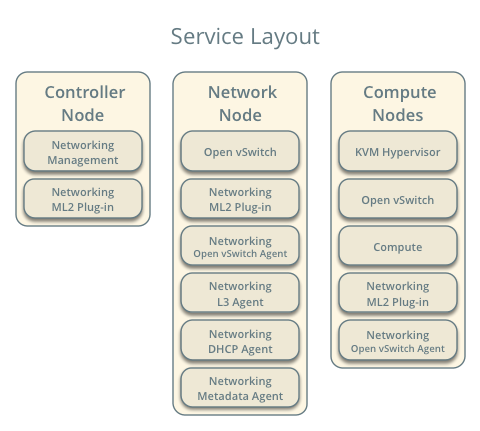
二、各个节点服务关系及说明
网络节点网络包含以下组件:
1. open vswitch-agent
2. l3-agent
3. dhcp-aent
4. Metadata-agent
网络节点网络包含以下组件:
1. open vswitch-agent
2. l3-agent
3. dhcp-aent
4. Metadata-agent 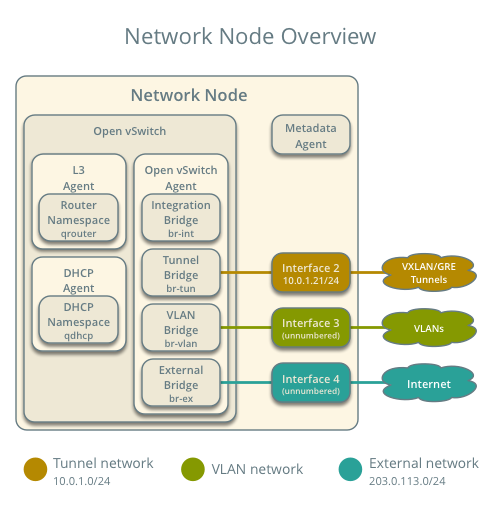
计算节点网络包含以下组件:
1. Open vSwitch-agent。
2. 网桥。
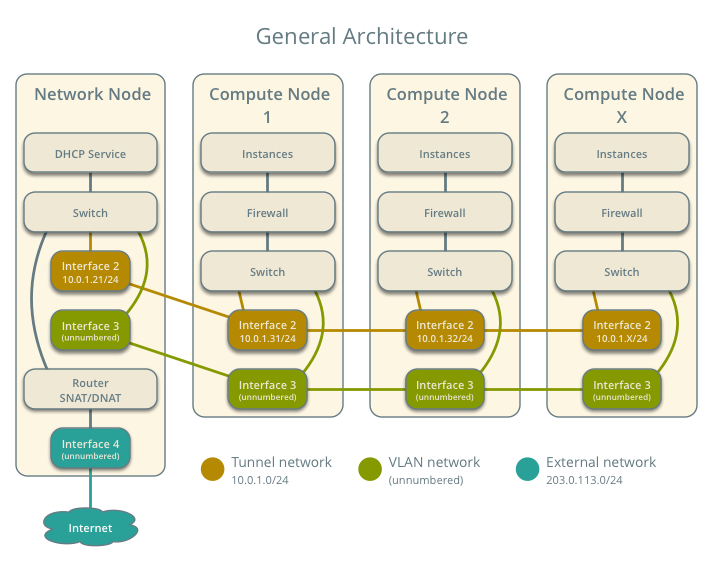
三、场景举例
Note请注意
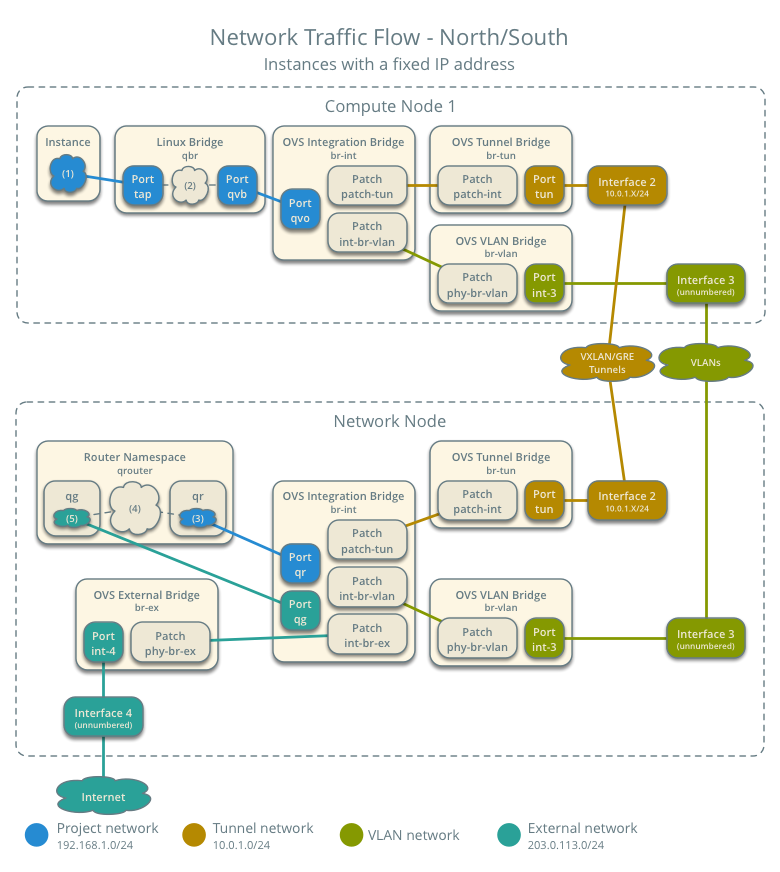
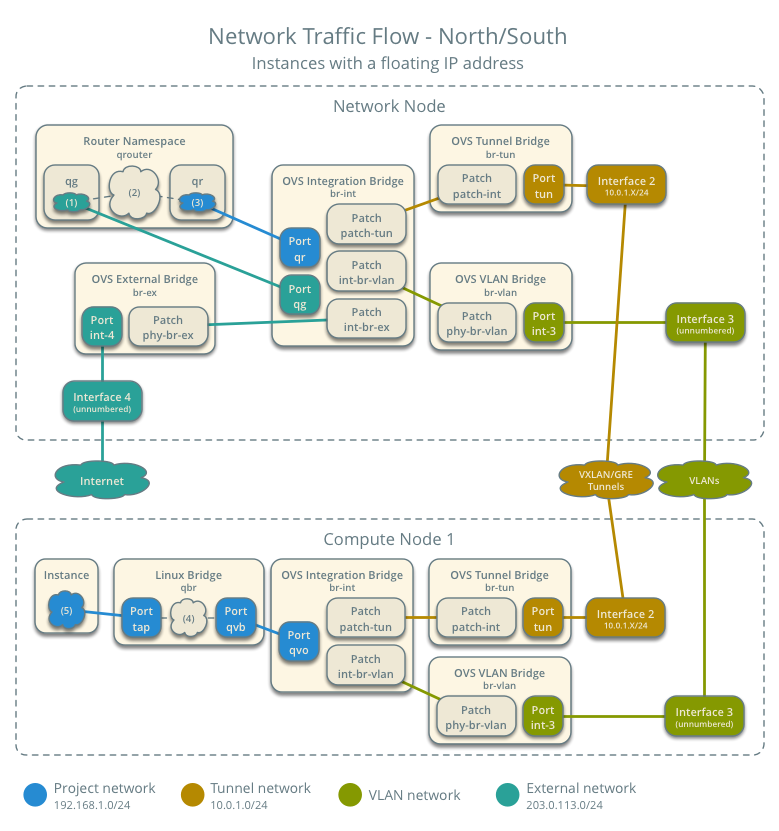
南北网络:虚拟机内部数据到外部网络
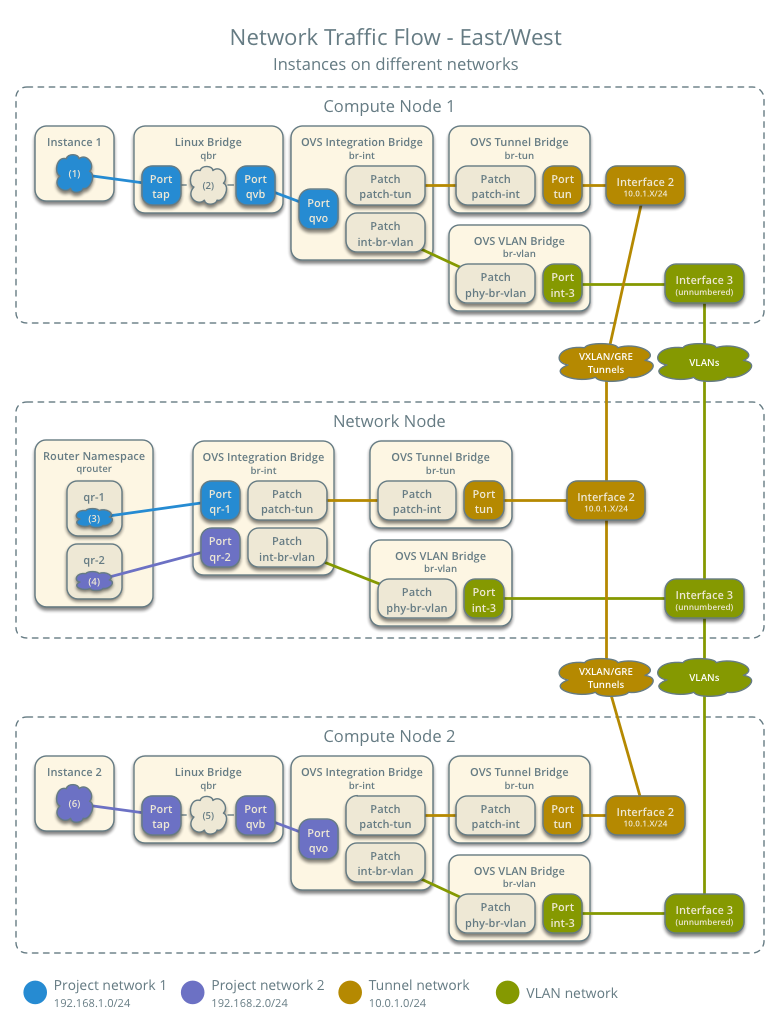
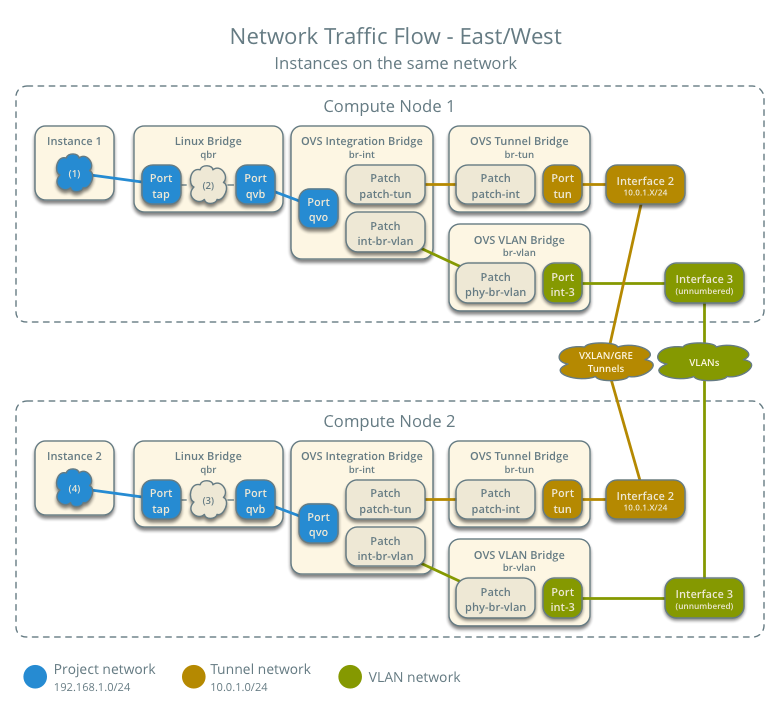
东西网络:虚拟机之间通信
案例1:南北网络、实例对应一个固定的IP地址
案例2:南北网络,实例对应一个浮动IP地址
案例3:东西网络,实例在不同的网络上
案例4:东西网络、实例在同一网络
四、安装配置
(一)controller节点
1、安装组件
# yum install openstack-neutron openstack-neutron-ml2 python-neutronclient which
2、配置服务器组件
编辑 /etc/neutron/neutron.conf文件,并完成以下动作:
在[数据库]节中,配置数据库访问:
[database]
connection = mysql+pymysql://neutron:NEUTRON_DBPASS@controller/neutron
替换 NEUTRON_DBPASS为你的密码
在[默认的]部分
[DEFAULT]
core_plugin = ml2
service_plugins = router
allow_overlapping_ips = True
在[默认的]和[oslo_messaging_rabbit]部分,配置RabbitMQ消息队列访问:
[DEFAULT]
rpc_backend = rabbit
[oslo_messaging_rabbit]
rabbit_host = controller
rabbit_userid = openstack
rabbit_password = RABBIT_PASS
替换 RABBIT_PASS为你的密码
在[默认的]和[keystone_authtoken]部分,配置身份服务访问:
[DEFAULT]
auth_strategy = keystone
[keystone_authtoken]
auth_uri = http://controller:5000
auth_url = http://controller:35357
memcached_servers = controller:11211
auth_type = password
project_domain_name = default
user_domain_name = default
project_name = service
username = neutron
password = NEUTRON_PASS
替换NEUTRON_PASS为你的密码
Note请注意
注释掉或删除任何其他选项 [keystone_authtoken]部分。
在[默认的]和[nova]部分,配置网络通知计算网络拓扑变化:
[DEFAULT]
notify_nova_on_port_status_changes = True
notify_nova_on_port_data_changes = True
[nova]
auth_url = http://controller:35357
auth_type = password
project_domain_name = default
user_domain_name = default
region_name = RegionOne
project_name = service
username = nova
password = NOVA_PASS
替换 NOVA_PASS 为你的密码
在[oslo_concurrency]节中,配置锁路径:
[oslo_concurrency]
lock_path = /var/lib/neutron/tmp
3、编辑/etc/neutron/plugins/ml2/ml2_conf.ini文件
在[ml2]部分,使平、VLAN和VXLAN网络:
[ml2]
type_drivers = flat,vlan,vxlan
在[ml2]部分,使VXLAN自助服务网络:
[ml2]
tenant_network_types = vxlan
在[ml2]部分
[ml2]
mechanism_drivers = openvswitch,l2population
在[ml2]部分,启用端口安全
[ml2]
extension_drivers = port_security
在[ml2_type_flat]部分,虚拟网络配置提供者平面网络:
[ml2_type_flat]
flat_networks = provider
在[ml2_type_vxlan]部分,配置VXLAN网络标识符范围自助服务网络:
[ml2_type_vxlan]
vni_ranges = 1:1000
在[securitygroup]部分,使ipset提高效率的安全组规则:
[securitygroup]
enable_ipset = True
编辑/etc/nova/nova.conf文件和执行以下操作:
在[nova]节中,配置访问参数,使元数据代理
[neutron]
url = http://controller:9696
auth_url = http://controller:35357
auth_type = password
project_domain_name = default
user_domain_name = default
region_name = RegionOne
project_name = service
username = neutron
password = NEUTRON_PASS
service_metadata_proxy = True
4、创建链接
ln -s /etc/neutron/plugins/ml2/ml2_conf.ini /etc/neutron/plugin.ini
5、同步数据库
su -s /bin/sh -c "neutron-db-manage --config-file /etc/neutron/neutron.conf --config-file /etc/neutron/plugins/ml2/ml2_conf.ini upgrade head" neutron
6、重启nova服务
systemctl restart openstack-nova-api.service
7、启动neutron服务
# systemctl enable neutron-server.service
# systemctl start neutron-server.service
(二)网络节点
1. 编辑 /etc/sysctl.conf
net.ipv4.conf.all.rp_filter=0
net.ipv4.conf.default.rp_filter=0
2.执行下列命令,立即生效
# sysctl -p
3.安装软件包
# yum install openstack-neutron openstack-neutron-ml2 openstack-neutron-openvswitch
4.配置组件
编辑/etc/neutron/neutron.conf文件,并完成以下动作:
在[数据库]节中,删除配置数据库访问:
在[默认的]部分,使模块化层2)中打开(名为ML2插件,路由器的服务,和重叠的IP地址:
[DEFAULT]
core_plugin = ml2
service_plugins = router
allow_overlapping_ips = True
在[默认的]和[oslo_messaging_rabbit]部分,配置RabbitMQ消息队列访问:
[DEFAULT]
rpc_backend = rabbit
[oslo_messaging_rabbit]
rabbit_host = controller
rabbit_userid = openstack
rabbit_password = RABBIT_PASS
替换 RABBIT_PASS 为你的密码
在[默认的]和[keystone_authtoken]部分,配置身份服务访问:
[DEFAULT]
auth_strategy = keystone
[keystone_authtoken]
auth_uri = http://controller:5000
auth_url = http://controller:35357
memcached_servers = controller:11211
auth_type = password
project_domain_name = default
user_domain_name = default
project_name = service
username = neutron
password = NEUTRON_PASS
替换 NEUTRON_PASS为你的密码
Note请注意
注释掉或删除任何其他选项 [keystone_authtoken]部分。
在[oslo_concurrency]节中,配置锁路径:
[oslo_concurrency]
lock_path = /var/lib/neutron/tmp
5、编辑/etc/neutron/plugins/ml2/ml2_conf.ini文件
在[ml2]部分,使平、VLAN和VXLAN网络:
[ml2]
type_drivers = flat,vlan,vxlan
在[ml2]部分,使VXLAN自助服务网络:
[ml2]
tenant_network_types = vxlan
mechanism_drivers = openvswitch,l2population
extension_drivers = port_security
在[ml2_type_flat]部分,虚拟网络配置提供者平面网络:
[ml2_type_flat]
flat_networks = provider
在[ml2_type_vxlan]部分,配置VXLAN网络标识符范围自助服务网络:
[ml2_type_vxlan]
vni_ranges = 1:1000
在[securitygroup]部分,使ipset提高效率的安全组规则:
[securitygroup]
enable_ipset = True
6、编辑 /etc/neutron/plugins/ml2/openvswitch_agent.ini文件:
[ovs]
local_ip=TUNNEL_INTERFACE_IP_ADDRESS
bridge_mappings=vlan:br-vlan,external:br-ex
[agent]
tunnel_types=gre,vxlan
l2_population=True
prevent_arp_spoofing=True
[securitygroup]
firewall_driver=neutron.agent.linux.iptables_firewall.OVSHybridIptablesFirewallDriver
enable_security_group=True
取代 TUNNEL_INTERFACE_IP_ADDRESS与接口的IP地址处理GRE / VXLAN项目网络。
1. 配置L3代理。编辑 /etc/neutron/l3_agent.ini文件:
[DEFAULT]
interface_driver=neutron.agent.linux.interface.OVSInterfaceDriver
external_network_bridge=
Note请注意
的 external_network_bridge选择故意不包含值。
2. 配置DHCP代理。编辑 /etc/neutron/dhcp_agent.ini文件:
[DEFAULT]
interface_driver=neutron.agent.linux.interface.OVSInterfaceDriver
dhcp_driver=neutron.agent.linux.dhcp.Dnsmasq
enable_isolated_metadata=True
- 配置元数据代理。编辑 /etc/neutron/metadata_agent.ini文件:
[DEFAULT]
nova_metadata_ip=controller
metadata_proxy_shared_secret=METADATA_SECRET
6、创建链接
# ln -s /etc/neutron/plugins/ml2/ml2_conf.ini /etc/neutron/plugin.ini
7、启动服务
创建网桥
# ovs-vsctl add-br br-ex
将网卡加入到网桥中
Neutorn节点上同样有OVS Tunnel bridge br-tun和OVS Integration bridge br-int,多了br-ex来提供外部网络连接,br-ex和物理网卡eth0绑定。这里出现的一个问题是eth0的IP无法ping通,OVS提供的解决方法如下。究其原因,一块物理以太网卡如果作为 OpenvSwitch bridge 的一部分,则它不能拥有 IP 地址,如果有,也会完全不起作用。如果发生了上述情况,可以将 IP 地址绑定至某 OpenvSwitch “internal” 设备来恢复网络访问功能。
ifconfig eth0 0.0.0.0
ifconfig br-ex 192.168.1.19
# ovs-vsctl add-port br-ex INTERFACE_NAME
# systemctl restart openstack-nova-api.service
# systemctl start neutron-openvswitch-agent.service neutron-l3-agent.
service neutron-dhcp-agent.service neutron-metadata-agent.service
# systemctl enable neutron-openvswitch-agent.service neutron-l3-agent.
service neutron-dhcp-agent.service neutron-metadata-agent.service
(三)计算节点
1. 编辑 /etc/sysctl.conf
net.ipv4.conf.all.rp_filter=0
net.ipv4.conf.default.rp_filter=0
net.bridge.bridge-nf-call-iptables=1
net.bridge.bridge-nf-call-ip6tables=1
2.执行下列命令,立即生效
# sysctl -p
3.安装软件包
# yum install openstack-neutron openstack-neutron-ml2 openstack-neutron-openvswitch
4.编辑 /etc/neutron/neutron.conf文件,并完成以下动作:
• 在 [数据库]节中,注释掉 连接选项,因为计算节点不直接访问数据库。
• 在 [默认的]和 [oslo_messaging_rabbit]部分,配置RabbitMQ消息队列访问:
[DEFAULT]
rpc_backend = rabbit
[oslo_messaging_rabbit]
rabbit_host = controller
rabbit_userid = openstack
rabbit_password = RABBIT_PASS
替换 RABBIT_PASS为你的密码
• 在 [默认的]和 [keystone_authtoken]部分,配置身份服务访问:
[DEFAULT]
auth_strategy = keystone
[keystone_authtoken]
auth_uri = http://controller:5000
auth_url = http://controller:35357
memcached_servers = controller:11211
auth_type = password
project_domain_name = default
user_domain_name = default
project_name = service
username = neutron
password = NEUTRON_PASS
替换 NEUTRON_PASS为你的密码
Note请注意
注释掉或删除任何其他选项 [keystone_authtoken]部分。
• 在 [oslo_concurrency]节中,配置锁路径:
[oslo_concurrency]
lock_path = /var/lib/neutron/tmp
5.编辑 /etc/neutron/plugins/ml2/openvswitch_agent.ini
[ovs]
local_ip = TUNNEL_INTERFACE_IP_ADDRESS
bridge_mappings = vlan:br-vlan
[agent]
tunnel_types = gre,vxlan
l2_population = True
prevent_arp_spoofing = True
[securitygroup]
firewall_driver = neutron.agent.linux.iptables_firewall.OVSHybridIptablesFirewallDriver
enable_security_group = True
6.编辑/etc/neutron/plugins/ml2/ml2_conf.ini文件
在[ml2]部分,使平、VLAN和VXLAN网络:
[ml2]
type_drivers = flat,vlan,vxlan
在[ml2]部分,使VXLAN自助服务网络:
[ml2]
tenant_network_types = vxlan
在[ml2]部分,使Linux桥和2层人口机制:
[ml2]
mechanism_drivers = openvswitch,l2population
在[ml2]部分,启用端口安全扩展司机:
[ml2]
extension_drivers = port_security
在[ml2_type_flat]部分,虚拟网络配置提供者平面网络:
[ml2_type_flat]
flat_networks = provider
在[ml2_type_vxlan]部分,配置VXLAN网络标识符范围自助服务网络:
[ml2_type_vxlan]
vni_ranges = 1:1000
在[securitygroup]部分,使ipset提高效率的安全组规则:
[securitygroup]
enable_ipset = True
配置nova配置文件
•7编辑 /etc/nova/nova.conf文件,并完成以下动作:
o 在 [neutron]节中,配置访问参数:
[neutron]
url = http://controller:9696
auth_url = http://controller:35357
auth_type = password
project_domain_name = default
user_domain_name = default
region_name = RegionOne
project_name = service
username = neutron
password = NEUTRON_PASS
替换 NEUTRON_PASS为你的密码
8.启动服务
# systemctl enable neutron-openvswitch-agent.service
# systemctl start neutron-openvswitch-agent.service
# systemctl restart openstack-nova-compute.service
参考:
http://docs.openstack.org/mitaka/networking-guide/scenario-classic-ovs.html
http://docs.openstack.org/mitaka/install-guide-rdo/neutron-verify.html
http://www.cnblogs.com/sammyliu/p/4201721.html


 1462
1462


 被折叠的 条评论
为什么被折叠?
被折叠的 条评论
为什么被折叠?
 到【灌水乐园】发言


