


为了保障文章的流畅性(文章穿插大量的环境搭建没意思,会干扰文章的主题,无聊的很),将环境的搭建与测试,工具的版本说明放了文末: 四、环境搭建。
一、概述
1.1、官网
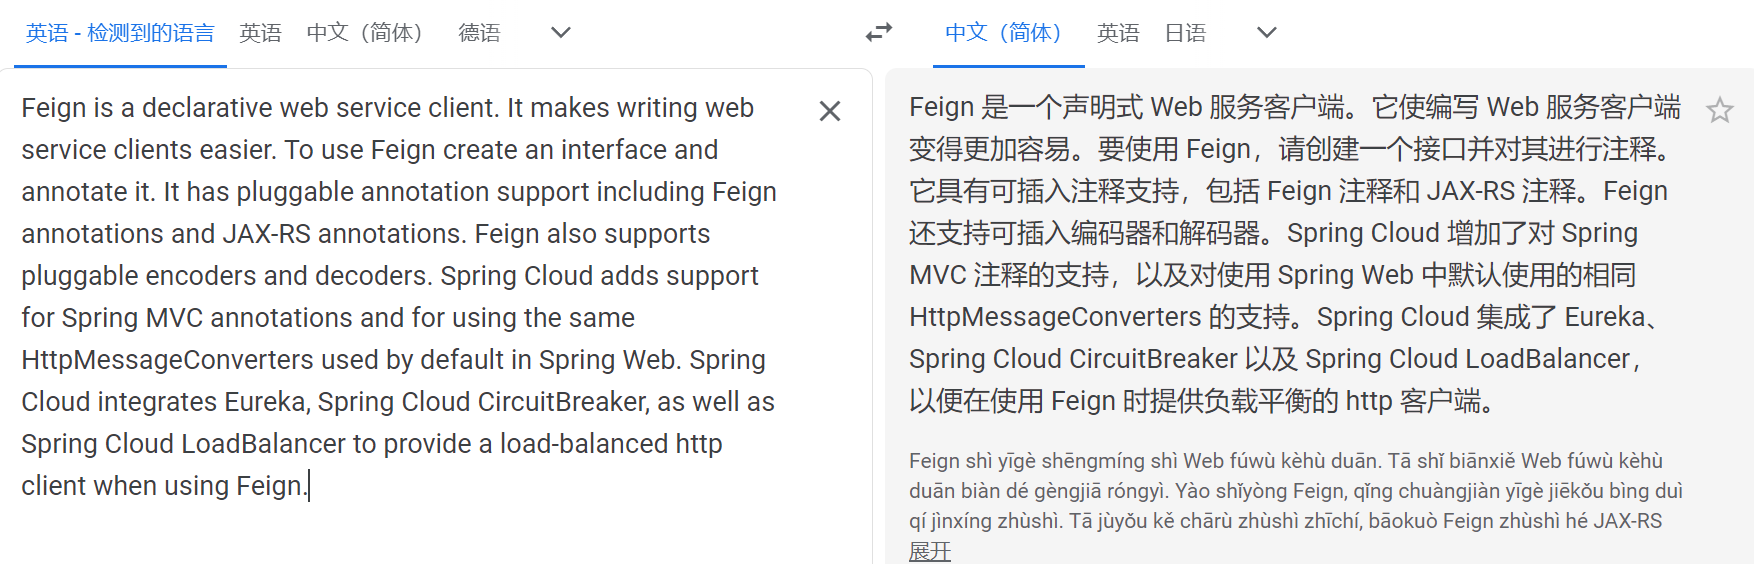
Feign 是一个声明式 Web 服务客户端。它使编写 Web 服务客户端变得更加容易。要使用 Feign,请创建一个接口并对其进行注释。它具有可插入注释支持,包括 Feign 注释和 JAX-RS 注释。Feign 还支持可插入编码器和解码器。Spring Cloud 增加了对 Spring MVC 注释的支持,以及对使用 Spring Web 中默认使用的相同 HttpMessageConverters 的支持。Spring Cloud 集成了 Eureka、Spring Cloud CircuitBreaker 以及 Spring Cloud LoadBalancer,以便在使用 Feign 时提供负载平衡的 http 客户端。
https://docs.spring.io/spring-cloud-openfeign/docs/current/reference/html/#spring-cloud-feign

GItHub:
https://github.com/OpenFeign/feign
1.2、使用
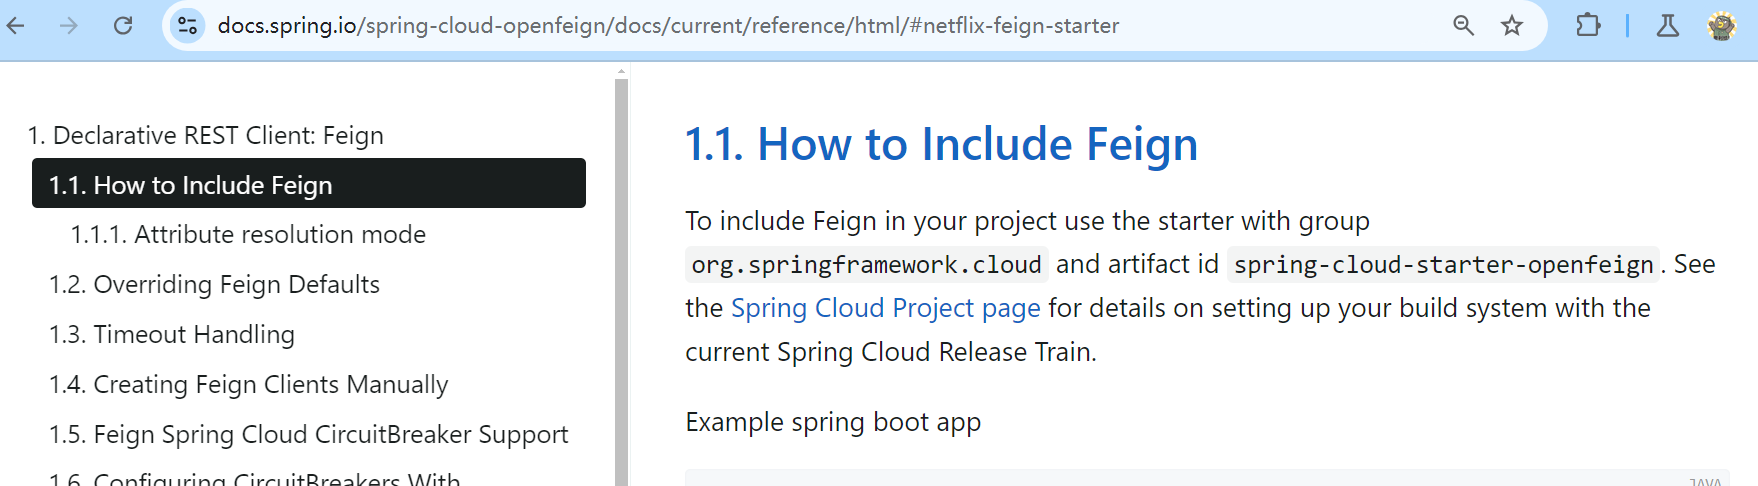
https://docs.spring.io/spring-cloud-openfeign/docs/current/reference/html/#netflix-feign-starter
@SpringBootApplication
@EnableFeignClients
public class Application {

    public static void main(String[] args) {
        SpringApplication.run(Application.class, args);
    }

}
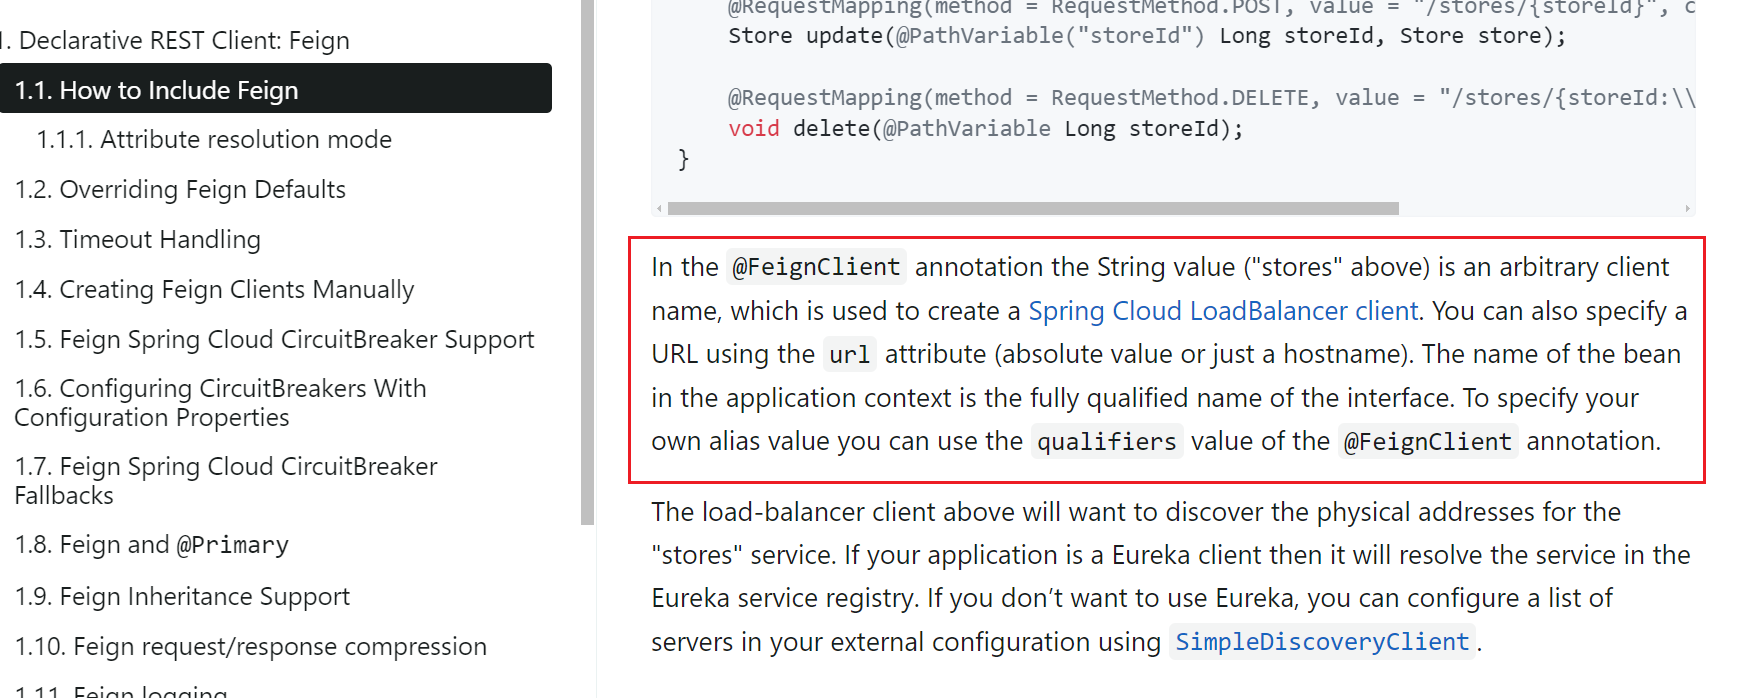
@FeignClient("stores")
public interface StoreClient {
    @RequestMapping(method = RequestMethod.GET, value = "/stores")
    List<Store> getStores();

    @RequestMapping(method = RequestMethod.GET, value = "/stores")
    Page<Store> getStores(Pageable pageable);

    @RequestMapping(method = RequestMethod.POST, value = "/stores/{storeId}", consumes = "application/json")
    Store update(@PathVariable("storeId") Long storeId, Store store);

    @RequestMapping(method = RequestMethod.DELETE, value = "/stores/{storeId:\\d+}")
    void delete(@PathVariable Long storeId);
}
翻译如下:
在 @FeignClient 注释中,字符串值(上面的“stores”)是任意客户端名称,用于创建 Spring Cloud LoadBalancer 客户端。您还可以使用 url 属性指定 URL(绝对值或仅主机名)。应用程序上下文中的 bean 名称是接口的完全限定名称。要指定您自己的别名值,您可以使用 @FeignClient 注释的限定符值。
总结:
openfeign是一个声明式的Web服务客户端,只需创建一个Rest接口并在该接口上添加注解@FeignClient即可
1.3、作用
在使用SpringCloud LoadBalancer+RestTemplate时,利用RestTemplate对http请求的封装处理形成了一套模版化的调用方法。但是在实际开发中,
由于对服务依赖的调用可能不止一处,往往一个接口会被多处调用,所以通常都会针对每个微服务自行封装一些客户端类来包装这些依赖服务的调用。所以,OpenFeign在此基础上做了进一步封装,由他来帮助我们定义和实现依赖服务接口的定义。在OpenFeign的实现下,我们只需创建一个接口并使用注解的方式来配置它(在一个微服务接口上面标注一个@FeignClient注解即可),即可完成对服务提供方的接口绑定,统一对外暴露可以被调用的接口方法,大大简化和降低了调用客户端的开发量,也即由服务提供者给出调用接口清单,消费者直接通过OpenFeign调用即可。
OpenFeign同时还集成SpringCloud LoadBalancer,可以在使用OpenFeign时提供Http客户端的负载均衡,也可以集成阿里巴巴Sentinel来提供熔断、降级等功能。而与SpringCloud LoadBalancer不同的是,通过OpenFeign只需要定义服务绑定接口且以声明式的方法,优雅而简单的实现了服务调用。
总结:
- 可插拔的注解支持,包括Feign注解和JAX-RS注解
- 支持可插拔的HTTP编码器和解码器
- 支持Sentinel和它的Fallback
- 支持SpringCloudLoadBalancer的负载均衡
- 支持HTTP请求和响应的压缩
二、实战:基本使用
2.1、消费者端
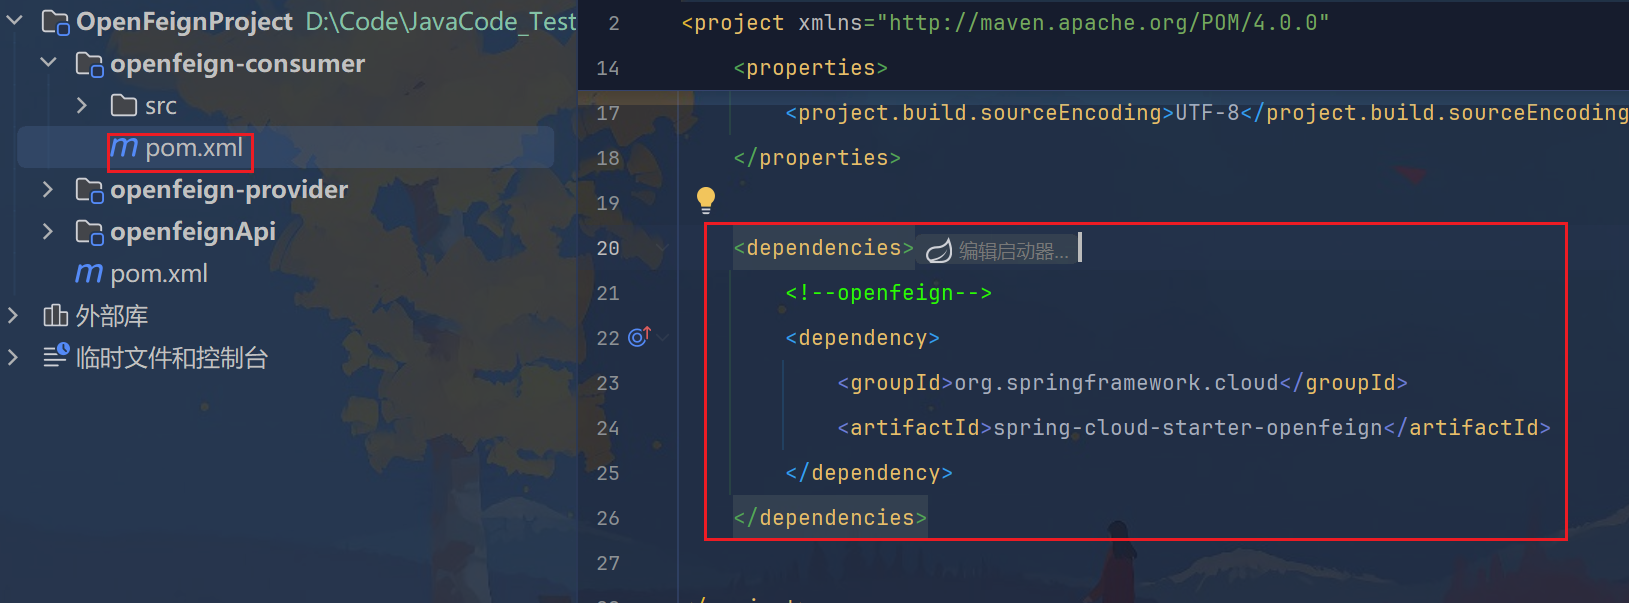
2.1.1、改POM
    <dependencies>
        <!--openfeign-->
        <dependency>
            <groupId>org.springframework.cloud</groupId>
            <artifactId>spring-cloud-starter-openfeign</artifactId>
        </dependency>
    </dependencies>
2.1.2、主启动
2.2、OpenFeign端
2.2.1、改POM
<dependencies>
        <!--openfeign-->
        <dependency>
            <groupId>org.springframework.cloud</groupId>
            <artifactId>spring-cloud-starter-openfeign</artifactId>
        </dependency>
    </dependencies>
2.2.2、写代码
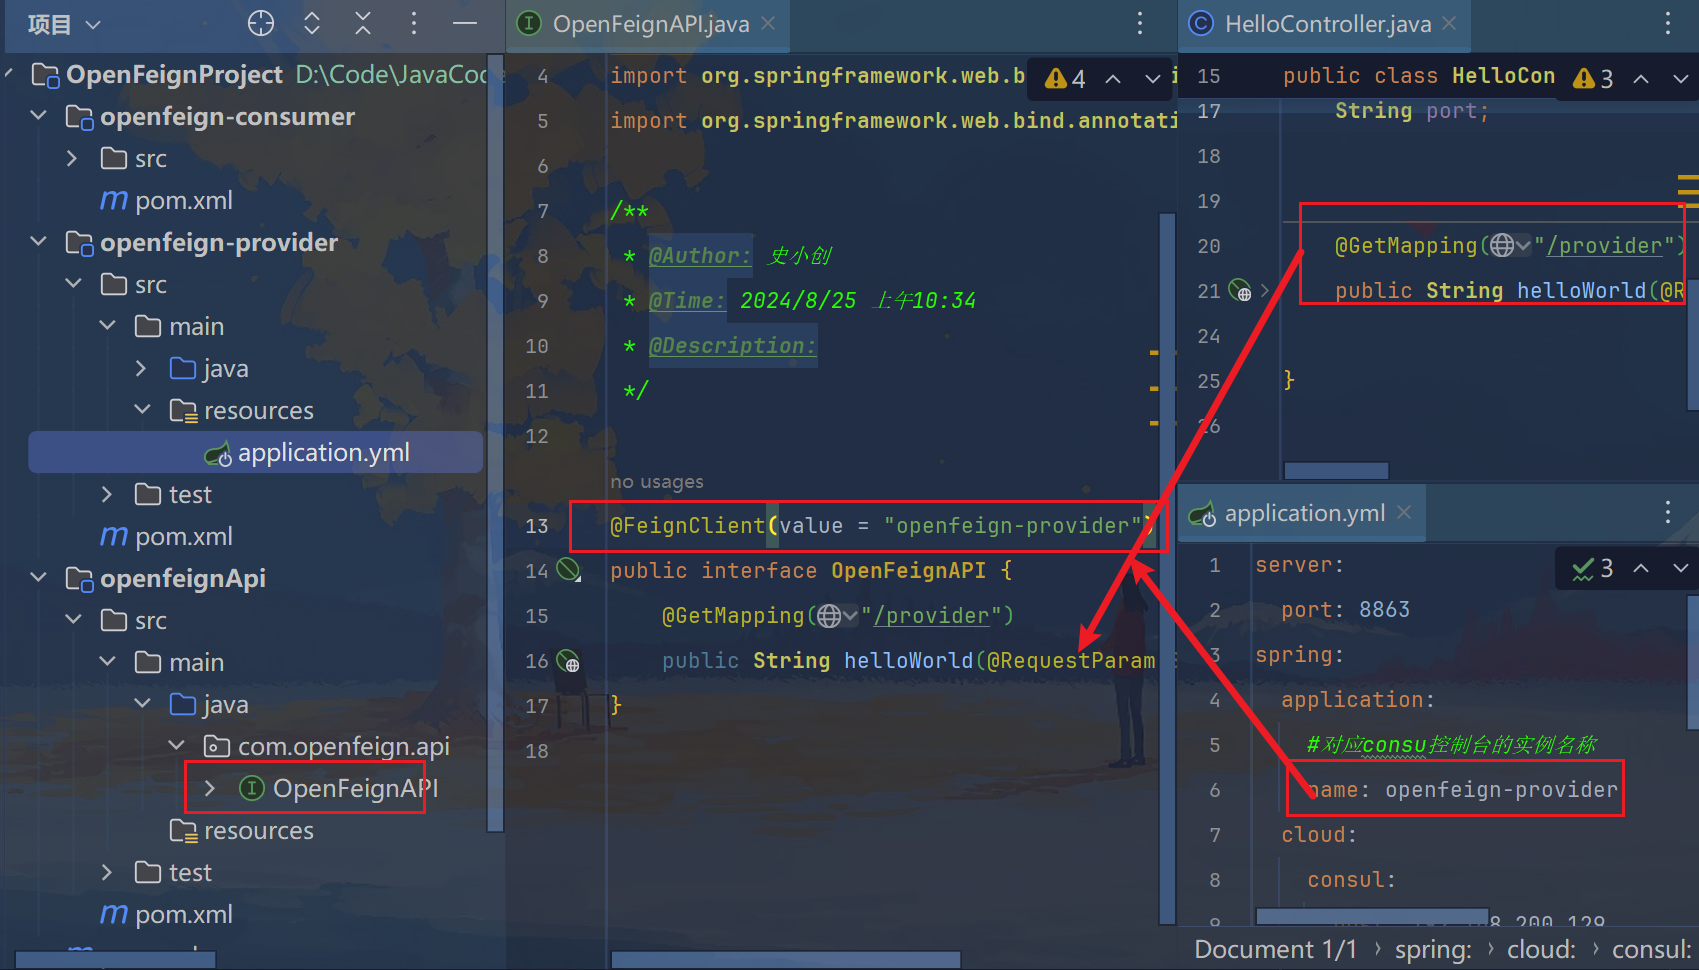
package com.openfeign.api;

import org.springframework.cloud.openfeign.FeignClient;
import org.springframework.web.bind.annotation.GetMapping;
import org.springframework.web.bind.annotation.RequestParam;

/**
 * @Author: 史小创
 * @Time: 2024/8/25 上午10:34
 * @Description:
 */

@FeignClient(value = "openfeign-provider")
public interface OpenFeignAPI {
    @GetMapping("/provider")
    public String helloWorld(@RequestParam("name") String name);
}
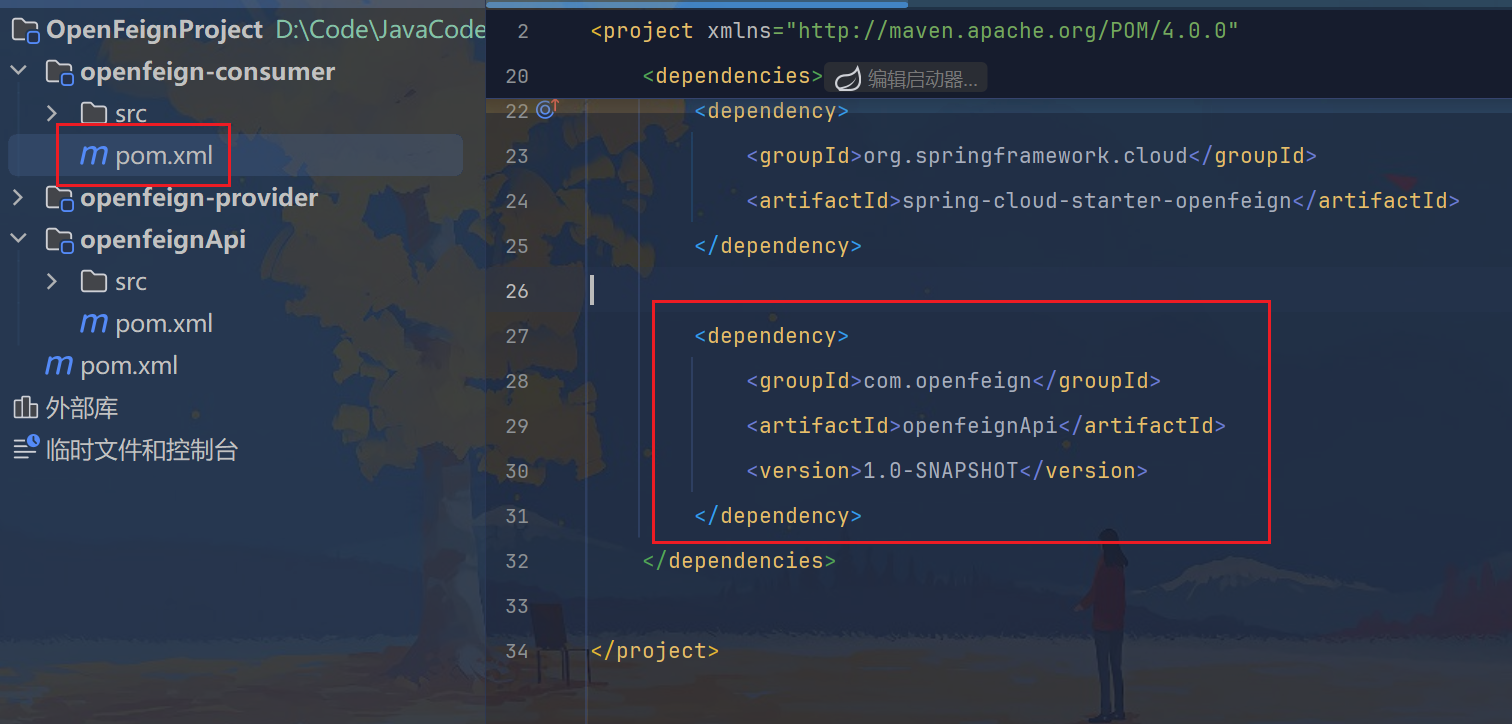
2.3、消费者端
2.3.1、改POM
  <dependency>
            <groupId>com.openfeign</groupId>
            <artifactId>openfeignApi</artifactId>
            <version>1.0-SNAPSHOT</version>
        </dependency>
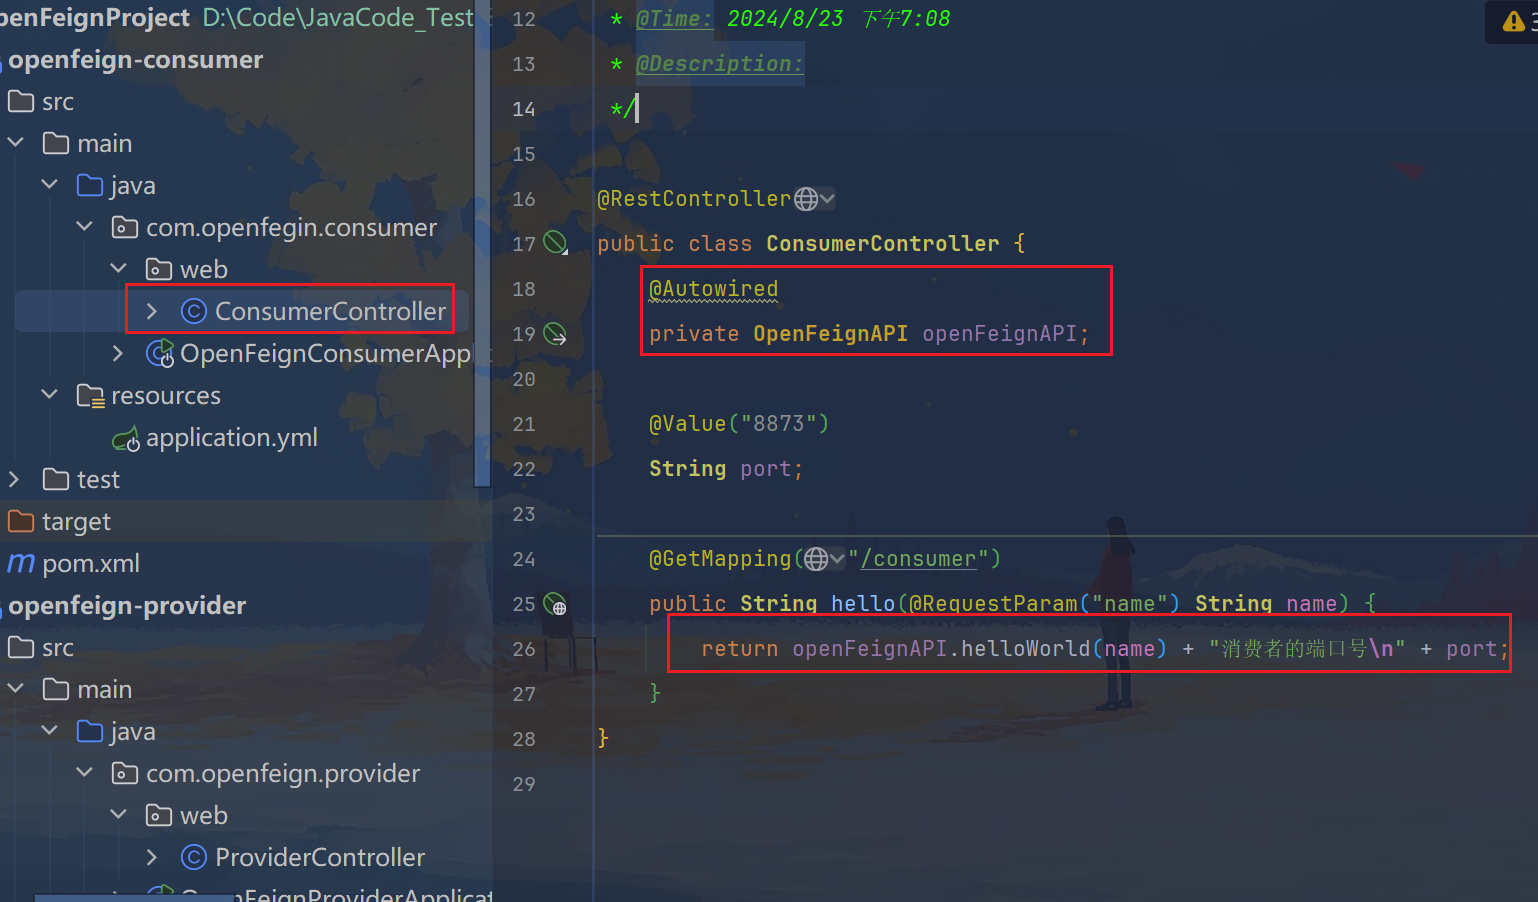
2.3.2、写代码
package com.openfegin.consumer.web;

import com.openfeign.api.OpenFeignAPI;
import org.springframework.beans.factory.annotation.Autowired;
import org.springframework.beans.factory.annotation.Value;
import org.springframework.web.bind.annotation.GetMapping;
import org.springframework.web.bind.annotation.RequestParam;
import org.springframework.web.bind.annotation.RestController;

/**
 * @Author: 史小创
 * @Time: 2024/8/23 下午7:08
 * @Description:
 */

@RestController
public class ConsumerController {
    @Autowired
    private OpenFeignAPI openFeignAPI;

    @Value("${server.port}")
    String port;

    @GetMapping("/consumer")
    public String hello(@RequestParam("name") String name) {
        return openFeignAPI.helloWorld(name) + "消费者的端口号\n" + port;
    }
}
2.4、测试
2.4.1、启动服务提供者
2.4.2、启动服务消费者
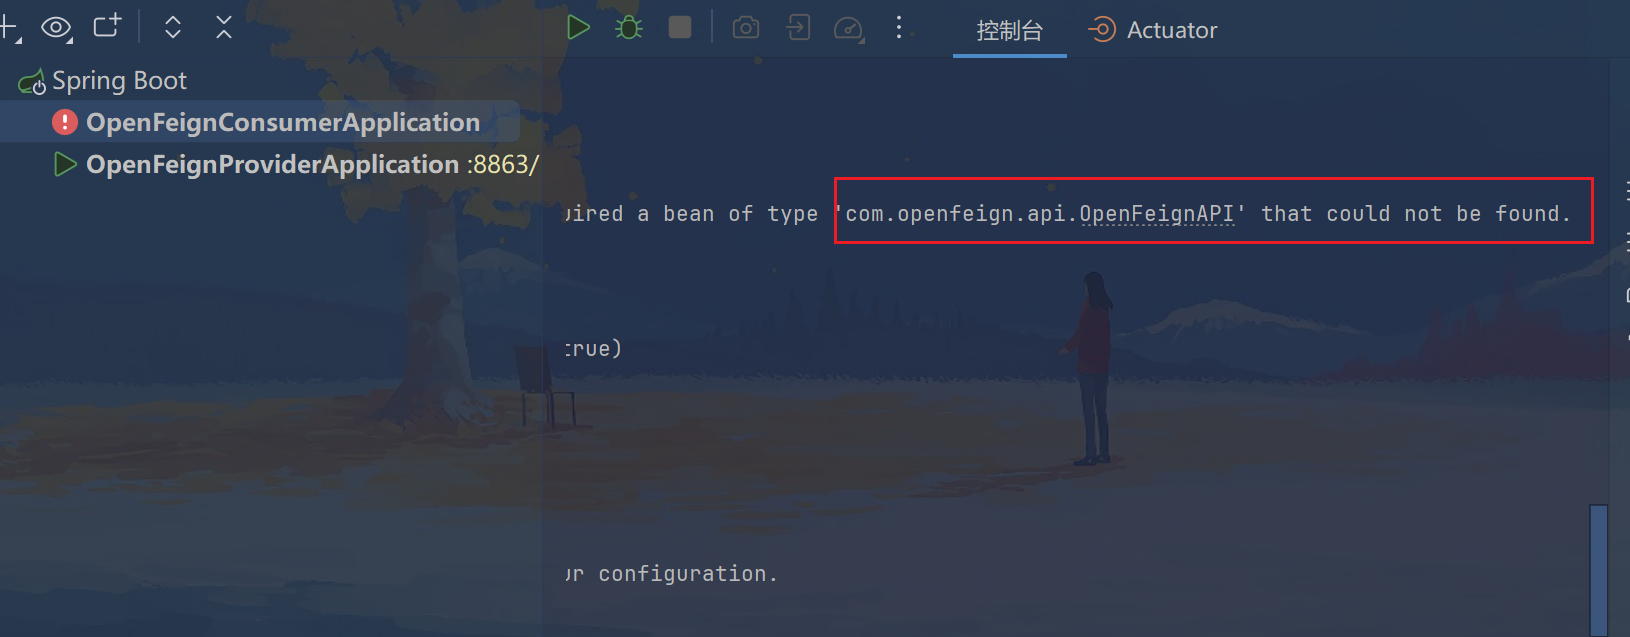
Error starting ApplicationContext. To display the condition evaluation report re-run your application with 'debug' enabled.
2024-08-25T11:24:32.738+08:00 ERROR 3288 --- [openfeign-consumer] [           main] o.s.b.d.LoggingFailureAnalysisReporter   :

***************************
APPLICATION FAILED TO START
***************************

Description:

Field openFeignAPI in com.openfegin.consumer.web.ConsumerController required a bean of type 'com.openfeign.api.OpenFeignAPI' that could not be found.

The injection point has the following annotations:
	- @org.springframework.beans.factory.annotation.Autowired(required=true)


Action:

Consider defining a bean of type 'com.openfeign.api.OpenFeignAPI' in your configuration.
原因:
这是因为OpenFeignAPI现在在com.openfeign.api包下,
而openfeign-consumer的@EnableFeignClients注解是在com.openfegin.consumer包下,不在同一个包,无法扫描OpenFeignAPI。
解决方案:
方式一:
指定Feign应该扫描的包:
@EnableFeignClients(basePackages = "com.openfeign.api")
方式二:
指定需要加载的Feign接口:
@EnableFeignClients(clients = OpenFeignAPI.class)
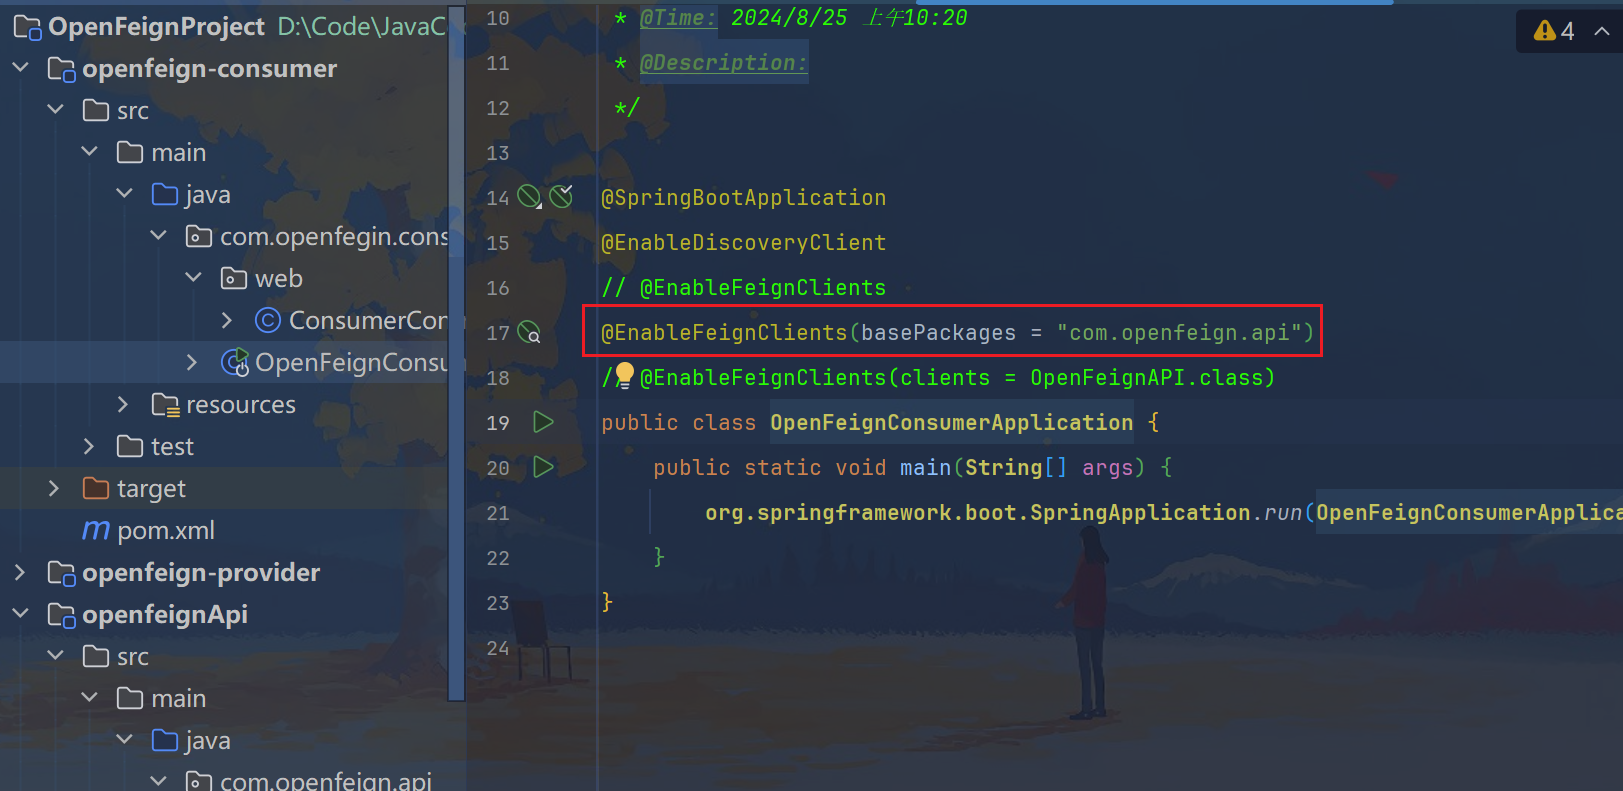
解决之后我们启动消费者
2.4.3、测试
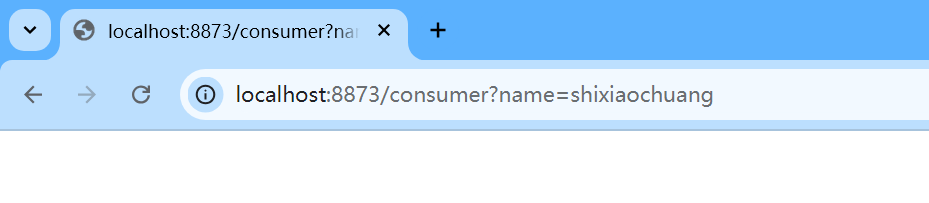
http://localhost:8873/consumer?name=shixiaochuang

2.4.4、OpenFeign默认集成了LoadBalancer
https://docs.spring.io/spring-cloud-openfeign/docs/current/reference/html/#spring-cloud-feign-overriding-defaults
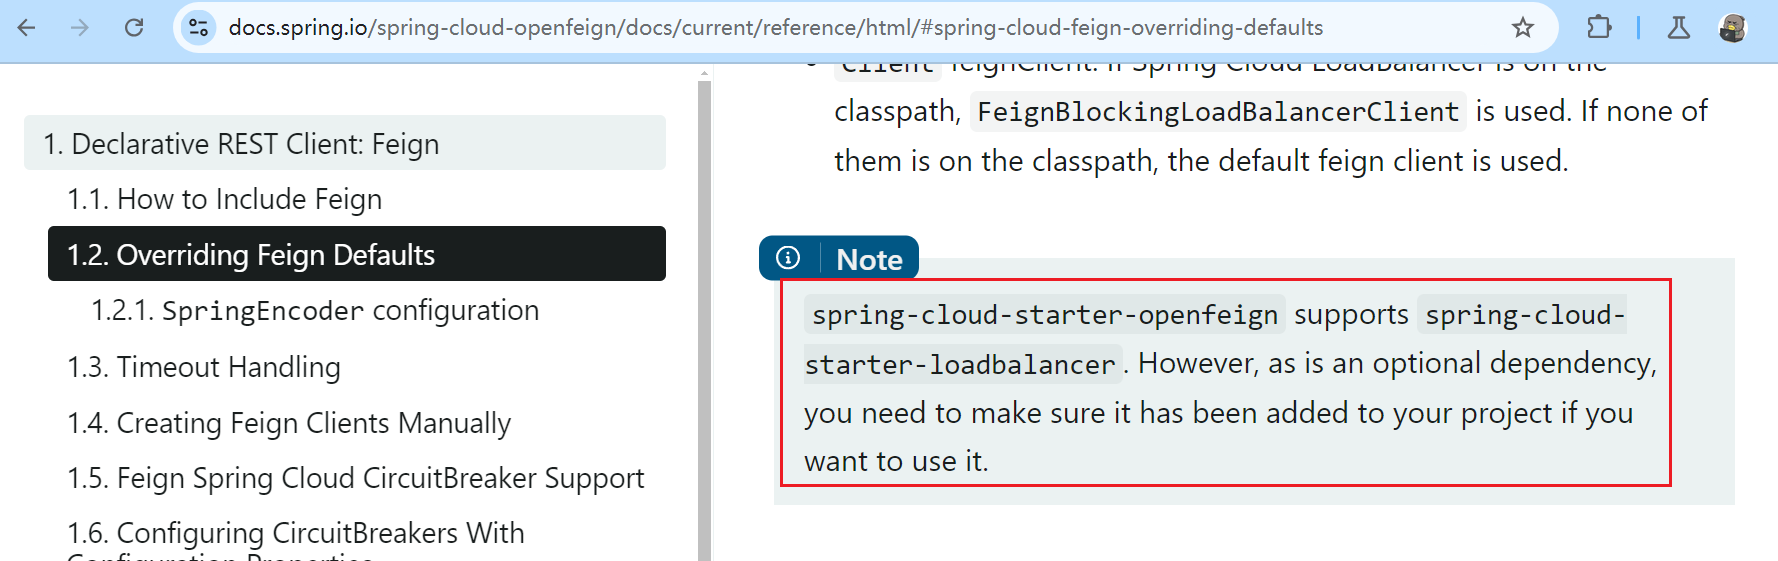
翻译:
spring-cloud-starter-openfeign 支持 spring-cloud-starter-loadbalancer。但是,由于它是可选依赖项,因此如果要使用它,则需要确保已将其添加到项目中。

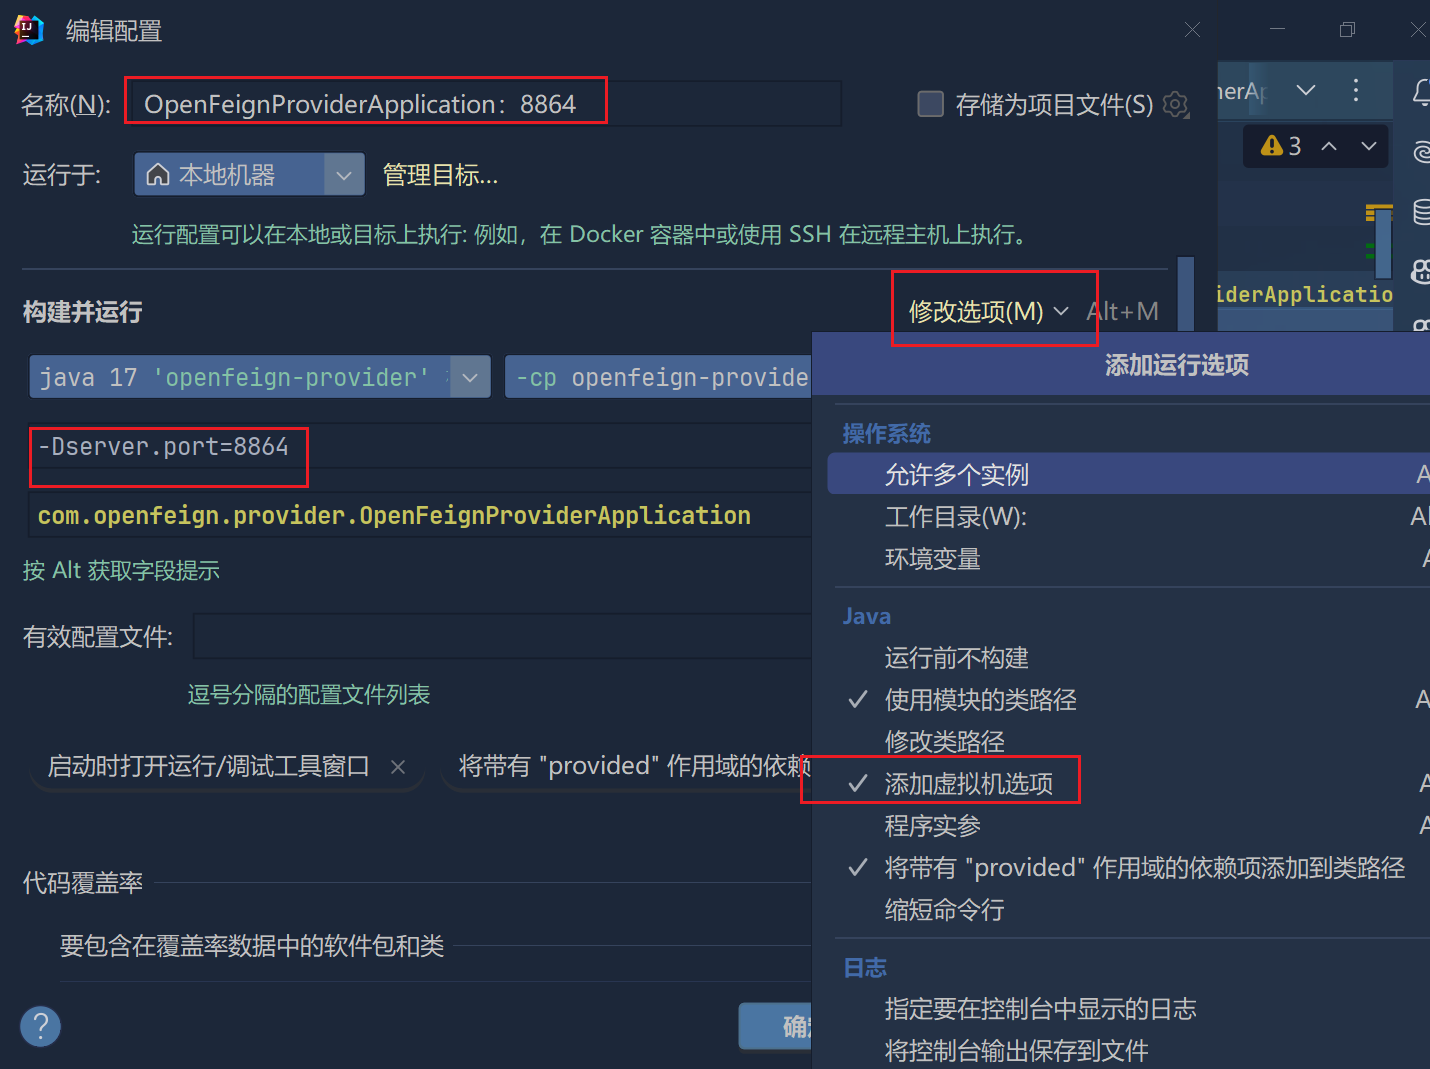
2.4.4.1、克隆服务端
-Dserver.port=8864
2.4.4.2、测试
http://localhost:8873/consumer?name=shixiaochuang

三、实战:高级特性
3.1、超时控制
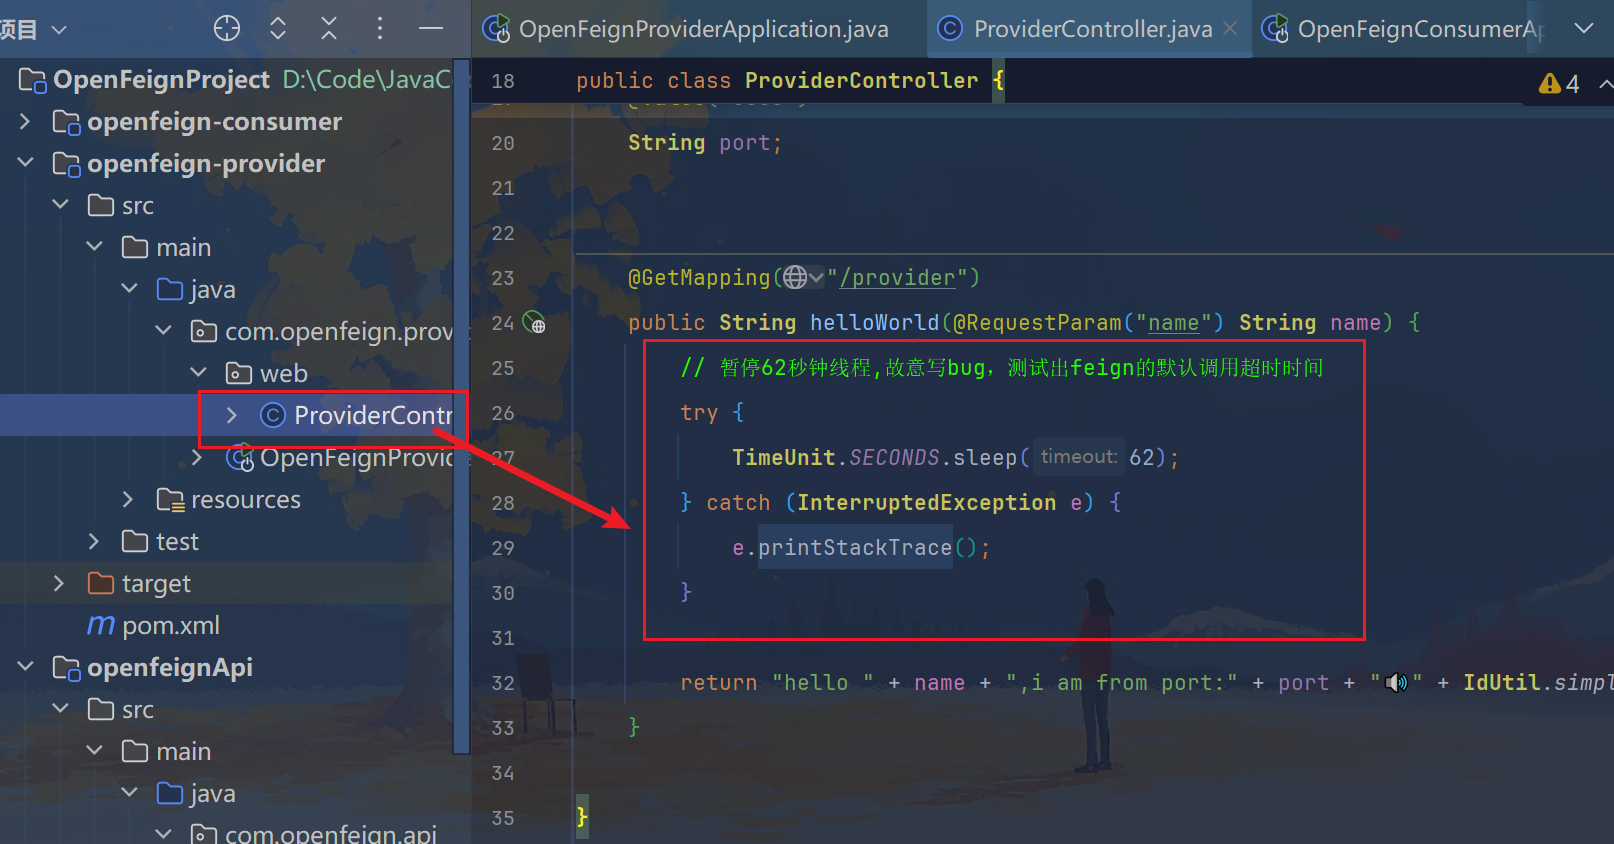
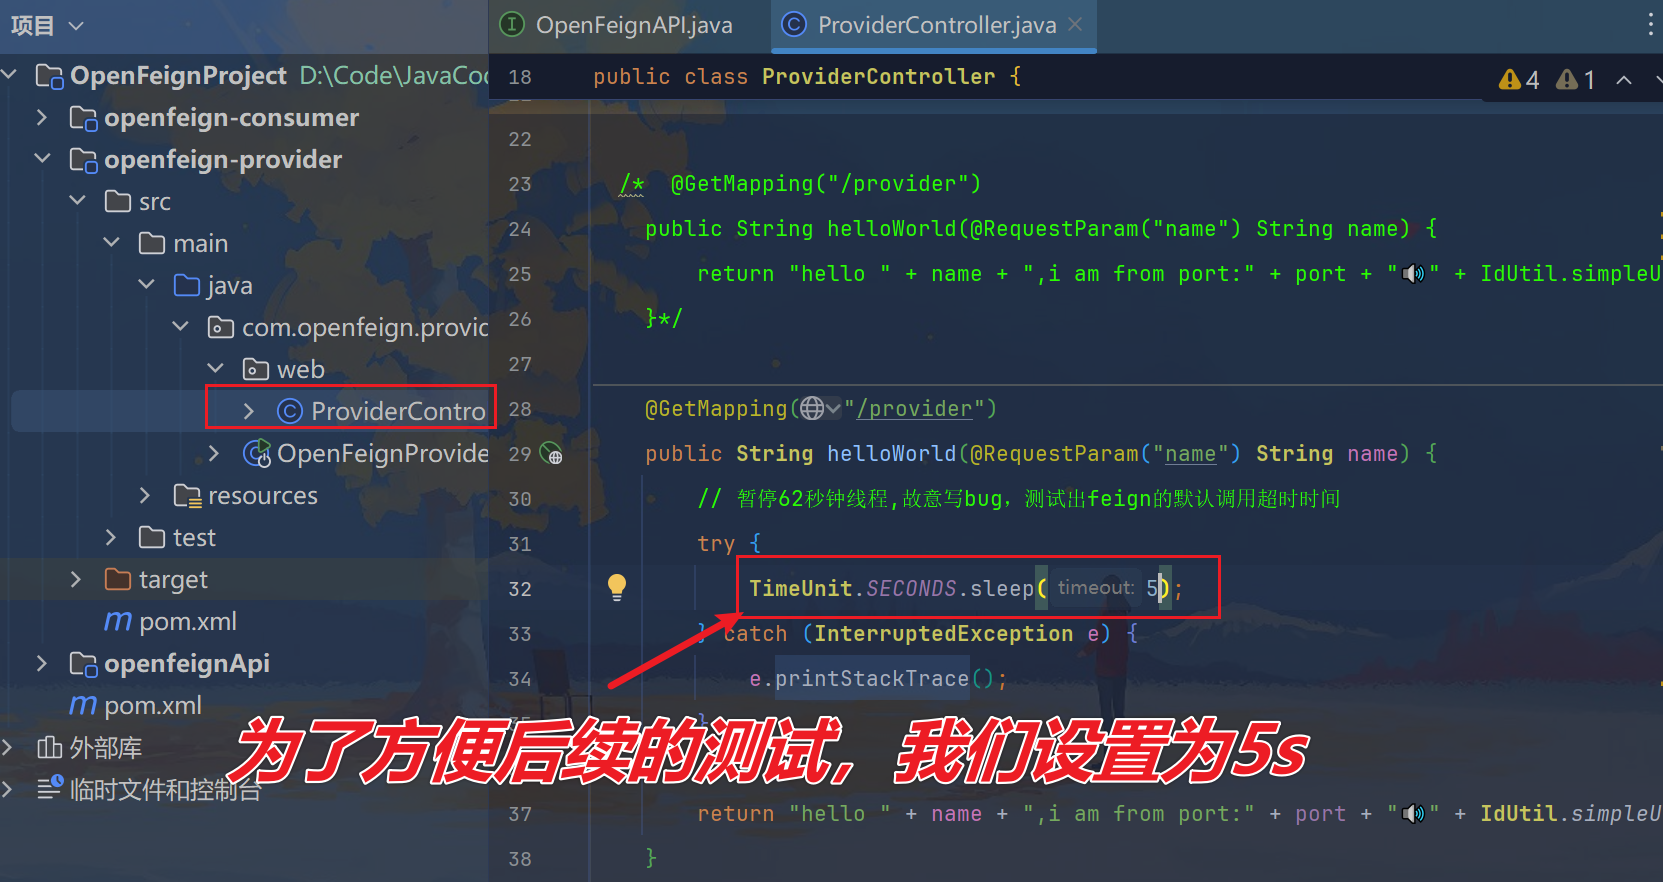
3.1.1、故意设置程序超时
  @GetMapping("/provider")
    public String helloWorld(@RequestParam("name") String name) {
        // 暂停62秒钟线程,故意写bug,测试出feign的默认调用超时时间
        try {
            TimeUnit.SECONDS.sleep(62);
        } catch (InterruptedException e) {
            e.printStackTrace();
        }

        return "hello " + name + ",i am from port:" + port + "🔊" + IdUtil.simpleUUID();
    }
@GetMapping("/consumer")
public String hello(@RequestParam("name") String name) {
String result = null;
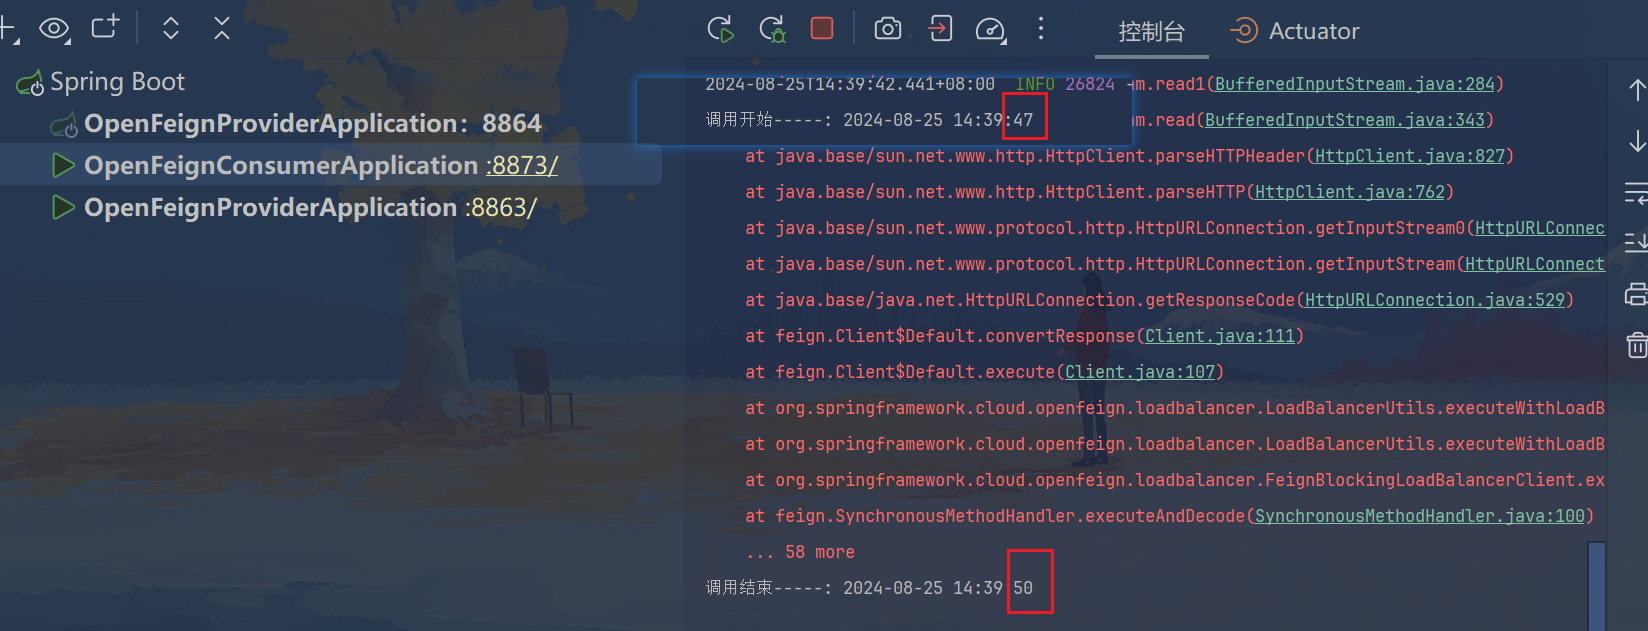
try {
System.out.println("调用开始-----: " + DateUtil.now());
return openFeignAPI.helloWorld(name) + "消费者的端口号\n" + port;
} catch (Exception e) {
e.printStackTrace();
System.out.println("调用结束-----: " + DateUtil.now());
}
return result;
}
3.1.2、测试
http://localhost:8873/consumer?name=shixiaochuang

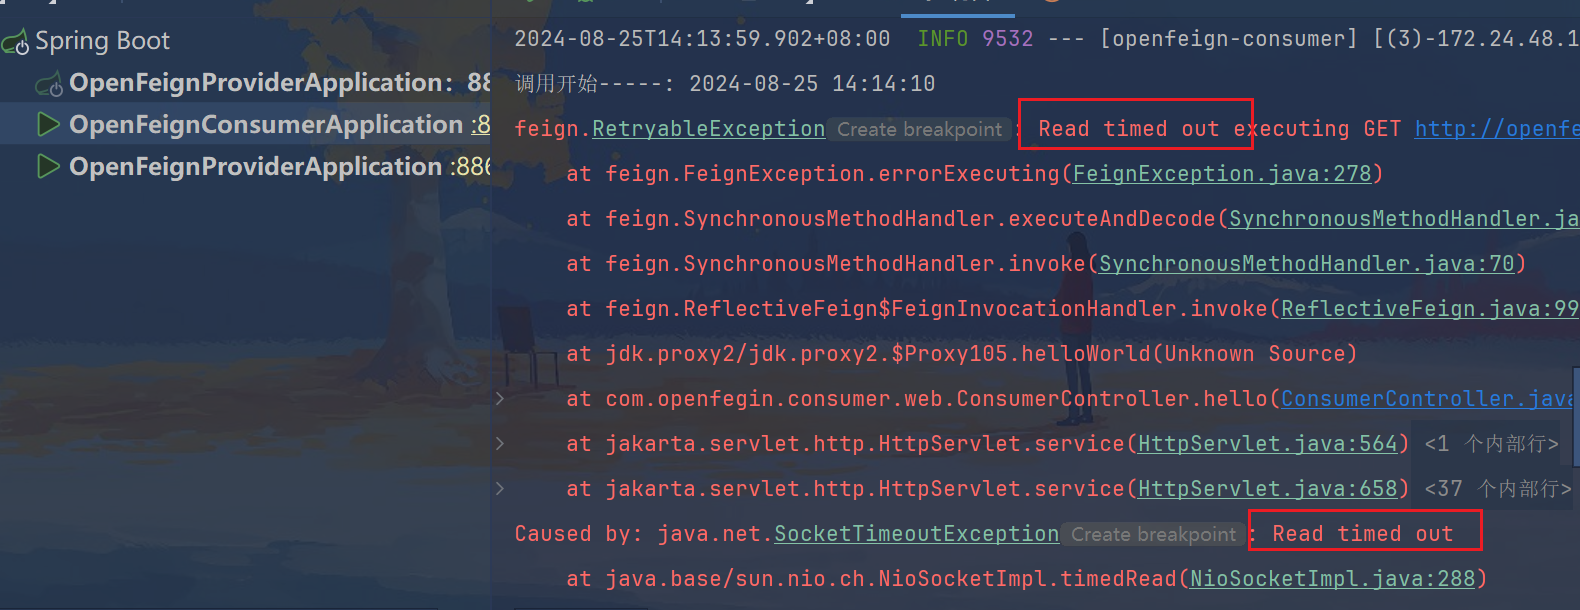
OpenFeign默认等待60秒钟,超过后报错
3.1.3、配置
默认OpenFeign客户端等待60秒钟,但是服务端处理超过规定时间会导致Feign客户端返回报错。
为了避免这样的情况,有时候我们需要设置Feign客户端的超时控制,默认60秒太长或者业务时间太短都不好
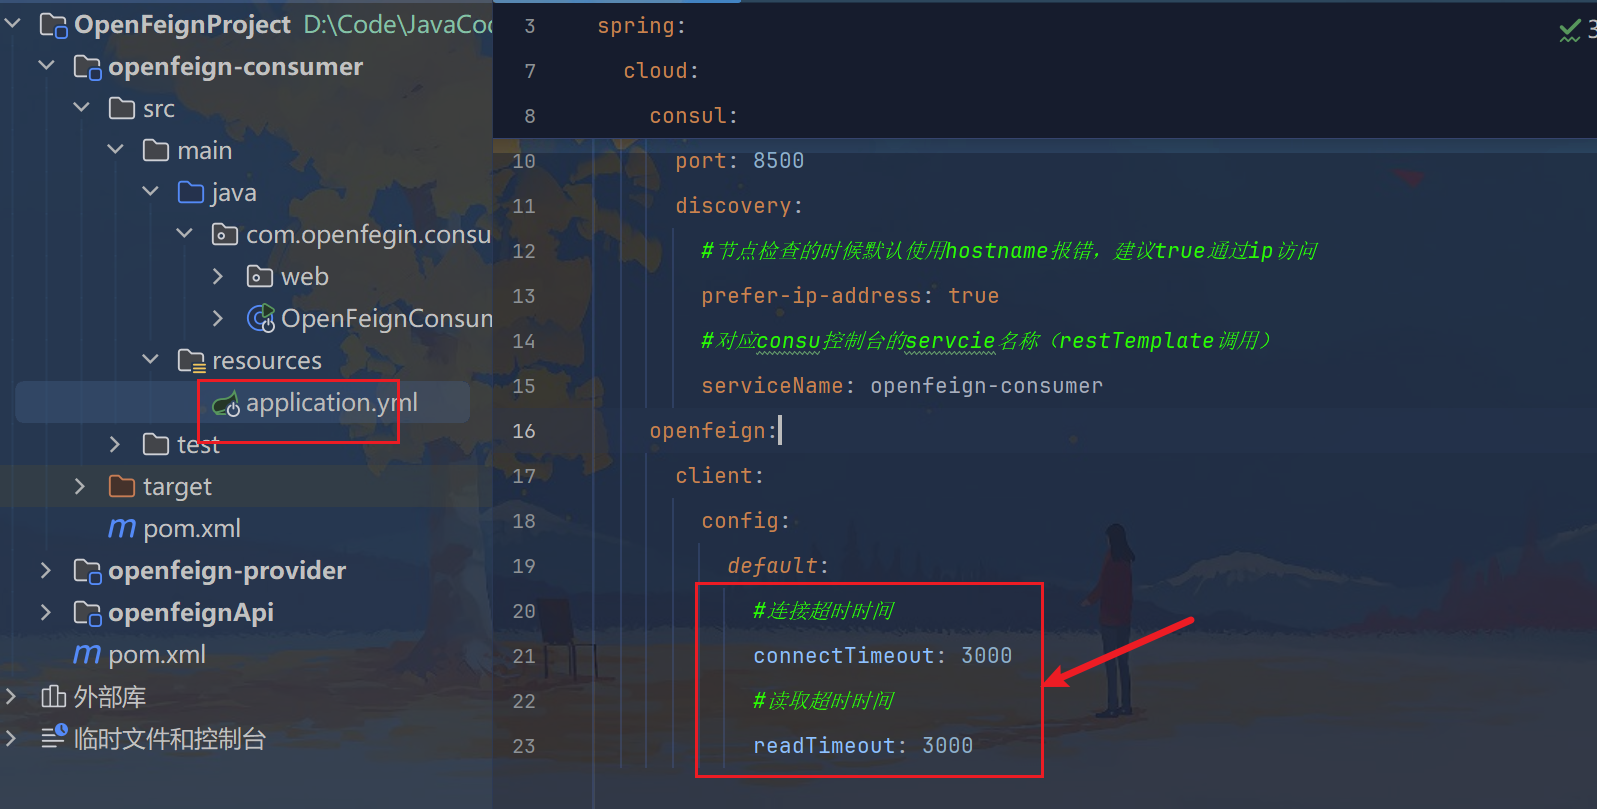
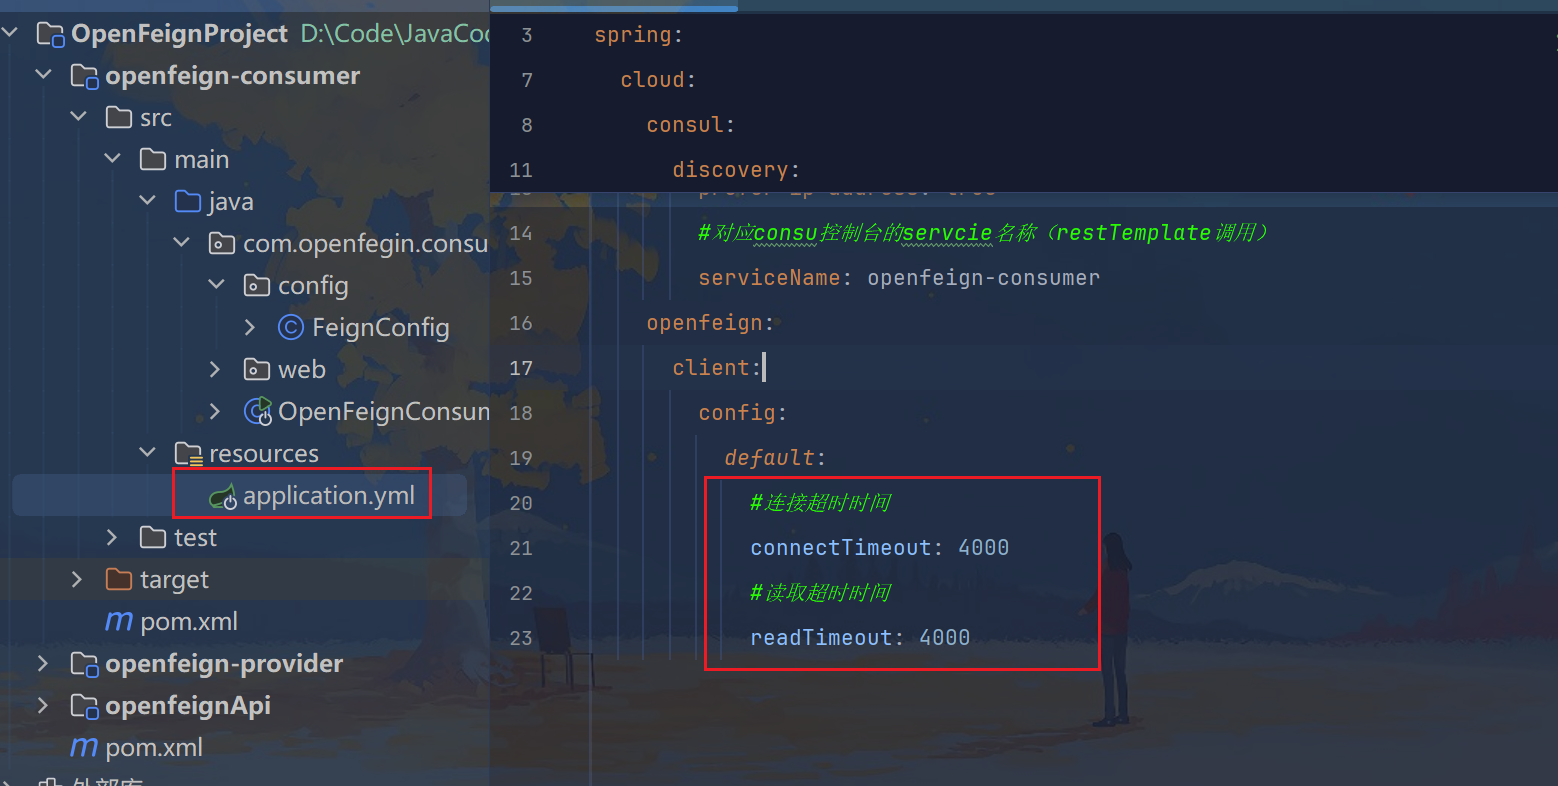
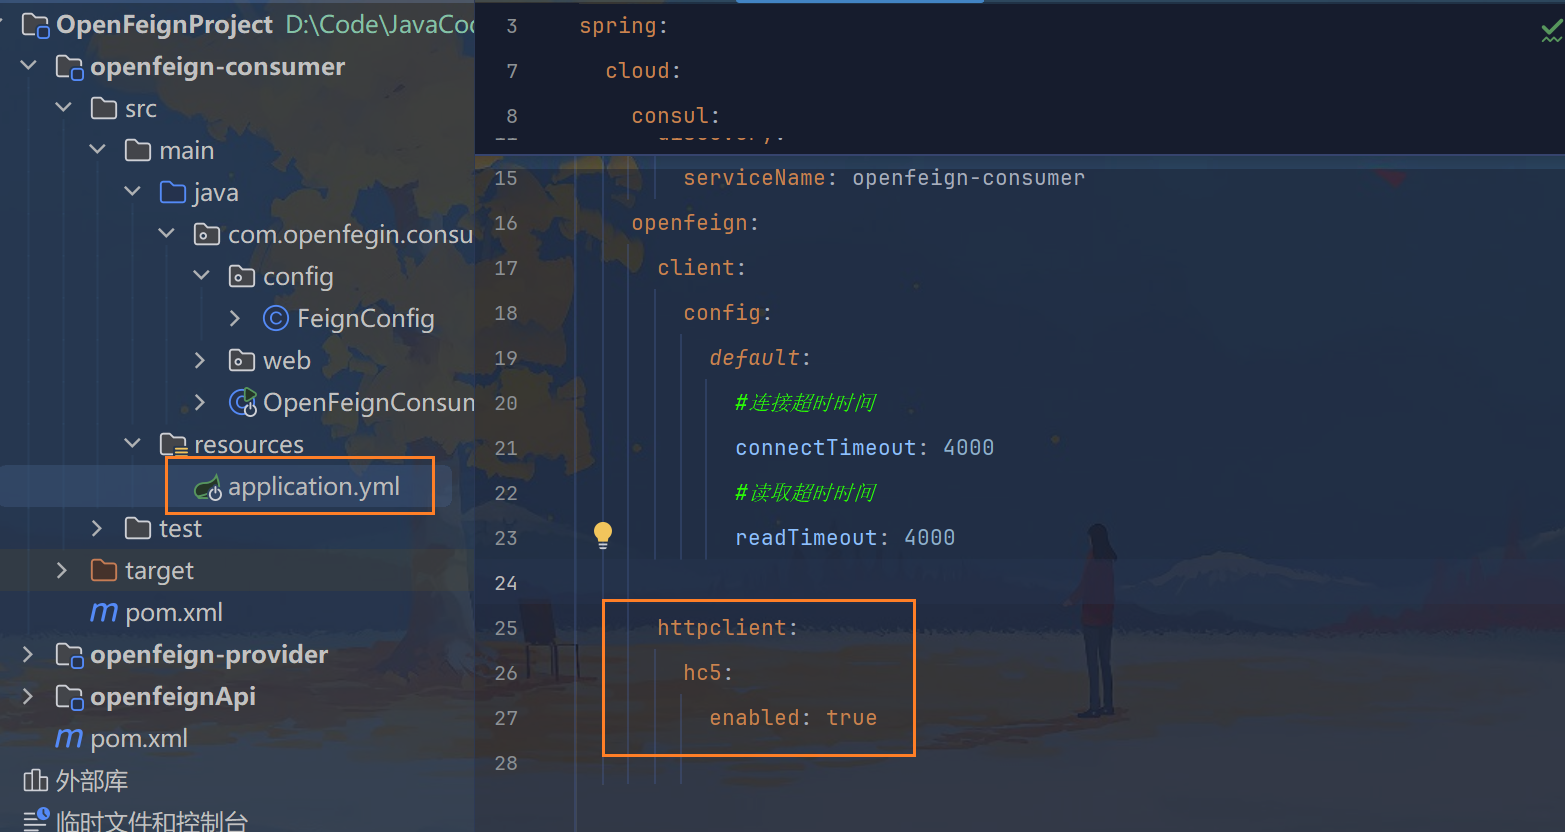
yml文件中开启配置:
connectTimeout 连接超时时间
readTimeout 请求处理超时时间
https://docs.spring.io/spring-cloud-openfeign/docs/current/reference/html/#timeout-handling
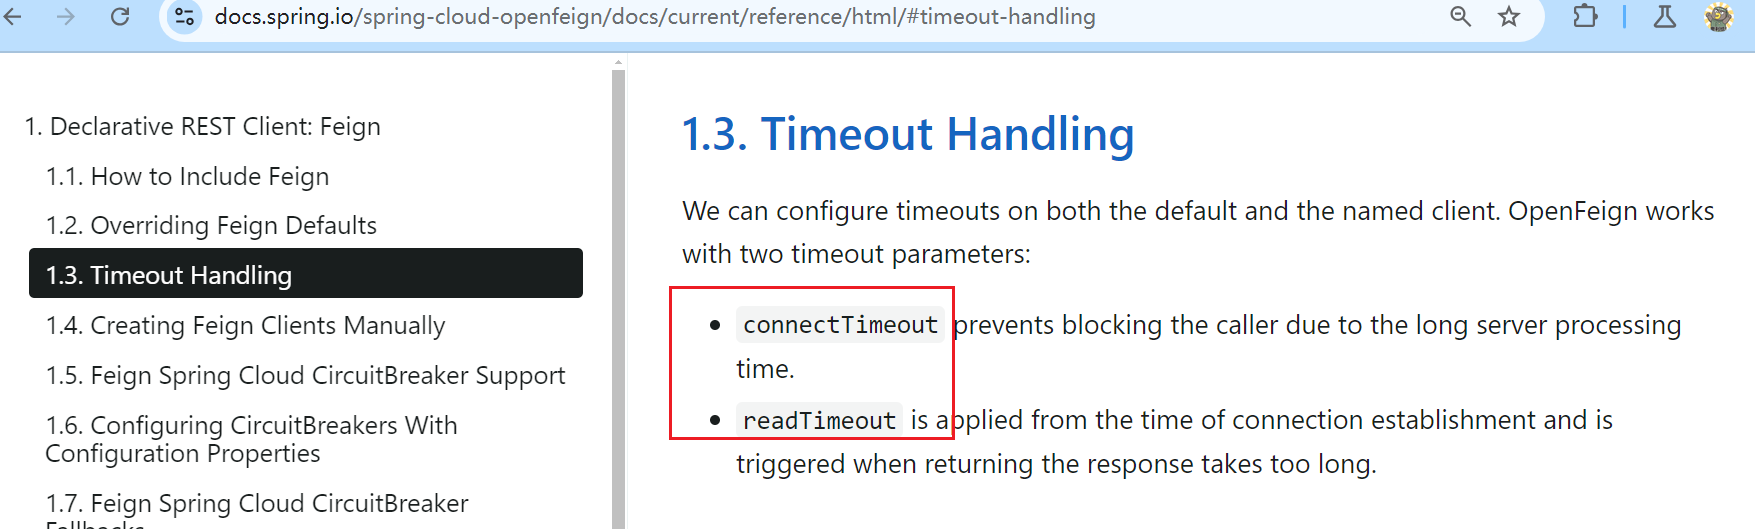
我们可以在默认客户端和指定客户端上配置超时。OpenFeign 使用两个超时参数:
- connectTimeout 可防止因服务器处理时间过长而阻塞调用者。
- readTimeout 从建立连接时开始应用,并在返回响应时间过长时触发。
https://docs.spring.io/spring-cloud-openfeign/docs/current/reference/html/#spring-cloud-feign-overriding-defaults
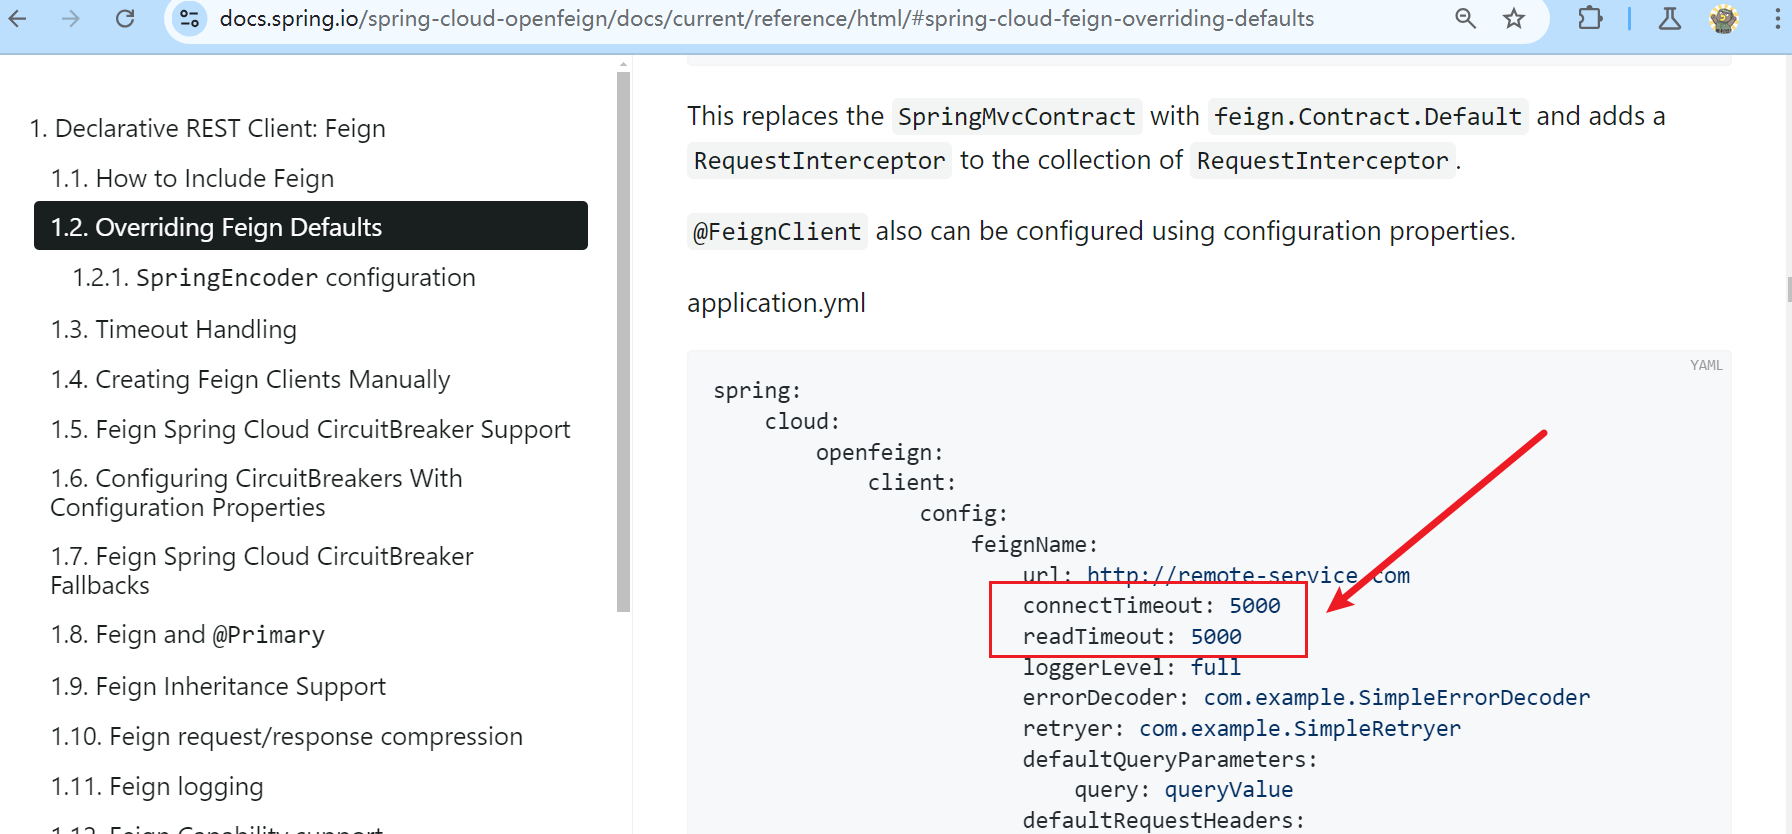
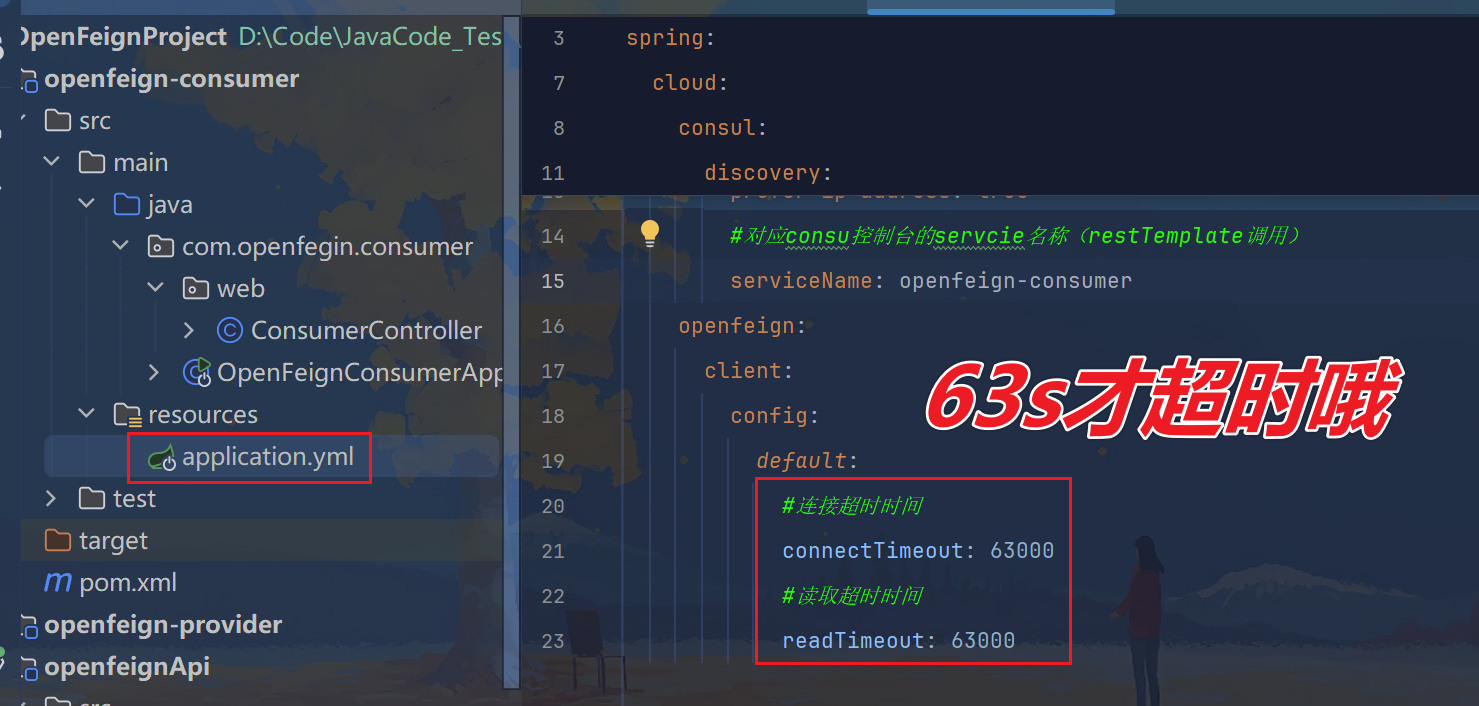
    openfeign:
      client:
        config:
          default:
            #连接超时时间
            connectTimeout: 63000
            #读取超时时间
            readTimeout: 63000
http://localhost:8873/consumer?name=shixiaochuang

3.2、重试机制
https://docs.spring.io/spring-cloud-openfeign/docs/current/reference/html/#spring-cloud-feign-overriding-defaults
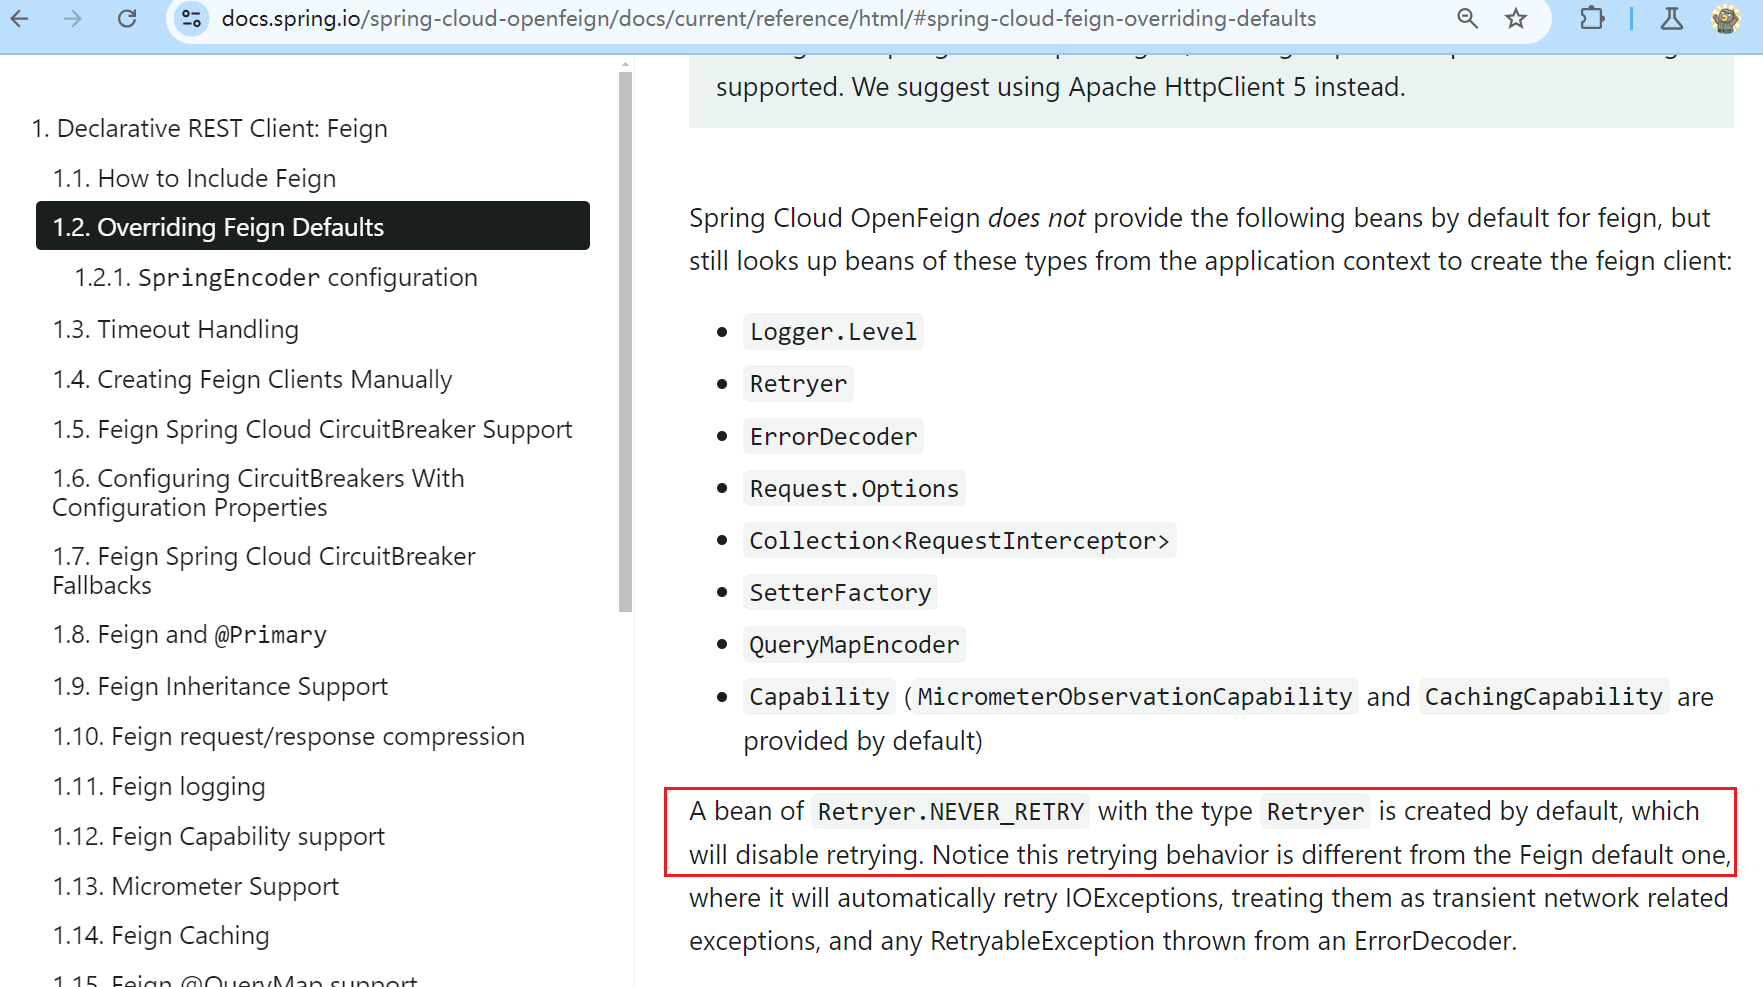
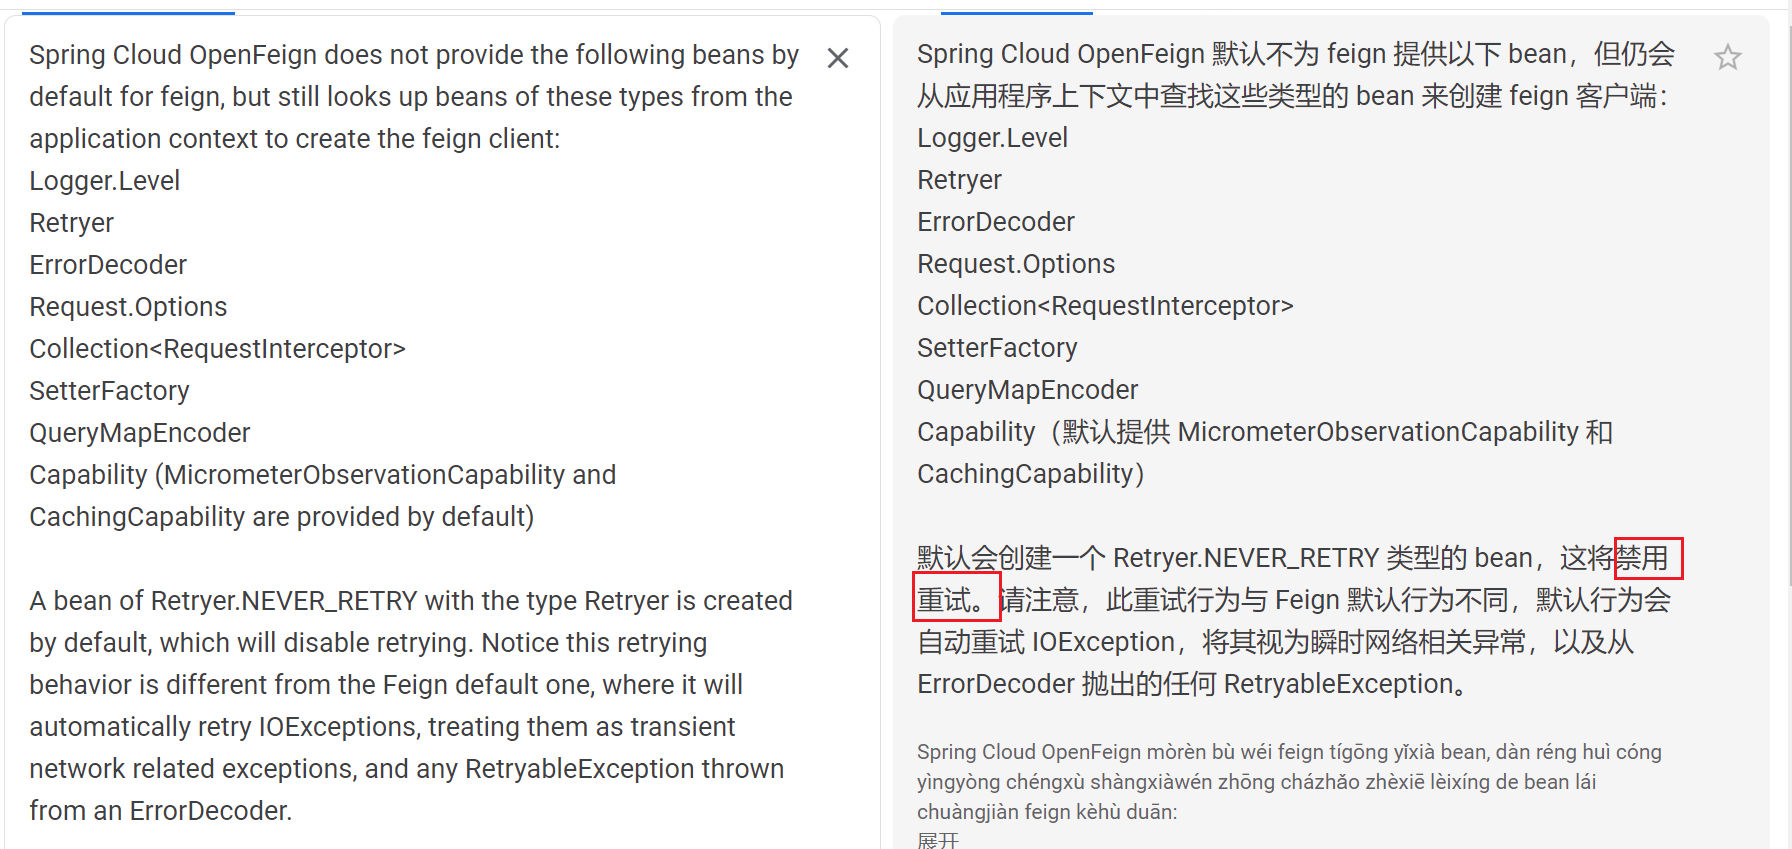
默认会创建一个 Retryer.NEVER_RETRY 类型的 bean,这将禁用重试。请注意,此重试行为与 Feign 默认行为不同,默认行为会自动重试 IOException,将其视为瞬时网络相关异常,以及从 ErrorDecoder 抛出的任何 RetryableException。
3.2.1、测试默认情况
http://localhost:8873/consumer?name=shixiaochuang

3.2.2、配置重试
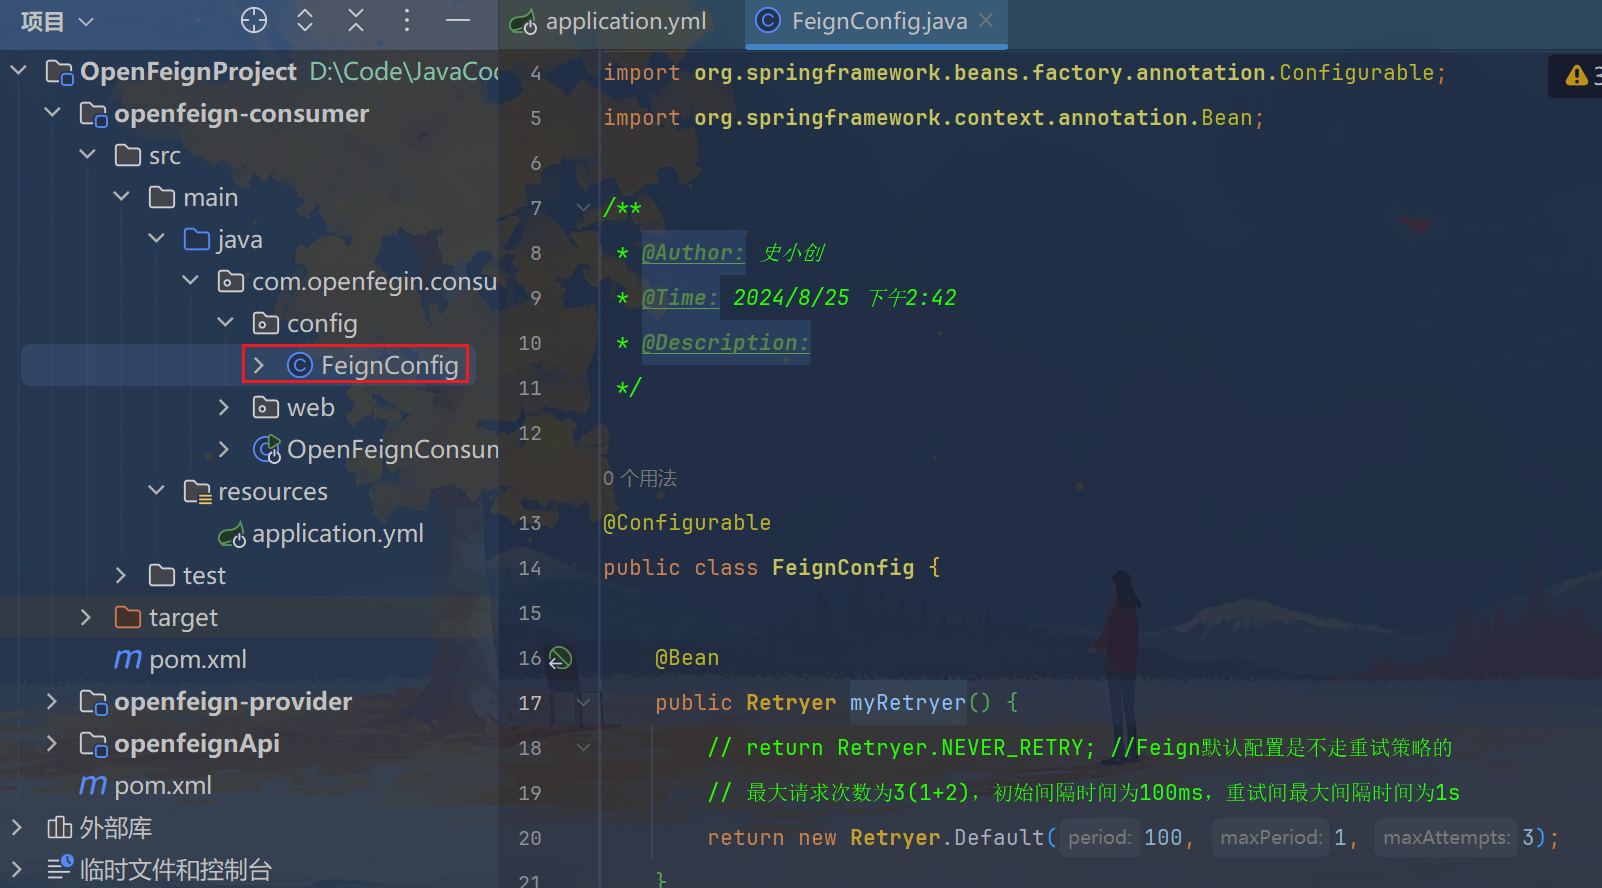
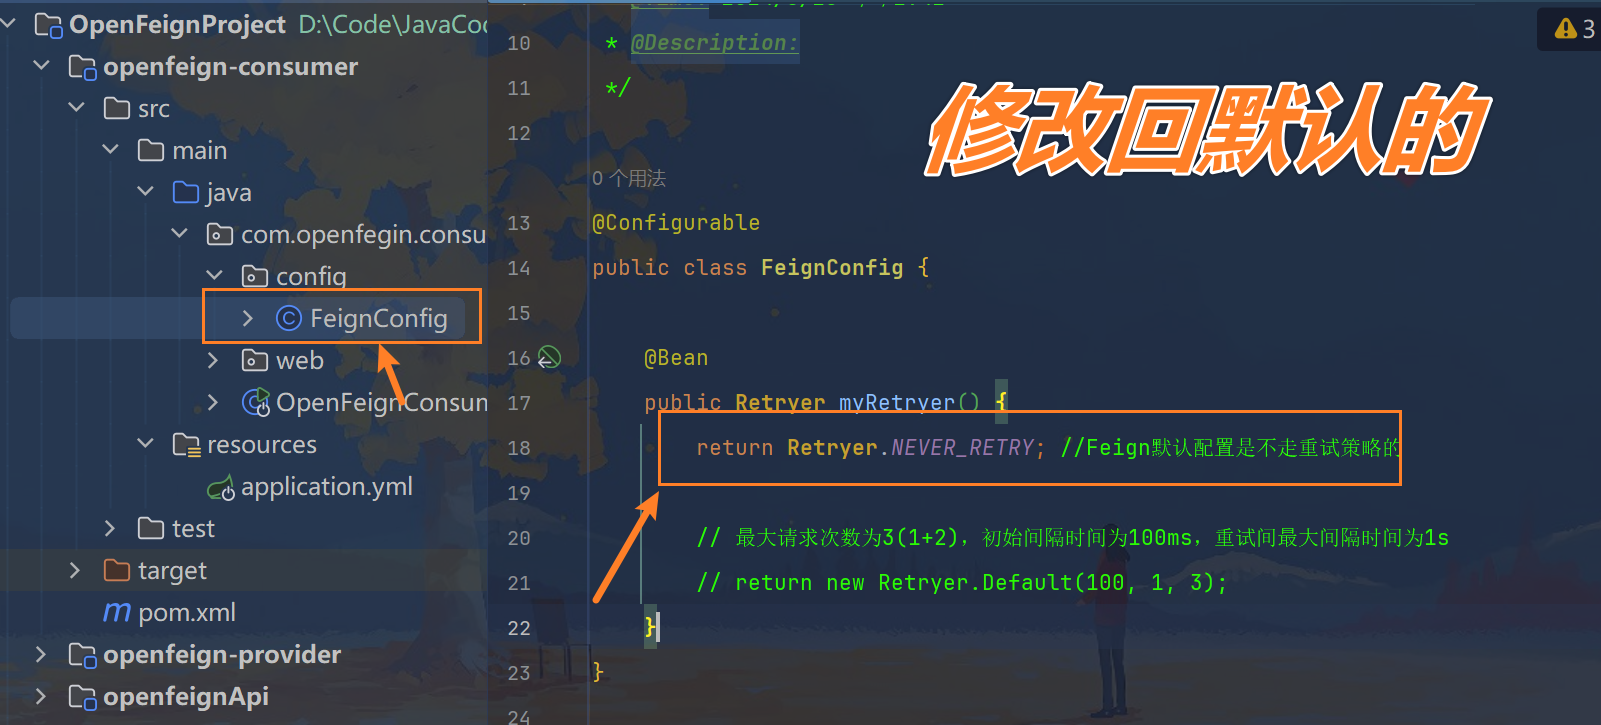
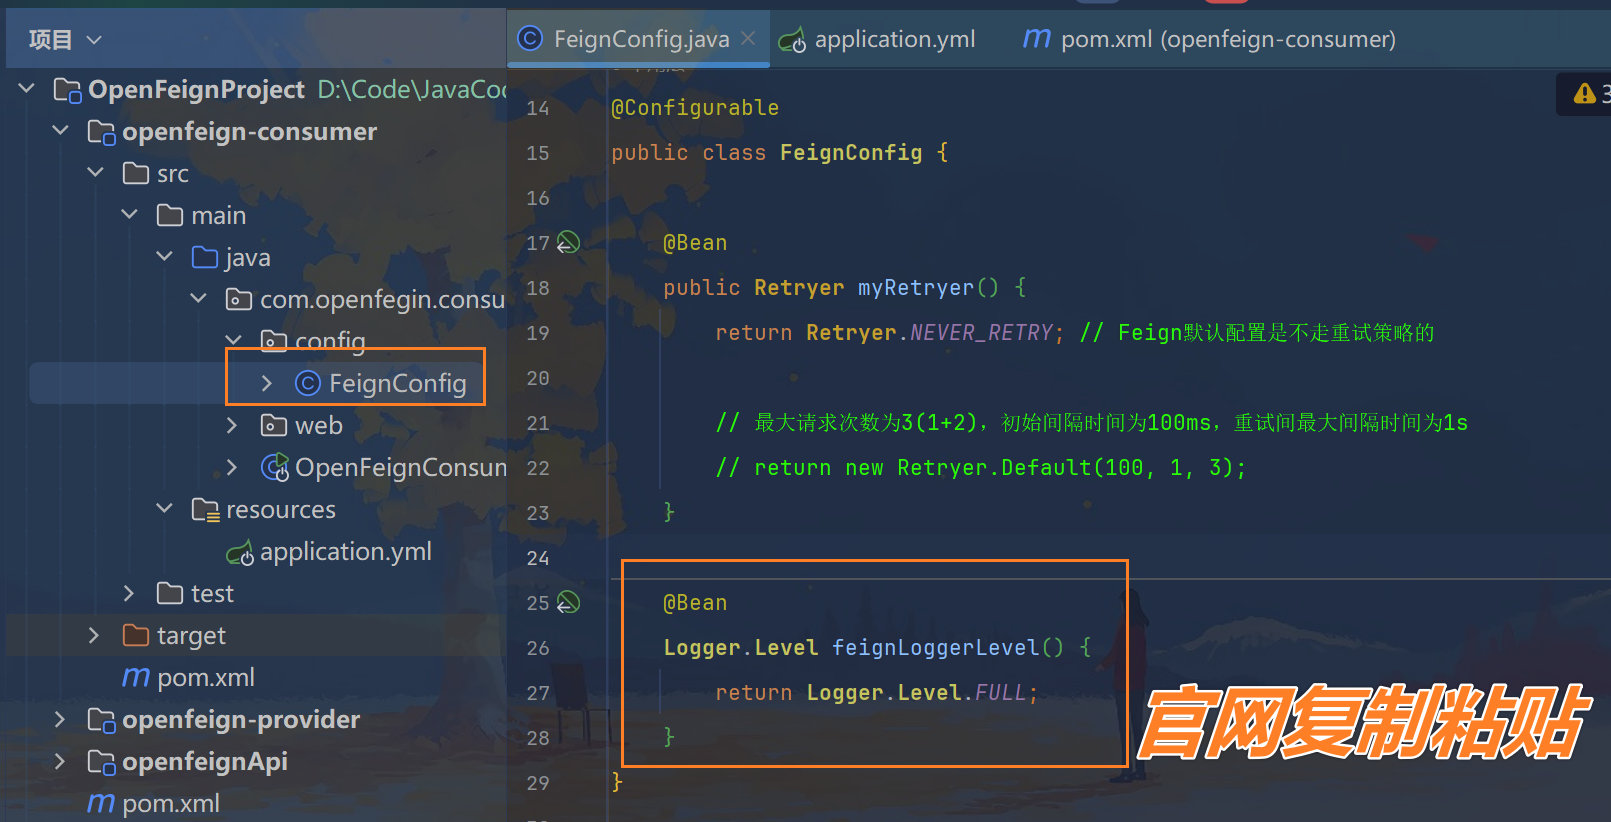
package com.openfegin.consumer.config;

import feign.Retryer;
import org.springframework.beans.factory.annotation.Configurable;
import org.springframework.context.annotation.Bean;

/**
 * @Author: 史小创
 * @Time: 2024/8/25 下午2:42
 * @Description:
 */

@Configurable
public class FeignConfig {

    @Bean
    public Retryer myRetryer() {
        // return Retryer.NEVER_RETRY; //Feign默认配置是不走重试策略的
        // 最大请求次数为3(1+2),初始间隔时间为100ms,重试间最大间隔时间为1s
        return new Retryer.Default(100, 1, 3);
    }
}
http://localhost:8873/consumer?name=shixiaochuang
目前控制台没有看到3次重试过程,只看到结果,是正常现象的,后续我们用日志看结果
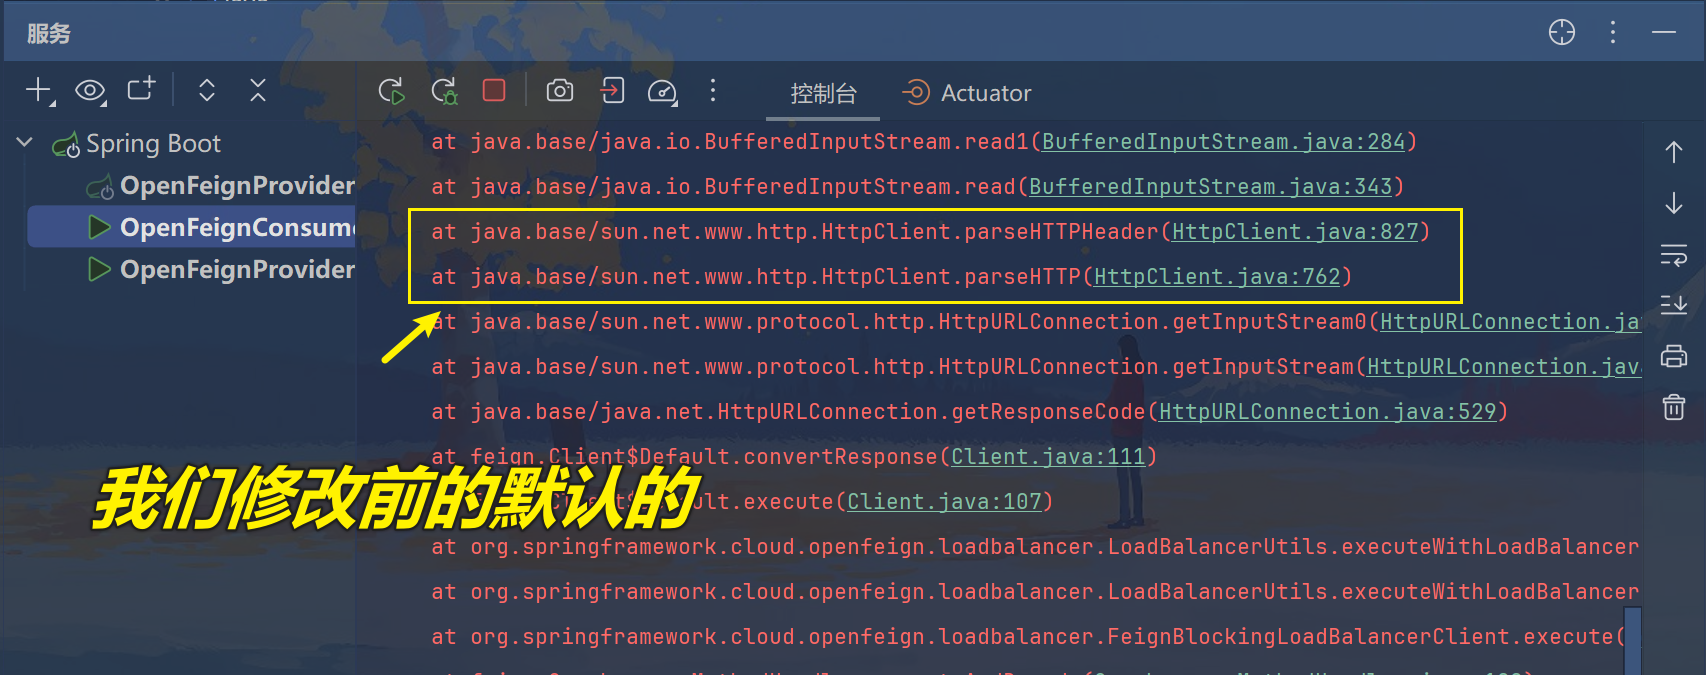
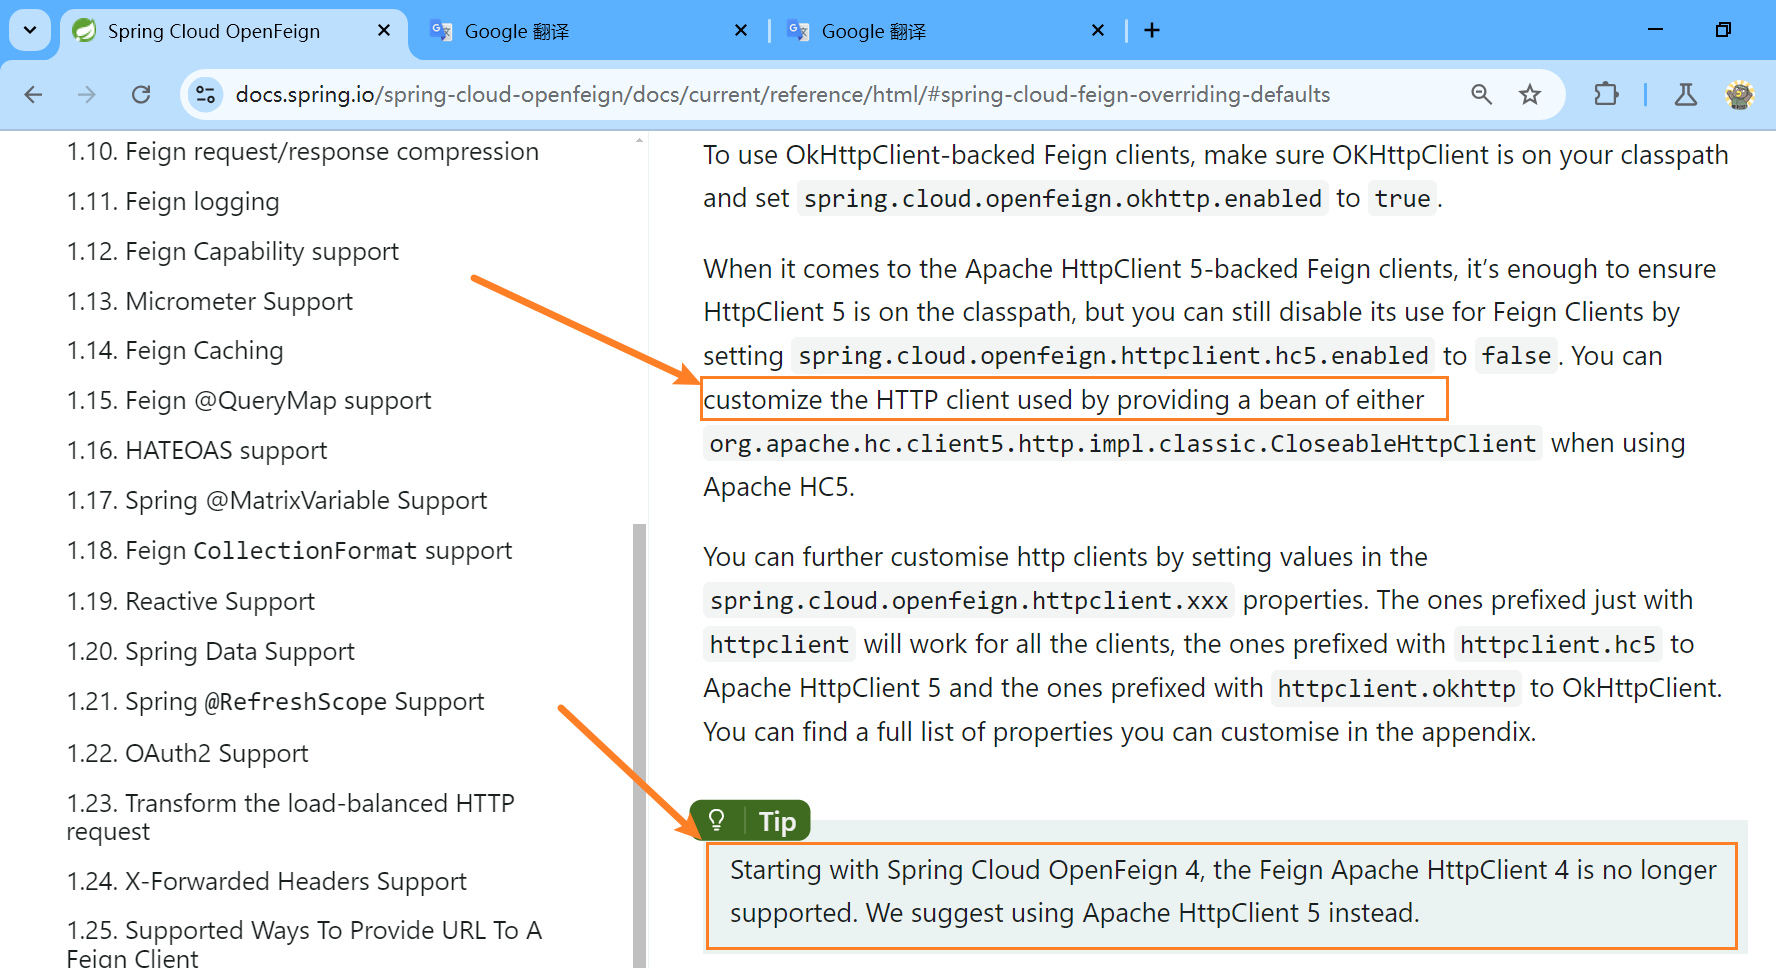
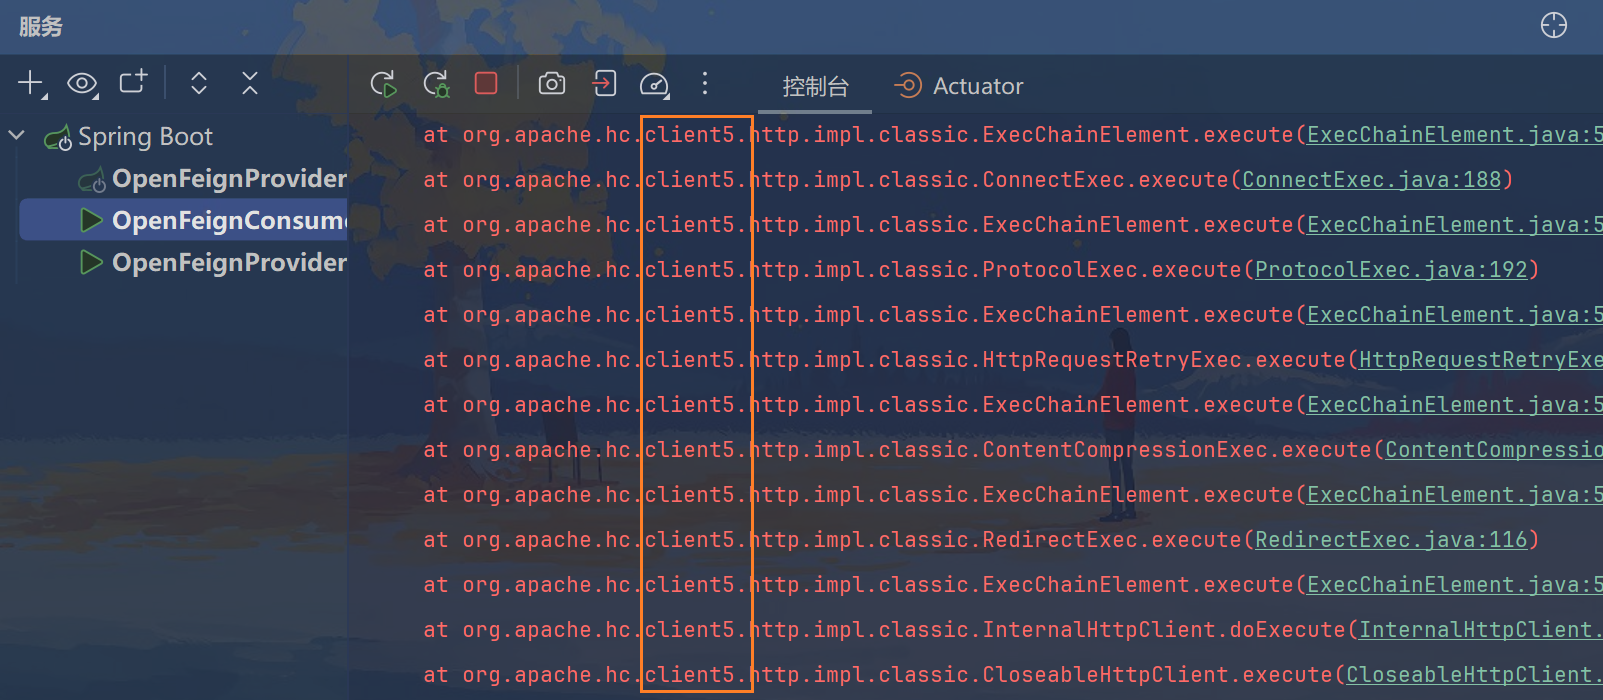
3.3、默认的HttpClient修改
OpenFeign中http client如果不做特殊配置,OpenFeign默认使用JDK自带的HttpURLConnection发送HTTP请求,由于默认HttpURLConnection没有连接池、性能和效率比较低,如果采用默认,性能上不是最牛B的,所以加到最大。
https://docs.spring.io/spring-cloud-openfeign/docs/current/reference/html/#spring-cloud-feign-overriding-defaults

步骤1:
步骤2:
<!-- httpclient5-->
<dependency>
    <groupId>org.apache.httpcomponents.client5</groupId>
    <artifactId>httpclient5</artifactId>
    <version>5.3</version>
</dependency>
<!-- feign-hc5-->
<dependency>
    <groupId>io.github.openfeign</groupId>
    <artifactId>feign-hc5</artifactId>
    <version>13.1</version>
</dependency>
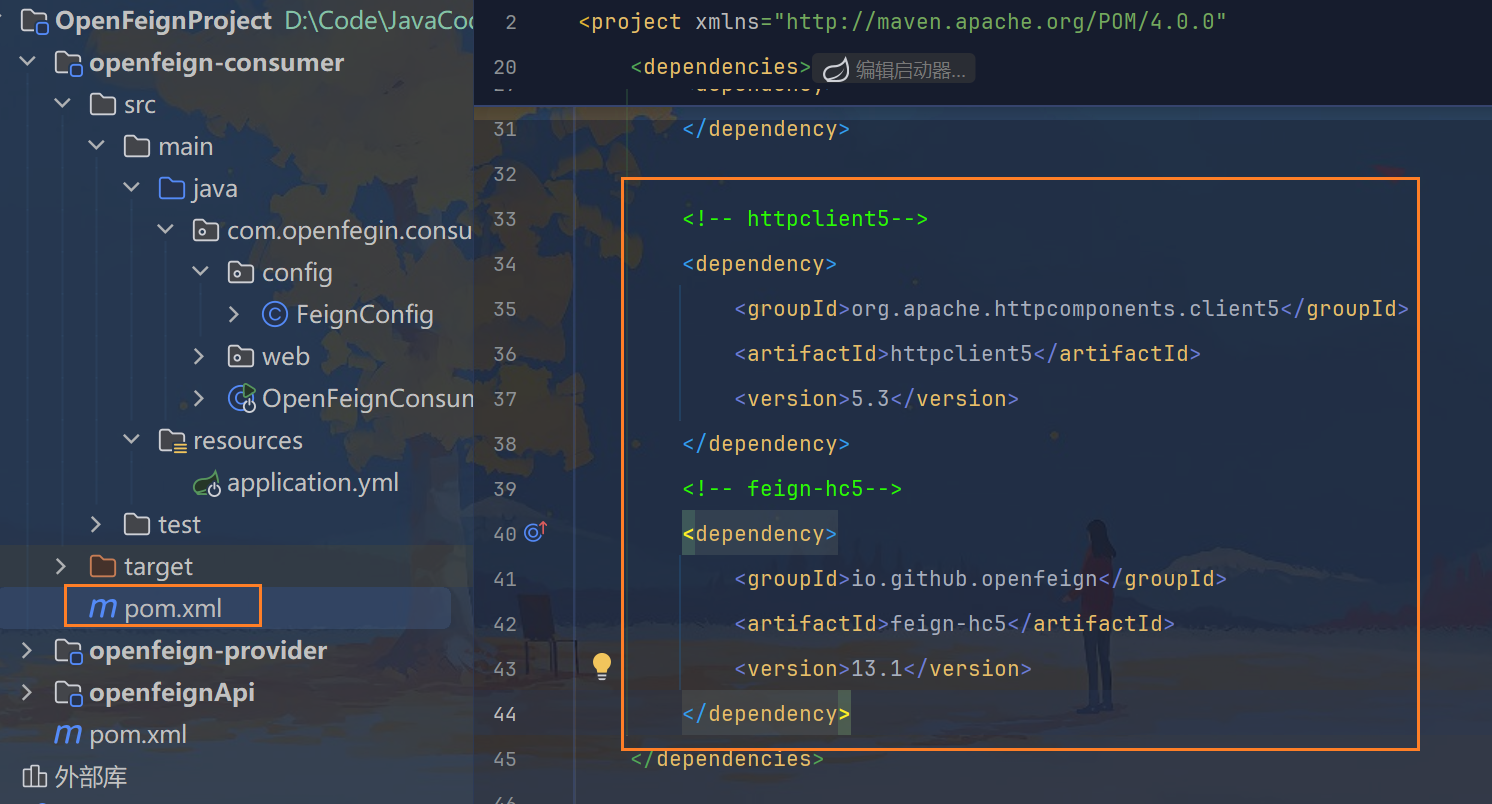
步骤3:
      httpclient:
        hc5:
          enabled: true
步骤4:
http://localhost:8873/consumer?name=shixiaochuang
3.4、请求响应的压缩
https://docs.spring.io/spring-cloud-openfeign/docs/current/reference/html/#feign-requestresponse-compression
-
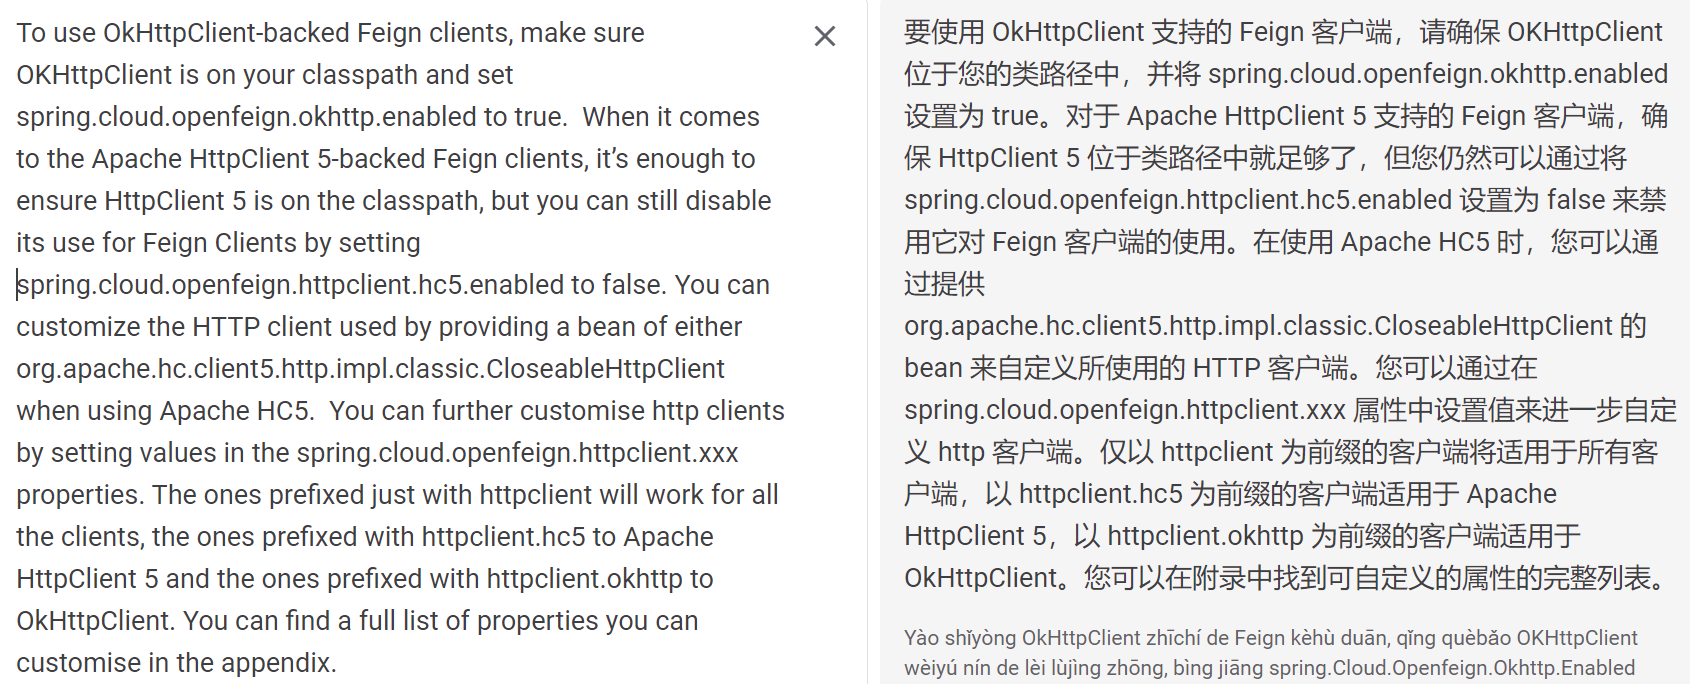
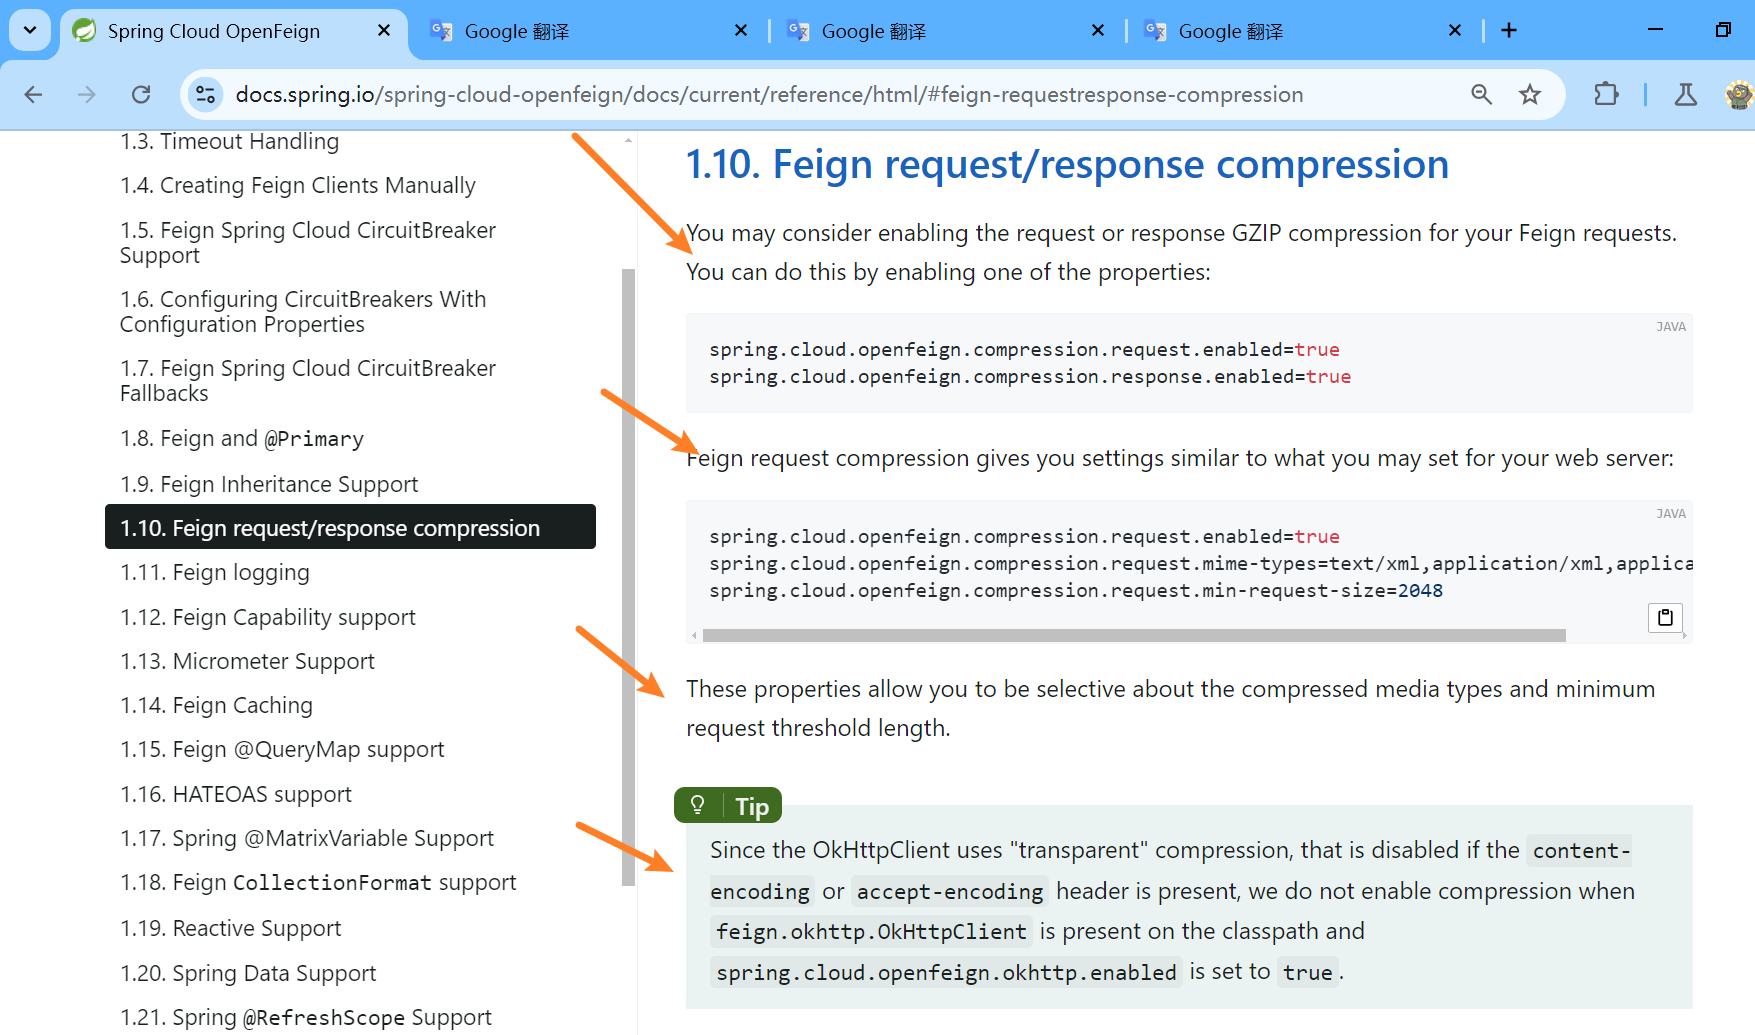
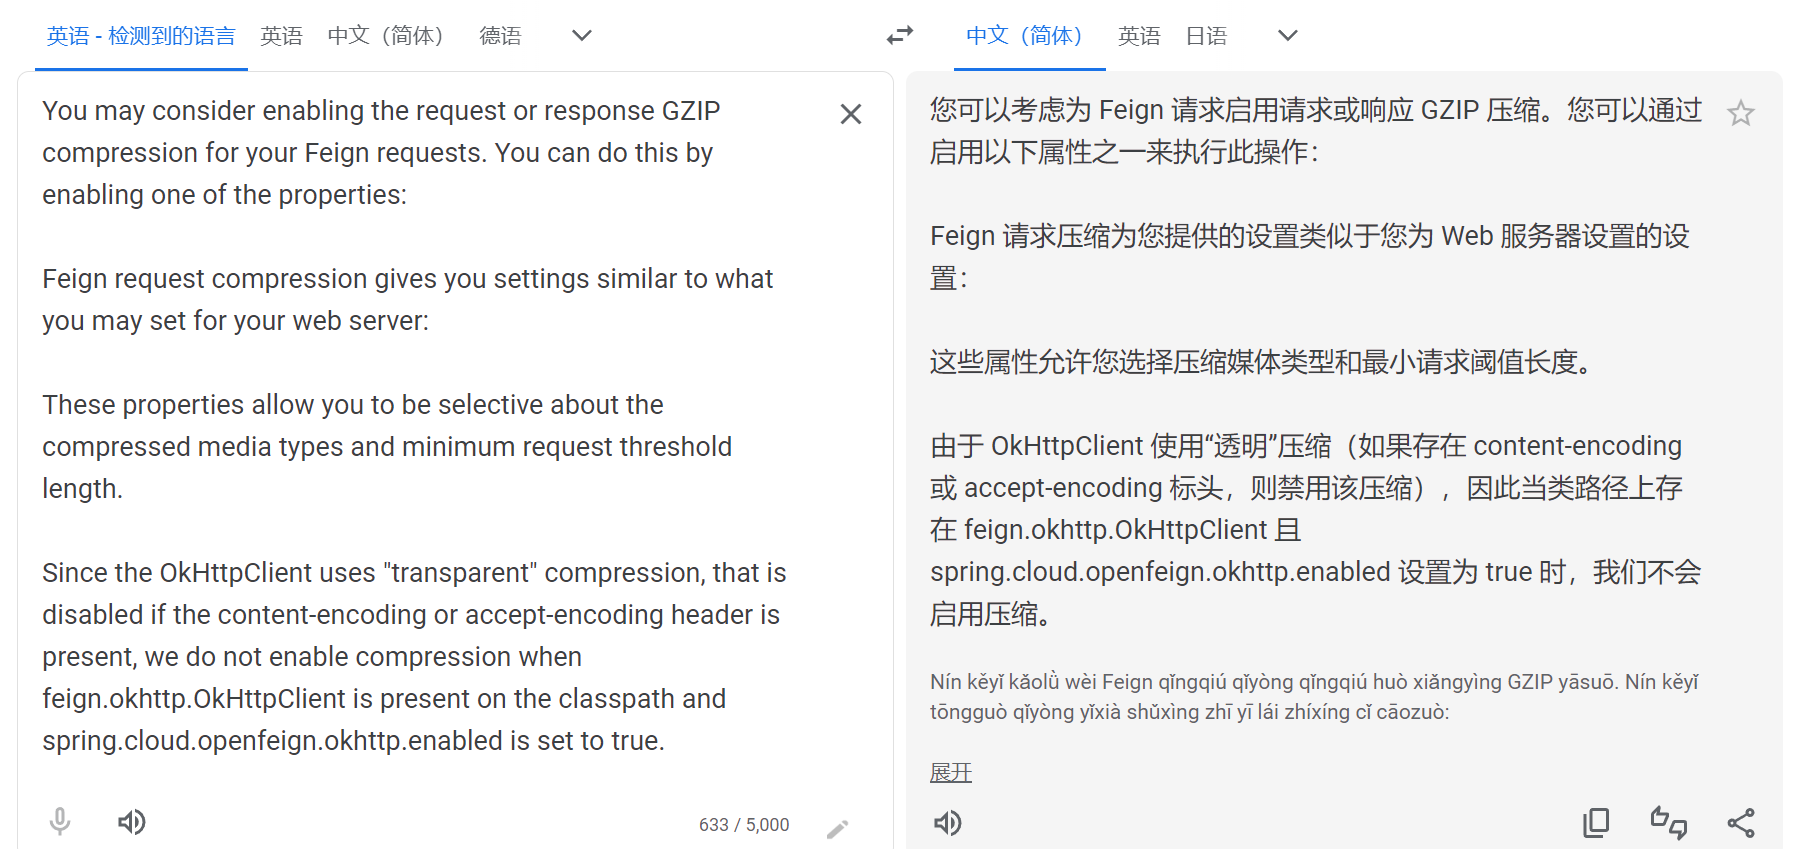
您可以考虑为 Feign 请求启用请求或响应 GZIP 压缩。您可以通过启用以下属性之一来执行此操作:
spring.cloud.openfeign.compression.request.enabled=true spring.cloud.openfeign.compression.response.enabled=true -
Feign 请求压缩为您提供的设置类似于您为 Web 服务器设置的设置:
spring.cloud.openfeign.compression.request.enabled=true spring.cloud.openfeign.compression.request.mime-types=text/xml,application/xml,application/json #触发压缩数据类型 spring.cloud.openfeign.compression.request.min-request-size=2048 #最小触发压缩的大小 -
这些属性允许您选择压缩媒体类型和最小请求阈值长度。
-
由于 OkHttpClient 使用“透明”压缩(如果存在 content-encoding 或 accept-encoding 标头,则禁用该压缩),因此当类路径上存在 feign.okhttp.OkHttpClient 且 spring.cloud.openfeign.okhttp.enabled 设置为 true 时,我们不会启用压缩。
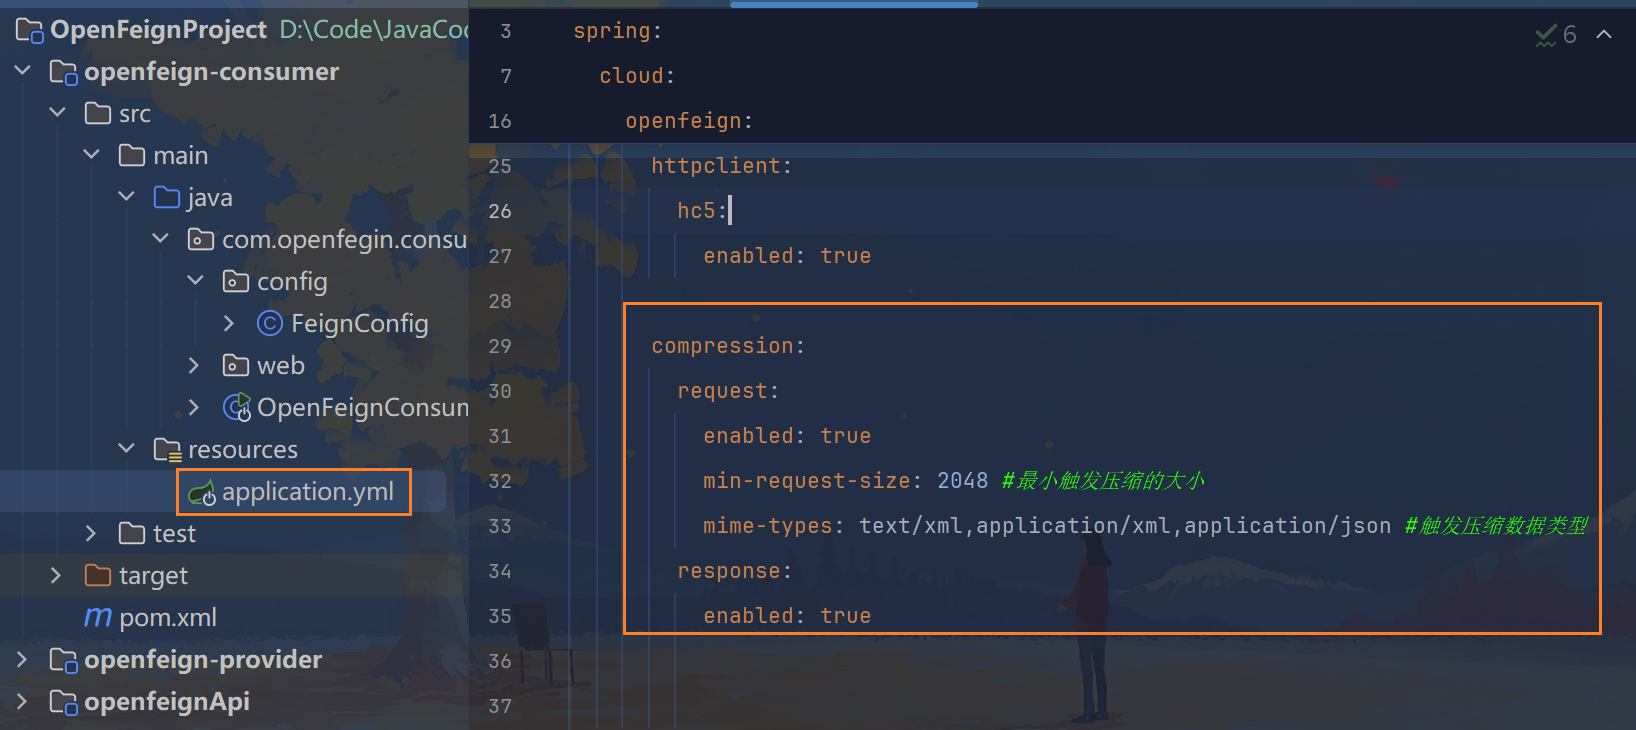
      compression:
        request:
          enabled: true
          min-request-size: 2048 #最小触发压缩的大小
          mime-types: text/xml,application/xml,application/json #触发压缩数据类型
        response:
          enabled: true
效果的测试在下一章
3.5、日志打印功能
Feign 提供了日志打印功能,我们可以通过配置来调整日志级别,从而了解 Feign 中 Http 请求的细节,说白了就是对Feign接口的调用情况进行监控和输出
https://docs.spring.io/spring-cloud-openfeign/docs/current/reference/html/#feign-logging
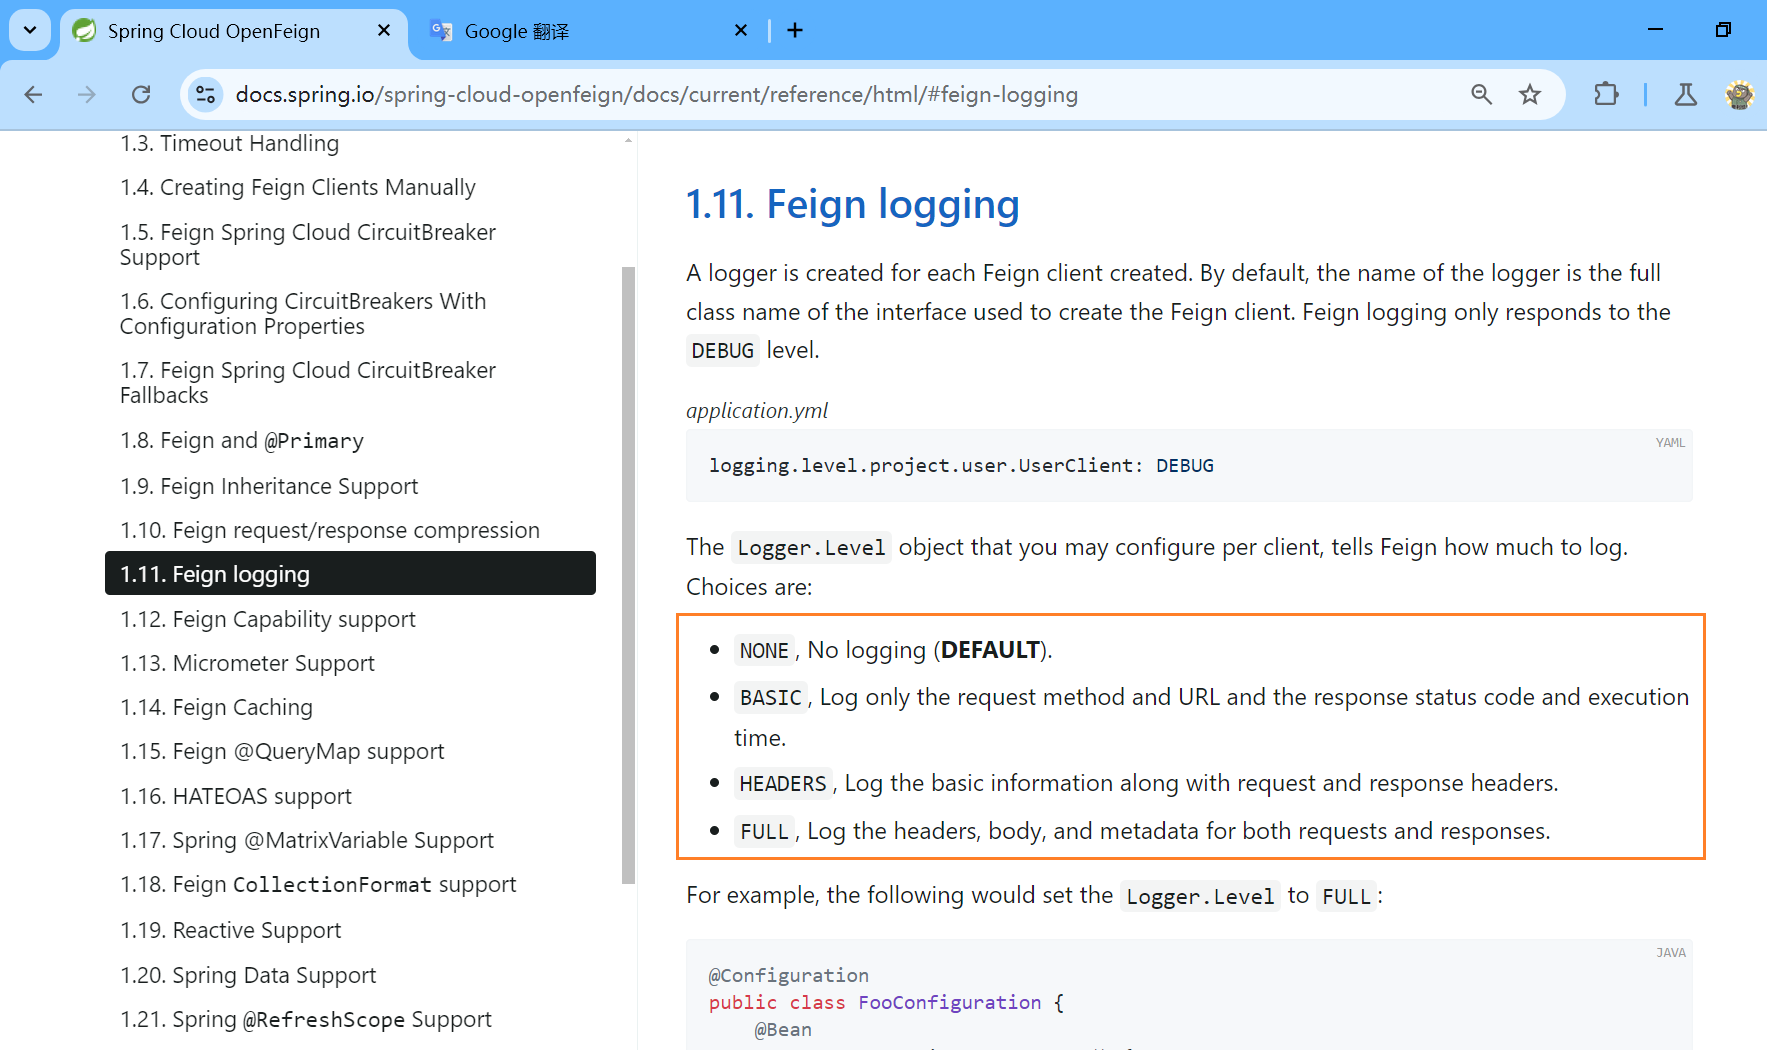
为每个创建的 Feign 客户端创建一个记录器。默认情况下,记录器的名称是用于创建 Feign 客户端的接口的完整类名。Feign 日志记录仅响应 DEBUG 级别。
logging.level.project.user.UserClient: DEBUG
您可以为每个客户端配置的 Logger.Level 对象告诉 Feign 记录多少内容。选项包括:
-
NONE,不记录(默认)。
-
BASIC,仅记录请求方法和 URL 以及响应状态代码和执行时间。
-
HEADERS,记录基本信息以及请求和响应标头。
-
FULL,记录请求和响应的标头、正文和元数据。
例如,以下内容将 Logger.Level 设置为 FULL:
@Configuration
public class FooConfiguration {
    @Bean
    Logger.Level feignLoggerLevel() {
        return Logger.Level.FULL;
    }
}
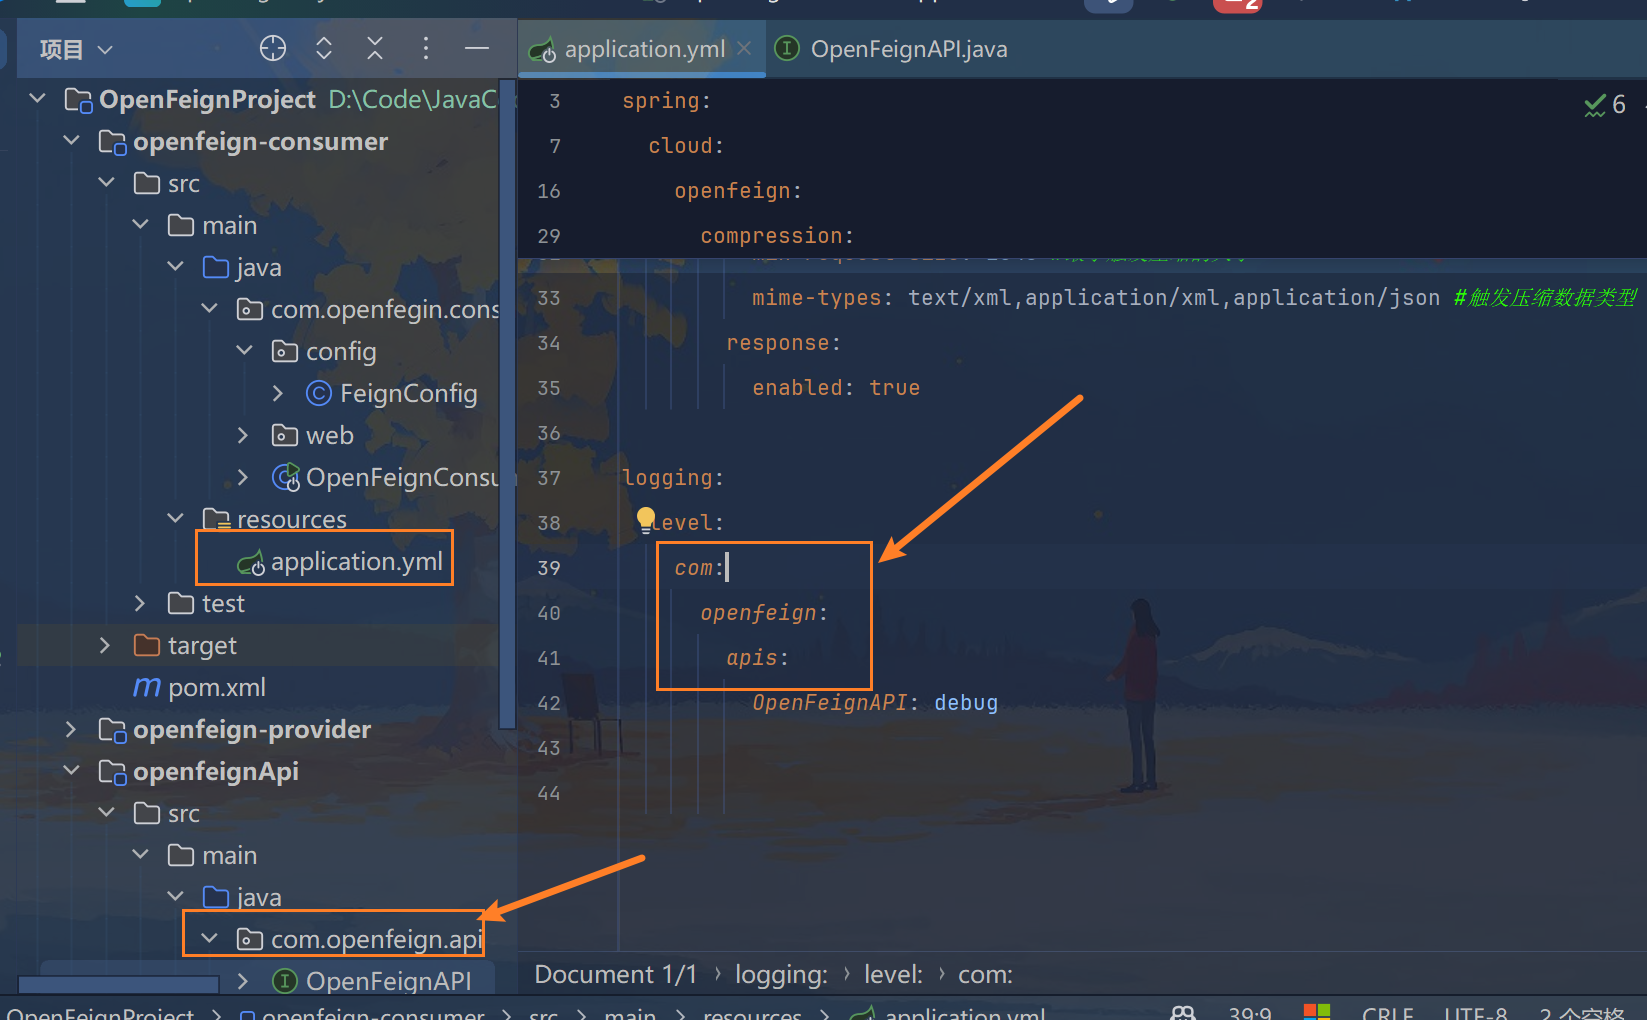
步骤一
步骤二
公式(三段):logging.level + 含有@FeignClient注解的完整带包名的接口名+debug
logging:
  level:
    com:
      openfeign:
        apis:
          OpenFeignAPI: debug
四、环境搭建
SpringBoot+SpringCloud的版本:
<spring.boot.version>3.2.0</spring.boot.version>
<spring.cloud.version>2023.0.0</spring.cloud.version>
注册中心:
  <dependency>
            <groupId>org.springframework.cloud</groupId>
            <artifactId>spring-cloud-starter-consul-discovery</artifactId>
        </dependency>
远程调用:
   <!--openfeign-->
        <dependency>
            <groupId>org.springframework.cloud</groupId>
            <artifactId>spring-cloud-starter-openfeign</artifactId>
        </dependency>
Consul
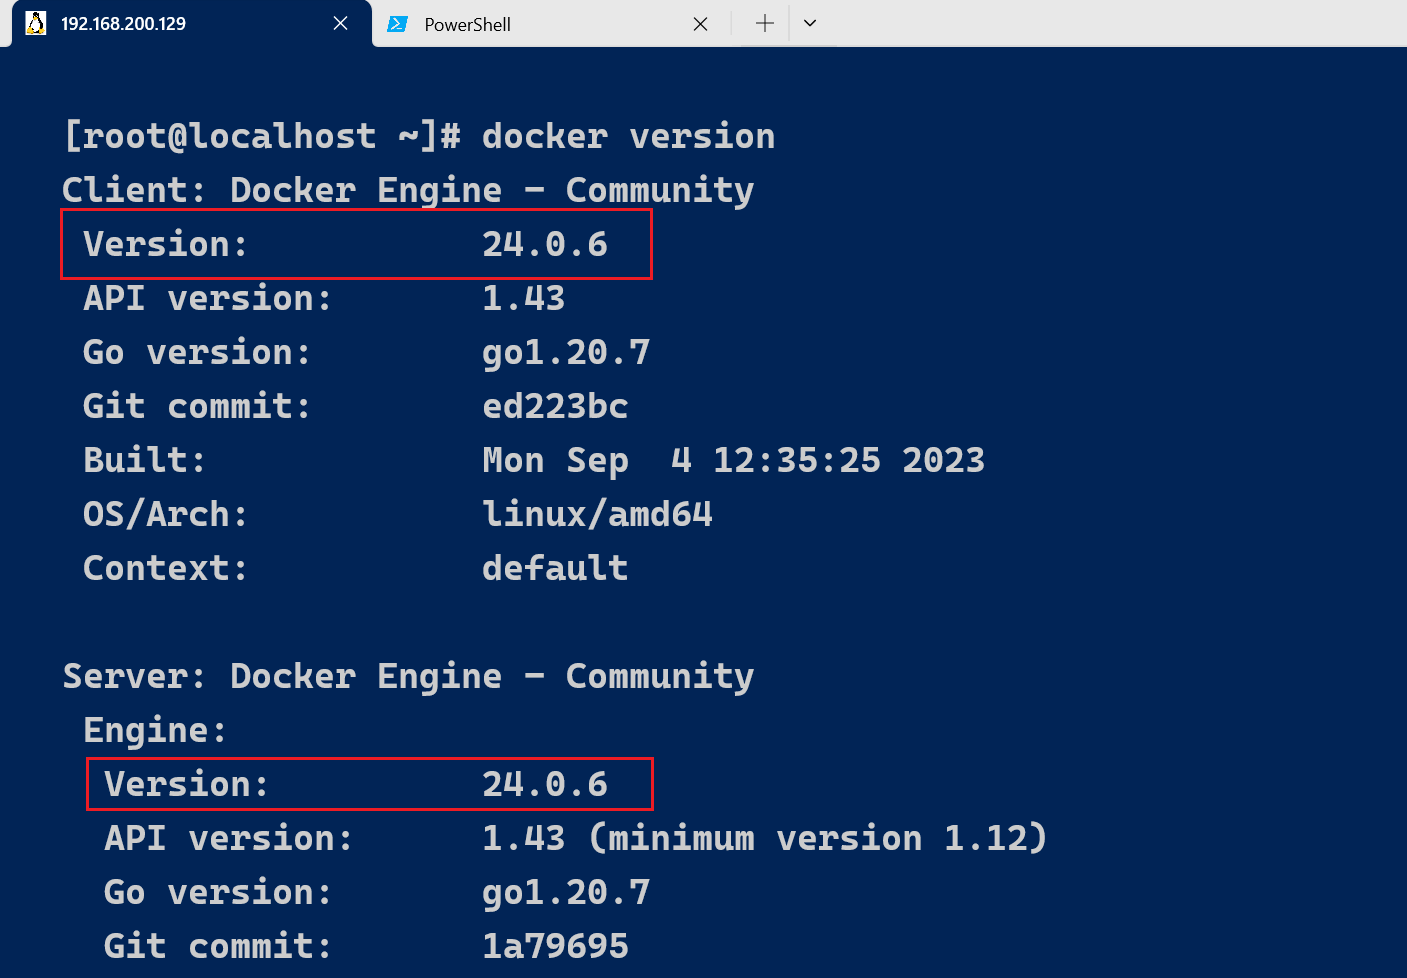
docker pull consul:1.9.6
docker run -d -p 8500:8500 --restart=always --name=consul -v /opt/consul:/consul/data consul:1.9.6 agent -server -bootstrap -ui -node=1 -client='0.0.0.0'
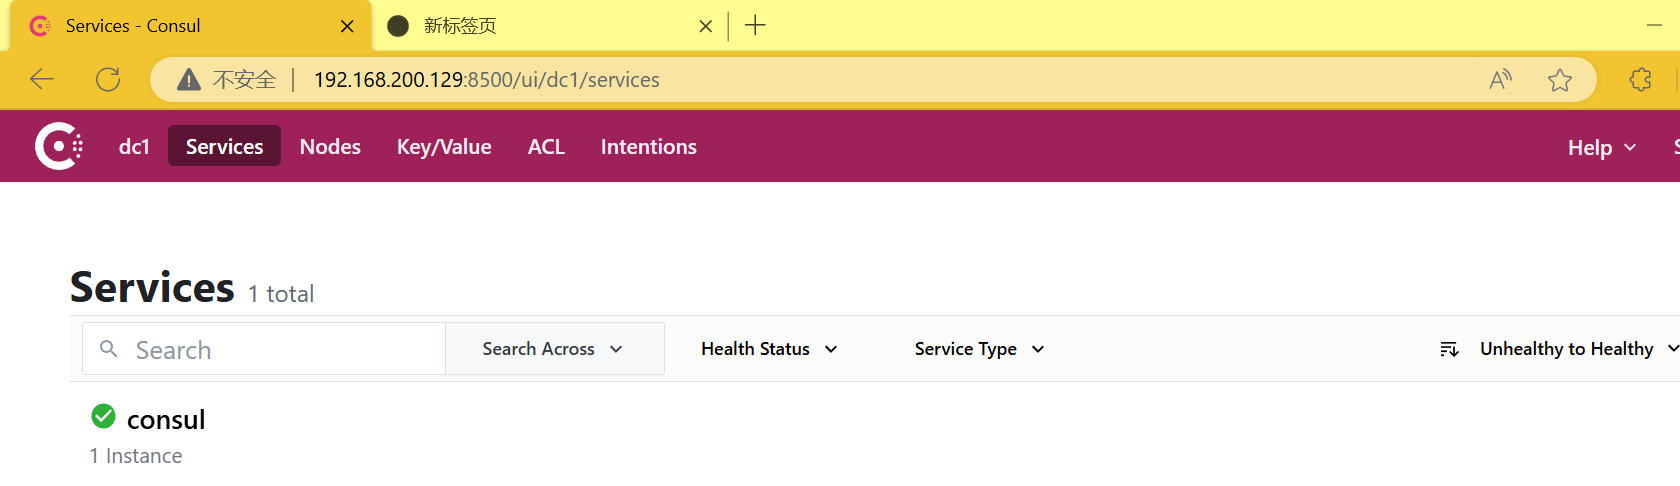
http://192.168.200.129:8500/ui/dc1/services
jdk:

Maven
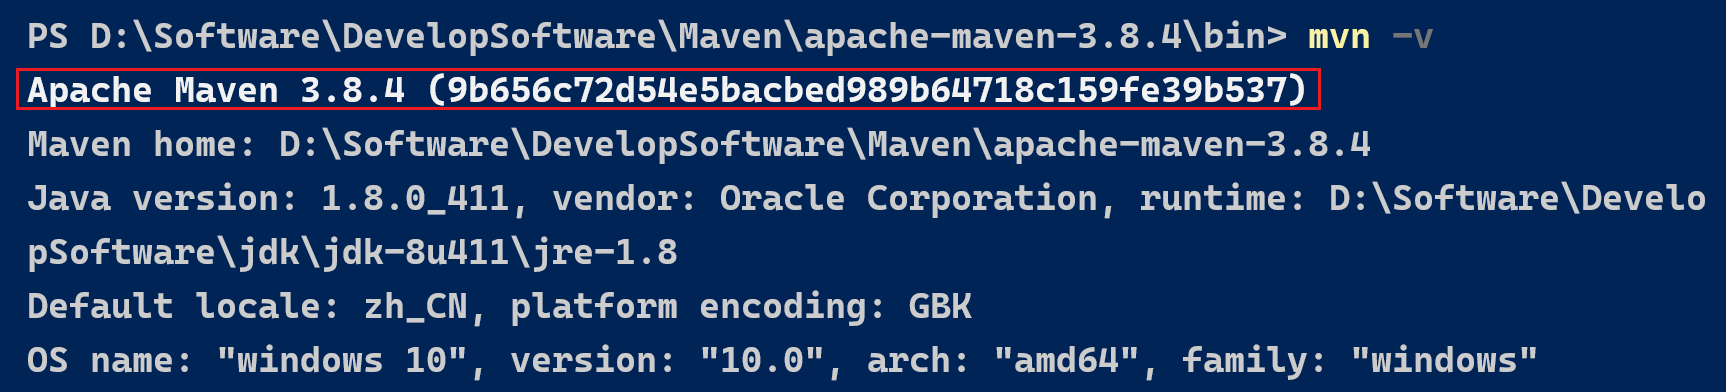
IDEA

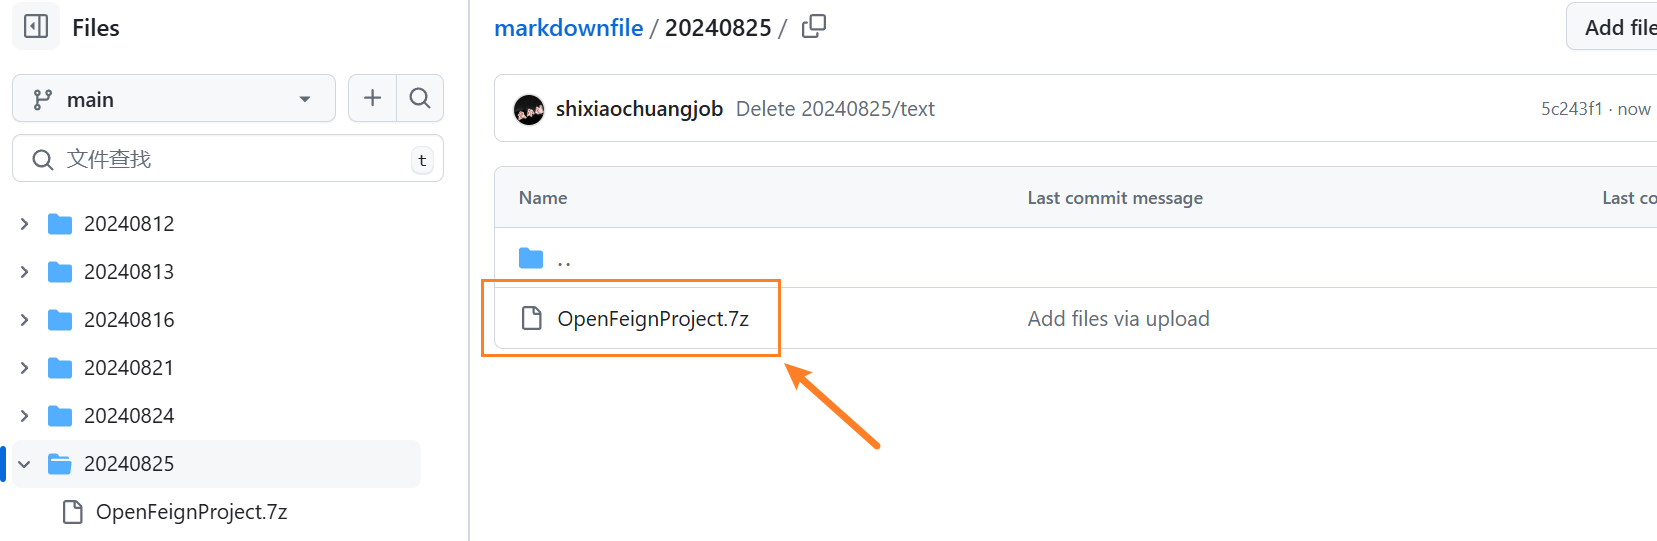
代码汇总:
https://github.com/shixiaochuangjob/markdownfile/tree/main/20240825
https://mp.weixin.qq.com/s?__biz=MzkwOTczNzUxMQ==&mid=2247484684&idx=1&sn=cb0a68d38e6bdd182cea2b736209ec6f&chksm=c1376e44f640e7523b5793ca7334f92ddc83e982ed21b62382d9d304cab6fb3b8a39c1e831ff#rd


 816
816

 被折叠的 条评论
为什么被折叠?
被折叠的 条评论
为什么被折叠?
 到【灌水乐园】发言


