


Dragonfly GitHub:
https://github.com/dragonflyoss/Dragonfly2
1
Git LFS 是什么?
Git LFS [1] 是 Git Large File Storage 的缩写,这是一个用来处理大型文件的 Git 扩展工具。Git 在处理大量的小型文件时表现出色,但它并不擅长版本控制大型二进制文件,比如视频、音频、数据集、模型资源等。如果这些大文件直接存储在 Git 仓库中,会导致仓库体积迅速膨胀,影响克隆和拉取操作的性能。
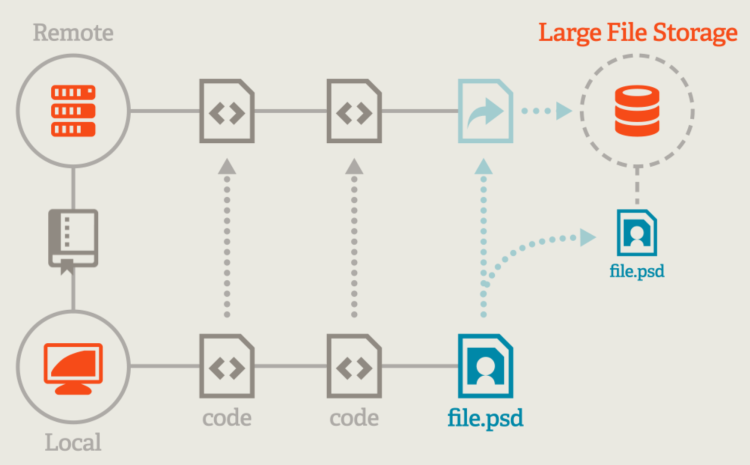
图片来源:Git Large File Storage
Git LFS 允许将大型文件的引用保存在 Git 仓库中,而将文件本身存储在一个单独的服务器上。当克隆或检出含有大型文件的仓库时,Git LFS 会从那个单独的服务器上下载必要的大文件,而不是从 Git 仓库直接下载。具体 Git LFS 实现分为客户端以及服务端两部分。客户端主要基于 git lfs track 进行操作,规范可以参考 Git LFS Specification [2]。服务端是基于 HTTP 协议遵守 Git LFS API [3] 实现的。通常情况下 Git LFS 的 Content Storage 也就是存储大文件的服务使用对象存储。
1.1 Git LFS 应用
大文件基于 Git LFS 管理
Github 以及 GitLab 对于大文件管理,通常是基于 Git LFS 进行管理的。
GitHub 可以参考文档 About Git Large File Storage [4] 使用。
GitLab 可以参考文档 Git Large File Storage [5] 使用。
AI 模型以及数据集基于 Git LFS 管理
AI 场景下模型以及数据集大文件,通常是基于 Git LFS 进行管理的。比 Hugging Face Hub [6] 以及 ModelScope Hub [7] 等平台,会基于 Git LFS 管理模型以及数据集。
Hugging Face Hub 可以参考文档 Getting Started with Repositories [8] 使用。
ModelScope Hub 可以参考文档 Getting Started with ModelScope [9] 使用。
Hugging Face Hub 的 Python Library 实现了 Git LFS 对模型以及数据集进行预加载。对于 Hugging Face Hub 的 Python Library 分发模型和数据集进行加速,可以参考文档 Hugging Face accelerates distribution of models and datasets based on Dragonfly [10]。
2
Dragonfly 解决 Git LFS 存储仓库带宽瓶颈
通常开发者会基于 Git LFS 管理大文件,本文主要解决在 Git LFS 拉取大文件时,存在的中心化的存储仓库带宽瓶颈问题。当使用 Git LFS 下载大文件的时候,文件相对较大且会有并发下载文件的场景。这样很容易导致存储带宽被打满,从而引起下载过慢的情况。
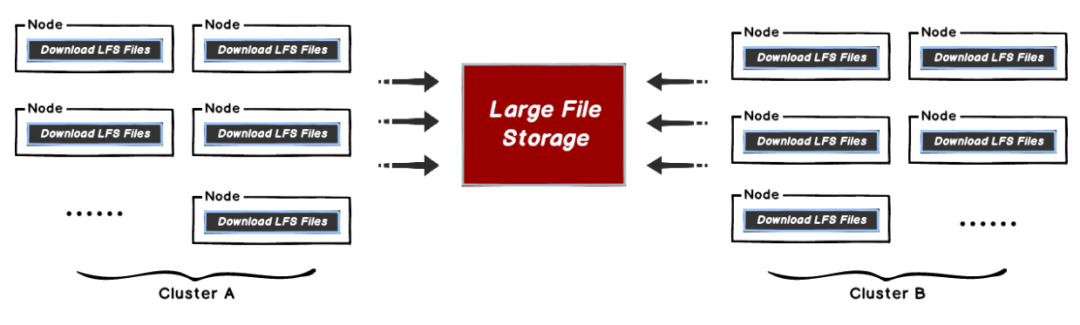
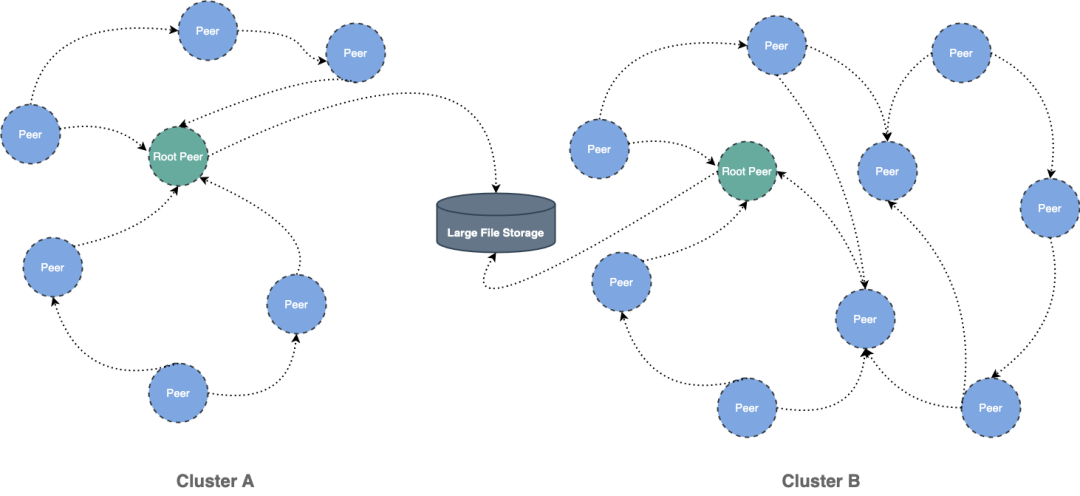
这种方式比较好的解决方案是使用 Dragonfly 的 P2P 技术利用每个节点的闲置带宽缓解存储仓库的带宽压力,从而达到加速效果。在最理想的情况下 Dragonfly 可以让整个 P2P 集群中只有一个节点回源下载模型,其他节点流量均使用集群内 P2P 内网带宽。
3
使用 Dragonfly 加速 Git LFS 大文件分发
通过将 Git LFS 的 HTTP 协议文件下载请求代理到 Dragonfly Peer 的 Proxy 服务,将文件下载流量转发至 P2P 网络中,从而减少回源流量,提升下载速度。下面使用文档基于 GitHub LFS 实现。
3.1 获取 Git LFS 的 Content Storage 地址
增加 GIT_CURL_VERBOSE=1 输出 git clone 的详细日志,方便获取 Git LFS 的 Content Storage 的地址。
GIT_CURL_VERBOSE=1 git clone git@github.com:{YOUR-USERNAME}/{YOUR-REPOSITORY}.git从输出的日志中找 trace git-lfs 关键字,可以看到 Git LFS 下载文件的日志。关注 Git LFS 日志中 actions 为 download 的返回内容。
15:31:04.848308 trace git-lfs: HTTP: {"objects":[{"oid":"c036cbb7553a909f8b8877d4461924307f27ecb66cff928eeeafd569c3887e29","size":5242880,"actions":{"download":{"href":"https://github-cloud.githubusercontent.com/alambic/media/376919987/c0/36/c036cbb7553a909f8b8877d4461924307f27ecb66cff928eeeafd569c3887e29?X-Amz-Algorithm=AWS4-HMAC-SHA256&X-Amz-Credential=AKIAIMWPLRQEC4XCWWPA%2F20231221%2Fus-east-1%2Fs3%2Faws4_request&X-Amz-Date=20231221T073104Z&X-Amz-Expires=3600&X-Amz-Signature=4dc757dff0ac96eac3f0cd2eb29ca887035d3a6afba41cb10200ed0aa22812fa&15:31:04.848403 trace git-lfs: HTTP: X-Amz-SignedHeaders=host&actor_id=15955374&key_id=0&repo_id=392935134&token=1","expires_at":"2023-12-21T08:31:04Z","expires_in":3600}}}]}可以在 objects 结构体中 actions.download.href 找到具体的下载 URL。这样可以发现 GitHub LFS 的 Content Storage 实际存储在 github-cloud.githubusercontent.com。并且可以找到一些 Query 参数比如 X-Amz-Algorithm、X-Amz-Credential、X-Amz-Date、X-Amz-Expires、X-Amz-Signature 以及 X-Amz-SignedHeaders 等,这些 Query 参数为 AWS 的 Authenticating Requests [11] 参数。后面在配置 Dragonfly Peer Proxy 的时候会用到这些参数的 Key。
Git LFS 关键信息:
Git LFS 的 Content Storage 地址为
github-cloud.githubusercontent.com。下载 URL 的 Query 参数:
X-Amz-Algorithm、X-Amz-Credential、X-Amz-Date、X-Amz-Expires、X-Amz-Signature以及X-Amz-SignedHeaders。
3.2 部署 Dragonfly
依赖

注意: 如果没有可用的 Kubernetes 集群进行测试,推荐使用 Kind [12]。
安装 Dragonfly
基于 Kubernetes cluster 详细安装文档可以参考 quick-start-kubernetes [13]。
使用 Kind 安装 Kubernetes 集群
创建 Kind 多节点集群配置文件 kind-config.yaml, 配置如下:
kind: Cluster
apiVersion: kind.x-k8s.io/v1alpha4
nodes:
  - role: control-plane
  - role: worker
    extraPortMappings:
      - containerPort: 30950
        hostPort: 65001
  - role: worker
使用配置文件创建 Kind 集群:
kind create cluster --config kind-config.yaml切换 Kubectl 的 context 到 Kind 集群:
kubectl config use-context kind-kindKind 加载 Dragonfly 镜像
下载 Dragonfly latest 镜像:
docker pull dragonflyoss/scheduler:latest
docker pull dragonflyoss/manager:latest
docker pull dragonflyoss/dfdaemon:latest
Kind 集群加载 Dragonfly latest 镜像:
kind load docker-image dragonflyoss/scheduler:latest
kind load docker-image dragonflyoss/manager:latest
kind load docker-image dragonflyoss/dfdaemon:latest
基于 Helm Charts 创建 Dragonfly P2P 集群
创建 Helm Charts 配置文件 charts-config.yaml。在 dfdaemon.config.proxy.proxies.regx 增加 github-cloud.githubusercontent.com 匹配规则,将 Git LFS 的 Content Storage 的 HTTP 文件下载流量转发至 P2P 网络中。并且 dfdaemon.config.proxy.defaultFilter 添加 X-Amz-Algorithm、X-Amz-Credential、X-Amz-Date、X-Amz-Expires、X-Amz-Signature 以及 X-Amz-SignedHeaders 参数,过滤掉可变的 Query 参数。Dargonfly 是根据 URL 生成唯一 Task ID 的,所以需要过滤掉可变的 Query 参数生成唯一的 Task ID。配置如下:
scheduler:
  image: dragonflyoss/scheduler
  tag: latest
  replicas: 1
  metrics:
    enable: true
  config:
    verbose: true
    pprofPort: 18066


seedPeer:
  image: dragonflyoss/dfdaemon
  tag: latest
  replicas: 1
  metrics:
    enable: true
  config:
    verbose: true
    pprofPort: 18066


dfdaemon:
  image: dragonflyoss/dfdaemon
  tag: latest
  metrics:
    enable: true
  config:
    verbose: true
    pprofPort: 18066
    proxy:
      defaultFilter: "X-Amz-Algorithm&X-Amz-Credential&X-Amz-Date&X-Amz-Expires&X-Amz-Signature&X-Amz-SignedHeaders"
      security:
        insecure: true
        cacert: ""
        cert: ""
        key: ""
      tcpListen:
        namespace: ""
        port: 65001
      registryMirror:
        url: https://index.docker.io
        insecure: true
        certs: []
        direct: false
      proxies:
      - regx: blobs/sha256.*
      - regx: github-cloud.githubusercontent.com.*


manager:
  image: dragonflyoss/manager
  tag: latest
  replicas: 1
  metrics:
    enable: true
  config:
    verbose: true
    pprofPort: 18066


jaeger:
  enable: true
使用配置文件部署 Dragonfly Helm Charts:
$ helm repo add dragonfly https://dragonflyoss.github.io/helm-charts/
$ helm install --wait --create-namespace --namespace dragonfly-system dragonfly dragonfly/dragonfly -f charts-config.yaml
NAME: dragonfly
LAST DEPLOYED: Thu Dec 21 17:24:37 2023
NAMESPACE: dragonfly-system
STATUS: deployed
REVISION: 1
TEST SUITE: None
NOTES:
1. Get the scheduler address by running these commands:
  export SCHEDULER_POD_NAME=$(kubectl get pods --namespace dragonfly-system -l "app=dragonfly,release=dragonfly,component=scheduler" -o jsonpath={.items[0].metadata.name})
  export SCHEDULER_CONTAINER_PORT=$(kubectl get pod --namespace dragonfly-system $SCHEDULER_POD_NAME -o jsonpath="{.spec.containers[0].ports[0].containerPort}")
  kubectl --namespace dragonfly-system port-forward $SCHEDULER_POD_NAME 8002:$SCHEDULER_CONTAINER_PORT
  echo "Visit http://127.0.0.1:8002 to use your scheduler"


2. Get the dfdaemon port by running these commands:
  export DFDAEMON_POD_NAME=$(kubectl get pods --namespace dragonfly-system -l "app=dragonfly,release=dragonfly,component=dfdaemon" -o jsonpath={.items[0].metadata.name})
  export DFDAEMON_CONTAINER_PORT=$(kubectl get pod --namespace dragonfly-system $DFDAEMON_POD_NAME -o jsonpath="{.spec.containers[0].ports[0].containerPort}")
  You can use $DFDAEMON_CONTAINER_PORT as a proxy port in Node.


3. Configure runtime to use dragonfly:
  https://d7y.io/docs/getting-started/quick-start/kubernetes/


4. Get Jaeger query URL by running these commands:
  export JAEGER_QUERY_PORT=$(kubectl --namespace dragonfly-system get services dragonfly-jaeger-query -o jsonpath="{.spec.ports[0].port}")
  kubectl --namespace dragonfly-system port-forward service/dragonfly-jaeger-query 16686:$JAEGER_QUERY_PORT
  echo "Visit http://127.0.0.1:16686/search?limit=20&lookback=1h&maxDuration&minDuration&service=dragonfly to query download events"
检查 Dragonfly 是否部署成功:
$ kubectl get po -n dragonfly-system
NAME                                 READY   STATUS    RESTARTS       AGE
dragonfly-dfdaemon-cttxz             1/1     Running   4 (116s ago)   2m51s
dragonfly-dfdaemon-k62vd             1/1     Running   4 (117s ago)   2m51s
dragonfly-jaeger-84dbfd5b56-mxpfs    1/1     Running   0              2m51s
dragonfly-manager-5c598d5754-fd9tf   1/1     Running   0              2m51s
dragonfly-mysql-0                    1/1     Running   0              2m51s
dragonfly-redis-master-0             1/1     Running   0              2m51s
dragonfly-redis-replicas-0           1/1     Running   0              2m51s
dragonfly-redis-replicas-1           1/1     Running   0              106s
dragonfly-redis-replicas-2           1/1     Running   0              78s
dragonfly-scheduler-0                1/1     Running   0              2m51s
dragonfly-seed-peer-0                1/1     Running   1 (37s ago)    2m51s
创建 Peer Service 配置文件 peer-service-config.yaml 配置如下:
apiVersion: v1
kind: Service
metadata:
  name: peer
  namespace: dragonfly-system
spec:
  type: NodePort
  ports:
    - name: http-65001
      nodePort: 30950
      port: 65001
  selector:
    app: dragonfly
    component: dfdaemon
    release: dragonfly
使用配置文件部署 Peer Service:
kubectl apply -f peer-service-config.yaml3.3
通过 Dragonfly 分发 Git LFS 的下载文件流量
通过 Git 配置将请求代理到 Dragonfly Peer Proxy 的 http://127.0.0.1:65001。主要基于 http.proxy 、 lfs.transfer.enablehrefrewrite 以及 url.{YOUR-LFS-CONTENT-STORAGE}.insteadOf 属性设置代理。
git config --global http.proxy http://127.0.0.1:65001
git config --global lfs.transfer.enablehrefrewrite true
git config --global url.http://github-cloud.githubusercontent.com/.insteadOf https://github-cloud.githubusercontent.com/
通过 Dragonfly Peer Proxy 转发 Git LFS 的下载流量至 P2P 网络,Git 克隆下载文件
git clone git@github.com:{YOUR-USERNAME}/{YOUR-REPOSITORY}.git3.4 验证下载文件通过 Dragonfly 分发
执行命令:
# find pods
kubectl -n dragonfly-system get pod -l component=dfdaemon
# find logs
pod_name=dfdaemon-xxxxx
kubectl -n dragonfly-system exec -it ${pod_name} -- grep "peer task done" /var/log/dragonfly/daemon/core.log
日志输出:
2023-12-21T16:55:20.495+0800 INFO peer/peertask_conductor.go:1326 peer task done, cost: 2238ms {"peer": "30.54.146.131-15874-f6729352-950e-412f-b876-0e5c8e3232b1", "task": "70c644474b6c986e3af27d742d3602469e88f8956956817f9f67082c6967dc1a", "component": "PeerTask", "trace": "35c801b7dac36eeb0ea43a58d1c82e77"}4
性能测试
测试 Git LFS 与 Dragonfly 集成后的单机大文件下载的性能。由于机器本身网络环境、配置等影响,实际下载时间不具有参考价值, 但是不同场景下载时间所提升的比率是有重要意义的。
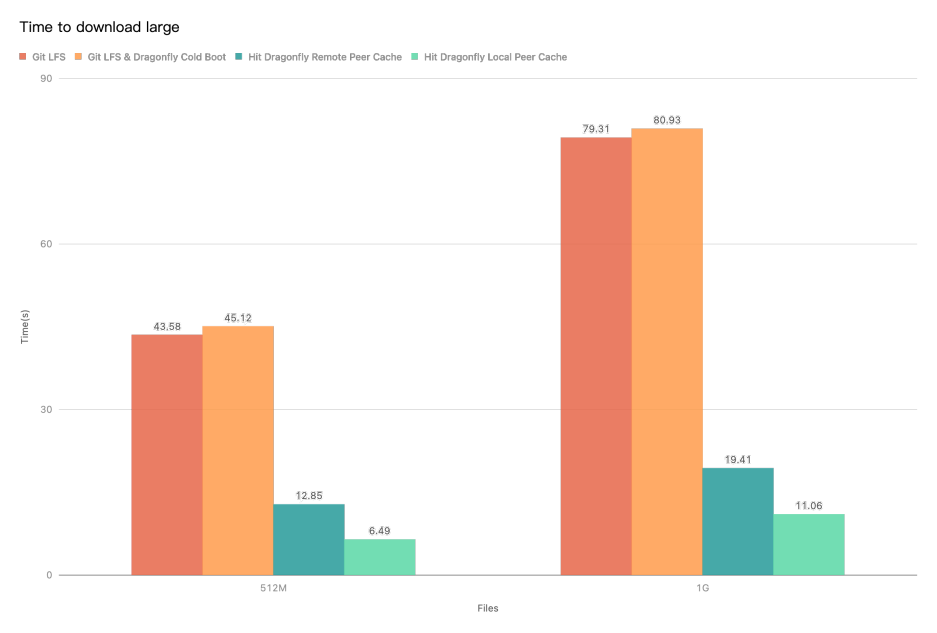
Git LFS: 使用 Git LFS 直接下载大文件。
Git LFS & Dragonfly Cold Boot: 使用 Git LFS 直接下载大文件,没有命中任何缓存。
Hit Dragonfly Remote Peer Cache: 使用 Git LFS 直接下载大文件,在命中 Dragonfly 的远端 Peer 缓存。
Hit Dragonfly Remote Local Cache: 使用 Git LFS 直接下载大文件,在命中 Dragonfly 的本地 Peer 缓存。
测试结果表明 Git LFS 和 Dragonfly 集成。能够有效减少大文件下载时间。测试是在单机情况下基本在缓存命中情况下, 性能瓶颈在于磁盘。如果在多节点并发下载大文件的情况下,Dragonfly 效果会更加明显。
5
相关链接
参考链接
[1] Git LFS:
https://git-lfs.com/
[2] Git LFS Specification:
https://github.com/git-lfs/git-lfs/blob/main/docs/spec.md
[3] Git LFS API:
https://github.com/git-lfs/git-lfs/tree/main/docs/api
[4] About Git Large File Storage:
https://docs.github.com/en/repositories/working-with-files/managing-large-files/about-git-large-file-storage
[5] Git Large File Storage:
https://docs.gitlab.com/ee/topics/git/lfs/
[6] Hugging Face Hub:
https://huggingface.co/
[7] ModelScope Hub:
https://modelscope.cn/home
[8] Getting Started with Repositories:
https://huggingface.co/docs/hub/repositories-getting-started
[9] Getting Started with ModelScope:
https://modelscope.cn/docs/ModelScope%20Hub使用文档
[10] Hugging Face accelerates distribution of models and datasets based on Dragonfly:
https://www.cncf.io/blog/2023/11/16/hugging-face-accelerates-distribution-of-models-and-datasets-based-on-dragonfly/
[11] Authenticating Requests:
https://docs.aws.amazon.com/AmazonS3/latest/API/sigv4-query-string-auth.html
[12] Kind:
https://kind.sigs.k8s.io/
[13] quick-start-kubernetes:
https://d7y.io/zh/docs/next/getting-started/quick-start/kubernetes/
Dragonfly 社区
Website
https://d7y.io/
Github Repo:
https://github.com/dragonflyoss/Dragonfly2
Slack Channel
#dragonfly on CNCF Slack
Discussion Group
dragonfly-discuss@googlegroups.com
Twitter
@dragonfly_oss
Git LFS
Website
https://git-lfs.com/
Github Repo
https://github.com/git-lfs/git-lfs
Document
https://github.com/git-lfs/git-lfs/tree/main/docs

Dragonfly Github 仓库二维码
欢迎加入开源共建✨


 911
911

 被折叠的 条评论
为什么被折叠?
被折叠的 条评论
为什么被折叠?
 到【灌水乐园】发言


