


使用koa+mongodb构建的仿知乎接口(一)
之前一直使用koa和express构建过一些小的应用,但是都是没有放到线上去跑。这回,我的想法是把自己那台学生服务器拿来充分利用一下,话不多说,直接直奔主题吧。
使用的技术栈:
- nodejs
- koa2(网络编程框架)
- mongodb(非关系型数据库)
- jwt(用于鉴权)
- pm2(用于跑启动脚本)
何为REST?何为restful api?
表现层状态转换(英语:Representational State Transfer,缩写:REST)是Roy Thomas Fielding博士于2000年在他的博士论文中提出来的一种万维网软件架构风格
restful api:则是符合REST风格的api
koa 洋葱模型
app.use(async (ctx, next) => {
  console.log(1)
  await next()
  ctx.body = '1'
})

app.use(async (ctx, next) => {
  console.log(2)
  await next()
  console.log(3)
})

app.use(async (ctx, next) => {
  console.log(4)
})

// 1 2 4 3
如何在写一个koa中间件
const auth = async (ctx,next) => {
  try {
    const {authorization=''} = ctx.request.header
    const token = authorization.replace('Bearer ', '')
    console.log('token',token)
    const user = jsonwebtoken.verify(token, scret)
    ctx.state.user = user
  } catch (error) {
    ctx.throw(401, error.message)
  }
  await next()
}
开始搭建目录结构
- 起一个简单的服务
const Koa = require('koa')
const app = new Koa()

const port = 3000 || process.env.port
app.listen(port, () => {
  console.log(`App is listen on ${port}`)
})
- 搭建路由,编写自动读取路由中间件
// routing
const fs = require('fs')

module.exports = app => {
  fs.readdirSync(__dirname).forEach(file=> {
    if (file === 'index.js') {return}
    const router = require(`./${file}`)
    app.use(router.routes()).use(router.allowedMethods())
  })
}

const routing = require('./routes/index')
routing(app)
- 解决post请求ctx.request.body为undefined问题
const KoaBodyPareser = require('koa-bodyparser')
app.use(KoaBodyPareser())
- 连接数据库
const mongoose = require('mongoose')
const connectionStr = require('./config').connectionStr

// 连接数据库
mongoose.connect(connectionStr, {
  useNewUrlParser: true,
  useUnifiedTopology: true
}, () => {
  console.log('数据库连接成功')
})
.catch(err => {
  console.log(err)
})

mongoose.connection.on(error, console.error)
- 错误处理
const error = require('koa-json-error')
app.use(error({
  postFormat: ({stack, ...rest}) => process.env.NODE_ENV === 'production' ? rest : {stack, ...rest}
}))
- 参数格式校验
app.use(parameter(app))
const parameter = require('koa-parameter')
实现用户接口的增删改查
- 定义用户的数据层model
const mongoose = require('mongoose')
const {Schema, model} = mongoose

const UserSchema = new Schema({
  name: {
    type: String,
    required: true
  },
  password:{
    type: String,
    required: true,
    select: false
  },
  __v: {
    type: Number,
    select: false
  }
})

module.exports = model('User', UserSchema)
- 用户的路由层router
const KoaRouter = require('koa-router')
const jwt = require('koa-jwt')

const router = new KoaRouter({prefix: '/users'})
const {find, findById, create, update, del, login, checkOwer} = require('../controller/users')
const secret = require('../config').secret

const auth = jwt({secret})

// 获取所有用户
router.get('/', find)
// 新建用户
router.post('/', create)
// 获取特定用户
router.get('/:id', findById)
// 更新用户
router.patch('/:id',auth, checkOwer, update)
// 删除用户
router.delete('/:id',auth, checkOwer, del)
// 登录
router.post('/login', login)

module.exports = router
- 用户的控制器controller
const jsonwebtoken = require('jsonwebtoken')
const User = require('../models/users')
const secret = require('../config').secret

class UsersCtl {
  async find(ctx) {
    ctx.body = await User.find()
  }
  async findById(ctx) {
    const user = await User.findById(ctx.params.id)
    if (!user) {ctx.throw(404, '用户不存在')}
    ctx.body = user
  }
  async create(ctx) {
    ctx.status = 200
    ctx.verifyParams({
      name: {type: 'string', required: true},
      password: {type: 'string', required: true}
    })
    const {name} = ctx.request.body
    const repeatUser = await User.findOne({name})
    if (repeatUser) { ctx.throw(409, '用户已被占用') }
    const user = await User(ctx.request.body).save()
    ctx.body = user
  }
  async update(ctx) {
    ctx.verifyParams({
      name: {type: 'string', required: false},
      password: {type: 'string', required: false}
    })
    const user = await User.findByIdAndUpdate(ctx.params.id, ctx.request.body)
    if (!user) {ctx.throw(404, '用户不存在')}
    ctx.body = user
  }
  async del(ctx) {
    const user = await User.findByIdAndRemove(ctx.params.id)
    if (!user) {ctx.throw(404, '用户不存在')}
    ctx.body = user
    ctx.status = 204
  }
  async login(ctx) {
    ctx.verifyParams({
      name: {type: 'string', required: true},
      password: {type: 'string', required: true}
    })
    const user = await User.findOne(ctx.request.body)
    if(!user) {ctx.throw(401, '用户名或者密码不正确')}
    const {_id, name} = user
    const token = await jsonwebtoken.sign({_id, name}, secret, {expiresIn: '1d'})
    ctx.body = {
      token
    }
  }
  async checkOwer(ctx, next) {
    if (ctx.params.id !== ctx.state.user._id) {
      ctx.throw(403, '用户没有权限')
    }
    await next()
  }
}

module.exports = new UsersCtl()
postman的使用
-
新建collection
-
在collection中新建request
-
在登录接口中的Test中设置token为全局变量

let jsonData = pm.response.json()
pm.globals.set("token", jsonData.token);
- 在其他需要验证的接口中Authization使用token

这就是项目大构建和用户接口的实现了,好记性不如烂笔头,特此总结, 下次将是图片上传几款的实践。
使用koa+mongodb构建的仿知乎接口(二)
1. 实现图片上传接口
需求:知乎中用户编辑资料的图片上传
分析:通过把图片上传到服务器中,再返回url
- 因为要识别file类型的参数,所以需要使用koa-body,koa-bodyparser无法识别。
const KoaBody = require('koa-body')
app.use(KoaBody({
  multipart: true,
  formidable: {
    // 设置上传地址
    uploadDir: path.join(__dirname, '/public/uploads'),
    // 保留图片后缀
    keepExtensions: true
  }
}))
- 要把url返回,需要使用koa-static管理静态资源
const KoaStatic = require('koa-static')
app.use(KoaStatic(
  path.join(__dirname, staticPath)
))
- 注册上传图片路由
router.post('/upload', upload)
- 实现上传的控制器函数
// home.js
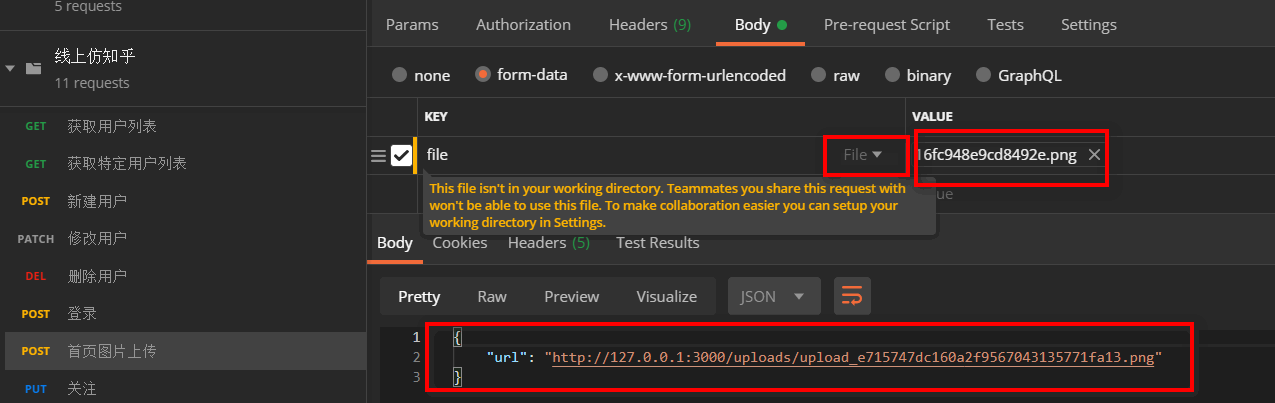
upload (ctx) {
const file = ctx.request.files.file
const basename = path.basename(file.path)
ctx.body = {
url: `${ctx.origin}/uploads/${basename}`
}
}
- 使用Postman测试
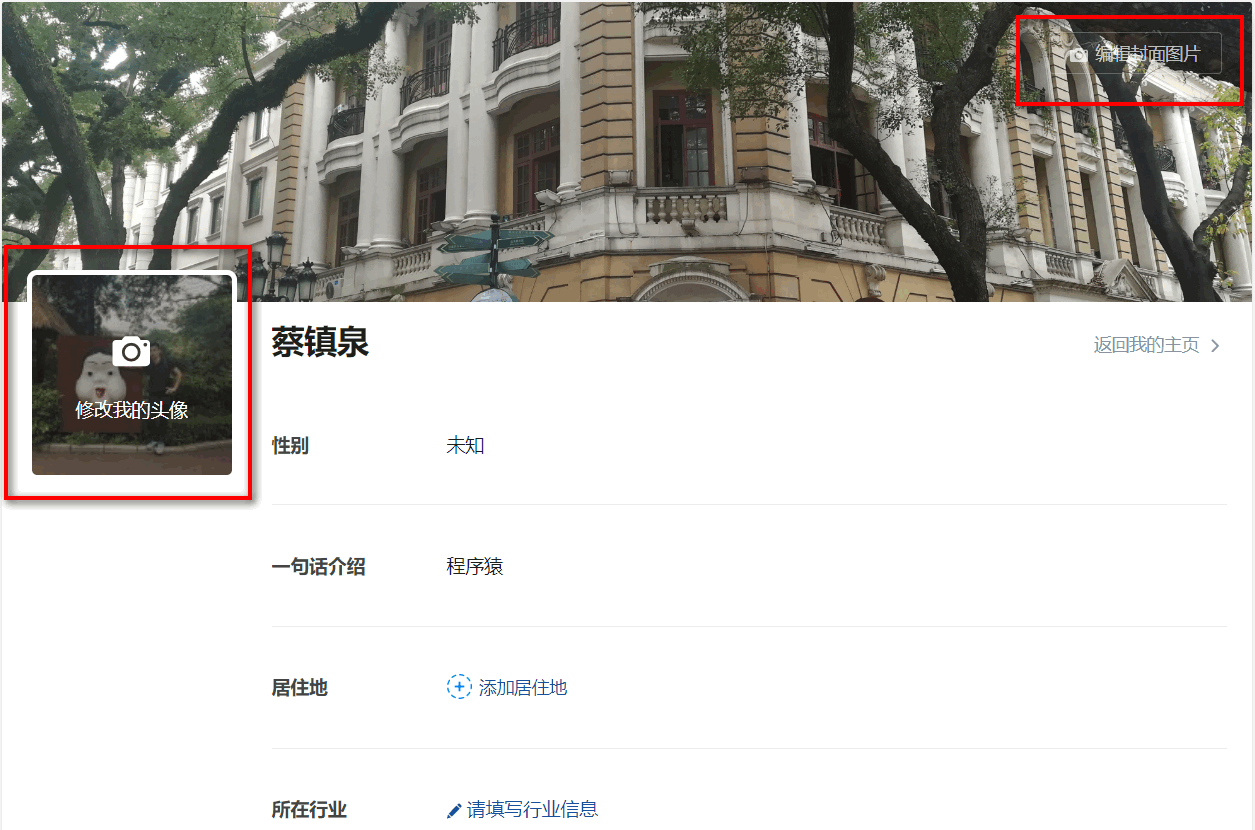
2. 实现用户资料编辑接口
需求:如图所示,实现编辑用户资料的接口
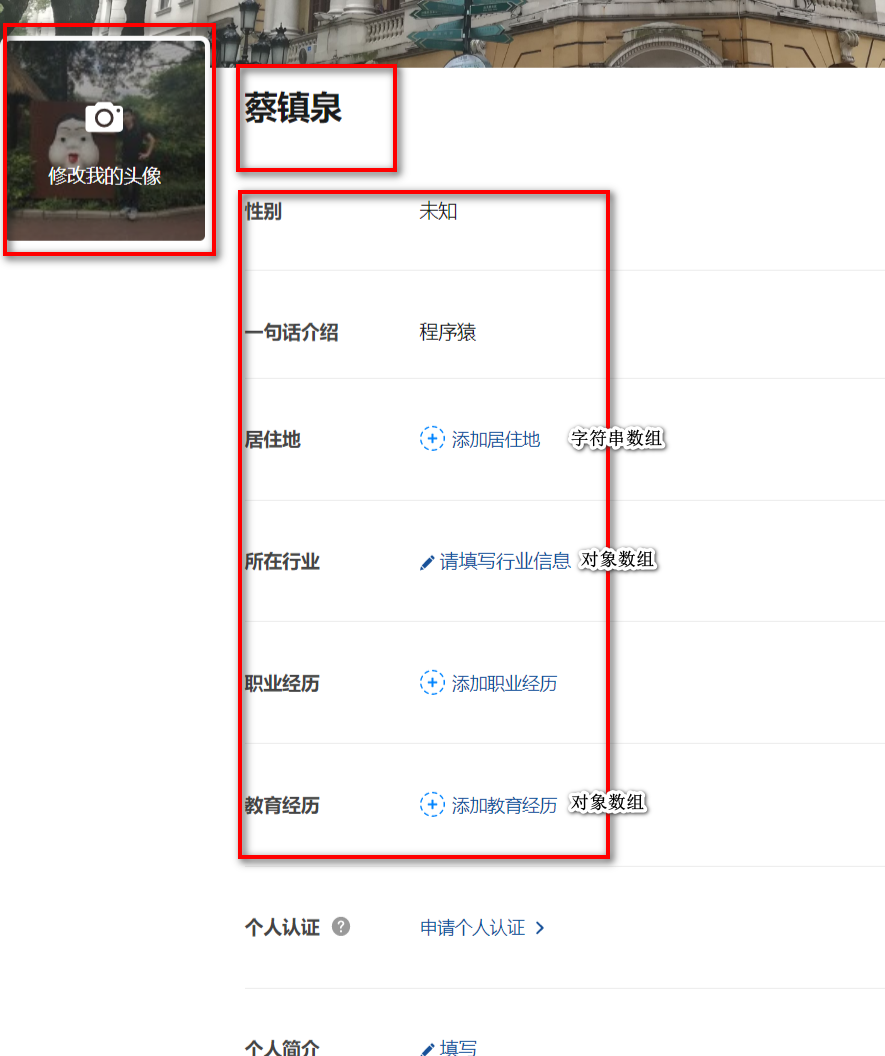
- 重新设计用户的Schema,较之前,增加一些字段
const UserSchema = new Schema({
  ...,
  avatar_url: {type: String},
  gender: {type: String, enum: ['male', 'female'], default: 'male'},
  headline: {type: String},
  locations: {type: [{type: String}], select: false},
  business: {type: String, select: false},
  employments: {
    type: [{
      company: {type: String},
      job: {type: String},
    }],
    select: false
  },
  educations: {
    type: [{
      school: {type: String},
      major: {type: String},
      diploma: {type: Number, enum: [1, 2, 3, 4, 5]},
      enterance_year: {type: Number},
      graduation_year: {type: Number}
    }],
    select: false
  },
  following: {
    type: [{type: Schema.Types.ObjectId, ref: 'User'}],
    select: false
  }
})
- 修改users控制器中的update方法
async update(ctx) {
  ctx.verifyParams({
    name: {type: 'string', required: false},
    password: {type: 'string', required: false},
    avatar_url: {type: 'string', required: false},
    gender: {type: 'string', required: false},
    headline: {type: 'string', required: false},
    locations: {type: 'array', itemType: 'string', required: false},
    business: {type: 'string', required: false},
    employments: {type: 'array', itemType: 'object', required: false},
    educations: {type: 'array', itemType: 'object', required: false},
  })
  const user = await User.findByIdAndUpdate(ctx.params.id, ctx.request.body)
  if (!user) {ctx.throw(404, '用户不存在')}
  ctx.body = user
}
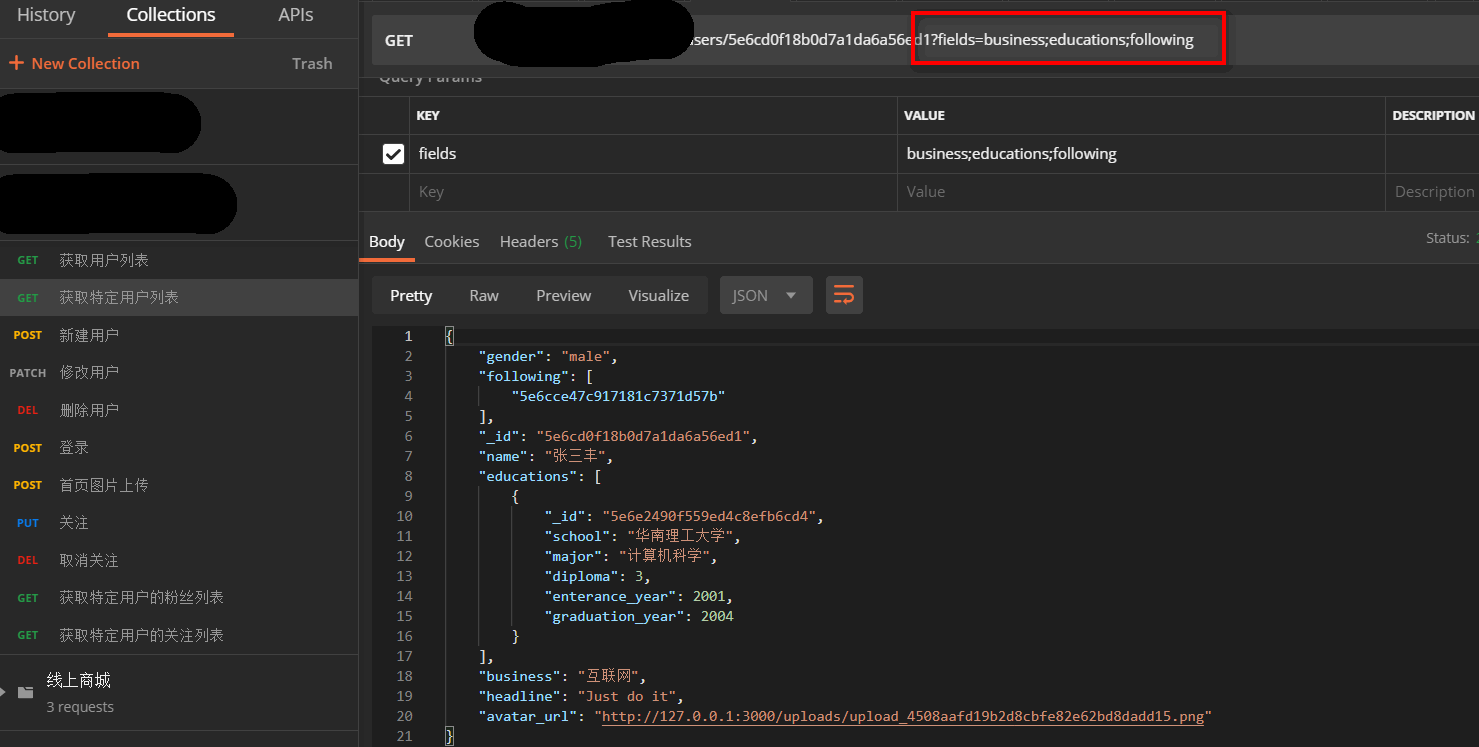
- 修改users控制器中的findById方法,实现过滤字段
async findById(ctx) {
  const {fields} = ctx.query
  const selectFields = fields.split(';').filter(f => f).map(f => ' +' + f).join('')
  const user = await User.findById(ctx.params.id).select(selectFields)
  if (!user) {ctx.throw(404, '用户不存在')}
  ctx.body = user
}
- 使用Postman测试
总结:
- 写接口的步骤一般是:
-
a. 定义数据模型Schema
-
b. 编写转发的路由
-
c. 使用数据模型编写控制器逻辑
-
e. 使用Postman测试
-
f. 编写单元测试和压测
2.更新或者删除用户的信息,是需要鉴权的过程的。
使用koa+mongodb构建的仿知乎接口(三)
好了,今天要实现的需求是什么呢?
需求:
关注和取消关注
- 继续增加UserSchema中的字段
const UserSchema = new Schema({
  ...,
  following: {
    type: [{type: Schema.Types.ObjectId, ref: 'User'}],
    select: false
  }
})
- 编写转发的路由
// 关注谁
router.put('/follow/:id', auth, follow)
// 取消关注谁
router.delete('/unfollow/:id', auth, unfollow)
- 使用数据模型编写控制器逻辑
async follow (ctx) {
  const me = await User.findById(ctx.state.user._id).select('+following');
  if (!me.following.map(id => id.toString()).includes(ctx.params.id)) {
    me.following.push(ctx.params.id);
    me.save();
  }
  ctx.status = 204;
}
async unfollow (ctx) {
  let user = await User.findById(ctx.state.user._id).select('+following')
  let index = user.following.map(id=>id.toString()).indexOf(ctx.params.id)
  if(index > -1) {
    user.following.splice(index)
    user.save()
  }
  ctx.status = 204
}
- 使用Postman测试
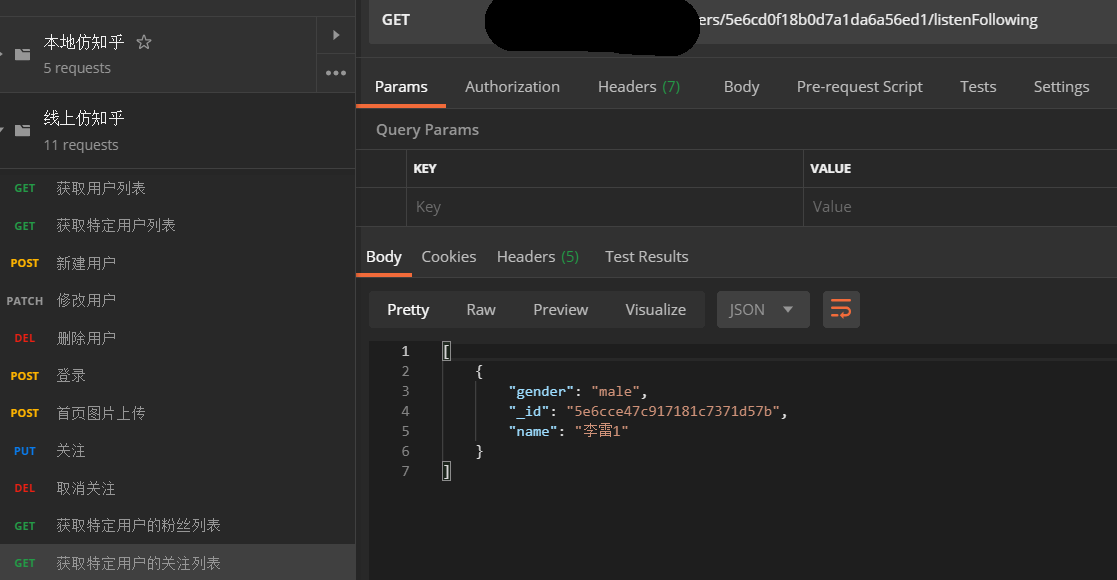
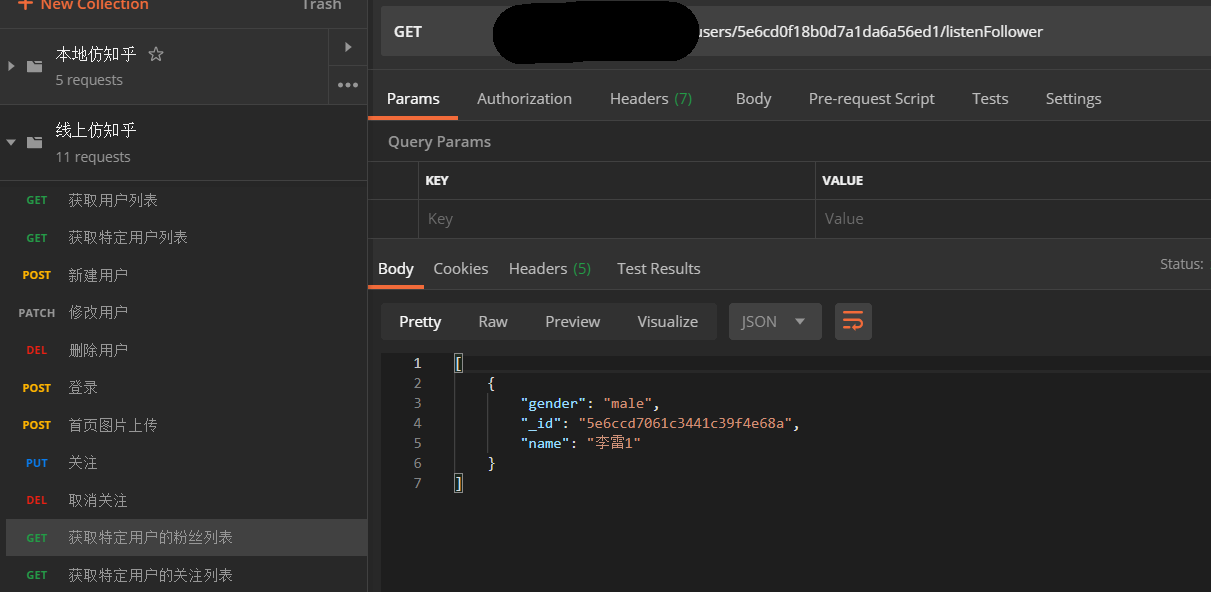
获取粉丝列表和正在关注列表
- 编写转发的路由
// 谁的粉丝
router.get('/:id/listenFollower', listenFollower)
// 谁关注了什么人
router.get('/:id/listenFollowing', listenFollowing)
- 使用数据模型编写控制器逻辑
async listenFollowing (ctx) {
  let user = await User.findById(ctx.params.id).select('+following').populate('following')
  if (!user) {ctx.throw(404)}
  ctx.body = user.following
}
async listenFollower(ctx) {
  const users = await User.find({following: ctx.params.id})
  ctx.body = users
}
- 使用Postman测试
总结:
1.用户关注和取消关注,是需要鉴权的过程的。


 5110
5110


 被折叠的 条评论
为什么被折叠?
被折叠的 条评论
为什么被折叠?
 到【灌水乐园】发言


