


Spring下载:
下载地址:http://repo.spring.io/libs-release-local/org/springframework/spring/
spring-framework-5.x.RELEASE:Spring核心组件。
docs: Spring开发、帮助文档。
libs: Spring核心组件的。jar包、源代码、文档。
schema: Spring配置文件的schema约束文件。
spring-framework-3.x.RELEASE-dependencies:Spring依赖的第三方组件。
包含了各大开源组织提供的依赖jar。比如apache common下的:dbcp.jar pool.jar logging.jar
Spring是框架,一般都是导入jar包然后完成配置文件基本设置
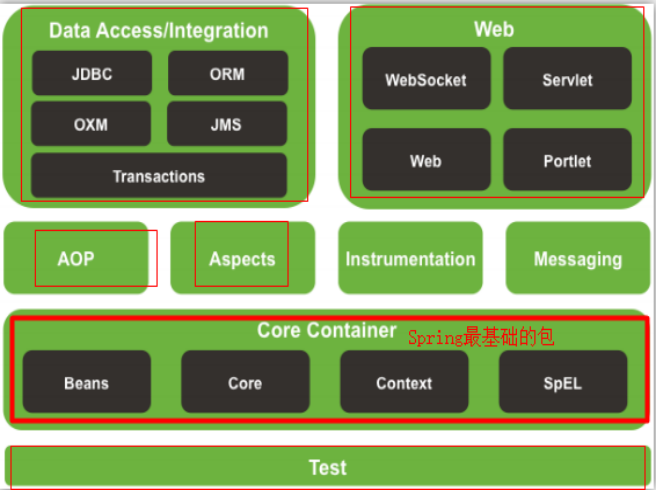
1、配置spring框架最基本的5个jar包
Spring有60多个jar包,要想使用首先要导入基本的jar包:
Spring基础jar包4个:beans创建对象;core核心包;context英文输入;expression;
spring日志包1个:common-longging-1.2

2.创建spring核心配置文件
①在项目的src目录下创建application-context.xml文件。xml文件语法:jar-dist-schema-beans-springbeans.xsd
语法提示问题:联网或者不联网时要手动关联。手动关联如下

②添加内容:spring-framework-5.1.9.RELEASE-dist\spring-framework-5.1.9.RELEASE\docs\spring-framework-referencein\index.html core
<?xml version="1.0" encoding="UTF-8"?>
<beans xmlns="http://www.springframework.org/schema/beans"
    xmlns:xsi="http://www.w3.org/2001/XMLSchema-instance"
    xsi:schemaLocation="http://www.springframework.org/schema/beans
        https://www.springframework.org/schema/beans/spring-beans.xsd">
</beans>
3.配置bean,让spring管理对象
<bean id`在这里插入代码片`="helloSpring" class="com.tedu.demo.HelloSpring"></bean>
或
<bean id="helloSpring" class="com.tedu.demo.HelloSpring">
		<property name="name" value="Tom"></property> //属性赋值,依赖注入
</bean>
id:被管理对象的名字,自己起 , name也可以。功能一样。
class:被管理对象的全名
| 早期在Spring配置中,id和name属性都可以定义bean元素的名称,不同的是: (现在差不多) |
|---|
| id属性,遵守XML语法ID约束。必须以字母开始,可以使用字母、数字、连字符、下划线、句话、冒号,不能以“/”开头。name属性,就可以使用很多特殊字符,比如在Spring和Struts1或Spring MVC的整合中,就得使用name属性来的定义bean的名称。比如: |
<bean name="/login" class="cn.xiaojingge.oa.web.action.LoginAction" /> |
注意:从Spring3.1开始,id属性不再是ID类型了,而是String类型,也就是说id属性也可以使用“/”开头了,而bean元素的id的唯一性由容器负责检查。<bean id="/login" class="cn.xiaojingge.pss.web.action.LoginAction" /> 当然也使用name属性为元素起多个别名,多个别名之间使用逗号或空格隔开,在代码中依然使用BeanFactory对象.getBean(…)方法获取。<bean name="hello,hiclass="cn.xiaojingge.spring._01hello.HelloWorld"/>或则<bean name="hello hi" class="cn.xiaojingge.spring._01hello.HelloWorld"/> |
4、获取bean
读取applicationContext.xml配置文件,启动Spring框架
applicationContext ctx = new ClassPathXmlapplicationContext("applicationContext.xml")
获取bean对象的三种方法:

eg:HelloSpring helloSpring = ctx.getBean("helloSpring",HelloSpring.class)//类型;推荐id在前面
5、引入其他配置文件
(要了解jar包中包含什么。)
applicationContext.xml作为核心配置文件引入其他配置文件:
<import resource="classpath:com/tedu/spring/hellospring.xml"> //classpath建议加上,web项目编译到build中。
在实际开发中,随着应用规模的增加,系统中元素配置的数量也会大量增加,导致applicationContext.xml配置文件变得非常臃肿。为了避免applicationContext.xml文件过于庞大、臃肿,为提高其可读性,我们可以将一个applicationContext.xml文件分解成多个配置文件,然后在applicationContext.xml文件中包含其他配置文件即可。
使用import元素引入其他的配置文件:
<import resource="classpath:cn/xiaojinge/spring/_01_hello/hello.xml"/>
使用import元素注意:
1、默认情况下,从classpath的跟路径寻找。
2、可以使用前缀来定位文件的基础位置:
①:[classpath:]:后面的文件从classpath路径开始找(推荐);[注意classloader的问题。]
②:[file:]:后面的文件使用文件系统的路径开始找;
注意:只有当框架中实现了Resource接口才能够识别上述的前缀标识符。
6、spring的测试

传统测试:每个测试都要重启Spring,spring被单元测试类管理,应该是spring管理测试类系统开销大。
JVM:虚拟机
junit:单元测试
测试类,测试方法,spring容器,许多bean
正确spring测试,
首先把
6、spring的两种创建方法:
方法一:


 1221
1221

 被折叠的 条评论
为什么被折叠?
被折叠的 条评论
为什么被折叠?
 到【灌水乐园】发言


